Table of Contents
Advertisement
Quick Links
Advertisement
Table of Contents

Related Manuals for Vertex Standard VXD-720


Summary of Contents for Vertex Standard VXD-720
-
Page 3: Declaration Of Conformity
C ECLARATION ONFORMITY This declaration is applicable to your radio only if your radio is labeled with the FCC logo shown below. DECLARATION OF CONFORMITY Per FCC CFR 47 Part 2 Section 2.1077(a) Name: Vertex Standard LMR, Inc. Address: US Headquarters: 10900 Walker Street, Cypress, CA 90630 U.S.A. Phone Number: 1-800-283-7839 Hereby declares that the product: Model Name: VXD-720 ... - Page 4 Note: This equipment has been tested and found to comply with the limits for a Class B digital device, pursuant to part 15 of the FCC Rules. These limits are designed to provide reasonable protection against harmful interference ...
-
Page 6: Table Of Contents
Identifying Radio Controls ........ 26 ONTENTS Radio Controls ..........27 This User Guide contains all the information you Programmable Buttons ........28 need to use the Vertex Standard VXD-720 Digital Assignable Radio Functions ... - Page 7 Making and Receiving Calls ......37 Advanced Features ........... 47 Selecting a Zone..........38 Radio Check ........... 47 Selecting a Radio Channel, Subscriber ID, Sending a Radio Check......47 or Group ID ............. 38 Remote Monitor ...
- Page 8 Call Indicator Settings ........59 Emergency Operation ........64 Activating and Deactivating Call Ringers Receiving an Emergency A larm ....65 for Private Calls ......... 59 Responding to an Emergency A larm ..66 Activating and Deactivating Call Ringers ...
- Page 9 Managing Sent Text Messages ....76 Turning the Voice Operating Transmission Viewing a Sent Text Message ....76 (VOX) Feature On or Off ......87 Sending a Sent Text Message ..... 76 Controlling the Display Backlight ....88 Deleting ...
-
Page 10: Product Safety And Rf Energy Exposure
BEFORE USING THIS RADIO, READ THIS CHAPTER WHICH CONTAINS IMPORTANT OPERATING INSTRUCTIONS FOR SAFE USAGE AND RF ENERGY AWARENESS AND CONTROL INFORMATION AND OPERATIONAL INSTRUCTIONS FOR COMPLIANCE WITH RF ... - Page 11 All Vertex Standard two-way radios are designed, manufactured, and tested to ensure they meet instructions to users of two-way radios. These instructions are important because they inform users about RF energy exposure and provide simple procedures on how to control it.
- Page 12 NOTE: The approved batteries, supplied with this radio, are rated for a 5-5-90 duty factor (5% talk-5% listen-90% standby) even though this radio complies with FCC occupational exposure limits and may operate at duty factors of up to 50% talk.
- Page 13 Operating Instructions Transmit no more than the rated duty factor of 50% of the lime. To transmit (talk), push the Push-To-Talk (PTT) button. To receive calls, release the PTT button Transmitting 50% of the lime, or less, is important because this radio generates measurable RF energy exposure only when transmitting (in terms of mea-...
- Page 14 Electromagnetic Interference/Compatibility NOTE: Nearly every electronic device is susceptible to electromagnetic interference (EMI) if inadequately Facilities posted notices instruct you to do so. Hospitals or health care facilities may be using equipment that is sensitive to external RF energy.
- Page 15 Hearing Aids Some digital wireless radios may interfere with some hearing aids. In the event of such interference, you may want to consult your hearing aid manufacturer to discuss alternatives. Other Medical Devices If you use any other personal medical device, consult the manufacturer of your device to determine if it is adequately shielded from RF energy.
- Page 16 Operational Warnings For Vehicle With Air Bags: Refer to vehicle manufacturer’s manual prior to installation of electronic equipment to avoid interference with air bag wiring. Do not place a portable radio in the area over an air bag or in the air bag deployment area. to occupants of the vehicle.
- Page 17 Operational Cautions Antennas Do not use any portable radio that has a damaged antenna if a damaged antenna comes into contact with your skin, a minor burn can result. Batteries All batteries can cause property damage and/or bodily injury, such as burns, if a conductive material ...
- Page 18 Intrinsically Safe Radio Information The Intrinsically safe approval unit refers to a product that has been approved as intrinsically safe by an A portable radio that has been approved for intrinsic safety will have Approval label attached to the radio to Class/Division/Group ...
- Page 19 Do not replace or change accessories in a hazardous atmosphere. Contact sparking may Turn the radio off before removing or installing a battery or accessory. Do not disassemble an intrinsically safe product in any way that exposes the internal cir- cuits of the unit.
- Page 20 Repair REPAIRS FOR VERTEX STANDARD PRODUCTS WITH INTRINSICALLY SAFE APPROVAL ARE THE RESPONSIBILITY OF THE USER. Repairs to a Vertex Standard FM approved radio product should only be done at a location that has been FM audited under the FM 3605 repairs and service standard.
-
Page 22: Important Safety Information
S I V MPORTANT AFETY NFORMATION OFTWARE ERSION Product Safety and RF Exposure Compliance All the features described in the following sections are supported by the radio’s software version 1.0 Before using this product, read the Build 10 or later. -
Page 23: Computer Software Copyrights
S C The AMBE+2 voice coding Technology embodied OMPUTER OFTWARE OPYRIGHTS in this product is protected by intellectual property The Vertex Standard products described in this rights including patent rights, copyrights and trade manual ... -
Page 24: Getting Started
S ETTING TARTED What Your Dealer/System Administrator Can Tell You How to Use This Guide Yo u c a n c o n s u l t y o u r d e a l e r o r s y s t e m This User Guide covers the basic operation of the ... -
Page 25: Preparing Your Radio For Use
Y R U Attaching the Battery REPARING ADIO Align the battery with the rails on the back of the Assemble your radio by following these steps: radio. Press the battery firmly, and slide upward Charging the Battery........ -
Page 26: Attaching The A Ntenna
Attaching the Antenna Attaching the Belt Clip With the radio turned off, set the antenna in its Align the grooves on the clip with receptacle and turn clockwise. those ... -
Page 27: Powering Up The Radio
NOTE: There is no power up tone if the radio Powering Up the Radio tones/alerts function is disabled (see Turn- R ota te t he On /Of f / ing ... -
Page 28: Adjusting The Volume
R C DENTIFYING ADIO ONTROLS T o i n c r e a s e t h e Take a moment to review the following: volume, turn the On/ Radio Controls ..........page 27 Off/Volume ... -
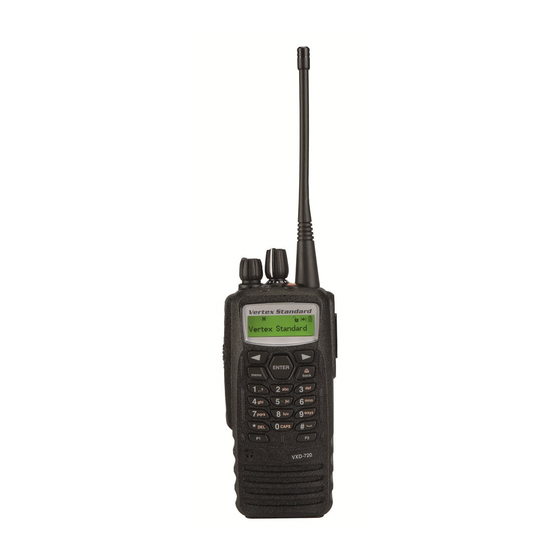
Page 29: Radio Controls
Radio Controls : Channel Selector Knob : On / Off / Volume Control Knob : LED Indicator : Side Button 1 ( Programmable Key ) : Push-to-Talk ( PTT ) Button : Side Button 2 ( Programmable Key ) : Side Button 3 ... -
Page 30: Programmable Buttons
Manual Site Roam Programmable Buttons search. Your dealer can program the programmable buttons as shortcuts to radio functions or preset Monitor channels/groups depending on the duration of a Nuisance Channel Delete button press: an ... -
Page 31: Assignable Settings Or Utility Functions
Repeater/Talkaround Accessing the Programmed Functions repeater and communicating directly with another You can access various radio functions through radio. one of the following ways: Scan the relevant programmable Text Message ... -
Page 32: Using The Keypad
Using the Keypad You can use the 3 x 4 alphanumeric keypad to access your radio’s features. You can use the keypad to enter subscriber aliases or IDs, and text messages. Many characters require that you press a key multiple times. The table below shows the number of times a key needs to be pressed to generate the required character. -
Page 33: Push-To-Talk (Ptt) Button
If the Talk Permit Tone (see Turning the Talk Push-To-Talk ( PTT ) Button Permit Tone On or Off on page 90) or the PTT The PTT button on the side of the radio serves two ... -
Page 34: Switching Between Conventional A Nalog And Digital Mode
Your radio also has features available in both Switching Between Conventional Analog and Digital Mode analog and digital mode. However, the minor differences ... -
Page 35: Identifying Status Indicators
S I Power Level DENTIFYING TATUS NDICATORS Radio is set at Low power. Your radio indicates its operational status through the following: Radio is set at High power. Display Icons ..........page 33 Tones Disable Call Icons ............ page 34 Tones are turned off. -
Page 36: Call Icons
Talkaround Call Icons In the absence of a repeater, radio is The following icons appear on the radio’s display during a call. communication. These icons also appear in the Contacts list to Battery indicate ID type. -
Page 37: Sent Item Icons
Sent Item Icons LED Indicator The following icons appear at the top right corner The LED indicator shows the operational status of of the radio’s display in the Sent Items folder. your radio. Sent Successfully LED Indicator The text message is sent successfully. -
Page 38: Audio Tones
a non privacy-enabled call or data, or detecting Audio Tones activity over the air. Alert tones provide you with audible indications of Rapidly blinking green the radio’s status or the radio’s response to data received. -
Page 39: Indicator Tones
R C Indicator Tones AKING ECEIVING ALLS High pitched tone Low pitched tone Once you understand how your Vertex Standard Positive Indicator Tone radio. -
Page 40: Selecting A Zone
Selecting a Zone Selecting a Radio Channel, Subscriber ID, or Group ID A zone is a group of channels. Your radio supports up to 250 zones, with a maximum of 16 channels per zone. Use the following procedure to select a zone. Procedure: Press ... -
Page 41: Receiving And Responding To A Radio Call
Receiving and Responding to a Group Call Receiving and Responding to a Radio Call O n c e t h e c h a n n e l , To receive a call from a group of users, your radio LED Indicator subscriber ID or group ... -
Page 42: Receiving And Responding To A Private Call
7 Release the PTT button to listen. 8 If there is no voice activity for a predetermined alias or ID, and the RSSI icon. The second line period of time, the call ends. displays Private Call and the Private Call icon. 3 ... -
Page 43: Receiving An All Call
Receiving an All Call Making a Radio Call An A ll Call is a call from an individual radio to every You can select a channel, subscriber ID, or group radio on the channel. It is used to make important by using: announcements requiring the user’s full attention. -
Page 44: Making A Call With The Channel Selector Knob
Making a Call with the Channel Selector Knob respond. Press the PTT button to respond. Making a Group Call OR If there is no voice activity for a predetermined To make a call to a group of users, your radio must period of time, the call ends. -
Page 45: Making An A Ll Cal
2 Hold the radio vertically 1 to 2 inches (2.5 to 5.0 Making an All Call cm) from your mouth. This feature allows you to transmit to all users on 3 Press the PTT button to make the call. The LED the channel. -
Page 46: Making A Group Or Private Call With The One Touch Access Button
Making a Group or Private Call with the One 5 Release the PTT button to listen. When the tar- get radio responds, the LED blinks green. Touch Access Button 6 If the Channel Free Indication feature is en- The One Touch Access feature allows you to make ... -
Page 47: Talkaround
7 The display shows “Talkaround On Talkaround OR You can continue to communicate when your The display shows “Talkaround Off repeater is not operating, or when your radio is out 8 ... -
Page 48: Monitoring Features
Permanent Monitor Monitoring Features Monitoring a Channel Use the Permanent Monitor feature to continuously monitor a selected channel for activity. Use the Monitor feature to make sure a channel is clear before transmitting. Procedure: 1 Press the programmed Permanent Monitor but- Procedure: ton. -
Page 49: Advanced Features
F Radio Check DVANCED EATURES If enabled, this feature allows you to determine Use this navigation guide to learn more about if another radio is active in a system without advanced features available with your radio: disturbing ... -
Page 50: Radio Check
5 The display shows “Radio Check: <Subscriber Alias or ID> Procedure: progress. The LED lights up solid green. Use the menu. 6 Wait for acknowledgement. 1 to access the menu. 7 If the target radio is active in the system, a tone 2 ... -
Page 51: Remote Monitor
6 If successful: Remote Monitor The radio starts receiving audio from the moni- Use the Remote Monitor feature to turn on the tored radio for a programmed duration. microphone ... -
Page 52: Stopping Remote Monitor
4 or to “Remote Mon. to Stopping Remote Monitor select. Procedure: 5 Radio sounds an alert tone and the LED blinks 1 Press the programmed Transmit Interrupt Re- green. mote Dekey button. 6 ... -
Page 53: Scan Lists
There is no priority icon if priority is set to None. Scan Lists Scan lists are created and assigned to individual Editing the Scan List channels/groups. Your radio scans for voice activity ... -
Page 54: Deleting An Entry From The Scan List
Deleting an Entry from the Scan List Setting and Editing Priority for an Entry in the Scan List Procedure: Procedure: 1 to access the menu. 1 to access the menu. 2 ... -
Page 55: Scan
Starting and Stopping Scan Scan When you start a scan, your radio cycles through Procedure: the programmed scan list for the current channel Press the programmed Scan button to start or stop looking for voice activity. -
Page 56: Responding To A Transmission During A Scan
Responding to a Transmission During a Deleting a Nuisance Channel Scan If a channel continually generates unwanted calls During scanning, your radio stops on a channel/ group where activity is detected. -
Page 57: Restoring A Nuisance Channel
Restoring a Nuisance Channel Contacts Settings Procedure: To restore the deleted nuisance channel, do one of your radio. Each entry corresponds to an alias or the following: ID that you use to initiate a call. Additionally, each entry, depending on context, associates ... -
Page 58: Making A Group Call From Contacts
Your radio supports two Contacts lists, one for 6 Wait for the Talk Permit Tone to finish (if en- Analog contacts and one for Digital contacts, with a abled) and speak clearly into the microphone. -
Page 59: Making A Private Call From Contacts
6 Wait for the Talk Permit Tone to finish (if en- Making a Private Call from Contacts abled) and speak clearly into the microphone. Procedure: 7 Release the PTT button to listen. When the tar- ... -
Page 60: Making A Private Call By Alias Search
9 If the Channel Free Indication feature is en- Making a Private Call by Alias Search abled, you will hear a short alert tone the mo- You can also use alias or alphanumeric search to ... -
Page 61: Call Indicator Settings
Activating and Deactivating Call Ringers for Call Indicator Settings Text Message Activating and Deactivating Call Ringers for You can turn on or off the ringing tones for a Private Calls ... -
Page 62: Assigning Ring Styles
Escalating Alarm Tone Volume Assigning Ring Styles You can program your radio to continually alert You can program your radio to sound one of ten you ... -
Page 63: Viewing Recent Calls
Missed Call Screen Call Log Features Your radio keeps track of all recent outgoing, Whenever a call is missed, your radio displays answered, and missed Private Calls. -
Page 64: Call Log Features
Storing an Alias or ID from the Missed Call Deleting a Call from a Call List List Procedure: Procedure: 1 to access the menu. 1 to access the menu. 2 or to “Call Log to select. -
Page 65: From The Missed Call List
Making a Call Alert from the Contacts List Call Alert Operation Call Alert paging enables you to alert a specific Procedure: radio user to call you back when they are able to 1 ... -
Page 66: Making A Call A Lert
Making a Call Alert with the One Touch Ac- Emergency Operation cess Button An Emergency Alarm is used to indicate a critical Procedure: situation. You are able to initiate an Emergency at 1 Press the programmed One Touch A ccess but- any time on any screen display even when there is ... -
Page 67: Receiving An Emergency Alarm
Your radio supports three Emergency A larms: Receiving an Emergency Alarm Procedure: 1 When receiving an Emergency Alarm, the dis- play shows the Emergency icon, the number of alarms received, and “Alarm Rcvd -... -
Page 68: Responding To An Emergency Alarm
When your radio receives an Emergency Alarm, green. Your radio remains in the Emergency and you change the radio channel, the Emergency mode. Alarm list is hidden. 4 ... -
Page 69: Sending An Emergency Alarm
Sending an Emergency Alarm Sending an Emergency Alarm with Call This feature allows you to send an Emergency This feature allows you to send an Emergency Alarm, ... -
Page 70: Sending An Emergency Alarm With Voice To Follow
7 Release the PTT button to listen. Sending an Emergency Alarm with Voice to 8 When the channel is free for you to respond, a Follow short alert tone sounds ( if the Channel Free This ... -
Page 71: Reinitiating An Emergency Mode
3 Once the display shows Emergency Alarm Reinitiating an Emergency Mode Successful, speak clearly into the microphone. NOTE: This feature is only applicable to the radio When hot mic has been enabled, the radio au- sending the Emergency ... -
Page 72: Exiting Emergency Mode
Exiting Emergency Mode Text Message Features NOTE: This feature is only applicable to the radio Your radio is able to receive a text message from sending the Emergency A larm. another radio or an e-mail application. Your radio exits Emergency mode when one of the ... -
Page 73: Sending A Quick Text Message
Use the keypad to type your message. display shows “Message Sent Press to move one space to the left. Press or the key to move one space to If the message is not sent, a low tone sounds the right. -
Page 74: Sending A Quick Text Message With The One Touch Access Button
Press to move one space to the left. If the message cannot be sent, a low tone Press or the key to move one space to the right. -
Page 75: Accessing The Drafts Folder
Accessing the Drafts Folder Viewing a Saved Text Message You can save a text message to send it at a later Procedure: time. Press the programmed Text Message button and proceed to Step 3. If ... -
Page 76: Deleting A Saved Text Message From Drafts
4 or to the required message and press to select. or to Manual Dial and press to select. Key in the subscriber alias or ID and press 5 or ... -
Page 77: Forwarding A Text Message
Forwarding a Text Message Procedure: Select Forward to send the message to another 1 or to “Edit to select. subscriber/group alias or ID. 2 A blinking cursor appears beside the message. ... -
Page 78: Managing Sent Text Messages
7 If the message is sent, a tone sounds and the 3 or to “Sent Items to select. display shows “Message Sent 4 or to the required message and press to select. ... - Page 79 4 If the message is sent, a tone sounds and the Select “Forward” to send the selected text mes- display shows “Message Sent sage to another subscriber/group alias or ID (see Forwarding a Text Message on page 75). ...
-
Page 80: Deleting A Ll Sent Text Messages
Deleting All Sent Text Messages from Sent Receiving a Text Message Items When your radio receives a message, the display Procedure: shows the alias or ID of the sender and the Press the programmed Text Message button and ... -
Page 81: Managing Received Text Messages
Press or to access the “Read Later” or Viewing a Text Message from the Inbox “Delete” option screen: Procedure: 1 to access the menu. Select “Read Later” to return to the screen you 2 ... -
Page 82: Deleting A Text Message From The Inbox
4 or to the required message and press Deleting a Text Message from the Inbox to select. Procedure: A subject line may be shown if the message is Press the programmed Text Message button and from an e-mail application. -
Page 83: Deleting A Ll Text Messages From The Inbox
Deleting All Text Messages from the Inbox Privacy Procedure: I f e n a b l e d , t h i s f e a t u r e h e l p s t o p r e v e n t Press the programmed Text Message button and ... -
Page 84: Dual Tone Multi Frequency (Dtmf)
Procedure: Dual Tone Multi Frequency ( DTMF ) Press the programmed Privacy button to toggle The Dual Tone Multi Frequency (DTMF) feature privacy on or off. allows the radio to operate in a radio system with ... -
Page 85: Security
Security Procedure: You can enable or disable any radio in the system. Use the menu. For example, you might want to disable a stolen 1 to access the menu. radio, to prevent the thief from using it, and enable ... -
Page 86: Radio Enable
Radio Enable Procedure: Procedure: Use the programmed Radio Enable button. Use the menu. 1 Press the programmed Radio Enable button. 1 to access the menu. 2 or to the required alias or ID and press 2 ... -
Page 87: Lone Worker
Lone Worker Utilities This feature prompts an emergency to be raised if Locking and Unlocking the Keypad there is no user activity, such as any radio button You can lock your radio’s keypad to avoid press ... -
Page 88: Turning Keypad Tones On Or Off
Turning Keypad Tones On or Off Setting the Squelch Level You can enable and disable keypad tones if You can adjust your radio’s squelch level to needed. -
Page 89: Setting The Power Level
Setting the Power Level Turning the Voice Operating Transmission ( VOX ) Feature On or Off You can customize your radio’s power setting to high or low for each channel. -
Page 90: Controlling The Display Backlight
3 or to “Radio Settings to Controlling the Display Backlight select. You can enable or disable the radio’s display 4 or to “VOX to select. -
Page 91: Setting The Tone A Lert Volume Offset Level
Turning the Radio Tones/Alerts On or Off Setting the Tone A lert Volume Offset Level You can enable and disable all radio tones and You can adjust the Tone A lert Volume Offset level if alerts ... -
Page 92: Turning The Talk Permit Tone On Or Off
Turning the Talk Permit Tone On or Off Turning the LED Indicator On or Off You can enable and disable the Talk Permit Tone if You can enable and disable the LED Indicator if needed. -
Page 93: Turning The Introduction Screen On Or Off
Turning the Introduction Screen On or Off Accessing General Radio Information You can enable and disable the Introduction Your radio contains information on the following: Screen if needed. Procedure: 1 to access the menu. -
Page 94: Checking The Radio Id
Checking the Codeplug Version Checking the Radio ID Displays the ID of your radio. Displays the codeplug version on your radio. Procedure: Procedure: 1 to access the menu. 1 to access the menu. 2 or ... -
Page 95: Accessories
Accessories Your radio is compatible with the accessories listed in this chapter. Contact your dealer for details. Antennas Battery Chargers Carry Devices Speaker Microphone Programming Cable... - Page 98 LMR Inc LMR Inc LMR, Inc...