Panasonic SC-HC30 Operating Instructions Manual
Compact stereo system
Hide thumbs
Also See for SC-HC30:
- Operating instructions manual (28 pages) ,
- Operating instructions manual (28 pages)
Table of Contents
Advertisement
Advertisement
Table of Contents

Related Manuals for Panasonic SC-HC30


Summary of Contents for Panasonic SC-HC30
- Page 1 RQTX1073-2L...
- Page 2 CAUTION! THIS PRODUCT UTILIZES A LASER. USE OF CONTROLS OR ADJUSTMENTS OR PERFORMANCE OF PROCEDURES OTHER THAN THOSE SPECIFIED HEREIN MAY RESULT IN HAZARDOUS RADIATION EXPOSURE. DO NOT OPEN COVERS AND DO NOT REPAIR YOURSELF. REFER SERVICING TO QUALIFIED PERSONNEL. RQT4389ZAA CAUTION! •...
-
Page 3: Table Of Contents
Table of contents Supplied accessories Supplied accessories Please check and identify the supplied accessories. Connections Attaching the unit to a wall (Optional) 1 AC mains lead 1 AM loop antenna Control guide Disc operations 1 FM indoor antenna 2 Batteries Radio operations ... -
Page 4: Attaching The Unit To A Wall (Optional)
When tightening screws, make sure the screws are not loosely-tightened or overtightened. g Secure a safe surrounding area and pay attention to safety during installation. g Panasonic is not liable for incidental or consequential damages resulting from improper installation or operation. Safety precautions... - Page 5 Attaching the unit to a wall (Optional) (continued) Wall mount instructions • Before installation, turn the unit off and disconnect the AC mains lead plug from the AC receptacle. • Tighten screws firmly to prevent slack in each step. 1. Detach the stand from the unit. ...
- Page 6 Attaching the unit to a wall (Optional) (continued) Wall mount instructions (continued) 4. Hang the unit on the wall. Wall Hook the unit securely onto the mounting screws • Connect the FM/AM antenna before hanging the main unit on the wall (➡ page 3). •...
-
Page 7: Control Guide
Control guide Standby/on switch [^], [8] (8, 11, 14) Remote control Press to switch the unit from on to standby mode or vice versa. In • Refer to the numbers in parentheses for page reference. standby mode, the unit is still consuming a small amount of power. [SLEEP] (11) Numeric buttons [1-9, 0, ≧... -
Page 8: Disc Operations
Control guide (continued) Preparing the remote control Place this side in before the other side. ■ Batteries • Use a manganese dry battery or an alkaline dry battery. • Insert so the poles (+ and –) match those in the remote control. •... -
Page 9: Program Play
Disc operations (continued) Program play Display function Enables you to program up to 24 tracks. Press [DISPLAY, –DIMMER] repeatedly during play or pause to view Press [CD q/h] and then [g]. the current track’s information. Press [PROGRAM]. • Maximum number of displayable characters: approximately 30 CD: ... -
Page 10: Radio Operations
Radio operations Manual tuning Press [RADIO] to select “FM” or “AM”. Press [TUNE MODE] to select “MANUAL”. Press [u/t] or [y/i] to select the frequency of the required station. “ST” is displayed when a stereo FM broadcast is being received. To tune automatically ... -
Page 11: Timer
Setting the clock This is a 24-hour clock. Press [CLOCK/TIMER] to select “CLOCK”. Within 5 seconds, press [e,r] to set the time. (Press and hold to change the time faster.) Press [OK]. • To display the clock, press [CLOCK/TIMER]. •... -
Page 12: External Unit
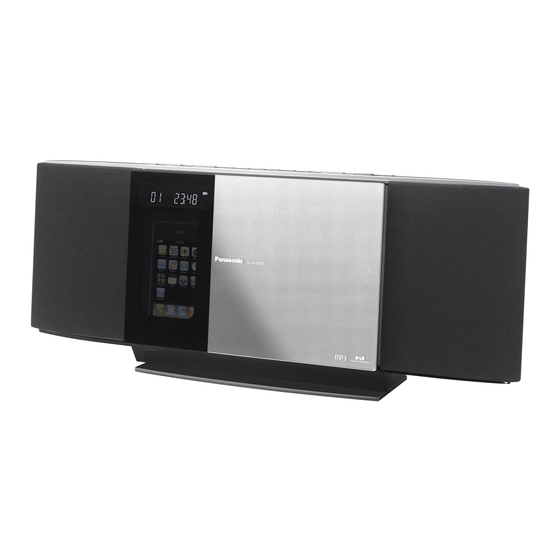
External unit Enjoying audio from iPod or iPhone g Inserting an iPod/iPhone g Removing an iPod/iPhone Press [;, iPod] to open the sliding door. Repeat step and (➡ left). To remove, simply pull the iPod/iPhone straight out to disconnect ... -
Page 13: Compatible Ipod
External unit (continued) ■ Charging the iPod/iPhone ■ Compatible iPhone • When iPod/iPhone is being charged in standby mode, “IPOD CHARGING” is shown on the main unit’s display. Name Memory size • Check iPod/iPhone to see if the battery is fully charged. If you are not using iPod/iPhone for an extended period of time after recharging iPhone 3GS 16 GB, 32 GB... -
Page 14: Troubleshooting Guide
Troubleshooting guide Before requesting service, make the following checks. If you are in doubt about some of the check points, or if the remedies indicated in the chart do not solve the problem, consult your dealer for instructions. g Common problems “PGM FULL”... -
Page 15: Specifications
Specifications Safety precautions Placement g AMPLIFIER SECTION RMS Output Power Set the unit up on an even surface away from direct sunlight, Front Ch (both ch driven) 20 W per channel (6 Ω), 1 kHz, 10 % THD high temperatures, high humidity, and excessive vibration. These Total RMS power 40 W conditions can damage the cabinet and other components, thereby... - Page 16 Panasonic Corporation Web Site: http://panasonic.net RQTX1073-2L © Panasonic Corporation 2010 H0210HU2050...