Panasonic SC-HC30 Operating Instructions Manual
Compact
Hide thumbs
Also See for SC-HC30:
- Operating instructions manual (28 pages) ,
- Operating instructions manual (16 pages)
Table of Contents
Advertisement
Available languages
Available languages
Quick Links
Advertisement
Chapters
Table of Contents

Related Manuals for Panasonic SC-HC30


Summary of Contents for Panasonic SC-HC30
- Page 1 RQTX1138-2C...
-
Page 2: Important Safety Instructions
ANTENNA ELECTRIC DISCHARGE UNIT SERVICE (NEC SECTION 810-20) EQUIPMENT GROUNDING CONDUCTORS (NEC SECTION 810-21) GROUND CLAMPS POWER SERVICE GROUNDING ELECTRODE SYSTEM IMPORTANT SAFETY INSTRUCTIONS (NEC ART 250, PART H) NEC- NATIONAL ELECTRICAL CODE Read these operating instructions carefully before using the unit. Follow the safety instructions on the unit and the applicable safety instructions listed below. -
Page 3: Table Of Contents
Product information TELEPHONE NUMBER _________________________________ For product information or assistance with product operation: Contact the Panasonic Canada Inc. Customer Care Centre at 1-800-561-5505, or visit the website (www.panasonic.ca), or an authorized Servicentre closest to you. -If you see this symbol-... -
Page 4: Supplied Accessories
Supplied accessories Please check and identify the supplied accessories. Use numbers indicated in parentheses when asking for replacement parts. (Product numbers are correct as of January 2010. These may be subject to change.) To order accessories, call the dealer from whom you have made your purchase. -
Page 5: Attaching The Unit To A Wall (Optional)
When tightening screws, make sure the screws are not loosely-tightened or overtightened. g Secure a safe surrounding area and pay attention to safety during installation. g Panasonic is not liable for incidental or consequential damages resulting from improper installation or operation. Safety precautions... - Page 6 Attaching the unit to a wall (Optional) (continued) Wall mount instructions • Before installation, turn the unit off and disconnect the AC power supply cord plug from the AC receptacle. • Tighten screws firmly to prevent slack in each step. 1.
- Page 7 Attaching the unit to a wall (Optional) (continued) Wall mount instructions (continued) 4. Hang the unit on the wall. Wall Hook the unit securely onto the mounting screws • Connect the FM/AM antenna before hanging the main unit on the wall (➡ page 4). •...
-
Page 8: Control Guide
Control guide [AUTO OFF] Standby/on switch [^], Remote control This function allows you to turn [8, POWER] (9, 11, 13) the unit off (except in radio mode) Press to switch the unit from on • Refer to the numbers in parentheses for page reference. after the unit is left unused for to standby mode or vice versa. -
Page 9: Disc Operations
Disc operations g Inserting a disc Basic play Press [^] to turn the unit on. Press [;, CD] to open the sliding door. Press [^] to turn the unit on. Insert the disc to be played (➡ left). ... -
Page 10: Radio Operations
Disc operations Radio operations (continued) Play Mode function Manual tuning Press [CD q/h]. Press [RADIO] to select “FM” or “AM”. Press [PLAY MODE] repeatedly to select the following modes. Press [TUNE MODE] to select “MANUAL”. Press [u/t] or [y/i] to select the frequency of the Mode To play required station. -
Page 11: Timer
Setting the clock This is a 12-hour clock. Press [CLOCK/TIMER] to select “CLOCK”. Within 5 seconds, press [e,r] to set the time. (Press and hold to change the time faster.) Press [OK]. • To display the clock, press [CLOCK/TIMER]. •... -
Page 12: External Unit
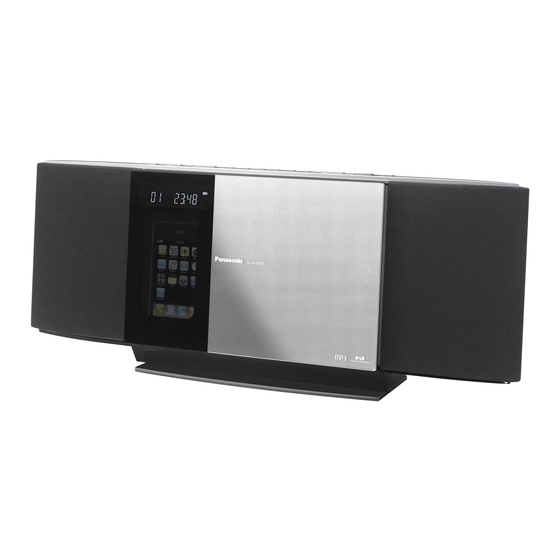
External unit (continued) Notes on iPhone: ■ Compatible iPod • All phone features can only be controled by the iPhone’s touch Name Memory size screen. • The unit does not display incoming calls or the phone status. iPod nano 5th generation (video camera) 8 GB, 16 GB •... -
Page 13: Specifications
Troubleshooting guide (continued) “F61” or “F76” “REMOTE 2” • Make sure that the iPod/iPhone is actually • There is a power supply problem. Consult • The main unit is in “REMOTE 2” mode. playing something. the dealer. Switch the remote control to “REMOTE 2” •... -
Page 14: Limited Warranty
Ninety (90) days This warranty is given only to the original purchaser, or the person for whom it was purchased as a gift, of a Panasonic brand product mentioned above sold by an authorized Panasonic dealer in Canada and purchased and used in Canada, which product was not sold “as is”, and which product was delivered to you in new condition in the original packaging. - Page 15 La présente garantie n’est fournie qu’à l’acheteur original d’un des produits de marque Panasonic indiqués plus haut, ou à la personne l’ayant reçu en cadeau, vendu par un détaillant Panasonic agréé au Canada et utilisé au Canada. Le produit ne doit pas avoir été « vendu tel quel » et doit avoir été...
- Page 16 ANTENNA ELECTRIC DISCHARGE UNIT SERVICE (NEC SECTION 810-20) EQUIPMENT GROUNDING CONDUCTORS (NEC SECTION 810-21) GROUND CLAMPS POWER SERVICE GROUNDING ELECTRODE SYSTEM IMPORTANTES MISES EN GARDE (NEC ART 250, PART H) NEC- NATIONAL ELECTRICAL CODE d’utiliser l’appareil, lire attentivement les instructions qui suivent. Se conformer tout particulièrement aux avertissements Avant inscrits sur l’appareil et aux consignes de sécurité...
-
Page 17: Protection De L'ouïe
Demande d’informations Pour toutes réparations, renseignements ou conseils sur le fonctionnement du produit: Veuillez contacter le service à la clientèle de Panasonic Canada Inc. au 1-800-561-5505, visiter son site web (www.panasonic.ca) ou le centre de service agréé le plus proche. -
Page 18: Accessoires Fournis
Accessoires fournis Vérifier et identifier les accessoires fournis. Lors de la commande de pièces de rechange, utiliser les numéros indiqués entre parenthèses. (Les numéros de modèle des produits sont à jour en date de janvier 2010. Ces numéros peuvent être modifiés sans préavis.) Pour la commande d’accessoires, contacter le détaillant où... -
Page 19: Installation Murale (Facultatif)
S’assurer que les vis ne sont ni excessivement ni insuffisamment serrées. g Dégager l’aire d’installation et observer toutes les mesures de sécurité requises. g Panasonic n’est responsable d’aucun dommage consécutif attribuable à une installation ou à une opération impropre. Précautions à prendre... - Page 20 Installation murale (facultatif) (suite) Montage mural • Avant de procéder à l’installation, mettre l’appareil hors marche et débrancher le cordon d’alimentation de la prise secteur. • Bien serrer les vis de manière à assurer la solidité de l’installation à chaque étape. 1.
- Page 21 Installation murale (facultatif) (suite) Montage mural (suite) 4. Accrocher l’appareil au mur. Accrocher l’appareil sur les vis de montage • Brancher l’antenne FM/AM avant d’accrocher l’appareil au mur (➡ page 5). • Après avoir accroché l’appareil, retirer lentement la main le soutenant pour confirmer la solidité de l’installation.
-
Page 22: Guide Des Commandes
Guide des commandes Interrupteur d’attente/marche [AUTO OFF] Télécommande [^], [8, POWER] (10, 12, 14) Permet la mise hors marche Appuyer sur cet interrupteur automatique après 30 minutes • Se reporter aux pages dont les numéros sont indiqués entre pour commuter l’appareil du d’inactivité... -
Page 23: Fonctions Avec Disques
Fonctions avec disques g Insertion d’un disque Lecture de base Appuyer sur [^] pour mettre l’appareil sous tension. Appuyer sur [;, CD] pour ouvrir le couvercle coulissant. Appuyer sur [^] pour mettre l’appareil sous tension. Insérer le disque à lire (➡ gauche). ... -
Page 24: Écoute De La Radio
Fonctions avec disques Écoute de la radio (suite) Fonction de mode de lecture des disques Syntonisation manuelle Appuyer sur [CD q/h]. Appuyer sur [RADIO] pour sélectionner «FM» ou «AM». Appuyer sur [PLAY MODE] à plusieurs reprises pour sélectionner ... -
Page 25: Minuterie
Réglage de l’horloge L’horloge fonctionne sur un cycle de 12 heures. Appuyer sur [CLOCK/TIMER] pour sélectionner «CLOCK». Dans un délai de moins de 5 secondes, appuyer sur [e,r] pour régler l’heure. (Appuyer et maintenir enfoncée pour changer l’heure plus rapidement.) ... -
Page 26: Appareil Auxiliaire
Appareil auxiliaire (suite) Notes à propos de l’iPhone: ■ Lecteurs iPod compatibles • Toute fonction du téléphone ne peut être pilotée qu’à partir de l’écran Capacité de mémoire tactile de l’iPhone. Lecteur iPod nano de 5 génération 8 Go, 16 Go •... -
Page 27: Spécifications
Guide de dépannage (suite) «NO PLAY» «REMOTE 1» Aucun son ne provient des haut-parleurs • Un CD-ROM qui ne comporte aucune • L’appareil est en mode «REMOTE 1». • L’iPod/iPhone n’est pas correctement donnée CD-DA ou MP3 a été inséré. Ce Commuter le mode de la télécommande au inséré... - Page 28 D.BASS REHAUT DES GRAVES BASS/TREBLE GRAVES/AIGUS POWER INTERRUP. OPEN/CLOSE OUVRIR/FERMER iPod iPod FM/AM FM/AM VOLUME VOLUME -DEMO -DÉMO Panasonic Canada Inc. 5770 Ambler Drive Mississauga, Ontario L4W 2T3 www.panasonic.ca RQTX1138-2C © Panasonic Corporation 2010 Printed in Malaysia/Imprimé en Malaisie H0310HU2050...