Table of Contents
Advertisement
Advertisement
Table of Contents

Related Manuals for Fisher & Paykel CT560QX


Summary of Contents for Fisher & Paykel CT560QX
-
Page 1: Ceramic Cooktop
SOL X: CT560QX, CT560MX TITAN: CE901, CE901M Ceramic cooktop User guide NZ & AU... -
Page 3: Table Of Contents
Contents Introducing your cooktop Temperature control - Titan Temperature control - Sol X Cookware Cleaning Safety & warnings Frequently asked questions Trouble shooting Warranty Customer care Important! It is important that the User Guide should be retained with the appliance for future reference. -
Page 4: Introducing Your Cooktop
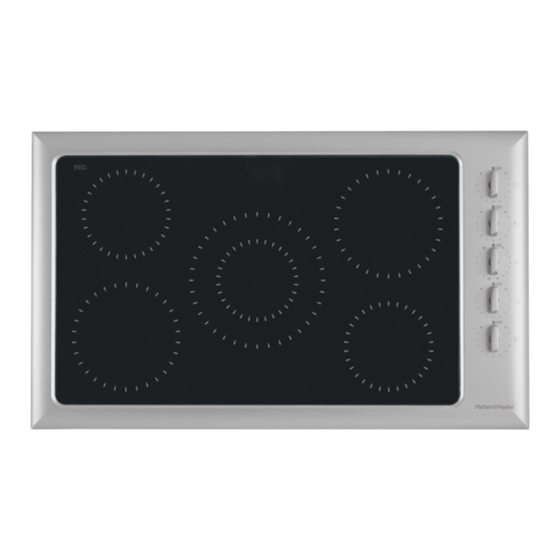
Introducing your cooktop This booklet will introduce you to the features of your cooktop. We recommend you read the whole book before you start using your cooktop. Location of features Sol X CT560X/MX Titan CE901 1. 1200W element 2. 1800W element 3. -
Page 5: Temperature Control - Titan
Temperature control - Titan The elements are controlled by variable energy regulators giving infinite control. There is no ‘stop’ at the low marking, this is to allow you to experiment at finding the minimum heat for those delicate cooking tasks. (The power level drops off rapidly to zero below the low marking). -
Page 6: Temperature Limiters
Supersimmer (CE901M only) The front right element of your cooktop is fitted with a unique simmer control. This allows the element to be turned down to a very low and even power setting (25 watts compared with 60 watts on other elements). These lower settings are ideal for melting chocolate and butter, cooking rice and delicate sauces and simmering soups and stews. -
Page 7: Temperature Control - Sol X
Temperature control - Sol X Your cooktop has temperature settings ranging from 1-9, the lowest setting being 1 and the highest setting 9. The low settings (from 1-6), offer a subtle and broad range of simmer settings (refer to the ‘Temperature Setting Guide’). - Page 8 Using the elements With the cooktop turned on, touch the corresponding element button in the touch controls for the element you wish to cook on. The red light will stop flashing and remain static, beside the element that is selected. (If no element is selected within 5-10 seconds the cooktop will automatically turn off ).
-
Page 9: Temperature Setting Guide
Keylock To lock out the controls for cleaning or to prevent children from playing, touch the button, then touch the button. A light will go on beside the keylock button. All the controls are now locked (except for the button). If the cooktop is turned off, the keylock light will go out, even though the controls are still locked. - Page 10 Dual element control The left front element is designed for dual element control, using either the inner or full element. With the cooktop turned on, touch the button in the touch controls. The red light will stop flashing and remain static. Select the element temperature setting, using the arrows as required.
- Page 11 While this function is activated the element indicator will flash between and the reduced temperature setting, until the fixed time elapses, and the reduced temperature setting is reached. Auto Heat-Reduce Guide Auto Heat- Time on Reduces Cooking suggestion Reduce maximum temperature setting heat setting...
-
Page 12: Cookware
Cookware To get the best results out of your cooktop follow these simple suggestions : Use heavy gauge, flat, smooth bottom pans that conform to the diameter of the cooking area. This will provide good contact with the glass and help reduce cooking times. Preheat the cookware on the cooktop/hob before adding food. -
Page 13: Cleaning
Cleaning Caring for your cooktop Use cleaner on the cooktop while it is warm to touch. Rinse and wipe dry with a clean cloth or paper towel. The cooktop may become stained if cleaning residue remains. Remove any food, spillovers or grease from the cooktop while it is still warm using the razor blade scraper provided held at a 30°... -
Page 14: Energy Saving Tips
Stainless steel surround Important! Do not use harsh/abrasive cleaning agents to clean your cooktop as they may damage the stainless steel finish and the knobs. Important! Commercial stainless steel cleaner containing chlorine compounds are corrosive and may damage the appearance of your cooktop. Brushed Stainless Steel Brushed Stainless Steel can be cleaned with a commercial stainless steel cleaner (see ‘Important’) or wiped with a clean damp cloth and dried with a lint free cloth. -
Page 15: Safety & Warnings
Safety & warnings WARNING! Hot Surface Hazard Accessible parts of this appliance will become hot during use. Care should be taken to avoid touching the cooktop surface other than the controls. Failure to practice caution could result in burns or scalds. WARNING! Electrical Shock Hazard If the glass cooktop surface becomes cracked, switch the appliance off... -
Page 16: Frequently Asked Questions
Frequently asked questions Is it possible for my cooktop to shatter? This is highly unlikely. The glass is very robust and strong and goes through a vigorous testing process before it is accepted. Does the glass scratch easily? No, the glass is very tough. However check that your pots do not have jagged edges on the bottom. -
Page 17: Trouble Shooting
Trouble shooting Problem Possible solutions There is a metal This could be caused by copper or aluminium bottomed sheen on the glass. pots. Ceramic cleaner should remove this. If the cooktop is not cleaned regularly and the stains are allowed to burn onto the surface, they may react with the glass and no longer be removable. -
Page 18: Warranty
Warranty When you purchase any new Fisher & Paykel whiteware Product you automatically receive a 2 year Manufacturer’s Warranty covering parts and labour for servicing. Fisher & Paykel undertakes to Repair or, at its option, replace without cost to the owner either for material or labour any part of the Product, the serial number of which appears on the Product, which is found to be defective within TWO YEARS of the date of purchase. -
Page 19: Customer Care
Customer care Before you call for service or assistance ... Check the things you can do yourself. Refer to your User Guide and check... Your product is correctly installed You are familiar with its normal operation If after checking these points you still need assistance, please refer to the following or contact us through our website: www.fisherpaykel.com In New Zealand if you need assistance ...*... - Page 20 Copyright Reserved © Fisher & Paykel 2003. The product specifications in this booklet apply to the specific products and models described at the date of issue. Under our policy of continuous product improvement, these specifications may change at any time. You should therefore check with your Dealer to ensure this booklet correctly describes the product currently available.