Table of Contents
Advertisement
Advertisement
Table of Contents

Related Manuals for Minelab Eureka Gold


Summary of Contents for Minelab Eureka Gold
- Page 1 The Minelab Eureka Gold MINELAB...
- Page 2 MINELAB ELECTRONICS PTY LTD LIMITED RIGHTS TECHNICAL DATA, OR RESTRICTED RIGHTS DATA, OR BOTH. © Minelab Electronics Pty Ltd This work is copyright. Apart from any use as permitted under the Copyright Act 1968, no part may be reproduced by any process...
-
Page 3: Table Of Contents
4.2 Installation of Alkaline Batteries ..........11 4.3 Low Battery Warning and NiMH Recharging......12 4.4 Using your NiMH Chargers............12 The Eureka Gold Controls ..........13 5.1 Volume Control ................ 13 5.2 Threshold Control ..............13 5.3 Sensitivity Control ..............15 5.4 Frequency Switch .............. - Page 4 The Minelab Eureka Gold Quickstart Operating Instructions ........20 6.1 Best Setup Positions..............21 Detector Sounds ..............22 Operating Instructions - Fundamentals ......23 8.1 Operating the Eureka Gold............23 8.2 Ground Balance.................24 Detecting Techniques............25 9.1 Sweeping...................26 9.2 Pinpointing the Target..............27 9.3 Digging the Target..............28...
-
Page 5: Introduction
For sensitivity to a wide range of targets, the Eureka Gold has a choice of three operating frequencies: •... -
Page 6: List Of Parts
Page 6 The Minelab Eureka Gold List of Parts The box in which the Eureka Gold is shipped should contain the following items. When you first receive your Eureka Gold check that all these items are in the box: •... -
Page 7: Assembling The Detector
The Minelab Eureka Gold Assembling the Detector Please follow these instructions to assemble the Eureka Gold. Refer to the drawings to identify parts and how they are positioned. Please contact your Minelab dealer for further instructions should any difficulties arise. -
Page 8: Completing The Shaft Assembly
Page 8 The Minelab Eureka Gold c) With the teardrop washers in place, push the lower tube (3) into the coil bracket so that the holes line up. Note: Ensure that the black nylon spring clip near the top of the fibreglass tube is pointing toward the rear of the coil. -
Page 9: Rear Shaft Mount
The hipmount bag is available from your supplier as an accessory item. Rear Shaft Mount The Eureka Gold provides the option of mounting the control box at the rear of the shaft (2), beneath the armrest. -
Page 10: Hipmounting/Chestmount
Page 10 The Minelab Eureka Gold b) Slide in the black plastic rear control box bracket (8). c) Tighten the nylon wing nut on the armrest. d) Clip the control box onto the rear mounting bracket (see figure 5). e) Firmly wind the cable up the stem using the Velcro tabs to hold in position. -
Page 11: Batteries
Connect the coil connector to the socket on the rear of the control box and tighten the locking nut. Batteries Your Eureka Gold is supplied with a rechargeable 12 Volt NiMH battery pack and mains charger. A car charger is also available as an accessory item from your authorised Minelab Dealer. -
Page 12: Installation Of Alkaline Batteries
Page 12 The Minelab Eureka Gold Installation of Alkaline Batteries A 12 Volt battery pack to hold 8 ‘AA’ alkaline batteries is available as an accessory item. These are useful to have as back-up if ever your NiMH batteries are flat. -
Page 13: Low Battery Warning And Nimh Recharging
Low Battery Warning and NiMH Recharging When the batteries are reaching the point at which they will no longer operate, the Eureka Gold will emit a distinct sharp “pip” from the speaker, approximately every 30 seconds. Shortly after this, the threshold will increase to a loud continuous signal that cannot be reduced by the threshold control. -
Page 14: The Eureka Gold Controls
The Minelab Eureka Gold The Eureka Gold Controls This section gives detailed descriptions of the controls of the Eureka Gold detector and their functionality. Having knowledge of these controls means that you will be able to achieve the best performance from your detector. -
Page 15: Threshold Control
Page 2 The Minelab Eureka Gold Figure 13 - Volume Control (The maximum audio output (volume) can be limited) Therefore this control is a volume limiter. It is a useful feature when using headphones, as audio signals which would otherwise be uncomfortably loud can be limited while maintaining full response to small signals. -
Page 16: Sensitivity Control
Page 3 The Minelab Eureka Gold In the graphs (on page 13) the dotted line represents the level at which the audio output becomes audible; signals cannot be heard if they are below that dotted line. When the threshold is set correctly it is just above being audible and even small variations in the sound level will be heard. -
Page 17: Frequency Switch
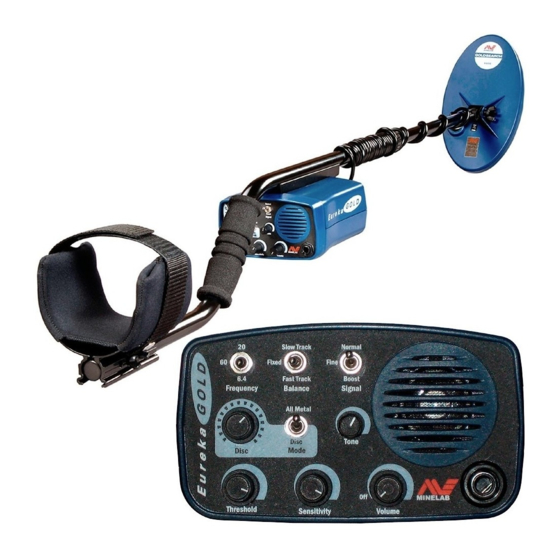
Page 4 The Minelab Eureka Gold Frequency Switch The Eureka Gold has three operating frequencies: 6.4kHz, 20kHz and 60kHz. Usually 6.4kHz is better suited to larger, deeper gold nuggets while 60kHz is better for smaller nuggets near the surface. The 20kHz setting is best for general purpose detecting, or a happy medium between both these extremes. -
Page 18: Balance Switch
Its ability to Discriminate between ferrous and non-ferrous targets may be affected by the depth and size of a target. Ferrous targets will be signalled by a blanking of the audio threshold. Using the Eureka Gold discriminating mode will not sacrifice sensitivity or depth, but it will not necessarily discriminate to the full depth at which the target can be detected. -
Page 19: Tone
Large ferrous objects should always be discriminated unless they are too deep. Tone The Eureka Gold has a tone control which allows the operator to adjust the “tone” or “pitch” of the audio threshold signal to suit the individual. Generally, this should be set to the pitch that you find the easiest to listen to. -
Page 20: Coils
The Eureka Gold should only be used with coils that have been indicated by Minelab Electronics as being suitable for use with this model. The 10” (25 cm) coil supplied with the Eureka Gold is a Double ‘D’ coil, that is, it contains two ‘D’ shaped windings which are partially overlapping. This Double ‘D’... -
Page 21: Quickstart Operating Instructions
Start searching. Minelab recommends that you read this instruction manual in full, so that you understand the true function and purpose of the controls. This will allow you to select the control settings for different conditions. -
Page 22: Best Setup Positions
Page 2 The Minelab Eureka Gold Best Setup Positions Gold Field Setting Signal: Normal Frequency: 20 or 60kHz Select: All Metals Threshold: Just audible Sensitivity: Maximum Volume: Maximum Balance: Fast Track or Slow Track Other Ground Settings (coins/relics) Signal: Boost Frequency: 6.4kHz... -
Page 23: Detector Sounds
• • • • • Discriminator Overload Signal — A loud ‘bell-ringing’ sound indicates that the Eureka Gold has detected a signal too large for the discriminator to process accurately. To overcome this, raise the coil from the ground, so that the signal from the target is weaker. -
Page 24: Operating Instructions - Fundamentals
The Minelab Eureka Gold Operating Instructions – Fundamentals The Eureka Gold is a motion detector and must be moving over a target to be able to detect it. If the coil is held still for a few seconds, any signals due to ground or targets will die away. - Page 25 (see Balance Switch on page 17). Leaving the setting at Fast Track or Slow Track while detecting will ensure that the Eureka Gold continuously adjusts itself to the changing ground conditions. Note that sudden changes in the ground conditions may still produce changes in the audio signal and balancing may need to be repeated.
-
Page 26: Ground Balance
To eliminate these unwanted signals the automatic ground balance of the Eureka Gold must be enabled by switching to either Fast Track or Slow Track. In these modes the Eureka Gold automatically adjusts its ground balance. -
Page 27: Detecting Techniques
The Eureka Gold is a motion detector which means that in order to detect a target the coil must be moving. It is recommended that you use a sweeping motion for the coil while detecting (see figure 18). -
Page 28: Pinpointing The Target
Page 8 The Minelab Eureka Gold Sweeping is carried out in a uniform motion along the ground to cover the search area. Keep the coil parallel to the ground at all times and be aware that there is a tendency for the coil to be raised at the end of each sweep (see figure 18). -
Page 29: Digging The Target
Page 9 The Minelab Eureka Gold The target could be anywhere along the length of the coil from head to toe. In order to pinpoint its exact location, it will be necessary for you to turn at a 90 degree angle and repeat the sweep across the target. -
Page 30: Automatic Ground Balancing
Automatic Ground Balancing These simplified diagrams (see Figure 20 overleaf) show how Automatic Ground Balancing with the Eureka Gold allows you to detect to its maximum depth at all times. The top diagram shows normal searching without Automatic Ground Balancing. - Page 31 Page 11 The Minelab Eureka Gold Figure 20 – Automatic Ground Balancing...
-
Page 32: Discrimination
To obtain the best performance out of your discriminator we suggest you take advantage of the multiple frequency features of the Eureka Gold. The best frequency for discrimination is 6.4kHz, followed by 20kHz and then 60kHz. -
Page 33: Discriminating Within Holes
Page 13 The Minelab Eureka Gold If the detector is swept across the target more than once in ‘hot’ ground it is possible that the detector’s automatic features will adjust the balance to the target and not discriminate out a ferrous target on subsequent passes. -
Page 34: Prospecting Tips
‘hot rocks’. These are rocks rich in minerals which can produce very strong audio signals. With the strong ones, some detectors have problems in tuning them out, but with the Eureka Gold signals from ‘hot rocks’ are not as great a problem. -
Page 35: Clay Domes
Page 15 The Minelab Eureka Gold 11.2 Clay Domes A common occurrence in nugget-bearing country is soil mineralisation commonly known as ‘clay domes’. These are regions of rather broad sound which could be confused with the sound which would come from a large deep nugget. -
Page 36: Gold Lore
Page 16 The Minelab Eureka Gold 11.4 Gold Lore To have a good chance of detecting gold, it is necessary to search out areas where ‘coarse gold’ is known to have been found, or other areas where it is likely to occur. The term ‘coarse gold’ refers to gold ranging in size from a grain of wheat to many grams, and in some cases many ounces. -
Page 37: The Coil And Skidplate
The Coil and Skidplate Over a long period of time the Coil Skidplate will wear if the ground is scrubbed continuously while searching. Minelab agents can supply a replaceable skidplate for the Coil. This can be fitted by removing the existing plate and pushing on the replacement skidplate (see Figure 21). -
Page 38: Environmental Concerns
Page 18 The Minelab Eureka Gold Environmental Concerns Firstly, it should be pointed out that gold prospecting and treasure hunting with a metal detector is the most environmentally friendly way to recover nuggets, coins, rings, and other treasure items. However, it is important to leave an area that you have searched in the same condition as you found All holes that have been dug must be properly refilled. -
Page 39: Care Of The Detector
Page 19 The Minelab Eureka Gold Care of the Eureka Gold Detector The Eureka Gold is a high-quality electronic instrument, finely engineered and packaged in a durable housing. Proper care and maintenance will ensure long-term reliability of the detector. Please observe the following precautions: •... - Page 40 Use the hipmount bag where possible. • • • • • The Eureka Gold is a very sensitive VLF radio receiver. There are many external sources of noise that may affect the performance of the detector, including another detector in close proximity, high power transmitters, power lines and electric fences.
-
Page 41: Trouble-Shooting Guide
Check headphones and their connection In the unfortunate circumstance that you need to return your detector to Minelab for service, please fill out a copy of the Minelab Service Repair Form on page 44 and enclose it with the detector. Please supply as much detail as possible about the fault and warranty details, as this will assist our service engineers to rectify the problem quickly and efficiently. -
Page 42: Warranty And Service
The Minelab Eureka Gold Warranty and Service There is a two-year parts and labour warranty for the Eureka Gold electronic Control Box. The Coil, Shafts, etc., are warranted for one year. Refer to your Warranty Card for further details. Always refer to your supplier or Minelab for service, either in or out of warranty. -
Page 43: Specifications
Page 23 The Minelab Eureka Gold Specifications These specifications are subject to change without notice. Length: Packed 710 mm Operating (min) 1190 mm (max) 1350 mm Weight: Control Box 740 g Complete Unit (excl batt) 2.2 kg Batteries: Recharge NiMH Batt Pack 12V, 1.2Ah ~ 20hr... -
Page 44: Fcc Compliance And Ec Conformity Notes
Page 24 The Minelab Eureka Gold 17. FCC Compliance NOTE: This equipment has been tested and found to comply with the limits for a Class B digital device, pursuant to part 15 of the FCC rules. These limits are designed to provide reasonable protection against harmful interference in a residential installation. -
Page 45: Minelab Service Repair Form
Page 25 The Minelab Eureka Gold Minelab Service Repair Form Today’s Date:.......... Detector Model: ........Serial No.: ......Purchased From: .................. Purchase Date: ........Faulty Part(s): ........................................Description of Fault: ........................................................................................................Owner’s Name: ..................Address: ....................