Precor RBK 615 Assembling & Maintaining Manual
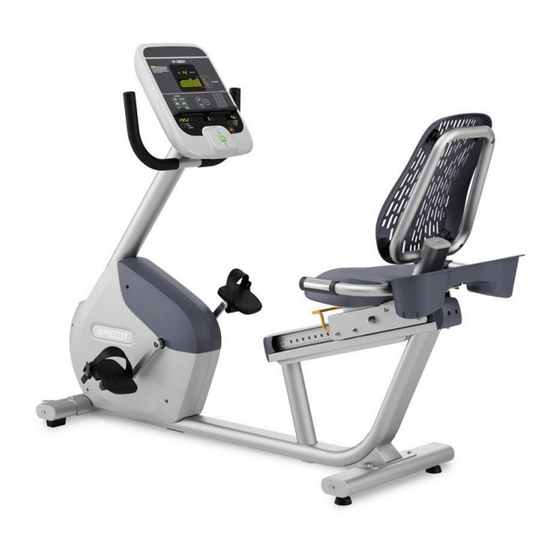
Recumbent exercise bike
Hide thumbs
Also See for RBK 615:
- Assembling & maintaining manual (112 pages) ,
- Assembling and maintaining manual (108 pages) ,
- Owner's manual (104 pages)
Table of Contents
Advertisement
Available languages
Available languages
Quick Links
Advertisement
Chapters
Table of Contents

Related Manuals for Precor RBK 615


Summary of Contents for Precor RBK 615
- Page 1 Productgebruikershandleiding RBK 615 • UBK 615...
- Page 2 ...
- Page 4 Specificaties kunnen zonder kennisgeving vooraf worden gewijzigd. Handelsmerkinformatie Precor, AMT, EFX, en Preva zijn gedeponeerde handelsmerken van Precor Incorporated. Andere namen in dit document zijn mogelijk (gedeponeerde) handelsmerken van de respectievelijke eigenaren. Opmerking met betrekking tot intellectueel eigendom...
-
Page 5: Belangrijke Veiligheidsinstructies
Opmerking: dit product is bestemd voor commercieel gebruik. Dit apparaat (hierna de console genoemd) is bedoeld om bij nieuwe Precor-trainingsapparaten (hierna het basisapparaat genoemd) te worden meegeleverd. Het is niet verpakt voor individuele verkoop. WAARSCHUWING Om letsel te vermijden, moet u... -
Page 6: Veiligheidsvoorschriften
Productgebruikershandleiding Veiligheidsvoorschriften Volg bij het gebruik van deze apparatuur altijd de basisveiligheidsvoorschriften om de kans op letsel, brand of schade te beperken. Andere hoofdstukken in deze handleiding bevatten meer details over veiligheidsfuncties. Lees deze hoofdstukken door en houd u aan alle veiligheidsvoorschriften. - Page 7 Belangrijke veiligheidsinstructies Voor loopbanden: gebruik geen invoer- of navigatiefuncties tijdens het lopen bij snelheden die hoger zijn dan een traag en ontspannen tempo. Behoud altijd uw evenwicht door de vaste handgreep vast te houden terwijl u gebruikmaakt van invoer- of navigatiefuncties. Voor AMT en EFX: behoud altijd uw evenwicht door de ...
- Page 8 Productgebruikershandleiding RUIMTE: de onderstaande minimale aanbevelingen zijn gebaseerd op een combinatie van de vrijwillige (Amerikaanse) ASTM-normen en de (Europese) EN-wetgeving per 1 oktober 2012, met betrekking tot toegang tot en ruimte om het apparaat en de noodstop: Loopbanden: minimaal 0,5 m (19,7 inch) aan beide ...
- Page 9 160 kg. Gebruik het apparaat alleen voor het doel waarvoor het volgens deze handleiding is bestemd. Gebruik geen accessoirehulpstukken die niet door Precor worden aanbevolen. Dergelijke hulpstukken kunnen letsels veroorzaken. Neem het apparaat niet in gebruik op plaatsen waar spuitbussen worden gebruikt of zuurstof wordt toegediend.
-
Page 10: Gebruikers Instrueren
Als u zich van het apparaat wilt ontdoen, neem dan contact op met de klantenservice van Precor Commercial Products voor informatie over de wijze waarop u de accu kunt afvoeren. Raadpleeg Service krijgen. -
Page 11: Product Recycleren En Afvoeren
Belangrijke veiligheidsinstructies Product recycleren en afvoeren Dit apparaat moet worden gerecycleerd of afgevoerd overeenkomstig de toepasselijke lokale en nationale voorschriften. Overeenkomstig de Europese richtlijn 2002/96/EG betreffende afgedankte elektrische en elektronische apparatuur (AEEA) geven productlabels aan onder welke voorwaarden apparaten in de gehele Europese Unie waar van toepassing moeten worden afgevoerd en gerecycleerd. - Page 12 Productgebruikershandleiding Radio Frequency Interference (RFI) De RFID-module voldoet aan de volgende nationale standaards die aanvaardbare limieten aangeven voor radiofrequentie-interferentie (RFI). Federal Communications Commission, Part 15 This equipment has been tested and found to comply with the limits for a Class A digital device, pursuant to Part 15 of the FCC Rules.
-
Page 13: Wettelijke Mededeling Voor Cardiovasculaire Fitnessapparatuur
De wettelijke informatie in dit hoofdstuk geldt voor het fitnessapparaat en de bedieningsconsole daarvan. Veiligheidsaanbevelingen voor cardiovasculaire apparatuur Precor-apparatuur is getest en voldoet aan de volgende toepasselijke veiligheidsnormen. Apparatuur van het type cardiovasculair: CAN/CSA, IEC, EN 60335-1 (Huishoudelijke en ... - Page 14 WARNING Per FCC rules, changes or modifications not expressly approved by Precor could void the user’s authority to operate the equipment. Industry Canada This Class A digital apparatus complies with Canadian ICES-003.
-
Page 15: Aanbevelingen Voor Elektriciteit: Alle Apparatuur Behalve Loopbanden
Neem contact op met uw dealer als er onderdelen ontbreken. Voor meer informatie over telefoonnummers van de klantenondersteuning of voor een lijst met door Precor erkende servicecentra gaat u naar de website van Precor op http://www.precor.com. -
Page 16: Bijgewerkte Documentatie Opvragen
Productgebruikershandleiding Bijgewerkte documentatie opvragen De huidige Precor-productdocumentatie vindt u op http://www.precor.com/productmanuals. Het is aan te raden deze site af en toe te bezoeken om te controleren of er nieuwe informatie beschikbaar is. -
Page 17: Table Of Contents
Inhoudsopgave Belangrijke veiligheidsinstructies ..........3 Veiligheidsvoorschriften ..............4 Gebruikers instrueren ................8 Gevaarlijke materialen en de afvoer ervan ........8 Product recycleren en afvoeren ............9 Berichten voor toezichthoudende instanties over de RFID-module ................9 Wettelijke mededeling voor cardiovasculaire fitnessapparatuur ................11 Aanbevelingen voor elektriciteit: Alle apparatuur behalve loopbanden .............. - Page 18 Productgebruikershandleiding Trainingsopties ................. 41 QUICKSTART kiezen ................. 42 Een programma selecteren .............. 43 Trainingsstatistieken opslaan ............44 Programma's wijzigen gedurende de trainingssessie ....45 Cool-down na een training .............. 45 Een pauze inlassen tijdens een training of cool-downperiode ..............46 Een training beëindigen ..............
-
Page 19: Productfuncties
Hoofdstuk Productfuncties In dit hoofdstuk leest u hoe u het apparaat kunt aanpassen voor uw gebruikers en nuttige productinformatie kunt bekijken. Deze functies blijven allemaal verborgen voor de gebruikers en zijn alleen toegankelijk door middel van specifieke toetscombinaties. Met deze instellingen op maat kunt u ... - Page 20 Productgebruikershandleiding Tabel 1. Aangepaste functies en instellingen voor uw fitnessapparaat Apparaat Programmeringsprompt Fabrieks- Functies die instelling u kunt wijzigen S E L E C T Alle * Engels Selecteer L A N G U A G E een taal voor ( T A A L S E L E C T E R E N ) gebruiker.
- Page 21 B E R E I K en Low I N S T E L L E N ) (Laag). * Deze functie is beschikbaar in alle Precor-fitnessapparaten. Opmerking: Wanneer u wijzigingen aanbrengt in de programmeringsmodus, zullen de nieuwe instellingen de fabrieksinstellingen vervangen.
-
Page 22: Programmeringstips
Productgebruikershandleiding Programmeringstips Begin altijd bij het Precor-merk. Het apparaat moet van stroom voorzien worden. Voor zelfaangedreven apparaten is een constante stroombron verkrijgbaar indien u de optionele voedingsadapter gebruikt. Anders moeten de gebruikers de minimale bewegingssnelheid handhaven. Als u van plan bent een... -
Page 23: De Productinstellingen Wijzigen
U moet zich in de programmeringsmodus bevinden alvorens u de instellingen kunt wijzigen. Om toegang te krijgen tot de programmeringsmodus: Druk bij het Precor-merk achtereenvolgens en zonder pauze op de volgende toetsen: RESET, 5, 6, 5, 1, 5, 6, 5... - Page 24 Hiermee keert de gebruiker terug naar het toetsenblok CLEAR vorige menuniveau zonder de wijzigingen (wissen) op te slaan. PAUZE/RESET Hiermee verlaat u de programmeringsmodus en keert u terug naar het PRECOR-merk. Opmerking: Het numerieke toetsenblok wordt uitgeschakeld zodra u in programmeringsmodus komt.
- Page 25 Productfuncties Gebruik het volgende stroomdiagram om door de menu-instellingen te navigeren. Afbeelding 3: Instellingen fietsmenu Een taal kiezen Het apparaat kan aanwijzingen voor gebruikers, tekst, en invoer door gebruikers in verschillende talen weergeven. De standaardtaal bij verzending vanuit het fabriek is het Engels. Opmerking: Programmeringsprompts worden niet beïnvloed door de taalkeuze.
- Page 26 Productgebruikershandleiding Amerikaans of metrisch display instellen Het apparaat kan de meetwaarden weergeven volgens het metrische of Amerikaanse stelsel. De fabrieksinstelling is het Amerikaanse stelsel. Om het weergegeven maatstelsel te wijzigen: Bij de S E L E C T U N I T S ( E E N H E I D S E L E C T E R E N ) prompt, drukt u op OK.
- Page 27 U kunt hiervoor een tijd instellen tussen 1 en 120 seconden (twee minuten). Als u bijvoorbeeld de maximale pauzeduur instelt op 60 seconden, keert het display automatisch terug naar het Precor-merk als de gebruiker één minuut lang niet beweegt en geen toets indrukt.
-
Page 28: Een Weerstandsbereik Instellen
Productgebruikershandleiding Een maximale cool-downduur instellen Gebruik deze instelling om de maximale duur te selecteren dat de machine in cool-downmodus zal blijven. De cool-downduur is de periode na afloop van een programma waarin de gebruiker met een lager ritme traint. Om een cool-downduur in te stellen: Bij de SET COOL DOWN TIME (cool-downduur instellen) prompt, drukt u op OK. -
Page 29: Informatiedisplays
(passenteller en urenteller), softwareversies en onderdeelnummer, serienummer, gebruikers- en foutenlogboeken op te sporen. In het algemeen hebt u deze informatie alleen nodig als de klantenservice van Precor daarom vraagt. Gebruik het volgende stroomdiagram om door de informatiedisplays te navigeren. Een tabel na het stroomdiagram verschaft verdere informatie over elk andere display. - Page 30 Productgebruikershandleiding Opmerking: De toets CLEAR (wissen) bevindt zich op het numerieke toetsenblok. Als uw product de PAUZE/RESET-toets bevat, gebruikt u deze in plaats van de RESET-toets die in het stroomdiagram wordt genoemd. Afbeelding 4: Informatie-instellingen...
- Page 31 Productfuncties Tabel 4. Informatiedisplays voor alle producten Product Display Beschrijving H O U R M E T E R Alle Het aantal uren dat het • ( U R E N T E L L E R ) apparaat is gebruikt. Het apparaat houdt bij •...
- Page 32 O D O M E T E R Alle De waarde van de ( P A S S E N T E L L E R ) passenteller stemt overeen met het type Precor-product en de maateenheid (Amerikaans of metrisch) die in de programma's zijn geselecteerd.
- Page 33 Om het foutenlogboek te bekijken: Houd RESET bij het Precor-merk gedurende 4 seconden ingedrukt. 2. Indien D I A G S - I N F O R M A T I O N D I S P L A Y...
- Page 34 Belangrijk: U kunt het foutenlogboek niet herstellen nadat u het verwijderd hebt. Normaliter kunt u het beste eerst eventuele problemen met het apparaat oplossen voordat u de gegevens in het foutenlogboek wist. 4. Druk op RESET om terug te keren naar het Precor-merk.
-
Page 35: Gebruikers Instrueren
SmartRate® een visuele hulp levert om de hartslag en trainingsintensiteit van nabij te volgen. SmartRate® gebruiken De Precor SmartRate® is een accurate, eenvoudig af te lezen hartslagmonitor waarmee gebruikers hun ultieme persoonlijke trainingen kunnen realiseren. SmartRate geeft actuele hartslaginformatie weer in combinatie met de doelzone van de gebruiker voor gewichtsverlies en cardiovasculaire training. - Page 36 Productgebruikershandleiding Hartslag testen: Start een training door op QUICK START te drukken, of door een vooraf ingestelde workout te selecteren door op GO te drukken. 2. Pak de hartslagsensoren die in de hand gehouden orden met beide handen vast. Afhankelijk van de apparatuur worden de letters ‘Hr’...
-
Page 37: Displayconsole
Hoofdstuk Displayconsole De displayconsole is ontworpen voor gebruiksvriendelijkheid. Raadpleeg de volgende grafiek en tabel voor meer informatie over de consoledisplays. Afbeelding 5: Consoleonderdelen... - Page 38 Middendisplay: geeft in eerste instantie de Precor-banner weer. Wijzigt naar het programmaprofiel als u een programma selecteert of op QUICKSTART drukt. Een knipperende kolom in het profiel geeft uw positie aan.
-
Page 39: Het Bovenste Display Gebruiken
Displayconsole Het bovenste display gebruiken Het programmaprofiel verschaft informatie over de door u geprogrammeerde training. Een knipperend segment in het profiel geeft uw positie aan. Het profiel stijgt of daalt indien u de weerstand verandert. Afbeelding 6: Delen van het programmaprofiel Toetsenblokken Gebruik de toetsenblokken om programmaselecties en displayvoorkeursinstellingen in te voeren. - Page 40 Productgebruikershandleiding Toetsenblok PROGRAMMA'S Afbeelding 7: Toetsenblok programma's Het toetsenblok PROGRAMS (programma's) biedt toegang tot alle trainingsprogramma's. Om het toetsenblok van het programma te gebruiken: Druk op het midden van de toets om het bovenste programma in het menu weer te geven. 2.
- Page 41 Displayconsole Cijfertoetsenblok Het cijfertoetsenblok heeft verschillende functies, afhankelijk van wat is aangesloten op het apparaat. Afbeelding 8: Cijfertoetsenblok Tabel 7. Aansluitingen Aansluitingen Description Computer Als een computer is aangesloten op de (CSAFE-compatibel) CSAFE-aansluiting van het apparaat, kunt u met behulp van het cijfertoetsenblok uw gebruikers-ID en andere instellingen invoeren.
- Page 42 Productgebruikershandleiding De toetsen CLEAR (wissen) en ENTER hebben de volgende functies: CLEAR (wissen): Gebruik de CLEAR-toets om het laatst weergegeven getal te wissen. ENTER: Gebruik de ENTER-toets om het weergegeven getal te accepteren. Opmerking: De OK- en ENTER-toetsen zijn gewoonlijk onderling verwisselbaar en hebben dezelfde functie als er geen randapparaten zijn aangesloten op het apparaat.
-
Page 43: Trainingsopties
Hoofdstuk Trainingsopties VOORZICHTIG: Alvorens aan een fitnessprogramma te beginnen, dient u een volledig medisch onderzoek te ondergaan. Zorg ervoor dat u de door een arts aangeraden streefzone voor uw hartslag kent. Om uw training te starten: Sta met uw gezicht naar het display toe. 2. -
Page 44: Quickstart Kiezen
Gebruik de Quickstart-functie om onmiddellijk te beginnen met een training. Om deze functie te gebruiken: Begin te trappen. 2. Druk op QUICKSTART terwijl het Precor-merk voorbijschuift om het handmatige programma te starten. Afbeelding 9: QUICKSTART-knop Bij gebruik van QUICKSTART gelden de volgende... -
Page 45: Een Programma Selecteren
Trainingsopties Een programma selecteren Als u de Precor-banner ziet, druk dan op een PROGRAMMA'S-toets en druk vervolgens op OK. Afbeelding 10: Toetsenblok programma's 2. Er verschijnt een tijdprompt in het display. Gebruik de pijltjestoetsen of cijfertoetsen om het aantal minuten aan te passen (1-240) en druk op OK. -
Page 46: Trainingsstatistieken Opslaan
Opmerking: Als het display leeg is, moet u de minimale bewegingssnelheid handhaven om het apparaat van voeding te voorzien. Als het Precor-merk verschijnt, is het apparaat niet op een computer aangesloten. Als het apparaat is aangesloten op een computer, verschijnt... -
Page 47: Programma's Wijzigen Gedurende De Trainingssessie
Trainingsopties Programma's wijzigen gedurende de trainingssessie U kunt gedurende een trainingssessie van programma veranderen door een nieuw programma te selecteren uit het menu PROGRAMMA'S en op OK te drukken. Alle opgebouwde statistieken worden naar het nieuwe programma overgebracht terwijl u doorgaat met de training. Bepaalde programma's, zoals Hartslagprg –... -
Page 48: Een Pauze Inlassen Tijdens Een Training Of Cool-Downperiode
Als de optionele voedingsadapter is aangesloten, kunt u gedurende een ingestelde tijd pauzeren, gewoonlijk twee minuten. Als u gedurende deze tijd de training niet hervat, keert het display terug naar het Precor-merk. Kom langzaam tot stilstand als u wilt pauzeren. ... -
Page 49: Programma's
Hoofdstuk Programma's Dit hoofdstuk beschrijft de programma's die beschikbaar zijn op het apparaat. Gebruik de volgende tabel voor meer informatie over elk trainingsprogramma. Afbeelding Kolomkop Trainingsdetails programma Handmatig Deze training start als een vlakke lijn. U kunt de weerstand verhogen of verlagen met behulp van de weerstand-toets. - Page 50 Productgebruikershandleiding Afbeelding Kolomkop Trainingsdetails programma Hartslag Gebruik deze programma's om een doel in te stellen voor uw hartslag. De trainingen stellen de weerstand zo bij dat uw hartslag tijdens de training niet meer dan twee slagen per minuut afwijkt van de ingevoerde streefwaarde.
- Page 51 Programma's Afbeelding Kolomkop Trainingsdetails programma Prestatie Deze trainingen bestaan uit een afwisselend profiel dat zich concentreert op de dijbeen- en kuitspiergroepen.
-
Page 52: Programmatips
Productgebruikershandleiding Programmatips Begin bij het Precor-merk en kies een programma door op PROGRAMMA'S of QUICKSTART te drukken. Tijdens de training moet u uw trainingsbeweging handhaven. Als u stopt met bewegen, schakelt het apparaat zichzelf uit om accustroom te besparen. - Page 53 Opmerkingen Opmerkingen:...
- Page 54 Productgebruikershandleiding Opmerkingen:...
- Page 55 ...
- Page 56 Precor Incorporated XBK 615 POM 302217-171 rev A, nl-nl 20031 142nd Avenue NE december 2012 P.O. Box 7202 Woodinville, WA USA 98072-4002...
- Page 57 Assembling and Maintaining the RBK 615 Recumbent Exercise Bike...
- Page 58 ...
- Page 60 Preva Business Suite, the accompanying printed materials, any copies of such software, and all data collected via the Preva Business Suite, are exclusively owned by Precor or its suppliers, as the case may be. Precor is widely recognized for its innovative, award-winning designs of exercise equipment.
-
Page 61: Important Safety Instructions
Note: This product is intended for commercial use. The display apparatus (hereinafter referred to as the console) is intended to be shipped with new Precor exercise equipment (hereinafter referred to as the base unit). It is not packaged for individual sale. -
Page 62: Safety Precautions
Assembling and Maintaining the RBK 615 Recumbent Exercise Bike Safety Precautions Always follow basic safety precautions when using this equipment to reduce the chance of injury, fire, or damage. Other sections in this manual provide more details of safety features. Be sure to read these sections and observe all safety notices. - Page 63 Important Safety Instructions Care should be taken when mounting or dismounting the equipment. For Treadmills: Do not use typing or web surfing features while walking at speeds that exceed a slow and relaxed leisurely pace. Always stabilize yourself by holding a stationary handle bar while using typing or web surfing features.
- Page 64 Assembling and Maintaining the RBK 615 Recumbent Exercise Bike SPACING—The below minimum spacing recommendations are based on a combination of the ASTM (U.S.) voluntary standards and EN (European) regulations as of October 1, 2012, for access, passage around, and emergency dismount: Treadmills—a minimum of 0.5 m (19.7 in.) on each...
- Page 65 350 pounds (160 kg). Use the equipment only for its intended purpose as described in this manual. Do not use accessory attachments that are not recommended by Precor. Such attachments may cause injuries. Do not operate the equipment where aerosol (spray) ...
-
Page 66: Educating Users
Assembling and Maintaining the RBK 615 Recumbent Exercise Bike Educating Users Take time to educate users about the Important Safety Instructions found in both the User Reference Manual and Product Owner’s Manual. Explain to your club or facility patrons that they should observe the following precautions: Hold onto a stationary handrail or handlebar while ... -
Page 67: Regulatory Notices For The Rfid Module
Important Safety Instructions Regulatory Notices for the RFID Module When equipped with a control console as described in this document, this equipment may include a radio-frequency identification (RFID) module. The RFID module has been certified to operate at temperatures between -20°C and 85°C (-4°F and 185°F). -
Page 68: European Applications
Assembling and Maintaining the RBK 615 Recumbent Exercise Bike Industry Canada This device complies with RSS-210:2007 of the Spectrum Management & Telecommunications Radio Standards Specification. Operation is subject to the following two conditions: (1) this device may not cause harmful... -
Page 69: Regulatory Notices For Cardiovascular Exercise Equipment
The regulatory information in this section applies to the exercise equipment and its control console. Safety Approvals for Cardiovascular Equipment Precor equipment has been tested and found to comply with the following applicable safety standards. Cardiovascular Type Equipment: CAN/CSA, IEC, EN 60335-1 (Household and similar ... - Page 70 Assembling and Maintaining the RBK 615 Recumbent Exercise Bike Industry Canada This Class A digital apparatus complies with Canadian ICES-003. Cet appareil numérique de la classe A est conforme à la norme NMB-003 du Canada. ATTENTION: Haute Tension Débranchez avant de réparer...
-
Page 71: Electrical Recommendations: All Equipment Excluding Treadmills
Important Safety Instructions Electrical Recommendations: All Equipment Excluding Treadmills Note: This is a recommendation only. NEC (National Electric Code) guidelines or local region electric codes must be followed. For equipment fitted with a P80 console or Personal Viewing System (PVS) screen a separate power connection is required. -
Page 72: Obtaining Service
Assembling and Maintaining the RBK 615 Recumbent Exercise Bike Obtaining Service Do not attempt to service the equipment except for maintenance tasks. If any items are missing, contact your dealer. For more information regarding customer support numbers or a list of Precor authorized service centers, visit the Precor web site at http://www.precor.com. - Page 73 Table of Contents Important Safety Instructions ............ 3 Safety Precautions ................4 Educating Users ..................8 Hazardous Materials and Proper Disposal ........8 Product Recycling and Disposal ............8 Regulatory Notices for the RFID Module ........9 Regulatory Notices for Cardiovascular Exercise Equipment ..................
- Page 74 Assembling and Maintaining the RBK 615 Recumbent Exercise Bike Self-Powered Features .............. 41 Informational Displays Prior to Shutdown ........42 Symptoms of a Low Battery ............42 Using the Optional Power Adapter ..........43 The Optional Power Adapter Kit ............ 43 Replacing the Battery ................
-
Page 75: Assembling The Exercise Bike
Assemble the equipment according to the guidelines in this manual to ensure you do not void the Precor Limited Warranty. Important: Any damage caused during installation is not covered by the Precor Limited Warranty. -
Page 76: Unpacking The Equipment
Assembling and Maintaining the RBK 615 Recumbent Exercise Bike Unpacking the Equipment The shipping container for this exercise bike consists of the following items: Wooden pallet Cardboard base Cardboard cover Foam spacers WARNING Do not attempt to move the equipment off of the pallet by yourself. -
Page 77: Hardware Kit (Not To Scale)
Assembling the Exercise Bike Hardware Kit (not to scale) Before you begin the assembly, verify that the following hardware items are packed with the equipment. Fasteners Quantity M12 x 80 mm sockethead screw M10 x 40 mm buttonhead screw M10 x 55 mm buttonhead screw M10 x 15 mm buttonhead screw... -
Page 78: Required Tools
Assembling and Maintaining the RBK 615 Recumbent Exercise Bike Required Tools 6 mm hex wrench 10 mm hex wrench ⁵₃₂-inch hex wrench 13 mm open-end, box, or socket wrench 14 mm open-end, box, or socket wrench ... - Page 79 Assembling the Exercise Bike 2. Secure the rear stabilizer using two M10 x 40 mm buttonhead screws. Tighten the screws completely using a 6 mm hex wrench. Figure 3: Rear stabilizer attachment 3. Place the front stabilizer underneath the bracket at the front of the bike.
- Page 80 Assembling and Maintaining the RBK 615 Recumbent Exercise Bike 4. Secure the front stabilizer using two M10 x 40 mm buttonhead screws. Tighten the screws completely using a 6 mm hex wrench. Figure 5: Front stabilizer attachment...
-
Page 81: Attaching The Seat Back And Bottle Holder
Assembling the Exercise Bike Attaching the Seat Back and Bottle Holder While the equipment is in use, the seat back flexes to support users of different shapes and sizes. Underneath the seat back, the bottle holder accommodates both left-handed and right-handed users. - Page 82 Assembling and Maintaining the RBK 615 Recumbent Exercise Bike 3. Swing the seat back assembly into place so that its four screw holes line up with the holes on the seat carriage bracket, as shown in the following figure. Figure 7: Positioning the seat back assembly 4.
- Page 83 Assembling the Exercise Bike 5. Adjust the position of the seat back, then tighten the screws completely using a 6 mm hex wrench. 6. Connect the heart rate sensor cable in the handlebars to the cable you passed through the seat back support earlier, then position the handlebars in the handlebar bracket as shown in the following figure.
- Page 84 Assembling and Maintaining the RBK 615 Recumbent Exercise Bike To attach the bottle holder: Move the seat as far back as it can go. 2. Position the bottle holder so that the two tabs on its underside are aligned with the bottle holder bracket.
-
Page 85: Installing The Upright Support And Cables
Assembling the Exercise Bike Installing the Upright Support and Cables DANGER Do not attempt to connect electrical power until all assembly procedures are complete and the console is properly installed. Before you begin this procedure, retrieve the cables for the console that you plan to install on this exercise bike, or for any Cardio Theater®... - Page 86 Assembling and Maintaining the RBK 615 Recumbent Exercise Bike 7. Lift the upright support and position its lower end over the upright support channel on the body assembly. Slide the support into position so that its screw holes line up with the corresponding holes on the body assembly, as shown in the following figure.
- Page 87 Assembling the Exercise Bike 8. Insert the two M12 x 80 mm sockethead screws through the openings on the support and into the screw holes on the body assembly. Tighten the screws completely using a 10 mm hex wrench. Figure 14: Bolting the upright support into place...
-
Page 88: Making Sure The Unit Is Stable
Assembling and Maintaining the RBK 615 Recumbent Exercise Bike Making Sure the Unit Is Stable Make sure the unit is level before allowing anyone to use it. CAUTION: To eliminate movement, make sure the adjustable feet are in contact with the floor. -
Page 89: Installing The Console
Assembling the Exercise Bike Installing the Console Before you begin, make sure that the cables have been fed through the mounting bracket and their ends extend through the round opening at the base of the bracket. The television cable, along with any audio, video, or power cables needed to support a Cardio Theater screen or receiver, should be fed through the bracket and should extend through the opening at its upper end. - Page 90 Assembling and Maintaining the RBK 615 Recumbent Exercise Bike 3. Retrieve the serial number label you removed from the body assembly earlier. Remove the backing from the label and apply it inside the console at the upper right, as shown in the following figure.
- Page 91 Assembling the Exercise Bike 4. Route the flat, black base unit data cable to the left of the mounting bracket and about three-quarters of the way up the left side of the console, as shown in the following figure. Attach the base unit data cable to the eight-conductor modular jack labeled LOWER BOARD CONNECTION.
- Page 92 Assembling and Maintaining the RBK 615 Recumbent Exercise Bike 6. Insert four ¹₄-inch x ³₄-inch buttonhead screws through the screw holes in the tabs on the mounting bracket and into the screw anchors on the console. Tighten the screws completely using a ⁵₃₂-inch hex wrench.
- Page 93 Assembling the Exercise Bike 8. Position the back cover and attach the four 1-inch panhead machine screws, then tighten the screws completely using a #2 Phillips screwdriver. Figure 19: Reattaching rear cover screws...
-
Page 94: Breaking In The Equipment
Assembling and Maintaining the RBK 615 Recumbent Exercise Bike Breaking in the Equipment Precor equipment does not require an actual break-in period. However, moving components such as belts, gears, and bearings can settle while the equipment is being stored or shipped. -
Page 95: Maintenance
To keep the equipment functioning properly, perform the minor maintenance tasks in this section at the intervals shown on the maintenance checklist. Failure to maintain the equipment as described in this section could void the Precor Limited Warranty. DANGER To reduce the risk of electrical shock, always... -
Page 96: Daily Inspection
Assembling and Maintaining the RBK 615 Recumbent Exercise Bike Alternatively, you can clean the equipment with Athletix fitness equipment cleaning wipes (for more information, visit www.athletixproducts.com) CAUTION: Read and follow the manufacturer’s instructions, particularly dilution instructions, before using any cleaner on Precor fitness equipment. -
Page 97: Quarterly Maintenance
Maintenance Quarterly Maintenance Precor recommends that you clean and inspect the equipment more thoroughly once every three months. To perform quarterly maintenance: Remove the cover panels. 2. Vacuum out any debris, being careful not to bring the vacuum cleaner nozzle too close to any circuit board (unless your vacuum cleaner is protected against static buildup). -
Page 98: Moving The Equipment
Assembling and Maintaining the RBK 615 Recumbent Exercise Bike Moving the Equipment The equipment is very heavy. If you plan to move it to a new location, obtain the help of an adult assistant and use proper lifting techniques. If the equipment includes roller wheels on one end, use the wheels to reduce the load on yourself and your assistant. -
Page 99: Self-Powered Features
Chapter Self-Powered Features Important: This chapter of the manual describes Precor fitness equipment that can operate without being connected to AC power. This includes units equipped with P30 or P10 consoles. However, P80 consoles must be connected to AC power through their power supplies to operate. -
Page 100: Informational Displays Prior To Shutdown
Assembling and Maintaining the RBK 615 Recumbent Exercise Bike Informational Displays Prior to Shutdown The equipment saves its battery charge by moving into a shutdown mode. If the user does not maintain the minimum rate of motion, a 30-second shutdown process begins. -
Page 101: Using The Optional Power Adapter
CAUTION: The internal cable kit must be installed by authorized service personnel. Do not attempt installation on your own as you could void the Precor Limited Warranty. For more information, refer to Obtaining Service. Important: If this equipment includes a P80 console, the optional... -
Page 102: Replacing The Battery
Assembling and Maintaining the RBK 615 Recumbent Exercise Bike Replacing the Battery The equipment’s battery is built to last for a long time. However, if you feel that the battery may need replacing, check with an authorized service technician. Refer to Obtaining Service. -
Page 103: Commercial Cardiovascular Equipment Limited Warranty
CONDITIONS. Limited Warranty. Precor Incorporated warrants all new Precor products to be free from defects in materials and manufacture for the warranty periods set forth below. The warranty periods commence on the invoice date of the original purchase. This warranty applies only against defects discovered within the warranty period and extends only to the original purchaser of the product. - Page 104 Internet connectivity, such as Ethernet cabling, routers, servers and switches. Precor is not responsible for the quality of television, video, audio, or other media supplied to its products. This restriction applies to services, such as those provided by a cable or satellite television provider;...
-
Page 105: Exclusive Remedies
GIVEN ABOVE FOR THOSE SAME PARTS. PRECOR HEREBY DISCLAIMS AND EXCLUDES THOSE WARRANTIES THEREAFTER. Some States do not allow limitations on how long an implied warranty lasts, so the above limitation may not apply to you. PRECOR ALSO HEREBY DISCLAIMS AND EXCLUDES ALL OTHER OBLIGATIONS OR LIABILITIES,... - Page 106 Assembling and Maintaining the RBK 615 Recumbent Exercise Bike EXCLUSION OF CONSEQUENTIAL AND INCIDENTAL DAMAGES. PRECOR AND/OR ITS SUPPLIERS SHALL HAVE NO OBLIGATION OR LIABILITY, WHETHER ARISING IN CONTRACT (INCLUDING WARRANTY), TORT (INCLUDING ACTIVE, PASSIVE, OR IMPUTED NEGLIGENCE AND STRICT LIABILITY), OR...
- Page 107 ...
- Page 108 Precor Incorporated RBK 615 PAG/OM 302216-101 rev A 20031 142nd Avenue NE Warranty #36286-114 P.O. Box 7202 December 2012 Woodinville, WA USA 98072-4002...