
Related Manuals for 3Com EtherLink III ISA


Summary of Contents for 3Com EtherLink III ISA
-
Page 1: User Guide
EtherLink III ISA ® Network Interface Card User Guide A member of the 3Com EtherLink III family of network interface cards http://www.3com.com/ Part No. 09-1310-000 Published January 1998... - Page 2 3Com Corporation. 3Com Corporation reserves the right to revise this documentation and to make changes in content from time to time without obligation on the part of 3Com Corporation to provide notification of such revision or change.
-
Page 3: Table Of Contents
ONTENTS BOUT UIDE How to Use This Guide Conventions ETWORK NTERFACE NSTALLATION Network Interface Card Overview Before You Begin Installing the NIC Connecting to the Network Link LED ETUP FOR USTOM NSTALLATION Selecting the Type of Installation Express Installation Custom Installation Multiple NIC Installations Windows 95 Setup Performing the Preinstallation Procedure... - Page 4 Configuring TCP/IP Under Windows 95 To Obtain an IP Address Automatically To Specify an IP Address Manually Configuring DNS To Obtain a DNS Address Automatically To Specify a DNS Address Manually Identifying Your PC on the Network 3-10 Configuring DynamicAccess Software 3-11 To Not Configure DynamicAccess Software 3-11...
- Page 5 Installing Multiple NICs in a Windows NT PC Installing the First NIC Installing Subsequent NICs Windows 95 and Windows NT Troubleshooting Diagnostic Testing Under Windows 95 and Windows NT Starting the 3Com NIC Diagnostics Program Running Tests NIC Test Network Test Uninstalling the NIC...
- Page 6 Disable Receive Packet Buffering ROSSOVER ABLE ROUBLESHOOTING Troubleshooting Hubs with Crossover Cable ECHNICAL UPPORT Support from Your Network Supplier Online Technical Services World Wide Web Site 3Com Bulletin Board Service Access by Analog Modem Access by Digital Modem 3ComFacts Automated Fax Service...
- Page 7 NDEX ORPORATION IMITED ARRANTY FCC C LASS TATEMENT FCC D ECLARATION OF ONFORMITY NDUSTRY ANADA LASS MISSION OMPLIANCE TATEMENT VIS DE CONFORMITÉ À LA RÉGLEMENTATION ’I NDUSTRIE ANADA OFTWARE ICENSE GREEMENT...
- Page 8 viii...
- Page 9 IGURES 3C509B Network Interface Cards Installing the 3C509B NIC Connecting to the RJ-45 Port on the 3C509B NIC Connecting to the BNC Port on the 3C509B-TPC NIC Connecting to the AUI Port on the 3C509B-COMBO NIC Windows 95 NIC Installation Overview Preinstallation Software Screen non–Plug and Play BIOS Detected Screen Update Device Driver Wizard Screen...
- Page 10 3-17 System Settings Change Dialog Box 3-16 3-18 Adapters Tab of the Network Screen 3-17 3-19 Microsoft TCP/IP Properties Screen 3-18 Main Menu of the DOS Installation Program NIC Configuration Screen Assembling a Loopback Plug RJ-45 Connector Pin Assignments PACE Additional Ranges Tab PACE Advanced Options Tab Straight-Through and Crossover Cable Pinouts...
- Page 11 ABLES Notice Icons Text Conventions Parameters for 3C509B NIC Models NIC LED Interpretation NetWare NLMs Network Driver Text File Names Option Settings 3Com NIC Diagnostics Program Tab Screens Diagnostic Programs AUI Connector Pin Assignments Supported Cable Types...
-
Page 13: About This Guide
NIC version and installation information Chapter 1 Windows 95 and Windows NT NIC installation setup information Chapter 2 3Com Installation Wizard Chapter 3 Windows 3.x procedures for installing and configuring the NIC Chapter 4 Windows 95 and Windows NT troubleshooting Chapter 5 Windows 3.x troubleshooting... -
Page 14: Conventions
BOUT UIDE Conventions Table 1 and Table 2 list conventions that are used throughout this guide. Table 1 Notice Icons Icon Notice Type Alerts you to... Information note Important features or instructions Caution Risk of personal safety, system damage, or loss of data Warning Risk of severe personal injury Table 2 Text Conventions... -
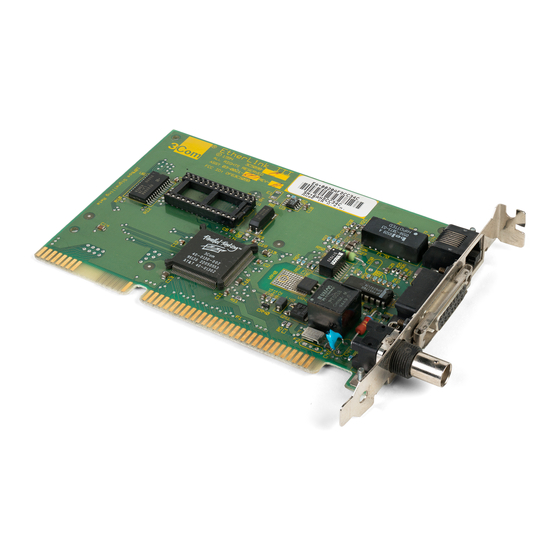
Page 15: Interface Card
NIC to an Ethernet network. Network Interface Card Overview ® ® The four versions of the 3Com EtherLink III ISA 3C509B NICs are shown in Figure 1-1. These NICs connect your ISA or EISA PC to an Ethernet network using up to three different types of media. -
Page 16: Before You Begin
If any of these items are damaged or missing, contact your shipper or network supplier. EtherLink III ISA NIC (3C509B) EtherLink III ISA Network Interface Card User Guide (this guide) EtherLink III ISA Network Interface Card Quick Guide 3Com 3C509B EtherDisk diskettes 1 and 2... -
Page 17: Installing The Nic
PC until you have run the Windows 95 preinstallation procedure described in Chapter 2. If you do not run the preinstallation procedure, Windows will install the default driver and the 3Com NIC Diagnostics program will not be installed on your hard disk. - Page 18 Save the screw. Some PCs have both ISA and PCI slots. Make sure that you install the EtherLink III ISA NIC in either an ISA or an EISA slot. See Figure 1-2. PCI slots, the shortest of the three types of slots, are white. The longer ISA slots are black.
-
Page 19: Connecting To The Network
Connecting to the Network Connecting to the Network This section describes how to connect the 3C509B NIC to an Ethernet network using an RJ-45, BNC, or AUI port. Each 3C509B NIC provides different network ports, as shown in Figure 1-1. When you first install the NIC and power on the PC, the LED on the NIC backplate lights, but the link is not active. -
Page 20: Connecting To The Bnc Port On The 3C509B-Tpc Nic
1: N HAPTER ETWORK NTERFACE NSTALLATION Follow these steps to connect the BNC port on the 3C509B-TPC and COMBO NICs to the network: 1 Connect the BNC connector on the thin Ethernet coaxial cable to the BNC port on the NIC. See Figure 1-4. BNC port BNC connector Figure 1-4 Connecting to the BNC Port on the 3C509B-TPC NIC... -
Page 21: Link Led
Link LED 2 Connect the thick Ethernet coaxial cable to the AUI port on the NIC. This connector will only attach one way. Orient the AUI connector to match the AUI port on the NIC. 3 Move the slide latch up to the closed position to lock the AUI connector in place. -
Page 23: Setup For Custom Installation
NSTALLATION This chapter describes how to set up your Windows 95 or Windows NT PC so that you can use the 3Com Installation Wizard to install and configure a 3C509B NIC. If you are running Windows 95, you must first determine if a Plug and Play BIOS is installed in your PC. -
Page 24: Custom Installation
This section describes how to set up your Windows 95 environment to install and configure the 3C509B NIC using the 3Com Installation Wizard Custom installation option. This section includes procedures for PCs with or without a Plug and Play BIOS. - Page 25 Chapter 2 Windows 95 Wizard detects the NIC Install NIC User guide software and Chapter 3 configure the NIC 3Com Installation Wizard User guide Select the type Chapter 2 of installation Quick guide Express installation User guide Custom installation Chapter 3...
-
Page 26: Performing The Preinstallation Procedure
Preinstallation is important for proper setup of your Windows 95 system environment. You must perform this procedure to ensure that the latest NIC driver and the 3Com NIC Diagnostics (a Windows-based program) can be successfully installed. Follow these steps to perform the preinstallation procedure: 1 Turn the power on and boot Windows 95. -
Page 27: Configuring The Nic In A Plug And Play Pc
Windows 95 Setup Figure 2-3 non–Plug and Play BIOS Detected Screen To install the NIC using the 3Com Installation Wizard Express installation option, see the EtherLink III ISA Network Interface Card Quick Guide that shipped with the 3C509B NIC. To set up the NIC for installation using the 3Com Installation Wizard Custom installation option, go to the next section. - Page 28 3Com NIC Windows 95 Installation Media 8 Click OK. 9 If it is not already displayed in the Copy files from entry box, type: 10 Click OK. The 3Com Installation Wizard starts. Go to Chapter 3.
-
Page 29: Disabling Plug And Play On The Nic
Windows 95 Setup Disabling Plug and Play on the NIC If your Windows 95 PC does not support Plug and Play, you must disable Plug and Play on the NIC before you can install the NIC software. Follow these steps to disable Plug and Play on the NIC: 1 After installing the NIC in the PC, turn the power on and boot Windows 95. -
Page 30: Select Device Screen
2: S HAPTER ETUP FOR USTOM NSTALLATION Configuring the NIC This section describes the procedure to install NIC software and configure the NIC when Plug and Play has been disabled on the NIC. Follow these steps to install the NIC software and configure the NIC: 1 Double-click the My Computer icon, double-click the Control Panel icon, and then double-click the Add New... -
Page 31: Select Device Screen
7 Click OK. The Select Device screen shown in Figure 2-9 appears, with 3Com EtherLink III ISA (3C509/3C509b) in ISA mode selected. Figure 2-9 Select Device Screen 8 Click OK. Windows 95 copies the required files and updates the driver database. -
Page 32: Windows Nt Setup
If this address is assigned to a hardware device in your PC, contact your network administrator before continuing. The next step is to use the 3Com Installation Wizard to install NIC software and configure the NIC. Go to Chapter 3. - Page 33 Is Microsoft Install Networking Microsoft Networking installed? Install NIC User guide software and Chapter 3 configure the NIC 3Com Installation Wizard User guide Custom installation Chapter 3 User guide Configure TCP/IP Chapter 3 Figure 2-11 Windows NT NIC Installation Overview...
- Page 34 Windows NT Setup copies the required files to your hard disk. The 3Com Installation Wizard starts. The next step is to use the 3Com Installation Wizard to install the NIC software and configure the 3C509B NIC. Go to Chapter 3.
-
Page 35: Om Installation Wizard
In the last step of the Windows NT setup procedure in Chapter 2, clicking OK starts the 3Com Installation Wizard. The first 3Com Installation Wizard screen is shown in Figure 3-1. Figure 3-1 Selecting Custom Installation Screen Follow these steps to perform a Custom installation: 1 Select the Custom Installation radio button, shown in Figure 3-1. -
Page 36: Configuring The Nic
3: 3C HAPTER NSTALLATION IZARD Configuring the NIC The NIC Configuration Settings screen appears, as shown in Figure 3-2. The list box displays recommended configuration settings for the NIC. You can either accept the recommended settings or change one or more to suit your operating environment. -
Page 37: To Modify Configuration Settings
Testing the NIC and the Network Connection To Modify Configuration Settings Follow these steps to change configuration settings in a Windows 95 non–Plug and Play PC: 1 Under Network Parameter, select I/O Base Address. 2 In the Set Value selection box, click the scroll arrow to select the I/O range setting that you wrote down in “Configuring the NIC”... -
Page 38: Network Connection Test Screen
3: 3C HAPTER NSTALLATION IZARD Follow these steps to test the NIC: 1 Click Perform NIC Test. While the test is running, a progress bar indicates test progress. If a test fails, a message indicates the error type. Click the Help button in the error message screen to obtain more information. -
Page 39: Installing Tcp/Ip Under Windows 95
Installing TCP/IP Under Windows 95 Installing TCP/IP Under Windows 95 Installing and configuring TCP/IP is optional. If you want to access the Internet, you must install and configure TCP/IP. Figure 3-5 TCP/IP Inquiry Screen To Not Install TCP/IP Follow these steps if you do not want to install TCP/IP: 1 Select the No radio button. -
Page 40: Configuring Tcp/Ip Under Windows 95
3: 3C HAPTER NSTALLATION IZARD Figure 3-6 TCP/IP Configuration Screen Configuring TCP/IP Under Windows 95 There are two ways to assign an IP address. You can obtain an IP address automatically or specify an IP address manually. Your network administrator will specify which method to use, and if required, provide an IP address for you to use. -
Page 41: To Specify An Ip Address Manually
Configuring TCP/IP Under Windows 95 To Specify an IP Address Manually Follow these steps to specify an IP address manually: 1 Select the Specify an IP address manually radio button. 2 Click Next. The Specify an IP Address screen appears, as shown in Figure 3-7. Figure 3-7 Specify an IP Address Screen 3 Enter the IP address. -
Page 42: Configuring Dns
3: 3C HAPTER NSTALLATION IZARD Configuring DNS Dynamic Name Server (DNS) converts a World Wide Web URL to an actual IP address. You can configure DNS either automatically or manually depending on how your network is set up. When you click Next in the previous section, the DNS Configuration screen appears, as shown in Figure 3-8. -
Page 43: To Specify A Dns Address Manually
Configuring DNS To Specify a DNS Address Manually Follow these steps to specify a DNS address manually: 1 Select the Specify DNS manually radio button if you are using a permanent DNS address. See Figure 3-9. Figure 3-9 Specifying a DNS Address Screen If DNS has been previously configured on your PC, the fields on this screen may already be filled in. -
Page 44: Identifying Your Pc On The Network
3-10 3: 3C HAPTER NSTALLATION IZARD Identifying Your PC on the Network When you click Next in the previous section, the Network Identification screen appears, as shown in Figure 3-10. This screen enables you to identify your PC on the network. Contact your network administrator if you do not have information to enter in these fields. -
Page 45: Configuring Dynamicaccess Software
Configuring DynamicAccess Software 3-11 Configuring DynamicAccess Software The DynamicAccess feature set optimizes network performance. DynamicAccess software includes PACE Interactive Access technology, dRMON (distributed RMON) support, Efficient Multicast Control, and PACE real-time and multimedia application support. PACE enhances both real-time, interactive applications and multimedia (data, voice, and video) applications by enhancing network bandwidth utilization, reducing latency, controlling jitter, and supporting multiple traffic priority levels. -
Page 46: To Configure Dynamicaccess Software
To Configure DynamicAccess Software Follow these steps if you want to configure DynamicAccess software: 1 Double-click the 3Com PACE Config icon shown in Figure 3-11. The PACE Support Setup screen appears, as shown in Figure 3-12. Figure 3-12 PACE Support Setup Screen 2 Select the Enable PACE Support radio button. -
Page 47: Repeating A Previous Installation
Repeating a Previous Installation 3-13 Repeating a Previous Installation You can save the configuration settings and test options that you selected during this installation for use in future installations. Saving settings is optional. When you click Next in the previous section, the Repeat Last Installation screen appears, as shown in Figure 3-13. -
Page 48: To Save Installation Settings
3-14 3: 3C HAPTER NSTALLATION IZARD To Save Installation Settings Follow these steps to save these configuration settings for future installations: 1 Select the Yes radio button, and then click Next. The Confirm Installation Settings screen appears, as shown in Figure 3-14. - Page 49 Repeating a Previous Installation 3-15 3 Enter the path for the EtherDisk diskette that you are using. This installation diskette is first copied to a temporary directory, and then that file is copied to the drive that you indicate. If you are saving to a diskette, insert a blank, formatted diskette in drive A.
-
Page 50: Completing The Installation And Configuration
You have successfully installed and configured the NIC under Windows 95. The 3Com NIC Diagnostics program icon appears in the taskbar tray. To start the program, double-click the tray icon. To disable the tray icon, right-click the icon and select Disable Tray Icon. See Chapter 5 for more information about the 3Com tray icon. -
Page 51: Windows Nt
Windows NT after you close the 3Com Installation Wizard. Clicking Finish on the Installation Complete screen closes the 3Com Installation Wizard. Windows NT then displays the Adapters tab of the Network screen, as shown in Figure 3-18. Figure 3-18 Adapters Tab of the Network Screen The next step is to install and configure TCP/IP in Windows NT... - Page 52 3-18 3: 3C HAPTER NSTALLATION IZARD Figure 3-19 Microsoft TCP/IP Properties Screen 2 Choose a method to configure TCP/IP. There are two ways to assign an IP address. You can obtain an IP address automatically or specify an IP address manually. Your network administrator will specify which method to use, and if required, provide an IP address for you to use.
- Page 53 Completing the Installation and Configuration 3-19 To specify an IP address manually—Follow these steps to install and configure TCP/IP manually: a Select the Specify an IP address radio button. b Enter the IP address, subnet mask address, and default gateway address in their respective entry fields. c Click OK.
-
Page 55: Software
OFTWARE NSTALLATION ONFIGURATION NDER INDOWS This chapter describes how to install NIC software and configure the NIC under DOS, Windows 3.1, or Windows for Workgroups. If your PC is running Windows 95 or Windows NT, go to Chapter 2 and Chapter 3. Installing NetWare Drivers for DOS, Windows 3.1, and Windows for Workgroups This section describes how to use the AutoLink program... - Page 56 Auto Install and Config for NetWare (Autolink) Driver Installation and Update ... Configuration and Diagnostic Program Release Notes This option displays a directory of help on relevant topics (C) Copyright 1993, 3Com Corporation. All Rights Reserved. [ENTER]=Execute Function ]=Scroll ↑↓ [F1]=Help [ESC]=<Cancel>...
-
Page 57: Obtaining Netware Loadable Modules
Installing Other Supported Network Drivers Obtaining NetWare Loadable Modules You can obtain current NetWare Loadable Modules (NLMs) for the NetWare servers listed in Table 4-1 from the Novell Web site, www.support.novell.com. Table 4-1 NetWare NLMs NetWare Server NLM Name NetWare 3.12 ETHERTSM.NLM NBI31X.NLM MSM31X.NLM... -
Page 58: Removing Nic Software
4: S HAPTER OFTWARE NSTALLATION AND ONFIGURATION NDER INDOWS Table 4-2 Network Driver Text File Names (continued) Network Operating System Text File Name Network Driver Name Windows 95 NDIS 2 16-bit W95NDIS2.TXT ELNK3.DOS network driver NetWare Client 32 CLIENT32.TXT 3C5X9.LAN NetWare 3.12 Server NETWARE.411 3C5X9.LAN... -
Page 59: Reconfiguring The Nic
Reconfiguring the NIC Configuration and Diagnostic Program Version 3.2 Quit Install Test View Select F1=Help NIC Configuration EtherLink III NIC Configuration I/O Base Address 300h Interrupt Request Level Boot PROM Transceiver Type On-board TP (RJ-45) Network Driver Optimization Windows or OS/2 Client Maximum Modem Speed 9600 Baud Plug and Play Compatibility... -
Page 60: Changing Nic Configuration From Isa To Eisa
4: S HAPTER OFTWARE NSTALLATION AND ONFIGURATION NDER INDOWS The following procedures are general. If you require more detail, see the configuration documentation that accompanied your PC. Changing NIC Configuration from ISA to EISA Follow these steps to configure the 3C509B ISA NIC for an EISA PC: 1 Run the installation program as described in the previous section. -
Page 61: Changing Nic Configuration From Eisa To Isa
Reconfiguring the NIC If you are prompted for the wrong !TCM file: a Turn the power off and remove the NIC. b Clean the edge connectors on the NIC. c Reinsert the NIC in the slot. Make sure the NIC is fully seated in the slot. -
Page 62: Changing Configuration Settings
4: S HAPTER OFTWARE NSTALLATION AND ONFIGURATION NDER INDOWS Changing Configuration Settings Figure 4-2, the NIC Configuration screen, shows the current configuration settings for the installed NIC. You can change the default settings to: Disable Plug and Play Use a boot PROM Optimize driver performance for a specific operating system Optimize driver performance for operation on a server Change the type of network connector... - Page 63 Changing Configuration Settings Follow these steps to change the configuration settings: 1 Run the installation program described in “Configuring the NIC” earlier in this chapter. 2 From the main menu (see Figure 4-1), select Configuration and Diagnostic Program. 3 If multiple NICs are installed in the PC, use the arrow keys to select the NIC you want to configure.
-
Page 65: Windows 95 And Windows Nt Troubleshooting
INDOWS INDOWS ROUBLESHOOTING This chapter explains how to isolate and solve problems that may occur when you install the 3C509B NIC in a PC running Windows 95 or Windows NT. Checklist If you experience problems installing the NIC, first check these items: Check the NIC LED, as described in “Link LED”... -
Page 66: Changing The I/O Base Address Or The Interrupt Request Level
Control Panel icon, and then double-click the System icon. The System Properties window is displayed. 2 Select the Device Manager tab, double-click Network adapters, and then double-click 3Com EtherLink III ISA Adapter. 3 Select the Resources tab. 4 Depending on the type of conflict that you have, select either Input/Output Range or Interrupt Request. - Page 67 I/O base address in a Windows NT PC: 1 Double-click the 3Com icon in the taskbar tray. The General tab of the 3Com NIC Diagnostics program appears. 2 Select the Configuration tab. 3 Select the resource (I/O base address or interrupt request level) that you want to change in the Network Parameter column of the list box.
-
Page 68: Installing Multiple Nics In A Windows Nt Pc
Installing Multiple NICs in a Windows NT PC If you are installing multiple 3C509B NICs in a Windows NT 4.0 PC, you cannot use the 3Com Installation Wizard to install the NICs. Use the following procedure to ensure that the NICs maintain separate resource assignments and are installed free of conflicts. -
Page 69: Installing Subsequent Nics
Installing Multiple NICs in a Windows NT PC 11 Click Close. The Microsoft TCP/IP Properties screen appears. 12 From the Adapter box, select 3Com EtherLink III 3C509 ISA Adapter, select a method of assigning the TCP/IP address, and then click OK. -
Page 70: Windows 95 And Windows Nt Troubleshooting
A comprehensive section on troubleshooting tips and techniques is provided in the online Help. To access the online Help, double-click the 3Com icon in the taskbar tray, go to the Support tab of the 3Com NIC Diagnostics program, and click Release Notes. - Page 71 The Statistics tab provides network traffic information that is updated by the NIC driver several times a minute. Diagnostics The Diagnostics tab provides access to the 3Com NIC Diagnostics program that lets you test the 3C509B NIC or change configuration settings.
-
Page 72: Running Tests
To run the test continuously, select the Continuous check box. 3 Click Close. Uninstalling the NIC If you have problems installing NIC software, allow the 3Com Installation Wizard to finish. The installation cannot be canceled once it is started. CAUTION: Before attempting to reinstall 3Com NIC installation... -
Page 73: Reinstalling Nic Software
For Windows 95—On the Configuration tab, select the 3Com EtherLink III ISA NIC. For Windows NT—On the Configuration tab, select Network adapters, and then select the 3Com EtherLink III ISA NIC. 3 Click Remove. 4 Click OK. The System Settings Change screen appears, prompting you to restart your PC. -
Page 74: Performing Automated Installations
file that contains the saved configuration settings that you want to use to reinstall the NIC. 2 Click OK. The 3Com Installation Wizard starts and displays the first screen. 3 Click Install. 3Com Installation Wizard screens appear sequentially, displaying the settings saved in the original installation. -
Page 75: Windows 3. X Troubleshooting
INDOWS ROUBLESHOOTING This chapter explains how to isolate and solve problems that may occur when you install the 3C509B NIC in a PC running DOS, Windows 3.1, or Windows for Workgroups. Checklist If you experience problems installing the NIC, first check these items: Check the NIC LED, as described in “Link LED”... -
Page 76: Starting The Dos Configuration And Diagnostic Program
6: W HAPTER INDOWS ROUBLESHOOTING Diagnostic tests are divided into three groups: The Group 1 tests check the physical components, connectors, and circuitry on the NIC. The Group 2 Network Loopback Test (for the 3C509B-TPC and COMBO NICs only) checks to see if the NIC can transmit and receive data through the coaxial transceiver. -
Page 77: Running The Group 2 Test
If you do not have a loopback plug, you can order one from your authorized network supplier or you can make your own. You can purchase the terminators from your network supplier (3Com part number 3C535). To assemble the loopback plug, connect two 50-ohm network cable terminators to a T connector, as shown in Figure 6-1. -
Page 78: Starting The Group 2 Test
CAUTION: Do not use an active network to run the Group 3 test. To run the Group 3 test on the network, you need a second PC to serve as an echo server, and it must have a 3Com NIC installed. The echo server receives packets from and echoes packets back to the NIC being tested. -
Page 79: Starting The Group 3 Test
® 3C503.EXE EtherLink II or II TP, EtherLink II/16 or II/16 TP 3C505.EXE EtherLink Plus ® 3C507.EXE EtherLink 16 or EtherLink 16 TP 3C508CFG.EXE 3Com Red 3C5X9CFG.EXE EtherLink III family 3C523.EXE EtherLink/MC 3C523TP.EXE EtherLink/MC TP 3C527.EXE EtherLink/MC 32 3C59XCFG.EXE EtherLink III EISA/PCI bus master family (including Fast EtherLink NIC running at 10 Mbps) 3C90XCFG.EXE... -
Page 80: Getting Help If A Test Fails
6: W HAPTER INDOWS ROUBLESHOOTING Getting Help If a Test Fails If a diagnostic test fails, the NIC may not be defective. The problem may be incorrect configuration settings, settings that conflict with other NICs, or improper installation. For more information about a failed diagnostic test: Select the test that failed in the Run Tests dialog box and press Enter. -
Page 81: Specifications
PECIFICATIONS This appendix lists specifications, pin assignments, and cable requirements for the 3C509B NIC. NIC Specifications Network Interface 3C509B-TP Ethernet IEEE 802.3i 10BASE-T 3C509B-TPO industry standard for a 10 Mbps baseband CSMA/CD local area network 3C509B-COMBO IEEE 802.3i 10BASE-T and 3C509B-TPC Ethernet IEEE 802.3 industry standard for a 10 Mbps CSMA/CD... -
Page 82: Rj-45 Connector Pin Assignments
A: S PPENDIX PECIFICATIONS RJ-45 Connector Pin Assignments Figure A-1 shows the RJ-45 connector pin assignments. RD- 6 RD+ 3 TD- 2 TD+ 1 Figure A-1 RJ-45 Connector Pin Assignments AUI Connector Pin Assignments Table A-1 lists the pin assignments for the AUI (attachment unit interface) connector. -
Page 83: Cable Specifications
3Com requires that you use quality interface cables when connecting to this device. Changes or modifications not expressly approved by 3Com could void the user’s authority to operate this equipment. Examples of supported cable types are shown in Table A-2. - Page 85 This appendix describes PACE advanced features and how to use them. Additional Ranges Tab The Additional Ranges tab of the 3Com PACE Support Setup screen allows you to add information for PACE-supported applications that are not listed in the list box on the Supported Applications tab.
-
Page 86: Advanced Pace Features
Do one of the following: To change advanced values, click Advanced Options to display the Advanced Options tab on the 3Com PACE Support Setup screen shown in Figure B-2. If you do not want to change advanced values, click OK to return to the 3Com PACE Support Setup screen. -
Page 87: Fifo Packet Threshold
Advanced Options Tab The following advanced values can be modified to regulate PACE traffic on the network. FIFO Packet Threshold Controls the number of non-PACE packets that the network driver allows in the FIFO ahead of PACE packets. A smaller number decreases the time between PACE packets, but it can also decrease performance. -
Page 88: Disable Switch Packet Prioritization
EATURES Disable Switch Packet Prioritization This option disables modification of Ethernet packets used for prioritization of multimedia traffic within 3Com switch products. For example, disabling switch packet prioritization can sometimes alleviate the failure to make a multimedia connection between a PACE-enabled workstation and a non-PACE workstation. -
Page 89: Troubleshooting Hubs With Crossover Cable
ROSSOVER ABLE ROUBLESHOOTING When you work with 10BASE-T cabling, concentrators, and NICs from different vendors, it is possible to connect everything but still have no communication between file servers and workstations. When there are several unknown variables, it is difficult to determine which component is failing. - Page 90 C: C PPENDIX ROSSOVER ABLE ROUBLESHOOTING To make a crossover cable, connect TD+ to RD+ and TD– to RD–. The cable performs the crossover that is usually performed by the hub. Figure C-1 shows the pinouts for the crossover cable: 1 2 3 4 5 6 7 8 Straight-through Crossover...
-
Page 91: Technical Support
For the very latest, we recommend that you access 3Com Corporation’s World Wide Web site as described below. Online Technical Services 3Com offers worldwide product support 24 hours a day, 7 days a week, through the following online systems: World Wide Web site... -
Page 92: World Wide Web Site
Access the latest networking information on 3Com Corporation’s World Wide Web site by entering our URL into your Internet browser: http://www.3com.com/ This service features the latest information about 3Com solutions and technologies, customer service and support, news about the ® company, NetAge Magazine, and more. -
Page 93: 3Comfacts Automated Fax Service
3ComFacts Automated Fax Service 3Com Corporation’s interactive fax service, 3ComFacts, provides data sheets, technical articles, diagrams, and troubleshooting instructions on 3Com products 24 hours a day, 7 days a week. Call 3ComFacts using your Touch-Tone telephone using one of these international access numbers:... - Page 95 NDEX Windows 3.x 4-1 Numbers Windows 95 2-5 3C509B NIC specifications 1-2 Windows for Workgroups 4-1, 4-4 3Com Bulletin Board Service saving settings 3-15 (3ComBBS) D-2 TCP/IP 3-6, 3-17 3Com Installation Wizard 3-1 connectors 1-2 Custom installation 2-1 conventions Express installation 2-1...
- Page 96 NDEX EISA, reconfiguring to ISA 4-7 NetWare 4-1 Express installation 2-1 NLM files 4-3 network drivers 4-3 identifying PC on 3-10 interface A-1 fax service. See 3ComFacts testing the connection 3-4 network supplier support D-1 network test 5-8 gateway server 3-7 configuration, changing 4-8 entering the address 3-7 disabling Plug and Play 2-7...
- Page 97 NIC software 5-9 network 3-3, 5-8 World Wide Web (WWW) D-2 network connection 3-4 NIC 3-3, 5-8 troubleshooting 3Com NIC Diagnostics 5-6 crossover cable C-1 DOS diagnostics 6-2 hubs with crossover cable C-1 initial 5-1, 6-1 resource conflicts 5-1 Windows 3.x 6-1...
- Page 99 ARDWARE 3Com warrants its hardware products to be free from defects in workmanship and materials, under normal use and service, for the following lengths of time from the date of purchase from 3Com or its Authorized Reseller: Network interface cards...
- Page 100 This booklet is available from the U.S. Government Printing Office, Washington, D.C. 20402. Stock No. 004-000-00345-4. NOTE: In order to maintain compliance with the limits of a Class B digital device, 3Com requires that you use quality interface cables when connecting to this device. Changes or modifications not expressly approved by 3Com could void the user’s authority to operate this equipment.
- Page 101 The Software is licensed to be used on any workstation or any network server owned by or leased to you, provided that the Software is used only in connection with a 3Com adapter. You may reproduce and provide one (1) copy of the Software and supporting documentation for each such workstation or network server on which the Software is used as permitted hereunder.
- Page 102 TRADE SECRETS; TITLE: You acknowledge and agree that the structure, sequence and organization of the Software are the valuable trade secrets of 3Com and its suppliers. You agree to hold such trade secrets in confidence. You further acknowledge and agree that ownership of, and title to, the Software and all subsequent copies thereof regardless of the form or media are held by 3Com and its suppliers.