Table of Contents
Advertisement
Quick Links
®
http://www.3com.com/
http://www.3com.com/productreg
Part No. 09-1742-000
Published August 1999
EtherLink
Network Interface Card
with 3XP processor
User Guide
3CR990 Family of EtherLink NICs
You can print this user guide using Adobe Acrobat Reader, which is provided on
the EtherCD that shipped with this product. Acrobat Reader is located in the
language subdirectory.
®
10/100 PCI
Advertisement
Table of Contents
Troubleshooting

Related Manuals for 3Com EtherLink 10


Summary of Contents for 3Com EtherLink 10
-
Page 1: User Guide
3CR990 Family of EtherLink NICs You can print this user guide using Adobe Acrobat Reader, which is provided on the EtherCD that shipped with this product. Acrobat Reader is located in the language subdirectory. http://www.3com.com/ http://www.3com.com/productreg Part No. 09-1742-000 Published August 1999... - Page 2 3Com Corporation. 3Com Corporation reserves the right to revise this documentation and to make changes in content from time to time without obligation on the part of 3Com Corporation to provide notification of such revision or change.
-
Page 3: Table Of Contents
ONTENTS EFORE EGIN Product Registration EtherCD Navigation Root Subdirectories Auto Insert Text Files Installation Overview Check List Windows 2000 Windows 98/95 Windows NT 4.0 Windows NT 3.51 Netware Server Minimum System Requirements Making a DOS-Bootable Diskette Diskette Installation Making NIC Installation Diskettes Installing from Diskettes 3CR990 NIC NIC Overview... - Page 4 INDOWS RIVERS Windows 2000 Windows 98 Windows 95 New Hardware Found Update Device Driver Wizard Windows NT 4.0 Windows NT 3.51 Verifying Successful Installation Windows 2000 Windows 98 and Windows 95 Windows NT 4.0 Windows NT 3.51 Multiple NICs Windows 2000 Windows 95 and Windows 98 Windows NT 4.0 RIVERS...
- Page 5 Windows NT 4.0 Windows NT 3.51 ONFIGURATION Configuration Options Definitions 3Com DOS Configuration Program 3Com NIC Diagnostics Program Starting the 3Com NIC Diagnostics Program Displaying Settings Changing Settings ROUBLESHOOTING Accessing the 3Com KnowledgeBase Troubleshooting the Installation Interpreting the LEDs Running Diagnostics Programs...
- Page 6 ECHNICAL UPPORT Register this Product Online Technical Services World Wide Web Site 3Com FTP Site 3Com Bulletin Board Service Access by Analog Modem Access by Digital Modem 3ComFacts Automated Fax Service Support from Your Network Supplier Support from 3Com Returning Products for Repair...
- Page 7 ECHNOLOGY DynamicAccess Features Client PC Requirements Installing DynamicAccess Technology Verifying Successful Installation Configuring DynamicAccess Technology Removing DynamicAccess Technology Windows 95/98 Windows NT 4.0 and Windows NT 3.51 NDEX ARRANTY AND EGULATORY OMPLIANCE NFORMATION 3Com Corporation Limited Warranty Regulatory Compliance Information...
-
Page 9: Before You Begin
3 Follow the prompts as they appear. To register by U.S. mail: 1 Find and remove the registration card included in the EtherLink 10/100 PCI Network Interface Card Quick Guide that shipped with this product. 2 Fill out the registration card and drop it in the mail. (No postage is required.) -
Page 10: Ethercd Navigation
EtherCD Navigation This section provides information about EtherCD content and navigation. If auto insert is enabled for your CD-ROM drive, the 3Com Welcome screen is displayed when you insert the EtherCD in your CD-ROM drive. If the Welcome screen is not displayed when you insert the EtherCD in your CD-ROM drive, you can either enable the auto insert feature for your CD-ROM drive or navigate to the root subdirectories. -
Page 11: Auto Insert
Explains how to install the driver for a 16-bit NetWare client running DOS. support.txt Contains information about technical assistance services available from 3Com. trouble.txt Contains troubleshooting tips. wakefaq.txt Contains common questions and answers about Remote Wake-Up. license.txt Includes the wording from the 3CR990 NIC software license agreement. -
Page 12: Installation Overview
1: B HAPTER EFORE EGIN Installation Overview This section provides basic information that you need before you start the installation. heck List Before you start the installation, verify that you have all of the components that shipped with this product. If any of these items are damaged or missing, contact your shipper or network supplier. -
Page 13: Making A Dos-Bootable Diskette
Making NIC Installation Diskettes. If you have Internet access, you can also download installation disk images from the 3Com World Wide Web site. Go to: http://support.3com.com/software. Making NIC You will need three blank, formatted diskettes with labels for this operation. Label Installation Diskettes the diskettes 1, 2, and 3. -
Page 14: Installing From Diskettes
1: B HAPTER EFORE EGIN Installing from Diskettes To install NIC software, you will need the NIC, your Windows operating system source diskettes, and the NIC installation diskettes. To install NIC software using installation diskettes, see the file DISKETTE.PDF on the EtherCD. The path for this file is: Installations \ Diskette.pdf To make installation diskettes Go to:... -
Page 15: 3Cr990 Nics
3CR990 NIC NIC Overview The 3CR990 network interface cards (NICs) represent a new generation of secure, intelligent client NICs with an on-board RISC processor (3XP processor). The RISC processor is designed to optimize system and network performance. Optimization occurs by offloading key networking and security tasks even when running bandwidth-intensive applications such as voice, video, imaging, and Internet and intranet applications. -
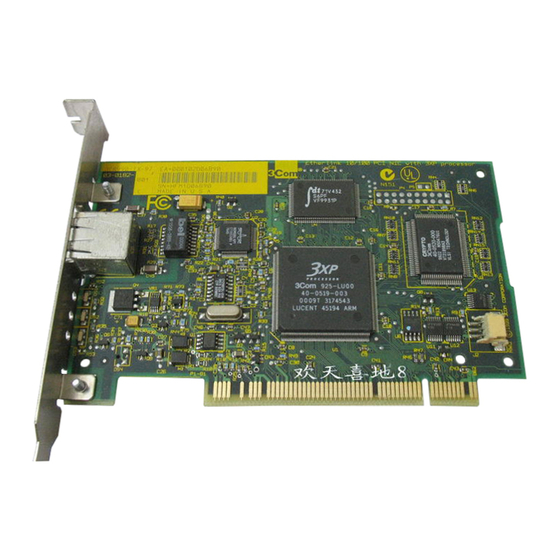
Page 16: Nic Features
2: 3CR990 NIC HAPTER The following figure shows the 3CR990 NIC and the location of its major components. Encryption chip Remote Wake-Up (RWU) connector T X D A T A A C T 3XP processor 1 0 0 3CR990 NICs support up to 168-bit (3DES) encryption NIC Features The 3CR990 NICs provide these features for supported IP and IPX environments:... -
Page 17: Remote Wake-Up
Reconfiguring multiple systems at once. Backing up hard drives automatically. For more information on the management features supported by 3C990 NICs, access the 3Com World Wide Web site Go to: http://www.3com.com/managedpc. Remote Wake-Up Remote Wake-Up provides the ability to remotely power-up a network PC. -
Page 18: Desktop Management Interface
DMI management application to access information such as the NIC driver location, version, and size; packets sent statistics; crc receive errors; and much more. The 3Com DMI Agent consists of a DMI browser with the following components: DMI service layer DMI agent... -
Page 19: Enabling Offloads
2 Click the Local Area Connection icon. The Local Area Connection Properties screen appears. 3 Click Configure. The 3Com EtherLink 10/100 NIC with 3XP processor (3CR990-TX-9x) screen appears. 4 Click the Advanced tab. 5 Select Enable Offloads in the Property list box. - Page 20 2: 3CR990 NIC HAPTER Hex Value Offload Function Enabled Hex Value Offload Function Enabled IP and TCP Checksum 802.1P Packet Priority TCP Segmentation IP and TCP Checksum IPSec TCP Segmentation IPSec...
-
Page 21: Nic Installation
NIC I NSTALLATION Installing the NIC This procedure graphically illustrates how to install the 3CR990 NIC in your PC or server. CAUTION: Windows 2000 users: If you are running Windows 2000 on your PC or server, you must run the Preinstallation program before you install the NIC in your system. - Page 22 3: NIC I HAPTER NSTALLATION...
- Page 23 Installing the NIC Remote Wake-Up Cable 2.1 PCI specifications–compliant...
- Page 24 3: NIC I HAPTER NSTALLATION...
- Page 25 Installing the NIC The next step is to install the software. What do you want to do? Go to: Windows 2000. Go to: Windows Go to: Windows NT 4.0. Go to: Windows NT 3.51. Go to: NetWare Drivers. If you are installing multiple NICs in: Windows 2000, Windows 9x, or Windows NT Go to: Multiple...
-
Page 27: Windows Drivers
Windows 2000 and installed the NIC, go to step 7 in this procedure. To install the software: 1 Turn the PC power on and insert the EtherCD in the CD-ROM drive. The 3Com EtherCD Welcome screen appears. If the EtherCD Welcome screen does not appear Go to: EtherCD Navigation. -
Page 28: Windows 98
Go to: Verifying Successful Installation. To change configuration settings Go to: 3Com DOS Configuration Program. Windows 98 This section describes how to install the network driver and NIC software in a PC or server running Windows 98. Before installing the NIC software: Make sure that the NIC is installed in the PC and connected to the network. -
Page 29: Windows 95
Windows 95 7 Click OK. The Copying Files dialog box appears. 8 Remove the EtherCD from the CD-ROM drive, insert the Windows 98 CD, enter the path to the CD-ROM drive, and click OK. The Add New Hardware Wizard displays a message informing you that Windows has finished installing the software. -
Page 30: New Hardware Found
4: W HAPTER INDOWS RIVERS New Hardware Found If the New Hardware Found screen appears, follow this procedure to install the NIC driver: 1 Select the Driver from disk provided by hardware manufacturer option, and then click OK. The Install From Disk screen appears. 2 Insert the EtherCD in the CD-ROM drive, enter the path to the CD-ROM drive, and click OK. -
Page 31: Update Device Driver Wizard
Windows 95 Update Device If the Update Device Driver Wizard starts, follow this procedure to install the Driver Wizard NIC driver: 1 Insert the EtherCD in the CD-ROM drive, and then click Next. Windows finds the driver. 2 Click Finish. If networking has already been installed on your PC, go to step 4. -
Page 32: Windows Nt 4.0
OK. The Select OEM Option screen appears. 7 Make sure that the correct 3Com NIC name is selected, and then click OK. Files are copied. The Network screen appears with the 3Com NIC name listed in the Network Adapters list box. - Page 33 CD-ROM drive appears in the entry box, and then click OK. The Select OEM Option screen appears. 8 Make sure that the 3Com NIC is selected, and then click OK. Files are copied. The Network Settings screen appears. Make sure that the name of the installed NIC appears in the list of installed adapter cards and that it is selected.
-
Page 34: Verifying Successful Installation
4: W HAPTER INDOWS RIVERS To change configuration settings Go to: 3Com DOS Configuration Program. Verifying Successful This section describes how to verify that a NIC installation under Windows 2000, Installation Windows 98, Windows 95, or Windows NT is successful. -
Page 35: Windows Nt 3.51
Follow the procedure that is appropriate for your operating system. Windows 2000 To install multiple NICs: 1 Turn the PC power on and insert the EtherCD in the CD-ROM drive. The 3Com EtherCD Welcome screen appears. If the EtherCD Welcome screen does not appear Go to: EtherCD Navigation. -
Page 36: Windows 95 And Windows 98
4: W HAPTER INDOWS RIVERS 8 Click Next. The Install Hardware Device Drivers screen appears. 9 Select Search for a suitable driver for my device (recommended), and then click Next. The Locate Driver Files screen appears. 10 Select the CD-ROM drives option, clear any other checked options, and click Next. -
Page 37: Windows Nt 4.0
Multiple NICs Windows NT 4.0 To install multiple NICs: 1 Physically install all of the NICs in your PC and connect each NIC to the network. 2 Turn the PC power on and start Windows NT. 3 Double-click the My Computer icon, then the Control Panel icon, and then the Network icon. -
Page 39: Net Ware Drivers
RIVERS Obtaining NetWare Although NetWare Loadable Modules (NLMs) are provided on the EtherCD, you Loadable Modules can always obtain the most current NLMs from the Novell Web site. Go to: http://www.support.novell.com. NetWare Server NLM Name NetWare 3.12 ETHERTSM.NLM NBI31X.NLM MSM31X.NLM NetWare 4.10, 4.11, and 5.0 ETHERTSM.NLM NBI.NLM... -
Page 40: Netware 4.10, 4.11, And
5: N HAPTER RIVERS 3 Add the following two lines to the AUTOEXEC.NCF file: load 3c99x.lan slot=<slot> NAME=<name> FRAME=<frametype> bind ipx to <name> net=<number> NOTE: If you copy the NLM files to a different directory, you must specify the path in the preceding load statement. -
Page 41: Multiple Nics
These sections provide procedures for upgrading drivers for multiple installed NICs and installing multiple NICs (new installation) in a NetWare server. Upgrading Drivers To upgrade drivers for installed 3Com NICs: 1 Uninstall the NIC software for all NICs. For more information Go to: Uninstalling NIC Software. -
Page 42: Verifying The Pci Slot Number
5: N HAPTER RIVERS Verifying the To verify the PCI slot number that the NIC is installed in: PCI Slot Number 1 Boot the NetWare server with the -na option. (This prevents the AUTOEXEC.NCF from loading.) Example: server -na 2 Issue the load command for the NIC LAN driver without a slot parameter. Example: load c:\nwserver\3c99x.lan 3 NetWare will list the valid slot number(s) for the NIC, depending on how many... -
Page 43: Ip Security
IP S ECURITY Overview The 3CR990 NICs accelerate IP security (IPSec) data encryption from supported operating systems that provide this offload capability. This feature is currently available in the Microsoft Windows 2000 operating system. IPSec consists of two parts: encryption/decryption and authentication. To send or receive encrypted data in a PC running Windows 2000 with a 3CR990 NIC installed, you must first create a security policy, and then enable encryption on the NIC. -
Page 44: Defining The Console
6: IP S HAPTER ECURITY Defining the Console This sequence establishes the Console and defines its parameters. To define the Console: 1 In the Windows taskbar, click Start, Programs, Accessories, and then Command Prompt. 2 At the DOS prompt, type MMC and press Enter. The Console1 screen appears. -
Page 45: Creating A Filter
Creating a Security Policy 12 Enable the default option All network connections, and then click Next. The Authentication Methods screen appears. 13 Enable the Use this string to protect the key exchange (preshared key): option, type the appropriate string text in the entry field, and then click Next. Creating a Filter This sequence creates a filter for the policy. -
Page 46: Binding The Filter Action
6: IP S HAPTER ECURITY 5 Accept the default value, and then click Next. The IP Traffic Security screen appears. 6 Select Custom and then click Settings. The Custom Security Method Settings screen appears. 7 Enable the Data integrity and encryption (ESP): check box, and then make the appropriate selections in the Integrity and algorithms list boxes. -
Page 47: Upgrading Drivers
9 Make sure that the correct path to the CD-ROM drive appears in the entry box, and then click OK. The Select Device screen reappears. 10 Click OK. After files are copied and updated, the 3Com EtherLink screen Driver tab reappears. The Insert Disk screen appears prompting for the EtherCD. -
Page 48: Windows 95
7: U HAPTER PGRADING RIVERS 11 Click OK. 12 Make sure that the correct path to the CD-ROM drive appears in the entry box, and then click OK. The Update Device Driver Wizard screen appears. 13 Click Next. The Insert Disk dialog box appears prompting for the EtherCD. 14 Click OK. -
Page 49: Windows 95 Osr2
8 Make sure the path to the CD-ROM drive appears in the entry box, and then click OK. The Select Device screen reappears. 9 Click OK. After files are copied and updated, the 3Com EtherLink screen Driver tab reappears. 10 Click Close. The NIC driver is installed. Windows NT 4.0 To upgrade to the current NIC driver: 1 Make sure that the EtherCD is in the CD-ROM drive. -
Page 50: Windows Nt 3.51
7: U HAPTER PGRADING RIVERS Windows NT 3.51 To upgrade to the current NIC driver: 1 Make sure that the EtherCD is in the CD-ROM drive. 2 Double-click the Control Panel icon, and then the Network icon. The Network Settings screen appears. 3 Click Update. -
Page 51: Configuration Options
ONFIGURATION Configuration Options Changing configuration settings can have a substantial effect on your network and your PC. Before you change these settings, contact your system administrator. The following table shows configurable options, descriptions, default values, and available settings. Factory Network Default Parameter Description... -
Page 52: 3Com Dos Configuration Program
3CR990 NICs support full-duplex. These NICs automatically run in full-duplex mode if the switch that you are connected to supports auto negotiation and full-duplex. 3Com DOS The configuration program within the DOS diagnostics program is used to Configuration configure a NIC installed in a PC running Windows 2000, Windows NT 3.51, Program or DOS. -
Page 53: 3Com Nic Diagnostics Program
3Com NIC Diagnostics Program 3Com NIC The 3Com NIC diagnostics program (3Com NIC Doctor) is a Windows-based Diagnostics Program program used to troubleshoot and configure NICs installed in PCs running Windows 98, Windows 95, or Windows NT 4.0. When the Network Connectivity test evaluates the network connection, it is possible to receive the message, “No packets were received.”... - Page 54 8: C HAPTER ONFIGURATION 4 Select a new value from the list of available options in the Set Value list box. 5 Repeat the process for each setting that you want to change. Before clicking OK, you can undo any unsaved configuration changes that you make.
-
Page 55: Troubleshooting
To access a database of technical information that can help you diagnose and 3Com KnowledgeBase solve 3CR990 NIC installation, configuration, and upgrade problems Go to: http://www.knowledgebase.3com.com. Troubleshooting Follow these troubleshooting tips if you have trouble installing or configuring your the Installation NIC, or if the NIC installation fails. -
Page 56: Interpreting The Leds
The 3CR990 NICs use two types of NIC diagnostics programs: a DOS-based Programs diagnostics program and a Windows-based diagnostics program. NOTE: Before starting any diagnostics program, close all running applications. Use the 3Com DOS diagnostics program if you are running any of the following operating systems: Windows 2000 Windows NT 3.51... -
Page 57: 3Com Dos Diagnostics Program
Select the General tab to display the node address, I/O address, and device ID for the installed NIC. This screen also allows you to show or not show the 3Com icon in the Windows system tray and enable Auto Echo, which sets the PC to respond automatically to requests from other PCs that run the Remote Wake-Up test. -
Page 58: Statistics Tab
Flash Update Tab Select the Flash Update tab to update firmware for the installed NIC. Accessing the 3Com The 3Com NIC Help system is a Windows Help application that includes numerous NIC Help System Help topics about 3CR990 NICs. NOTE: To access the Help system from within the 3Com NIC diagnostics program, click the Help button on any screen. -
Page 59: To Run The Network Test
Running NIC Diagnostics Tests To run the NIC test, Network test, or Remote Wake-Up test: 1 Start the 3Com NIC diagnostics program. Go to: 3Com NIC Diagnostics Program. 2 Select the Diagnostics tab. The Diagnostics screen appears. To Run the Network Test Run the Network test to check the NIC’s connectivity to the network. -
Page 60: To Run The Nic Test
If the test passes, the NIC is functioning correctly. 3 Click Close. To Run the Remote You need at least two PCs on your network that contain a 3Com NIC with Wake-Up Test EtherDisk 4.0 (or later) or EtherCD Version 1.0 for the 3CR990 Family software to run the Remote Wake-Up test. -
Page 61: Viewing Network Statistics
Accessing 3Com The 3Com NIC diagnostics program provides access to several support services Support Services such as the 3Com World Wide Web site, BBS information, and customer support information databases. To access 3Com support services: 1 Start the 3Com NIC diagnostics program. -
Page 62: 3Com Tray Icon
If the 3Com icon is visible in the Windows system tray, double-click the icon to start the 3Com NIC diagnostics program. NOTE: If a red circle with a line through it appears over the 3Com icon, there is no connection between the NIC and the network. -
Page 63: Remote Wake-Up Cable
PC or contact your PC vendor. b Locate the Wake-Up on LAN setting and verify that it is enabled. For more troubleshooting tips Go to: http://www.knowledgebase.3com.com. NOTE: For more information on PCI specifications and Remote Wake-Up Go to: Remote Wake-Up. -
Page 64: Troubleshooting Hubs
9: T HAPTER ROUBLESHOOTING 2 Connect a straight-through cable from the PC to the hub. The hub performs an internal crossover so that the signal can go from TD+ to RD+ and TD– to RD–. When you look at an RJ-45 connector from the front (that is, the opposite side from where the wires enter the connector), pin 1 is identified on the right side when the metal contacts are facing up. -
Page 65: Specifications
PECIFICATIONS NIC Specifications The following table provides environmental, interface, and standards information for the EtherLink 10/100 PCI network interface cards with 3XP processor (3CR990 family). Hardware Memory 128 K external RAM Bus interface PCI Local Bus Specification, Revision 2.2 32-bit bus PCI master Supports bus master scatter-gather DMAs. -
Page 66: Network Connection Criteria
100BASE-TX Network Cable This section provides information about various network cable standards and descriptions of those standards for EtherLink 10/100 PCI NICs. Cabling Requirements The cable type, quality, distance, and connectors must comply with the Electronic Industries Association/Telecommunications Industries Association (EIA/TIA) 568 Commercial Building Wiring Standard and the Technical Services Bulletin TSB38 standards. -
Page 67: 100Base-Tx Description
Network Cable The 10BASE-T name indicates a signaling speed of 10 Mbps and twisted-pair wiring. Base stands for baseband, which denotes a technique for transmitting signals as direct-current pulses rather than modulating them onto separate carrier frequencies. A wiring topology using 10BASE-T specifies a wiring hub, cable arranged in a star configuration, and unshielded twisted-pair cable. -
Page 68: Flow Control
A: S PPENDIX PECIFICATIONS Flow Control The 3CR990 NICs utilize flow control technology to throttle the incoming data packet stream and prevent the loss of packets. IEEE 803.2x flow control prevents the input buffers of a device from overflowing. By using pause frames to communicate buffer status between linked transmitting and receiving devices (transmitters and receivers). -
Page 69: Technical Support
Download drivers, patches, software, and MIBs across the Internet from the 3Com public FTP site. This service is available 24 hours a day, 7 days a week. To connect to the 3Com FTP site, enter the following information into your... -
Page 70: 3Com Bulletin Board Service
Up to 53,333 bps 1 847 262 6000 Access by ISDN users can dial in to the 3Com BBS using a digital modem for fast access up to Digital Modem 64 Kbps. To access the 3Com BBS using ISDN, use the following number:... -
Page 71: Support From 3Com
Support from 3Com Support from 3Com If you are unable to obtain assistance from the 3Com online technical resources or from your network supplier, please call the 3Com technical telephone support phone number at the location nearest you. When you contact 3Com for assistance, have the following information ready:... -
Page 72: Returning Products For Repair
MERICA (1 800 638 3266) Returning Products Before you send a product directly to 3Com for repair, you must first obtain a for Repair Return Materials Authorization (RMA) number. Products sent to 3Com without RMA numbers will be returned to the sender unopened, at the sender’s expense. -
Page 73: Supported Drivers
WINNT.TXT EL99XND4.SYS Windows NT 3.51 WINNT.TXT EL99XND3.SYS NetWare 3.12, 4.1x, and 5.0 Servers NETWARE.TXT 3C99X.LAN For a list of additional supported network drivers and instructions on how to install them, access the 3Com World Wide Web site. Go to: http://www.support.3com.com/software. -
Page 75: Uninstalling Nic Software
4 Click Device Manager in the middle panel. The Device Manager screen appears. 5 Click the + symbol next to Network adapters. 6 Double-click 3Com EtherLink 10/100 PCI NIC with 3XP Processor (3CR990-TX-9X). A screen with the name of the NIC in the title bar appears. -
Page 76: Windows Nt 4.0
D: U NIC S PPENDIX NINSTALLING OFTWARE Windows NT 4.0 Follow this procedure to uninstall the NIC software in a PC running Windows NT 4.0: 1 Double-click the My Computer icon, the Control Panel icon, and then the Network icon. The Network screen appears. -
Page 77: Mba Boot Rom
NOTE: For detailed information on using, configuring, and troubleshooting the MBA boot ROM, see the documentation for MBA on the EtherCD that shipped with this product. To enable or disable the NIC boot ROM setting using the 3Com NIC diagnostics program: 1 Start the 3Com NIC diagnostics program. -
Page 78: Non-Bbs Bios-Compatible Pcs
E: MBA B PPENDIX 3 Reboot the PC. The MBA attempts to boot from the network using the default protocol TCP/IP DHCP. To change the default protocol or any other MBA configurations, press Ctrl+Alt+B when the following message appears: Initializing MBA. Press Ctrl+Alt+B to configure... If the network boot fails, the following message appears: Network boot aborted, press any key to continue The BIOS continues to the next device in the boot order (for example, the local... -
Page 79: F Dynamic Access Technology
Efficient multicast control—prevents flooding of switched networks by multicast applications such as video training, stock quotes, or online news For detailed information about DynamicAccess technology, access the 3Com World Wide Web site. Go to: http://www.3com.com/dynamicaccess. Client PC DynamicAccess technology can only be installed on a PC running Windows 2000, Requirements Windows 95, Windows 98, Windows NT 4.0, or Windows NT 3.51. -
Page 80: Installing Dynamicaccess Technology
Service Pack 4, download and install the appropriate Microsoft patch before beginning the installation. Failure to install the patch will result in system failure. To download this patch. To download this patch Go to: http://www.3com.com/dynamicaccess/hotfixes. 2 Start Windows. 3 Insert the EtherCD in the CD-ROM drive. -
Page 81: Verifying Successful Installation
All protocols are re-bound to the virtual NIC. The bindings to the physical NIC are still intact. A 3Com DynamicAccess technology entry appears as a protocol. A 3Com DynamicAccess technology icon in installed in the Windows Control Panel. Configuring Contact your system administrator before using DynamicAccess technology DynamicAccess at your site. -
Page 82: Removing Dynamicaccess Technology
NOTE: Contact your system administrator before you remove DynamicAccess technology from your PC. Windows 95/98 If the 3Com DynamicAccess Control Panel Administration utility is set to Read Only, you cannot remove the DynamicAccess technology. You must change the access to Read/Write and then remove DynamicAccess technology. -
Page 83: Windows Nt 4.0 And Windows Nt
Removing DynamicAccess Technology Windows NT 4.0 and Follow this procedure to remove DynamicAccess technology from a PC running Windows NT 3.51 Windows NT 4.0 or Windows NT 3.51: 1 Double-click the Network icon in the Control Panel. 2 Select the DAPassThru Driver Transport protocol. Windows NT 4.0—this protocol is located on the Protocols tab. -
Page 85: Index
100 LNK LED 56 changing settings 52 3C990cfg.exe 52 check list 12 configuration program 52 3Com bulletin board service (3Com diskettes, making 13 diagnostic program 57 BBS) 70 troubleshooting 55 DOS configuration program, changing 3Com NIC diagnostic program 53... - Page 86 NDEX NetWare Loadable Modules Windows 95 (NLMs) 39 Build 950 30 server driver 39 determining version 48 security policy, creating 43 server installation overview 12 server driver, NetWare 39 installation overview 12 server, installing multiple NICs 41 installing driver 29 slot number 41 verifying slot number 42 installing multiple NICs 36...
-
Page 87: Warranty And Regulatory Compliance Information
If it appears that any product that is stated to meet this standard does not perform properly with regard to such date data on and after January 1, 2000, and Customer notifies 3Com before the later of April 1, 2000, or ninety (90) days after... -
Page 88: Regulatory Compliance Information
Tested to comply with the FCC Standards for home and office use. NOTE: In order to maintain compliance with the limits of a Class B digital device, 3Com requires that you use quality interface cables when connecting to this device. Changes or modifications not expressly approved by 3Com could void the user’s authority to operate this equipment. - Page 89 The Software is licensed to be used on any workstation or any network server owned by or leased to you provided that the Software is used only in connection with a 3Com adapter. You may reproduce and provide one (1) copy of the Software and supporting documentation for each such workstation or network server on which the Software is used as permitted hereunder.
- Page 90 ENTIRE AGREEMENT: This License Agreement sets forth the entire understanding and agreement between you and 3Com, supersedes all prior agreements, whether written or oral, with respect to the Software, and may be amended only in a writing signed by both parties.