Table of Contents
Advertisement
Available languages
Available languages
Quick Links
Advertisement
Table of Contents

Related Manuals for Bushnell BackTrack D-TOUR 360310BG


Summary of Contents for Bushnell BackTrack D-TOUR 360310BG
- Page 2 TABLE OF CONTENTS PAGE # ENGLISH 3-13 FrANçAIS 14-24 ESPAñOL 25-35 DEuTSCH 36-46 ITALIANO 47-57...
-
Page 3: Front View
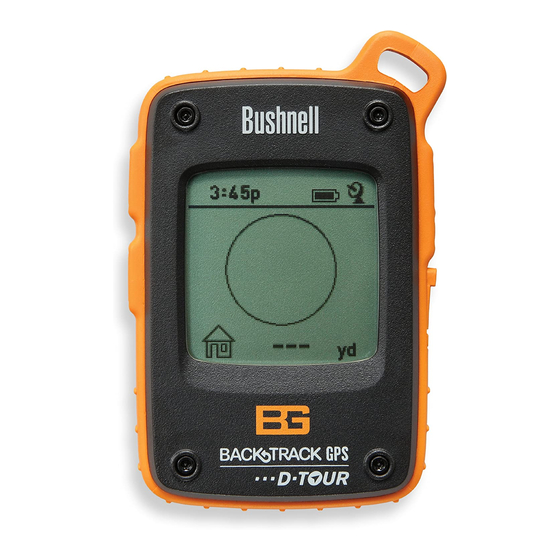
Control & Display Guide FRONT VIEW 1. POWER Button 2. MARK Button 3. TRIP Button 4. SETUP Button 5. USB Port 6. Location Icon (1 of 5) 7. Local Time 8. Direction to Location 9. Distance to Location 10. Battery Level Indicator 11. -
Page 4: Basic Setup
BASIC SETUP • Unlock/open battery cover and insert 3 AAA batteries* (Fig 1, pg 3). Record the serial # inside-you’ll need it later to register your D-Tour online. Close the cover. • Go outdoors. HOLD POWER (1) (keep the button pressed) until the display comes on. - Page 5 When you reach the location, the “Mark” icon will flash in the center of the display. • You can use the five icons (and up to 5 numbers) to mark five different locations of any kind (your car, tent, scenic area, etc.). Be sure you select a different icon or # to store each new location.
-
Page 6: Compass Calibration
“Figure 8” pattern a few times to re-calibrate the compass (Fig. 9). A compass calibration video is available at: http://www. bushnell.com/products/gps/instruction-videos/. Fig. 10 • For best results, we recommend holding the D-Tour in a horizontal position (not tilted) during use (Fig. -
Page 7: Viewing Trip Data
VIEWING TRIP DATA After recording at least one trip, connecting the D-Tour to your computer will enable you to see the path you took on any of 4 types of map, view a trip data graph, and share your trip via email or social media. To get the software: •... - Page 8 Fig. 19 Fig. 18...
- Page 9 Note: if you get a Windows “AutoPlay” popup when you connect your D-Tour, click “Open Folder to View Files”, then double click a .btk (trip data) file). On Mac®, double click the “D-Tour” icon in your Applications folder to launch the application.
- Page 10 USING THE D-TOUR APP-Additional Features (Fig. 20) • Clicking on the “handle” (g) at the bottom center of the map screen will open a popup graph displaying the altitude, temperature and speed data from the trip. You can use the pull-downs (h) to change how the data is displayed. This feature is ideal for runners and bikers that want to track their performance on an exercise course over time.
- Page 11 Fig. 20 Fig. 22 Fig. 21...
-
Page 12: One-Year Limited Warranty
ONE YEAR LIMITED WARRANTY Your Bushnell® product is warranted to be free of defects in materials and workmanship for one year after the date of purchase. In the event of a defect under this warranty, we will, at our option, repair or replace the product, provided that you return the product postage prepaid. - Page 13 GPS reception inside a car. Liability Notice: In no event shall Bushnell be liable for any incidental, special, indirect or consequential damages, whether resulting from the use, misuse, or inability to use this product or from defects in the product.
- Page 14 Guide d’affichage et de contrôle 1. Touche Marche/Arrêt 2. Touche REPÈRE 3. Bouton ITINÉRAIRE/ DONNÉES 4. Touche RÉGLAGE 5. Port USB 6. Icône d’emplacement (1 sur 5) 7. Heure locale 8. Direction vers le lieu 9. Distance par rapport au lieu 10.
-
Page 15: Configuration De Base
CONFIGURATION DE BASE • Débloquez/Ouvrez le couvercle du compartiment des piles et insérez 3 piles AAA* (Fig. 1, page 14). Notez le numéro de série situé à l’intérieur du compartiment, vous en aurez besoin plus tard pour enregistrer votre D-Tour en ligne. Fermez le couvercle. - Page 16 le cas, appuyez sur MARCHE/ARRÊT pour la sélectionner). L’affichage indique la direction et la distance à parcourir avant d’atteindre l’emplacement (Fig. 5). Déplacez-vous dans le sens de la flèche et regardez la distance restante diminuer. Lorsque vous arrivez à destination, l’icône « Repère » clignote au centre de l’écran.
- Page 17 « huit » plusieurs fois pour étalonner à nouveau la boussole (Fig. 9). Une vidéo pour l’étalonnage de la boussole est disponible à l’adresse: http://www.bushnell.com/products/gps/instruction- videos/. • Pour de meilleurs résultats, nous vous conseillons de tenir le D-Tour horizontalement (non incliné) lors de son utilisation...
- Page 18 indicateur de mémoire résiduelle (% de la mémoire itinéraire utilisée) (Fig. 12). Le D-Tour peut stocker jusqu’à 48 heures de données d’itinéraires (cela peut concerner plusieurs itinéraires effectués sur des jours différents). • Appuyez à nouveau brièvement sur la touche ITINÉRAIRE (ne maintenez pas la touche enfoncée en mode «...
- Page 19 Fig. 19 Fig. 18...
- Page 20 Cliquez sur « Télécharger maintenant » puis sélectionnez « Ouvrir ». Un lien vous permettant de télécharger le logiciel vous sera également proposé dans votre e-mail de confirmation. Mettez sous tension le D-Tour et connectez son port USB à votre ordinateur avec le câble USB fourni.
- Page 21 (Fig. 20) UTILISATION DES FONCTIONS SUPPLÉMENTAIRES DE L’APPLICATION D-TOUR • En cliquant sur la « poignée » (g) en bas au centre de l’écran affichant la carte, vous ouvrirez un graphique qui indiquera l’altitude, la température et les données de vitesse concernant cet itinéraire.
- Page 22 Fig. 20 Fig. 22 Fig. 21...
- Page 23 GARANTIE LIMITÉE de UNE ANNÉE Votre produit Bushnell® est garanti exempt de défauts de matériaux et de fabrication pendant une année après la date d’achat. Au cas où un défaut apparaîtrait sous cette garantie, nous nous réservons l’option de réparer ou de remplacer le produit, à condition de nous le renvoyer en port payé.
- Page 24 Responsabilité : La responsabilité de Bushnell ne saurait en aucun cas être mise en cause en cas de dommages accidentels, particuliers ou immatériels résultant de l’utilisation, d’une mauvaise utilisation ou de l’incapacité à utiliser ce produit ou des défauts de ce produit.
- Page 25 Guía de control y visualización VISTA FRONTAL 1. Botón de POWER 2. Botón MARCA 3. Botón DATOS DE RECORRIDO 4. Botón CONFIGURACIÓN 5. Puerto USB 6. Icono de ubicación (1 de 5) 7. Hora local 8. Dirección a la posición 9.
-
Page 26: Configuración Básica
CONFIGURACIÓN BÁSICA • Desbloquee/abra la tapa de las pilas e inserte tres pilas AAA* (Fig. 1, pág. 25). Anote el número de serie del interior. Lo necesitará más adelante para registrar su D-Tour en línea. Cierre la tapa. • Salga al aire libre. APRIETE POWER (ENCENDIDO) (1) (mantenga el botón pulsado) hasta que se encienda la pantalla. - Page 27 la dirección de la flecha y verá como se reduce la distancia. Cuando llegue a la posición, el icono Marca parpadeará en el centro de la pantalla. • Puede utilizar los cinco iconos (y hasta 5 números) para marcar cinco ubicaciones diferentes de cualquier tipo (coche, tienda, área panorámica, etc.).
-
Page 28: Calibración De La Brújula
(Fig. 9). Dispone de un vídeo sobre la calibración de brújulas en: http://www. bushnell.com/products/gps/instruction-videos/. Fig. 10 • Para conseguir los mejores resultados, recomendamos sujetar el D-Tour en posición horizontal (no inclinada) - Page 29 el recorrido de la ruta (desde los puntos de inicio hasta la parada del recorrido actual o del último recorrido). VISUALIZACIÓN DE LOS DATOS DE RECORRIDO Después de grabar como mínimo un recorrido, si conecta el D-Tour a un ordenador podrá ver el recorrido que realizó...
- Page 30 Fig. 19 Fig. 18...
- Page 31 [Fig. 17]). Nota: Si, al conectar el D-Tour aparece una ventana emergente de reproducción automática de Windows, pulse en “Abrir la carpeta para ver los archivos” y haga doble clic en un archivo .btk (datos de recorrido). En Mac®, haga doble clic en el icono D-Tour de la carpeta Aplicaciones para iniciar la aplicación.
- Page 32 velocidad del recorrido. Puede utilizar las listas desplegables (h) para cambiar la forma de mostrar los datos. Esta función resulta ideal para corredores y ciclistas que quieren realizar un seguimiento de sus prestaciones conforme pasa el tiempo en un recorrido de entrenamiento.
- Page 33 Fig. 20 Fig. 22 Fig. 21...
-
Page 34: Garantía Limitada De Un Año
GARANTÍA LIMITADA de UN AÑO Su producto Bushnell® está garantizado contra defectos de materiales y fabricación durante un año después de la fecha de compra. En caso de defectos bajo esta garantía, nosotros, a nuestra opción, repararemos o sustituiremos el producto siempre que lo devuelva con portes pagados. - Page 35 Aviso sobre la Responsabilidad: Bajo ninguna circunstancia será Bushnell responsable por cualquier daño accidental, especial, indirecto o directo, ya sea como resultado del uso, mal uso o de la incapacidad para usar este producto o bien como resultado de defectos en el producto.
- Page 36 Beschreibung der Bedienung und Anzeige VORDERANSICHT 1. POWER Taste 2. MARK Taste 3. TRIP/DATA-Taste 4. SETUP Taste 5. USB-Anschluss 6. Standortsymbol (1 von 5) 7. Ortszeit 8. Richtung zum Standort 9. Entfernung zum Zielort 10. Batterielebensdauer- anzeige 11. Symbol Satelliten- verbindung 12.
-
Page 37: Grundlegende Einrichtung
GRUNDLEGENDE EINRICHTUNG • Öffnen Sie das Batteriefach und legen Sie 3 AAA-Batterien ein* (Abb. 1, S. 36). Notieren Sie sich die Seriennummer innen – Sie brauchen sie später, um Ihr D-Tour online zu registrieren. Schließen Sie das Fach. • Gehen Sie ins Freie. Halten Sie POWER (1) gedrückt, bis sich das Display einschaltet. - Page 38 das Auswählen mit POWER erforderlich). Das Display gibt die Richtung und die Entfernung bis zum Standort an (Abb. 5). Wenn Sie in Richtung des Pfeils gehen, stellen Sie fest, dass die Entfernung abnimmt. Wird der Standort erreicht, blinkt das Symbol „Markierung“ in der Mitte des Displays. •...
- Page 39 Fig. 10 Schleifenmuster in Form einer 8, um den Kompass neu zu kalibrieren (Abb. 9). Ein Video zur Kompasskalibrierung finden Sie unter: http://www.bushnell.com/products/gps/ instruction-videos/. • Für ein optimales Ergebnis empfehlen wir, das D-Tour bei der Benutzung in einer horizontalen (nicht geneigten) Position zu halten (Abb.
- Page 40 insgesamt speichern (dies können mehrere Touren an mehreren Tagen sein). • Die TRIP-Taste erneut kurz drücken (die Taste nicht im Trip-Modus gedrückt halten, sonst beginnt eine neue Tour oder Sie stoppen Ihre aktuelle Tour) , um den „Brotkrumen“- Bildschirm anzuzeigen (Abb. 13), der die gefahrene Route zeigt (von den Anfangs- bis zu den Endpunkten der aktuellen oder letzten Tour).
- Page 41 Fig. 19 Fig. 18...
- Page 42 dann „Open“ (Öffnen). In einer Bestägigungs-E-Mail erhalten Sie ebenfalls einen Link zum Herunterladen der Software. Schalten Sie das D-Tour ein und schließen Sie seinen USB-Port mit dem mitgelieferten USB-Kabel an Ihren Computer an. Auf Windows®- PCs sollte sich die Anwendung automatisch öffnen (falls nicht, klicken Sie auf das Desktop-Symbol (Abb.
- Page 43 VERWENDUNG DER D-TOUR APP-Zusatzfunktionalitäten (Abb. 20) • Wenn Sie auf den „Griff” (g) im unteren Mittelbereich des Kartenbildschirms klicken, öffnet sich ein Popup-Graph, der Höhen-, Temperatur- und Geschwindigkeitsdaten der Tour anzeigt. Über die Pulldown-Menüs (h) können Sie die Darstellungsweise der Daten ändern.
- Page 44 Fig. 20 Fig. 22 Fig. 21...
- Page 45 GEWÄHRLEISTUNGSFRIST EIN JAHR Auf das von Ihnen erworbene Produkt der Firma Bushnell® gewähren wir eine einjährige Garantie auf Materialmängel und Verarbeitung, gültig ab dem Kaufdatum. Falls während dieser Garantiezeit ein Mangel auftreten sollte, behalten wir uns die Entscheidung darüber vor, das Produkt zu reparieren oder zu ersetzen, unter der Voraussetzung, dass der Kunde das Produkt porto- und versandkostenfrei an uns zurückschickt.
- Page 46 Navigation von Fluggeräten verwendet werden. Hinweis zur Verwendung in Fahrzeugen: Bushnell möchte zu einer sicheren und verantwortungsvollen Gestaltung von Freizeitaktivitäten in der Natur beitragen. Verwenden Sie dieses Gerät nicht während des Führens eines Fahrzeugs. Unvorsichtiges Fahrverhalten kann zu Sach- oder Personenschäden oder Todesfällen führen.
-
Page 47: Vista Frontale
Guida ai tasti e al display VISTA FRONTALE 1. Tasto POWER 2. Tasto MARK 3. Tasto TRIP/DATA 4. Tasto SETUP 5. Porta USB 6. Icona località (1 di 5) 7. Ora locale 8. Direzione verso la località 9. Distanza dalla Località 10. -
Page 48: Regolazioni Di Base
REGOLAZIONI DI BASE • Sbloccare/aprire il coperchio del vano batteria e inserire tre batterie tipo AAA* (Fig 1, pg 47). Memorizzare il n. di serie riportato all’interno, da utilizzarsi successivamente per registrare D-Tour online. Richiudere il coperchio. • Uscire all’aperto. TENERE PREMUTO IL TASTO POWER (1) fino a che il display non si attiva. - Page 49 mano diminuisca. Quando si raggiunge la località, l’icona “Mark” inizia a lampeggiare al centro del display. • Si possono usare le cinque icone (e fino a 5 numeri) per contrassegnare cinque diverse posizioni di qualsiasi specie (auto, tenda, zona panoramica, ecc.). Verificare di selezionare una icona o n.
- Page 50 8; in questo modo è possibile ritarare la bussola (Fig. 9). Il video sulla taratura della bussola è disponibile su: http://www.bushnell.com/products/gps/instruction- Fig. 10 videos/. • Per ottenere il migliore risultato possibile, si raccomanda di mantenere D-Tour in posizione orizzontale (non inclinata) durante l’uso (Fig.
- Page 51 visualizzare la schermata del percorso (Fig. 13), che mostra il percorso seguito (dal punto di partenza al punto d’arrivo dell’itinerario attuale o dell’ultimo itinerario). VISUALIZZAZIONE DATI SUGLI ITINERARI Dopo aver memorizzato almeno un itinerario, collegare D-Tour al computer per visualizzare il percorso effettuato su uno dei 4 tipi di cartine, per visualizzare il grafico con i dati sull’itinerario e per condividere l’itinerario via e-mail o altri social media.
- Page 52 Fig. 19 Fig. 18...
- Page 53 momento del collegamento di D-Tour, fare clic su “Open Folder to View Files” (apri cartella per visualizzare i file), quindi fare doppio clic sul file .btk (dati relativi all’itinerario). Sui computer Mac®, per lanciare l’applicazione fare doppio clic sull’icona “D-Tour” nella cartella Applicazioni.
- Page 54 modificare le modalità di visualizzazione dei dati. Tale funzione è particolarmente consigliabile per runner e biker che desiderano tenere sotto controllo le prestazioni nel tempo relative a un determinato percorso di allenamento. • Per creare una nuova cartella, fare clic sull’icona + in basso a sinistra (i). Gli itinerari esistenti possono essere trascinati dalla cartella originaria a una nuova cartella.
- Page 55 Fig. 20 Fig. 22 Fig. 21...
- Page 56 GARANZIA LIMITATA PER UN ANNO Si garantisce che questo prodotto Bushnell® sarà esente da difetti di materiale e fabbricazione per un anno a decorrere dalla data di acquisto. In caso di difetto durante il periodo di garanzia, a nostra discrezione ripareremo o sostituiremo il prodotto purché sia restituito franco destinatario.
- Page 57 Esclusione di responsabilità: In nessun caso Bushnell potrà essere ritenuta responsabile di danni accidentali, speciali, indiretti o consequenziali, dovuti all’uso, all’uso improprio o alla incapacità di usare il presente prodotto o da difetti in esso presenti.
- Page 60 Bushnell Outdoor Products 9200 Cody, Overland Park, Kansas 66214 (800) 423-3537 • www.bushnell.com ©2013 Bushnell Outdoor Products...