
Related Manuals for Bushnell Back Track 360500


Summary of Contents for Bushnell Back Track 360500
- Page 1 R e co R d Yo u R T R ac k F i n d Yo u R WaY B ac k Instruction Manual Lit# 98-2348/03-12 Model#: 360500...
-
Page 2: Front View
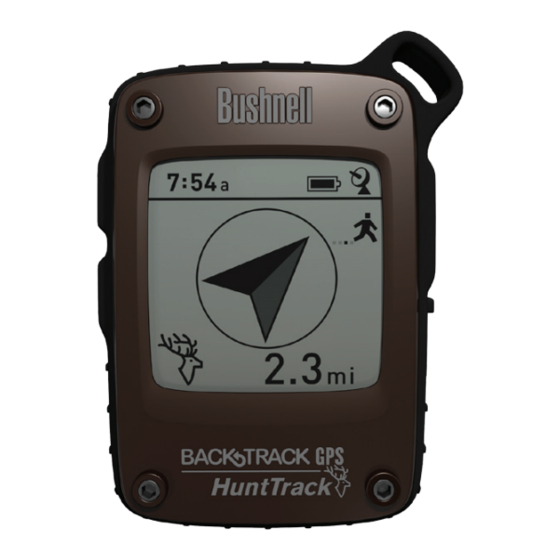
control & display Guide FRONT VIEW 1. POWER Button 2. MARK Button 3. TRIP/DATA Button 4. SETUP Button 5. USB Port 6. Location Icon (1 of 5) 7. Local Time 8. Direction to Location 9. Distance to Location 10. Battery Level Indicator 11. -
Page 3: Basic Setup
BaSic SeTuP • Open battery cover and insert 3 AAA batteries (Fig 1, pg 4). Record the serial # inside-you’ll need it later to register your HuntTrack online. Close the cover. • Go outdoors. HOLD POWER (1) (keep the button pressed) until the display comes on. Wait for GPS satellite lock (icon stops blinking) (11). This may take a few minutes after the first power-up in a new area. Fig. 2 • Press SETUP (4). Press MARK (2), then press the TRIP (3) or SETUP button to set the Hour for your area (Fig. - Page 4 Fig. 7 coMPaSS caLiBRaTion • To ensure directional accuracy, hold the HuntTrack out in front of you and move it in a “Figure 8” pattern a few times to re-calibrate the compass (Fig. 7). A compass calibration video is available at: http://www. bushnell.com/products/gps/instruction-videos/. • For best results, we recommend holding the HuntTrack in a horizontal position (not tilted) during use (Fig. 8). Fig. 8...
- Page 5 RecoRdinG a neW TRiP (RouTe) • Press TRIP/DATA (3) to enter Trip mode. HOLD the TRIP/DATA button to start recording new trip data. The display shows a moving “hiker” icon, along with updated readouts of elapsed distance and average speed during your trip (Fig. 9). Keep the HuntTrack powered ON during your trip. • To stop recording the trip data, HOLD the TRIP/DATA Fig. 9 button again.
- Page 6 VieWinG TRiP daTa After recording at least one trip, connecting the HuntTrack to your computer will enable you to see the path you took on any of 4 types of map, view a trip data graph, and share your trip via email or social media. To get the software: • Go to http://www.hunttrackgps.com/ and follow the directions to create an account (free) and register your HuntTrack, and download the software app (Fig. 11, next pg.). Your account provides online backup for all your trip Fig. 10 data. (Serial number is inside the battery compartment-(Fig. 10). After registering, you’ll be taken to a screen to download the HuntTrack application (Fig. 12) (Adobe Air® is required-it will be installed automatically if you do not already have it on your computer). Click “Download Now”, then select “Open”. A link to download the software will also be provided in your confirmation email. Turn on the HuntTrack and connect its USB port to your...
- Page 7 Fig. 13 Fig. 12 Fig. 11 Fig. 14 Fig. 15...
-
Page 8: Additional App Features
• The route you traveled for each trip is shown as a colored line (c) on a map. Four types of maps are available-click on the name of a map type (d) to change the view: MAP-a “road map” style view, complete with road names. SATELLITE-an aerial photo of the area. HYBRID-a combination of the first two maps. TERRAIN-this is a topographic map showing elevation data for the area. • The zoom slider and position arrow pad allow you to zoom in/out and move around on the map (e). • Click on the name of a trip to highlight it on the map. You can hide any trip by clicking on the “eye” icon next to it’s name (f). • To change the name of a folder (from the default date to something like “Canyon Trip Day 1”), right click on its name. You can also right click on a trip within the folder to rename it. - Page 9 Fig. 16 Please read the Google™ Maps Terms of Service at: http://maps.google.com/intl/en/help/terms_maps.html...
- Page 10 icon and click “+” to add the location to the map (Fig. 18). To remove a custom location, click it again and select “Remove” (Fig. 19). • To view an animal activity graph for any point on the map (based on its location, current date/time and solunar tables built into the app), click the deer icon (Fig. 17, B), then anywhere on the map. You can even view predicted (or past) animal activity for that location by changing the date and time within the animal activity pop-up window (Fig.
- Page 11 Fig. 18 Fig. 17 Fig. 19 Fig. 20...
-
Page 12: One Year Limited Warranty
This warranty does not cover damages caused by misuse, improper handling, installation, or maintenance provided by someone other than a Bushnell Authorized Service Department. -
Page 13: Warnings And Notices
GPS reception inside a car. Liability Notice: In no event shall Bushnell be liable for any incidental, special, indirect or consequential damages, whether resulting from the use, misuse, or inability to use this product or from defects in the product. - Page 14 Bushnell Outdoor Products 9200 Cody, Overland Park, Kansas 66214 (800) 423-3537 • www.bushnell.com ©2012 Bushnell Outdoor Products...