
Related Manuals for RCA 1114


Summary of Contents for RCA 1114
- Page 1 Digital Answerer with Call Waiting Caller ID and Speakerphone Telephone User’s Guide Please read this manual before operating product for the first time. Visit the RCA web site at www.rca4phones.com Model 1114...
-
Page 2: Equipment Approval Information
Equipment Approval Information Your telephone equipment is approved for connection to the Public Switched Telephone Network and is in compliance with parts 15 and 68, FCC Rules and Regulations and the Technical Requirements for Telephone Terminal Equipment published by ACTA. 1 Notification to the Local Telephone Company On the bottom of this equipment is a label indicating, among other information, the US number and Ringer Equivalence Number (REN) for the equipment. -
Page 3: Interference Information
(2) afford you the opportunity to correct the situation; and (3) inform you of your right to bring a complaint to the Commission pursuant to procedures set forth in Subpart E of Part 68, FCC Rules and Regulations. The telephone company may make changes in its communications facilities, equipment , operations or procedures where such action is required in the operation of its business and not inconsistent with FCC Rules and Regulations. -
Page 4: Hearing Aid Compatibility
Hearing Aid Compatibility (HAC) This telephone system meets FCC standards for Hearing Aid Compatibility. FCC RF Radiation Exposure Statement This equipment complies with FCC RF radiation exposure limits set forth for an uncontrolled environment. This equipment should be installed and operated with a minimum distance of 20 centimeters between the radiator and your body. -
Page 5: Table Of Contents
Table of Contents Setting Your Local Area Code ..15 Equipment Approval Information..2 Setting the Dialing Mode ....16 Interference Information .....3 Setting Day of Week ......16 Hearing Aid Compatibility ....4 Setting the Time and Date ....16 Fcc Rf Radiation Exposure Statement ...4 Setting the Language .......17 Introduction ...........7 Message Volume .........17... - Page 6 Table of Contents Erase Messages........25 Leaving a Memo ........25 Memory Full .............26 Remote Access ..........26 Remote Access Commands… … .....26 Message Indicators ......27 Troubleshooting Guide ......27 General Product Care ......29 Causes Of Poor Reception ....29 Warranty Assistance ......29 Limited Warranty .......30...
-
Page 7: Introduction
Introduction CAUTION: When using telephone equipment, there are basic safety instructions that should always be followed. Refer to the IMPORTANT S A F E T Y INSTRUCTIONS provided with this product and save them for future reference. Before You Begin Parts Checklist Make sure your package includes the following items: AC power... -
Page 8: Base Layout
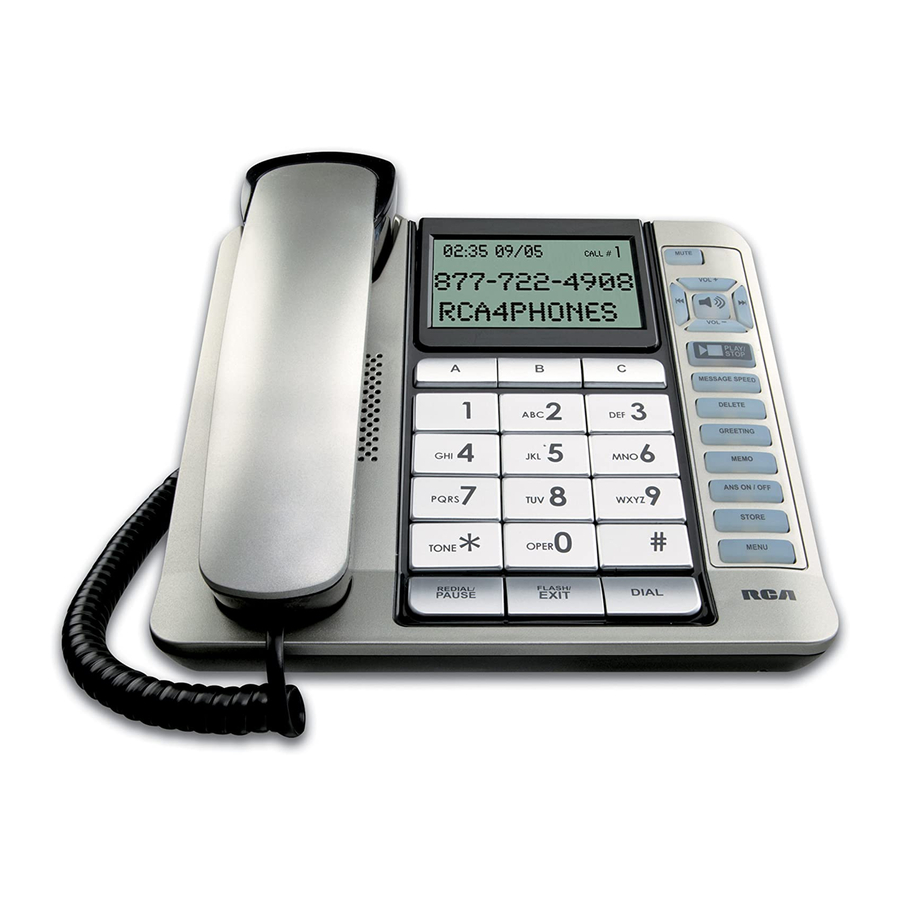
Base Layout Quick dial/emergency display memory buttons mute button hook switch repeat button speaker button VOL (+/-) buttons skip button PLAY/STOP button message speed button delete button greeting button memo button ans on/off button store button menu button tone button redial/pause button flsha/exit button dial button... -
Page 9: Installing The Phone
Installing the Phone Desktop Installation CAUTION: To reduce risk of personal injury, fire, or damage use only the power adaptor listed in the user’s guide. This power adaptor is intended to be correctly orientated in a vertical or floor mount position 1. -
Page 10: Wall Mounting The Phone
Wall Mounting the Phone To detach the desktop pedestal: 1. Rotate the hook 180°. (Refer to Dia.1A) 2. Plug one end of the straight telephone line cord into the jack on the bottom of the base. 3. Feed the line cord through the groove and plug the end into the modular telephone jack. -
Page 11: Answering System Setup
7. Reset the time/date settings or wait for the next call to set them automatically. Answering System Setup Recording the Outgoing Announcement Before using your new answerer, you should record a greeting (the announcement callers hear when your answering system answers a call). If you don’t record a greeting, callers hear a default greeting which says, “We are not available to take your call. -
Page 12: Receiving A Phone Call
Speakerphone Use Note the following guidelines when using the speakerphone: • The speakerphone works similar to a two-way radio in that you can only listen or talk at one time. • Stay reasonably close to the phone so that you can be clearly heard by the person to whom you are talking. -
Page 13: Redial
Redial Redial the last number you called by pressing the REDIAL button after you get a dial tone. NOTE: The REDIAL feature holds in memory the last phone number you dialed (as many as 32 digits). If you pressed any numbers after dialing the phone number, (for example, when accessing a voice-menu system) those numbers also are redialed. -
Page 14: Setting The Rings To Answer
Setting the Rings to Answer This setting allows you to set the number of rings before the unit answers a call. You can choose from 2-8 or Toll Saver (see “Toll Saver.”) 1. Press and release the MENU button. The screen displays RING TO ANSWER. The unit announces, Setup Menu . -
Page 15: Setting The Security Code
Setting the Security Code This feature allows you to change the factory default remote access code used for remote access to you answerer. The default code is 123. 1. Press and release the MENU button until the screen displays REMOTE ACCESS”... -
Page 16: Setting The Dialing Mode
Setting the Dialing Mode This adjustment allows you to select tone (touch-tone) or pulse (rotary) mode dialing. The phone is automatically set for touch-tone use. 1. Press and release the MENU button until the screen displays TONE PULSE “ ... -
Page 17: Setting The Language
Month 1. Use the keypad to enter two digit numbers to set the month. 2. When finished, the cursor moves to the Date field. Now you’re ready to enter the day. Date 1. Use the keypad to enter two digit numbers to set the date. 2. -
Page 18: Caller Id Features
Caller ID Features IMPORTANT: In order to use this unit’s Caller ID features, you must subscribe to either the standard Name/Number Caller ID Service or Call Waiting Caller ID Service. To know who is calling while you are on the phone, you must subscribe to Call Waiting Caller ID Service. -
Page 19: Caller Id With Call Waiting
Caller ID with Call Waiting Provided you subscribe to Call Waiting Caller ID service from your phone company; if you receive an incoming call and you are already on the phone, a beep indicates the presence of a Call Waiting call on the line. Only the handset that is in use at the time of the call will display and store the Call Waiting Caller ID information. -
Page 20: Dialing Back
Dialing Back When reviewing Caller ID records, you can dial back the numbers on the display by pressing the dial button. NOTE: If PICKUP PHONE shows in the display, no other changes to the number can be made. The information sent from the telephone c o mp a n y is known to be a valid number for dialing back (used only in very limited areas). -
Page 21: If You Did Not Program Your Local Area Code
If You Did Not Program Your Local Area Code 1. Use the SKIP or REPEAT buttons to display the number you want to dial. You will only see 10-digit numbers (i.e. 234- 555-1234). 2. See Steps 2 through 4 in the previous section to complete the dialback process. -
Page 22: Storing A Redial Number To Memory
Storing a Redial Number to Memory 1. Press the REDIAL button and the screen displays the number. 2. Press the STORE button. The screen displays LOCATION?. 3. Press the desired memory location (0-9, A, B , C ). 4. Press the STORE button again to confirm the memory location. 5. -
Page 23: Inserting A Pause In The Dialing Sequence
6. Press the STORE button to confirm and save. NOTE: If the name you want to enter is longer than 12 characters, only the first 12 characters will be copied into memory. Inserting a Pause in the Dialing Sequence Press the REDIAL/PAUSE button to insert a delay in the dialing sequence of a stored telephone number when a pause is needed to wait for a dial tone (for example after you dial 9 for an outside line, or to wait for a computer access tone). -
Page 24: Chain Dialing From Memory
telephone number you just entered. More than one letter is stored in each of the number keys. For example, to enter the name BILL SMITH, press the “2” key twice for the letter B. Press the “4” key 3 times for the letter I. Press the “5” key 3 times for the letter L. -
Page 25: Auto Disconnect
Auto Disconnect Auto disconnect is a feature that tells the unit to stop playing the greeting or recording when a extension phone is picked up. Sometimes you may pick up and the machine keeps playing the greeting. This is normal. If you want to pick up the phone during the greeting play, wait about two seconds after the system answers before picking up a phone. -
Page 26: Memory Full
1. Press and hold the MEMO button. The unit announces, “Record your memo after the tone.” 2. Record your message after the beep. 3. Release MEMO when you’re finished talking. The unit treats the memo as a message, as the display shows. Memory Full When the unit’s memory i s full, it answers after 10 rings and announces, “Memory i s full.”... -
Page 27: Message Indicators
Message Indicators The following special messages indicate the status of a message or the unit: The call record log is empty. 00 CALLS UNKNOWN NUMBER The incoming call does not have Caller ID service or their service area is not linked to yours. - Page 28 Incoming messages are incomplete • Was an extension phone picked up? • The caller left a message that is longer than the message length you set during setup. • Memory is full. Won’t respond to remote commands • Must use a touch-tone phone. •...
-
Page 29: General Product Care
General Product Care To keep your product working and looking good, follow these guidelines: • Avoid putting it near heating appliances and devices that generate electrical noise (for example, motors or fluorescent lamps). • DO NOT expose to direct sunlight or moisture. •... -
Page 30: Limited Warranty
Warranty Assistance Your sales receipt will be required to demonstrate proof of purchase in order to validate your warranty eligibility. You may want to attach either the original, or a photocopy, of your sales receipt to this booklet for future reference. If this product was received as a gift, it is suggested you jot down the date of gift receipt , as this information will be valuable should service be required during the warranty period. - Page 31 • Call Customer Care at 1-877-722-4908. Please have your product with you and please have your model number and date code available when calling us. The model number and date code can be found on the underside of the base unit . If you are within your limited warranty period and it is determined that service is required: •...
- Page 32 Visit the RCA web site at www.rca4phones.com Please do not send any products to the Indianapolis address listed in this manual or on the carton. This will only add delays in service for your product .