Table of Contents
Advertisement
Advertisement
Table of Contents

Related Manuals for RCA 25825


Summary of Contents for RCA 25825
- Page 1 Digital 8-Line Multihandset System User’s Guide 25825...
-
Page 2: Equipment Approval Information
The REN is useful in determining the number of devices you may connect to your tele- phone line and still have all of these devices ring when your telephone number is called. In most (but not all) areas, the sum of the RENs of all devices connected to one line should not exceed 5. -
Page 3: Interference Information
Commission pursuant to procedures set forth in Subpart E of Part 68, FCC Rules and Regulations. The telephone company may make changes in its communications facilities, equipment, operations or procedures where such action is required in the operation of its business and not inconsistent with FCC Rules and Regulations. -
Page 4: Fcc Rf Radiation Exposure Statement
For body worn operation, the optional RCA H5801 8-Line cordless handset has been tested and meets the FCC RF exposure guidelines when used with the belt clip sup- plied with this product. - Page 7 It also features an Auto Attendant function, which will pick up and redirect incoming calls to other extensions in the system per the caller’s input. Your RCA 8-Line phone system is expandable with the additional purchase of the H5801 accessory cordless handset.
-
Page 8: Parts Checklist
Important Installation Information • Never install network or telephone wiring during a lightning storm. • Never install network or telephone jacks in wet locations unless the jack is specifically designed for wet locations. • Never touch non-insulated network or telephone wires or terminals, unless the telephone line is disconnected from the network. -
Page 10: System Installation
System Installation: Important Installation Guidelines Privacy of communications may not be ensured when using this telephone. TANT: Connecting your RCA 25801 Digital Router:... - Page 11 Just disconnect the computer's Ethernet cable from the wall jack and plug the phone's Ethernet cable into the wall jack, after the phone initialization and show ID number, plug the computer Ethernet cableit into the LAN port on the back of the 25825 phone. Welcome. Your Pre-Assigned ext. is 100.
-
Page 12: Connect The Handset Cord
CAUTION: Make sure that no two base phone units have the same extension. resolved. connected to the system. A maximum of 25 phones can be connected in the system. Next the phone will ask you to enter the ID number of the digital router this phone will be using. -
Page 13: Auto Attendant
Voicemail Turn on the voicemail by pressing the VOICEMAIL button once, a blue indicator will light up. Then select the preferred Mailbox setting. (Personal Mailbox allows you to access the current base mailbox only, or choose General Mailbox to access the operator's mailbox.) To turn off the Voicemail, you can press and hold the VOICEMAIL button for about 2 seconds until the Voice mail LED off. -
Page 14: Set Language
7. Press the Select softkey to save. The cursor automatically moves to LINE 2. 8. Repeat steps 6 and 7 for each telephone line. After you select the ringer tone for LINE 8 and the system ring for Intercom call, press the EXIT button. -
Page 15: Set Extension Number
This option allows you to set up the PBX ID number to which your system links. The default PBX ID is 1. You will only need to change this if you have multiple RCA 8-Line phone 1. Press the Menu softkey while in standby mode. -
Page 16: Intercom Auto Answer
3. Press the Select softkey. 4. Use the VOL (+ or -) buttons to scroll up or down to SET STATION NAME. 5. Press the Select softkey. 6. Use the touch-tone pad to enter the phonebook name. Using less than 15 characters is stored in each of the number keys. -
Page 17: Set Backlight
1. Press the Menu softkey while in standby mode. 2. Use the VOL (+ or -) buttons to scroll up or down to PHONE OPTIONS. 3. Press the Select softkey. 4. Use the VOL (+ or -) buttons to scroll up or down to Call Alert Tone. 5. -
Page 18: Local Area Code
NOTE: If you make a mistake, press the Delete softkey to erase all digits. Manually Setting the Time and Date store in the digital router and can be set by any one 25825 in the system. To manually reset the time and date, follow the steps below. -
Page 19: Hour Format
4. Use the VOL (+ or -) buttons to scroll up or down to SET CLOCK. 6. Use the VOL (+ or -) buttons to scroll up or down to select the Year. 8. Use the VOL (+ or -) buttons to scroll up or down to select the hour. NOTE: AM or PM will be set accordingly with selected hour. -
Page 20: Record Name
Note: After the Restore the Default Settings is selected, the unit will restore all the menu set- tings which saved in base to the factory default Note: For the Voice mail and Administrator settings and the Flash time are stored in the digital router, so they can't be restore to default after the Restore default settings operation. -
Page 21: Recording A Greeting
4. Use the VOL (+ or -) buttons to scroll to Name. 6. Use the VOL (+ or -) buttons to scroll to Playback Name. The unit plays the previously recorded Name. To stop playback, press EXIT softkey. To erase the recorded greeting, press DELETE button during playback. The beep sound con- Note: Cannot delete the default greeting. -
Page 22: Pickup Delay
3. Press the SELECT softkey. 4. Use the VOL (+ or - ) buttons to scrolls up or down to Set Voice Prompt MSG. 5. Press the SELECT softkey. 6. Use the VOL (+ or -) buttons to scroll up or down to Select the voice prompt. 7. -
Page 23: Recording Incoming Messages
6. Use the VOL (+ or -) buttons to scroll up or down to 1 minute, 2 minutes , 5 minutes, or Greeting Only. The default is minutes 7. Press the Select softkey to save. NOTE: If you select Greeting Only, once the call is picked up by the voicemail it will announce “Sorry, no one is available to answer the call. -
Page 24: Message Playback
1. While on a call using the handset or headset, press MEMO to begin recording the conver- sation. 2. Press MEMO again to stop recording. This is a considered standard message and will be included in the message counter. Note: Before you start to record the phone conversation, we suggest you tell the party you are speaking to that the conversation will be recorded. -
Page 25: Forward Messages
6. Press # to exit. Key in your selection with the dialing pad. Forward Messages To forward the message which on playing to other stations, you can: press "8" during the mes- sage playing, then follow the voice prompt to forward the current message to other station. Accessing your Voicemail from Another Location You can access many features of this voicemail when you are away from your phone. -
Page 26: Record Greeting
This menu allows the user to decide whether Auto Attendant will answer all incoming calls. From the Auto Attendant sub-menu: 1. Use the VOL (+ or -) buttons to scroll to “Auto Attendant”. 3. Use the VOL (+ or -) buttons to scroll the options to “Auto Attendant ON/OFF”. 5. - Page 27 1. Use the VOL (+ or -) buttons to scroll up or down to Day Greeting. 2. Press the Select softkey. 3. Use the VOL (+ or -) buttons to scroll up or down to Record Greeting. 4. After the beep, speak into the phone in a normal tone of voice. (The maximum recording time of an outgoing annoucement is 30 seconds) 5.
- Page 28 Review Greeting From the Auto Attendant sub-menu: 1. Use the VOL (+ or -) buttons to scroll up or down to Night/Weekend Greeting. 2. Press the Select softkey. 3. Use the VOL (+ or -) buttons to scroll up or down to Review Greeting. 4.
- Page 29 7. Use the VOL (+ or -) buttons to scroll up or down to select the correct minutes. 8. Press the Select softkey to save. Note: The default setting is 5: 00 pm. Set Weekend Day From the Auto Attendant sub-menu: 1.
-
Page 30: General Delivery Mailbox
greeting is: “Hello, thank you for calling.”) 7. To stop playback, press the Exit softkey. Record Greeting This option gives you the opportunity to further customize the auto-attendant by recording over the standard greetings with your own greetings. In order to preserve functionality for both your callers and the users of the system, we recommend that your custom greetings contain the same basic information as the standard greeting. - Page 31 2. Press the Select softkey. 3. Use the VOL (+ or -) buttons to scroll up or down to General Delivery Mailbox. 4. Press the Select softkey. 5. Use the VOL (+ or -) buttons to scroll up or down to Name. 6.
-
Page 32: Select Greeting
2. Press the Select softkey. 3. Use the VOL (+ or -) buttons to scroll up or down to General Delivery Mailbox. 4. Press the Select softkey. 5. Use the VOL (+ or -) buttons to scroll up or down to Greeting. 6. -
Page 33: Dial By Name Directory
7. Use the VOL (+ or -) buttons to scroll up or down to select ON or OFF. 8. Press Select softkey to save. NOTE: When using the Dial by Name Directory, please make sure that each RCA 25825 phone Dial by Name Directory. - Page 34 6. Press the Select softkey. 7. Use the VOL (+ or -) buttons to navigate the list of extension numbers. 9. Press the Delete softkey to delete the selected extensions from the list. 10. Or press the New softkey to add a new extension into the list. 11.
- Page 35 9. Press Select softkey to save. 10. After the greeting is saved, it will be played back once. Dial Zero for Operator Enabling this option will allow callers to press 0 after the Auto-Attendant answers to be connected with an operator. The default extension for the operator’s phone is 100, but this can be changed to any phone on the system.
-
Page 36: Extension Dialing
2. Press the Select softkey. 3. Use the VOL (+ or -) buttons to scroll up or down to Dial Zero for operator. 4. Press the Select softkey. 5. Use the VOL (+ or -) buttons to scroll up or down to Review Voice Prompt. 6. -
Page 37: Conference Room
9. After the greeting is saved, it will be played back once. Conference Room Included in your RCA 8-Line telephone system are two integrated conference rooms allow- ing your company to host your own conference bridge calls without additional per-minute charges. - Page 38 5. Use the VOL (+ or -) buttons to scroll up or down to Conference Room. 6. Press the Select softkey. 7. Use the VOL (+ or -) buttons to scroll up or down to select Conference Room A or Con- ference Room B.
-
Page 39: Admin Password
Room Extension 1. After selecting Conference Room A or B, use the VOL (+ or -) buttons to scroll up or down to Room Extension. 2. Press the Select softkey. 3. Key in an extension number in the range between 2000-2099. 4. -
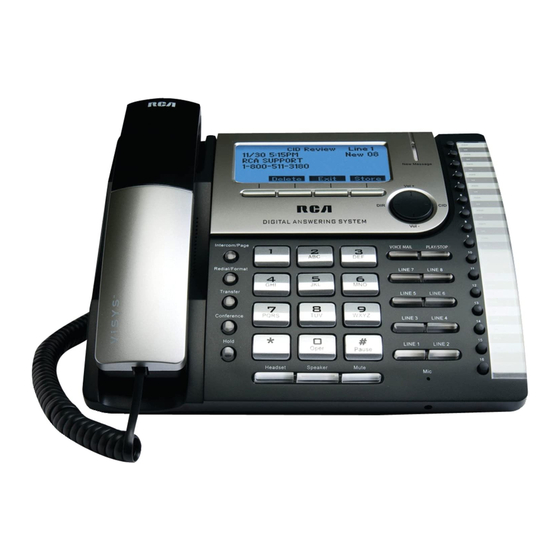
Page 40: Basic Operation
Basic Operation Your phone provides the convenience of accessing eight separate telephone lines, each ob- tained from the telephone company and each having its own phone number. This is gener- lines. Each station is interconnected to all others by an intercom. -
Page 41: Pre-Dialing
Pre-dialing 1. With the phone idle and the handset on the cradle, manually enter the telephone number. The telephone number shows in the display. 2. Press the DIAL softkey to take a line, and the telephone number is automatically dialed. -
Page 42: Switching Between The Speakerphone, Handset, And Headset
Switching Between the Speakerphone, Handset, and Headset To switch to the speakerphone, press SPEAKER. The speakerphone indicator turns on. Put handset back in cradle. To switch to the headset, press the HEADSET button to enable the headset, and the headset indicator turns on. -
Page 43: Releasing A Call From Hold
NOTE: The call on hold can only be picked up again by this extension only, but then can be transferred to another extension using the Transfer button. 1. With a call on hold, press the Transfer button. The unit will then enter Attend Transfer mode. 2. -
Page 44: Receiving A Transferred Call From Another Station
Please see the Conference Room section. To connect and conference: 1. To make a call, press the line you want and dial the telephone number. If you already have someone on the line, skip to step 2. -
Page 45: Answering An Intercom Call
Intercom Calls One-Touch Intercom 1. Press the Intercom/Page button, the speaker turns on, then dial the station number. NOTE: If you want to switch to the handset, pick it up and continue speaking. To switch to the headset press the HEADSET button. NOTE: The handset, headset, or speakerphone cannot be active when an intercom call is initi- ated (the handset should be on the cradle and the speakerphone and headset turned OFF.) NOTE: To cancel intercom call, press SPEAKER button. -
Page 46: Paging All Stations
4.Press the CONFERENCE button. 5.Speak to both parties. NOTE: If you have more than one party on hold (telephone line or intercom), you must select the line for the party you want to conference with. To disconnect one party: Press the line or intercom button for the person you want to continue speaking with, and the other party is automatically disconnected. -
Page 47: Summary Screen
b. When you select “Deregister Handset” , the unit will de-register the current cordless handset. NOTE: If there is no cordless handset registered, press and hold the Page button to enter the “Page stations” and “Register Handset” selection menu. a. When you select “Register Handset” , the unit will start searching for a cordless handset to register. Using the Conference Room Once you have set up your conference room and password (see the Conference Room section for setup information) you can enter into the integrated Conference Room by pressing “Inte-... - Page 48 Saving a CID Record to the Memory Log or to Phone Book Memory 1. While a name and telephone number shows in the display you can edit and save the information by pressing the Store softkey and following the steps for Storing a Name and Number in Memory.
-
Page 49: Deleting All Call Records
7-digits: 7-digit telephone number (i.e.555-5555) 10-digits: 3-digit area code +7-digit telephone number (i.e.425-555-5555) 11-digits: long distance code 1 +3-digit area code +7-digit telephone number (i.e. 1-425- 555-5555) 4. To dial the displayed number, select a line or press Speaker or lift handset. -
Page 50: Memory Log And Phone Book (Directory) Memory
NOTE: To cancel the storing procedure at any time, press EXIT. 1. Press the Store softkey. ENTER NUMBER is displayed. 2. Use the touch tone pad on your telephone to enter the telephone number you want to store. The numbers you enter show in the display. -
Page 51: Reviewing Phone Book (Directory) Memory
Reviewing Phone Book (Directory) Memory stored in alphabetical order). 2. Use the VOL (+ or -) buttons to scroll up or down through the phone book memories, or use the touch tone pad on your phone to enter the corresponding letters for the memory you want to review. -
Page 52: Storing A Pause In Memory
Press the #PAUSE button twice to insert a pause in the dialing sequence of a stored telephone number when a pause is needed (for example, when you must dial a 9 to get an outside line or when you must enter codes to access your bank’s information line). -
Page 53: Clear All Memories
Clear All Memories 1. Press the Menu softkey while in standby mode. 2. Use the VOL (+ or -) buttons to scroll up or down to PHONE OPTIONS. 3. Press the Select softkey. 4. Use the VOL (+ or -) buttons to scroll up or down to CLEAR ALL MEMORIES. 5. -
Page 54: Recording Auto Attendant Greetings
No dial tone • Check or repeat installation steps: • Make sure the telephone line cords are connected to the IPBX and the wall jack. Make the unit will prompt "For dial by Zero directory, The Caller ID memory log is empty. -
Page 55: Phone Does Not Ring
If the 25801 digital router becomes unplugged or there is a power outage, the router enters into No Power Operation mode. In this mode, all of the 25825 phone stations will not be functional, but you can plug any other standard corded phone into the by-pass port on the... -
Page 56: General Product Care
If trouble is experienced with this equipment, for repair or warranty information, please contact customer service at 1-800-511-3180. If the equipment is causing harm to the telephone network, the telephone company may request that you disconnect the equipment until the problem is resolved. -
Page 57: Limited Warranty
• Contact RCA Customer Care at (800) 511-3180. Our representatives will help you troubleshoot and diagnose the problem. As you may be asked to disconnect your RCA telephone from it’s power source, you must call from another telephone. If the issue cannot... -
Page 58: Product Registration
• Products purchased or serviced outside the USA • Acts of nature, such as, but not limited to lightning damage Product Registration: • Please complete and mail the Product Registration Card packed with your unit. It will make it easier to contact you should it ever be neccessary. The return of the card is not required for warranty coverage. - Page 60 Please do not send any products to the Oregon address listed in this manual or on the carton. This will only add delays in service for your product. Beaverton, Or 97005 RCA is a trademark of RCA Trademark Management S.A., Used under license. © 2010. All rights reserved.