
Related Manuals for JVC NX-F7


Summary of Contents for JVC NX-F7
- Page 1 NX-F3_NX-F7[A]EN-frontcover.fm Page 1 Thursday, May 1, 2008 4:07 PM COMPACT COMPONENT SYSTEM NX-F7 Consists of CA-NXF7, SP-NXF7F and SP-NXF7W NX-F3 Consists of CA-NXF3, SP-NXF3F and SP-NXF3W D R A F T INSTRUCTIONS LVT1833-016A [A, UB]...
- Page 2 NX-F3_NX-F7[A]EN.book Page 1 Tuesday, April 22, 2008 1:55 PM Warnings, cautions and others CAUTION To reduce the risk of electrical shocks, fire, etc.: 1. Do not remove screws, covers or cabinet. 2. Do not expose this appliance to rain or moisture. CAUTION —...
- Page 3 NX-F3_NX-F7[A]EN.book Page 2 Tuesday, April 22, 2008 1:55 PM CAUTION — Proper Ventilation To avoid risk of electric shock and fire and to protect from damage, locate the apparatus as follows: Top/Front/Back/Sides: No obstructions should be placed in the areas shown by the dimensions below. Bottom: Place on the level surface.
-
Page 4: Table Of Contents
NX-F3_NX-F7[A]EN.book Page 1 Tuesday, April 22, 2008 1:55 PM Table of contents Thank you for purchasing a JVC product. Please read all instructions carefully before operation, to ensure your complete understanding and to obtain the best possible performance from the unit. - Page 5 NX-F3_NX-F7[A]EN.book Page 2 Tuesday, April 22, 2008 1:55 PM Convenient functions of Basic operations of HDMI disc/file playback Convenient functions of disc/file Basic operations of HDMI CEC...51 playback ........29 Reference Playing back a disc/file in the desired order (Program playback) ........29 Notes on operation ......52 Playing back a disc/file in a random order (Random playback) ........
-
Page 6: Part Description
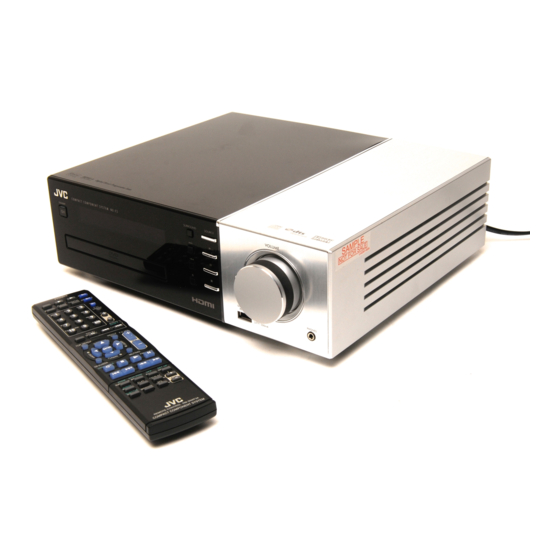
The numbers refer to the pages in which the parts are explained. Front view Refer to “Display window” shown below. Remote control sensor [K2] is printed on NX-F7. [SURROUND] is printed on NX-F3 instead. Rear view Cooling fan Display window... -
Page 7: Using The Remote Control
Operating the system from the remote control Point the remote control directly at the front of the main unit. • Do not block the remote control sensor on the main unit. NOTE [K2] is printed on the remote control for NX-F7 only. -
Page 8: Preparation
NX-F3_NX-F7[A]EN.book Page 5 Tuesday, April 22, 2008 1:55 PM Preparation Do not connect the power cable until all other connections have been made. Connecting the antennas FM antenna (supplied) FM antenna Main unit (rear view) AM loop antenna (supplied) Setting up the AM loop antenna Stretch out the FM antenna to the best position for radio... -
Page 9: Connecting The Speakers And Subwoofer
• Improper speaker cable connection reduces the sively for use with the supplied main unit as stereo effect and sound quality. parts of the NX-F7/NX-F3 system. Do not con- • The supplied left/right speakers are magnetically nect the supplied speakers to devices other than shielded, but color irregularity may occur on the the supplied main unit. -
Page 10: Speaker Layout
The left and right speakers can be fitted onto commercially available speaker stands. Before fitting the speak- ers onto commercially available speaker stands, follow the instructions shown below. Left and right speakers for NX-F7 Left and right speakers for NX-F3 Detach the original speaker stands. -
Page 11: Connecting A Tv
NX-F3_NX-F7[A]EN.book Page 8 Tuesday, April 22, 2008 1:55 PM Connecting a TV Connecting a TV with the [COMPONENT] terminals After connecting a TV, follow the instructions on pages 10 and 11. ■ IMPORTANT Main unit • Connect the main unit directly to a TV (or a mon- (rear view) itor) without routing through a video cassette recorder (VCR). -
Page 12: Connecting External Digital Audio Devices
NX-F3_NX-F7[A]EN.book Page 9 Tuesday, April 22, 2008 1:55 PM Preparation (continued) Do not connect the power cable until all other connections have been made. Connecting external digital Connecting external analog audio devices audio devices Output Analog audio Output MD player or device satellite receiver To an optical digital... -
Page 13: Selecting The Video Signal Type
NX-F3_NX-F7[A]EN.book Page 10 Tuesday, April 22, 2008 1:55 PM Turn on the main unit. Selecting the video signal • Refer to “Turning on/off the main unit” on type page 12. Press [DVD 3] or [USB 3]. To view an image on the TV screen, select the •... - Page 14 [AUDIO]. • To check the compatibility of your TV, contact your local JVC customer service center. • Even if the main unit is turned off, the video sig- nal type setting is stored.
-
Page 15: Basic Operations
Remote control main unit) again to turn off the power of the main mode selector (Only for NX-F7) unit. (The main unit enters the standby mode.) • With the power off, pressing any of the following buttons also turns on the main unit. -
Page 16: Enhancing The Playback Sound (K2) (Only For Nx-F7)
NX-F3_NX-F7[A]EN-04.fm Page 13 Wednesday, April 23, 2008 9:34 AM Basic operations (continued) Enhancing the playback Adjusting the volume level sound (K2) (Only for NX-F7) for surround/subwoofer sound The K2 function is designed to provide natural sound by improving the playback sound from low- You can adjust the volume level for the left and bit-rate digital sources. -
Page 17: Selecting The Headphone Surround Mode
NX-F3_NX-F7[A]EN.book Page 14 Tuesday, April 22, 2008 1:55 PM For the locations of the remote control buttons, refer to page 12. Selecting the headphone Selecting the surround surround mode volume level You can listen to surround sound via headphones You can increase the surround volume level. connected to the [PHONES] terminal. -
Page 18: Using The Sleep Timer
NX-F3_NX-F7[A]EN.book Page 15 Tuesday, April 22, 2008 1:55 PM For the locations of the remote Basic operations (continued) control buttons, refer to page 12. Using the sleep timer Changing the brightness of the display window When the time you specify elapses, the main unit automatically turns off. -
Page 19: Listening To Radio Broadcasts
NX-F3_NX-F7[A]EN.book Page 16 Tuesday, April 22, 2008 1:55 PM Listening to radio broadcasts Setting the AM tuner spacing AM stations are spaced 9 kHz apart in some coun- tries and 10 kHz in other countries. Number buttons Remote control mode selector ■When the main unit is turned off To select 10 kHz spacing, while holding down ¢, press F on the main unit to turn on the... -
Page 20: Tuning In To A Preset Radio Station
NX-F3_NX-F7[A]EN.book Page 17 Tuesday, April 22, 2008 1:55 PM For the locations of the remote Listening to radio broadcasts (continued) control buttons, refer to page 16. Press [TUNING ] or [TUNING Tuning in to a preset radio repeatedly to select a radio station station (frequency). -
Page 21: Playing Back Sources From External Devices Playing Back Sources From External Devices
NX-F3_NX-F7[A]EN.book Page 18 Tuesday, April 22, 2008 1:55 PM Playing back sources from external devices Playing back sources from external devices Press [AUDIO IN] or [DIGITAL IN]. • Pressing [AUDIO IN] displays “AUDIO IN” and selects the device connected to the [AUDIO IN] terminals. -
Page 22: Basic Operations Of Disc/File Playback
NX-F3_NX-F7[A]EN.book Page 19 Tuesday, April 22, 2008 1:55 PM Basic operations of disc/file playback Playing back a disc This part explains how to play back the types of discs shown above. Number Press 0 on the remote control or buttons on the main unit. -
Page 23: Playing Back A File
NX-F3_NX-F7[A]EN.book Page 20 Tuesday, April 22, 2008 1:55 PM For the locations of the remote control buttons, refer to page 19. NOTE Playing back a file • When a file on a USB device is played back, the “USB” indicator lights up in the display window. •... -
Page 24: Display Window On The Main Unit For Disc/File Types
NX-F3_NX-F7[A]EN.book Page 21 Tuesday, April 22, 2008 1:55 PM Basic operations of disc/file playback (continued) Press 5, /, 2 or 3 (cursor) to Display window on the main select a group and track. unit for disc/file types NOTE • You can also use the number buttons and 4 or ¢... -
Page 25: Dvd Audio
NX-F3_NX-F7[A]EN-06.fm Page 22 Thursday, May 1, 2008 3:31 PM For the locations of the remote control buttons, refer to page 19. DVD AUDIO DVD VR ■When a disc is played back ■When a disc is played back Track number Elapsed playback time Chapter number Elapsed playback time [DISPLAY] is pressed. - Page 26 NX-F3_NX-F7[A]EN-06.fm Page 23 Thursday, May 1, 2008 3:31 PM Basic operations of disc/file playback (continued) VCD/SVCD ■When a disc is played back ■When a disc is played back Track number Playback control Track number Elapsed playback time • You can use the menu screen to control play- ■When a disc is stopped back of a PBC compatible disc.
- Page 27 NX-F3_NX-F7[A]EN-06.fm Page 24 Thursday, May 1, 2008 3:31 PM For the locations of the remote control buttons, refer to page 19. MP3/WMA/WAV/ASF/DivX/MPEG1/ JPEG file MPEG2 file ■When a file is played back ■When a file is played back File number File type Track number Elapsed playback time...
- Page 28 NX-F3_NX-F7[A]EN.book Page 25 Tuesday, April 22, 2008 1:55 PM Basic operations of disc/file playback (continued) Indicators in the display window Messages on the TV screen When a DVD VIDEO or a USB device is selected The indicators corresponding to the status below as the source, the messages shown below are dis- light up in the display window.
-
Page 29: Stopping Playback
NX-F3_NX-F7[A]EN.book Page 26 Tuesday, April 22, 2008 1:55 PM For the locations of the remote control buttons, refer to page 19. Stopping playback Pausing playback ■When a disc/file is played back ■When a disc/file is played back Press 7. Press 8. •... -
Page 30: Playing Back From A Position 10 Seconds
NX-F3_NX-F7[A]EN.book Page 27 Tuesday, April 22, 2008 1:55 PM Basic operations of disc/file playback (continued) Playing back from a position Selecting a chapter/track 10 seconds before using the number buttons ■When a disc is played back Press (PBC off) ■When a disc/file is played back NOTE Use the number buttons to select the •... -
Page 31: Selecting A Chapter/Track From The Menu Screen
NX-F3_NX-F7[A]EN.book Page 28 Tuesday, April 22, 2008 1:55 PM For the locations of the remote control buttons, refer to page 19. Selecting a chapter/track from the menu screen ■When a disc is stopped or played back Press [TOP MENU/PG] to display the original program or press ■When a disc is stopped or played back [MENU/PL] to display the play list. -
Page 32: Convenient Functions Of Disc/File Playback
NX-F3_NX-F7[A]EN.book Page 29 Tuesday, April 22, 2008 1:55 PM Convenient functions of disc/file playback Playing back a disc/file in the desired order (Program playback) Number buttons (only on a loaded disc) Remote control You can program a maximum of 99 chapters or mode selector tracks. - Page 33 NX-F3_NX-F7[A]EN.book Page 30 Tuesday, April 22, 2008 1:55 PM Example: TV screen for a DVD VIDEO Press the number buttons to pro- (Program screen) gram tracks/chapters. • You can refer to the program number in the display window by pressing [DISPLAY]. Display for a DVD VIDEO •...
-
Page 34: Playing Back A Disc/File In A Random Order (Random Playback)
NX-F3_NX-F7[A]EN.book Page 31 Tuesday, April 22, 2008 1:55 PM Convenient functions of disc/file playback (continued) Playing back a disc/file in a Playing back a disc/file random order repeatedly (Repeat playback) (Random playback) (PBC off) (only on a loaded disc) ■When a disc/file is played back ■When a disc/file is stopped Press [REPEAT]. -
Page 35: Selecting The Audio Language And Subtitle Language
NX-F3_NX-F7[A]EN.book Page 32 Tuesday, April 22, 2008 1:55 PM For the locations of the remote control buttons, refer to page 29. Selecting the audio language Magnifying the picture and subtitle language ■When a disc/file is played back (only for moving images) ■When a disc/file is played back or paused ■... -
Page 36: Adjusting The Picture Quality (Vfp)
NX-F3_NX-F7[A]EN.book Page 33 Tuesday, April 22, 2008 1:55 PM Convenient functions of disc/file playback (continued) Press 5 or / (cursor) to select the Adjusting the picture quality item you want to adjust. (VFP) • Each time you press 5 or / (cursor), the item changes on the TV screen as follows. -
Page 37: Playing Back The Bonus Group
NX-F3_NX-F7[A]EN.book Page 34 Tuesday, April 22, 2008 1:55 PM For the locations of the remote control buttons, refer to page 29. Playing back the bonus group Some DVD AUDIOs may have a special group, called “bonus group”. You can use this function when the “BONUS”... -
Page 38: Using The Status Bar And The Menu Bar
NX-F3_NX-F7[A]EN.book Page 35 Tuesday, April 22, 2008 1:55 PM Using the status bar and the menu bar ■When a disc/file is played back Information displayed on the status Press [ON SCREEN] twice. Example: TV screen for a DVD VIDEO DVD VIDEO/DVD AUDIO/DVD VR Status bar Example: Status bar for a DVD VIDEO (DVD VIDEO/DVD AUDIO) -
Page 39: Function List
NX-F3_NX-F7[A]EN.book Page 36 Tuesday, April 22, 2008 1:55 PM For the locations of the remote control buttons, refer to page 29. Function list Refer to page 31. Changes the time information in the TIME (For A-B repeat playback, refer to display window and the status bar. -
Page 40: Playing Back A Specified Part Repeatedly (A-B Repeat Playback)
NX-F3_NX-F7[A]EN.book Page 37 Tuesday, April 22, 2008 1:55 PM For the locations of the remote Using the status bar and the menu bar (continued) control buttons, refer to page 29. Playing back a specified part Designating the time (Time repeatedly (A-B repeat search) playback) (PBC off) -
Page 41: Changing The Initial Settings With The Preference Screen
NX-F3_NX-F7[A]EN.book Page 38 Tuesday, April 22, 2008 1:55 PM Changing the initial settings with the preference screen Basic operations ■When a disc/file is stopped or no disc is You can use the preference screen to change the loaded (“NO DISC” is displayed in the dis- initial settings of the main unit according to the play window) environment where the main unit is used. -
Page 42: Picture
NX-F3_NX-F7[A]EN-07.fm Page 39 Monday, May 12, 2008 6:26 PM Changing the initial settings with the preference screen (continued) PICTURE Items Items Contents ( : initial setting) Contents ( : initial setting) MONITOR Select the display method suitable for your TV. PICTURE Select the item suitable to the video TYPE... -
Page 43: Audio
NX-F3_NX-F7[A]EN.book Page 40 Tuesday, April 22, 2008 1:55 PM AUDIO OTHERS Items Items Contents ( : initial setting) Contents ( : initial setting) DIGITAL Select the output signal type suitable to RESUME Select or OFF. (Refer to page 26.) AUDIO the device connected to the [DIGITAL Select or OFF. -
Page 44: Language Codes
NX-F3_NX-F7[A]EN.book Page 41 Tuesday, April 22, 2008 1:55 PM Changing the initial settings with the preference screen (continued) List of relationships of DIGITAL AUDIO OUTPUT preference items and output signals DIGITAL AUDIO OUTPUT preference Playback disc/file STREAM/PCM DOLBY DIGITAL/PCM PCM ONLY 48 kHz, 16/20/24-bit linear PCM DVD VIDEO 48 kHz, 16-bit stereo linear PCM... -
Page 45: Cd To A Usb Device
NX-F3_NX-F7[A]EN.book Page 42 Tuesday, April 22, 2008 1:55 PM Ripping sound directly from a CD to a USB device You can record sound from a CD to a USB device. Recording all tracks from a This function is generally called “ripping” or “digital audio extraction”. -
Page 46: Recording Only One Track
• The following functions do not affect the recorded sound: the treble/bass adjustment function (page 12), K2 function (page 13 [only for NX-F7]), speaker volume level function (page 13), surround mode function (page 13), head- phone surround function (page 14) and clear voice function (page 14). -
Page 47: Deleting A Track/Group From A Usb Device
NX-F3_NX-F7[A]EN.book Page 44 Tuesday, April 22, 2008 1:55 PM For the locations of the remote control buttons, refer to page 42. NOTE Deleting a track/group from a • When “WAIT” is displayed in the display window, USB device you cannot start deletion. Wait until the main unit reads signals from the USB device. -
Page 48: Adding (Editing) A Title To A Track/Group On A Usb Device
NX-F3_NX-F7[A]EN.book Page 45 Tuesday, April 22, 2008 1:55 PM Ripping sound directly from a CD to a USB device (continued) Enter a title. Adding (Editing) a title to a • Refer to “Entering a title” on page 46. track/group on a USB device •... - Page 49 NX-F3_NX-F7[A]EN-08.fm Page 46 Thursday, May 1, 2008 4:00 PM For the locations of the remote control buttons, refer to page 42. Available characters Entering a title You can use the characters shown below by repeatedly pressing the number buttons ([1] to [9] The operation is explained with the time when to and [0]).
-
Page 50: Operating External Devices Using The Remote Control
Sharp 06, 16, 17 Sony Toshiba Zenith The initial code setting is “01 (JVC)”. Release [TV F]. NOTE • It is recommended that you slide the remote control mode selector to [AUDIO] after using this function. Most of the other functions can be used when the remote control mode selector is at [AUDIO]. -
Page 51: Operating A Dbs Using The Remote Control
NX-F3_NX-F7[A]EN.book Page 48 Tuesday, April 22, 2008 1:55 PM Operating a DBS using the Using the remote control for the TV operation remote control Before the TV operation, select the remote control mode for the TV. Setting the manufacturer code ■... -
Page 52: Operating A Vcr Using The Remote Control
Emerson 11, 26 Fisher Funai 10, 14, 15, 16 Gold Star Hitachi Mitsubishi Panasonic 07, 17 Philips 05, 06 Samsung Sanyo 21, 22, 23 Sharp 27, 28 Shintom Sony 18, 19, 20 Zenith The initial code setting is “01 (JVC)”. - Page 53 NX-F3_NX-F7[A]EN.book Page 50 Tuesday, April 22, 2008 1:55 PM For the locations of the remote control buttons, refer to page 47. Release [DBS/VCR F]. NOTE • It is recommended that you slide the remote control mode selector to [AUDIO] after using this function.
-
Page 54: Basic Operations Of Hdmi Cec
• Not all HDMI devices are compatible with CEC. If the main unit is connected to non-CEC compatible devices, these devices cannot be controlled using the CEC function. • The CEC function may not work with some CEC devices. (When the main unit is connected to a non-JVC product, the CEC function may not work.) •... -
Page 55: Notes On Operation
NX-F3_NX-F7[A]EN.book Page 52 Tuesday, April 22, 2008 1:55 PM Notes on operation Suitable locations for the Notes on handling main unit Important cautions To minimize the need for servicing and maintain the high quality of this system, do not place the Installation of the system main unit in the following locations: •... -
Page 56: License And Trademark
NX-F3_NX-F7[A]EN.book Page 53 Tuesday, April 22, 2008 1:55 PM Notes on operation (continued) License and trademark Safety Precautions Avoid moisture, water and dust • This product incorporates copyright protection Do not place the system in moist or dusty places. technology that is protected by U.S. patents and Avoid high temperatures other intellectual property rights. -
Page 57: Notes On Discs/Files
NX-F3_NX-F7[A]EN-11.fm Page 54 Thursday, May 1, 2008 3:58 PM Notes on discs/files Playable disc/file types Playable discs * DVD VIDEO, DVD AUDIO, DVD VR * , VCD, SVCD, CD, CD-R * , CD-RW * , DVD-R * , DVD-RW * , +R, +RW Playable files recorded on a disc * MP3, WMA, WAV, JPEG, ASF, DivX, MPEG1, MPEG2... -
Page 58: Unplayable Discs
• If characters other than single-byte alphanu- cannot be played back. meric characters are used in the file name of an • JVC does not guarantee the operation and MP3/WMA/WAV/JPEG/ASF file, the track/file sound quality of discs not authorized by CD-DA, name is not displayed correctly. - Page 59 • The stream structure of MPEG1/MPEG2 discs USB device. and files should conform to MPEG system/pro- • JVC bears no responsibility for any loss of data gram stream. on the USB device while using this system. • 720 x 576 pixels (25 fps)/720 x 480 pixels (30 fps) is recommended for the highest resolution.
-
Page 60: Data Hierarchy
NX-F3_NX-F7[A]EN.book Page 57 Tuesday, April 22, 2008 1:55 PM Notes on discs/files (continued) Data hierarchy Handling discs DVD VIDEO/DVD VR • Do not use a commercially-available non-stan- A DVD VIDEO consists of “titles” and each title dard shape disc (like a heart, flower or credit may be divided into “chapters”. -
Page 61: Troubleshooting
NX-F3_NX-F7[A]EN.book Page 58 Tuesday, April 22, 2008 1:55 PM Troubleshooting ■General Reference Problem Possible cause Possible solution page Power does not come The power cable is not con- Connect the power cable correctly. nected to an AC outlet. You cannot operate any Some specific operations are This is not a malfunction. - Page 62 NX-F3_NX-F7[A]EN.book Page 59 Tuesday, April 22, 2008 1:55 PM Troubleshooting (continued) ■General (continued) Reference Problem Possible cause Possible solution page No sound is produced. The speakers are not con- Connect the speakers correctly. nected correctly. Headphones are connected. Disconnect the headphone plug. The sound is turned off.
- Page 63 NX-F3_NX-F7[A]EN.book Page 60 Tuesday, April 22, 2008 1:55 PM ■For a loaded disc Reference Problem Possible cause Possible solution page A disc cannot be played If “REGION CODE ERROR!” Confirm the region code number back. appears on the TV screen, the compatible with this system.
- Page 64 NX-F3_NX-F7[A]EN.book Page 61 Tuesday, April 22, 2008 1:55 PM Troubleshooting (continued) ■For a connected USB device Reference Problem Possible cause Possible solution page Files on a USB device If “CANNOT PLAY THIS Check that the file types recorded cannot be played back. DEVICE”...
-
Page 65: Specifications
NX-F3_NX-F7[A]EN.book Page 62 Tuesday, April 22, 2008 1:55 PM Specifications Main unit Speaker (CA-NXF7/CA-NXF3) (SP-NXF7F/SP-NXF3F) Tuner Type: 1-way bass reflex type FM frequency: 87.50 MHz – 108.00 MHz Magnetically shielded type AM frequency: 531 kHz - 1 710 kHz Speaker driver: (9 kHz spacing) Front ch: 5.5 cm cone... - Page 66 NX-F3_NX-F7[A]EN-11.fm Page 63 Wednesday, April 23, 2008 9:42 AM...
- Page 67 NX-F3_NX-F7[A]EN-11.fm Page 64 Wednesday, April 23, 2008 9:43 AM...
- Page 68 NX-F3_NX-F7[A]EN.book Page 73 Tuesday, April 22, 2008 1:55 PM 2008 Victor Company of Japan, Limited 0608SKMMODJMM...