Table of Contents
Advertisement
Advertisement
Table of Contents
Troubleshooting

Related Manuals for Polar Electro RS300X


Summary of Contents for Polar Electro RS300X
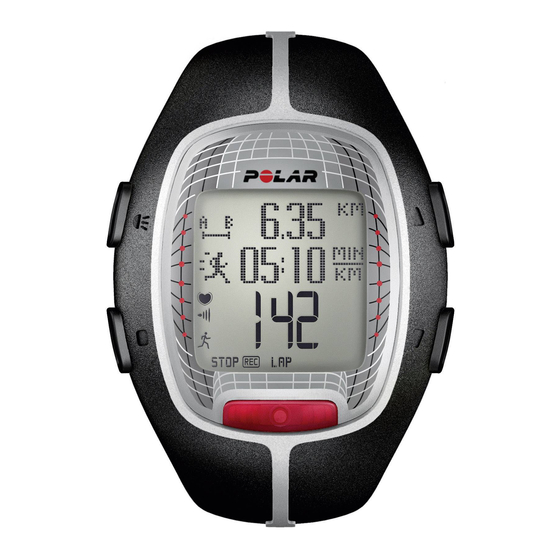
- Page 1 Polar RS300X ™ User Manual...
-
Page 2: Table Of Contents
ENGLISH Contents 1. GET STARTED........4 4. AFTER TRAINING ......23 Get to Know Your Polar RS300X....4 Summary ........23 Wrist Unit Buttons and Menu Structure ..5 Review Training Data ......24 Start With Basic Settings ..... 6 Transfer Data ......... - Page 3 ENGLISH Guarantee and Disclaimer ....44...
-
Page 4: Get Started
The Polar G1 GPS sensor transmits the speed and distance data to your training computer. Can be used for various sports, in addition to running. Register your Polar product at http://register.polar.fi/ to help us improve our products and services, to better fulfill your needs. 4 Get Started... -
Page 5: Wrist Unit Buttons And Menu Structure
(to, e.g., adjust training sounds or lock buttons) -Touch : To view information during training without pressing buttons, bring the training computer near the Polar logo on the transmitter. See Feature Settings for more information. Get Started 5... -
Page 6: Start With Basic Settings
Start With Basic Settings Select . Select metric (kilograms, Units centimeters, KCAL) or imperial (pounds, feet, To activate your Polar RS300X, press any button CAL). Calories are always measured as for one second. Once RS300X is activated, it kilocalories. cannot be switched off. -
Page 7: Symbols On The Display
The key lock is active. Current speed/pace. The G1 GPS sensor is in use. If the symbol is blinking, RS300X is trying to establish a connection to the GPS sensor, or the GPS sensor is trying to establish a connection to the satellites. -
Page 8: Before Training
The • avoid distractions. The more relaxed you are and Polar Fitness Test™ is an easy and quick way to the more peaceful the testing environment is, measure your cardiovascular fitness and aerobic the more accurate the test result will be (for capacity. - Page 9 In Time view, select UP/DOWN > Test > Start further information. The fitness test begins as soon as the RS300X • is displayed or no heart rate Fitness Test Failed locates your heart rate. So, make sure you are is shown. Check that the transmitter electrodes...
- Page 10 ENGLISH Interpret Your Fitness Test Results Interpret the OwnIndex values by comparing your individual values and changes in them over time. OwnIndex can also be interpreted based on gender and age. Locate your OwnIndex in the table on the right, and see how it compares to others of the same gender and age.
- Page 11 The HR -p definition can be set to be performed OwnIndex values, including the dates. On average, simultaneously with the Polar Fitness Test. It it takes six weeks of regular training to improve predicts your individual maximum heart rate value your aerobic fitness noticeably.
-
Page 12: Ownzone Limits
Before you start, make sure: Your training computer can determine your • you entered your user information correctly. individual aerobic heart rate zone automatically. • you selected the OwnZone exercise (UP/DOWN > ® This feature is called Polar OwnZone (OZ). Settings > Exercise >... -
Page 13: Training
Check that the wet electrode areas are firmly against your skin and that the Polar logo of the connector is in a central and upright position. Detach the connector from the strap when it is not in use to maximize the transmitter lifetime. -
Page 14: Wear The Polar S1 Foot Pod
• Install a battery before using the foot pod for the training computer is unable to receive a first time. For instructions, see the Polar S1 foot signal from the foot pod. pod user manual. • Change the battery if the green light on •... - Page 15 ENGLISH Attaching the S1 Foot Pod to Your Shoe To measure speed/pace and distance accurately, make sure the foot pod is correctly positioned. Detach the foot pod from the fork. Loosen your shoelaces and place the fork underneath them, on top of the tongue of your shoe.
-
Page 16: Wear The Polar G1 Gps Sensor
• The GPS sensor has to be activated from the training computer before it can be used: UP/DOWN > Settings > Features > S sensor > • Install a battery before using the GPS sensor for the first time. See the Polar G1 GPS sensor user manual. *Optional G1 GPS sensor required. 16 Training... - Page 17 Make sure that the "POLAR" logo is in an upright position. Turn the GPS sensor on only after your heart rate appears on your training computer. See the Polar G1 GPS Sensor user manual for further instructions on turning the sensor on.
-
Page 18: Start Training
ENGLISH Start Training Your training session is saved only when recording for more than one minute. Wear the training computer, the transmitter, and additionally either foot pod or GPS sensor. In Time view, press the RED button and select Start to start recording your training session or select Settings... -
Page 19: During Training
ENGLISH During Training The following information is displayed during training. Press UP/DOWN to change the view. You can adjust the display options by selecting BACK > > . The name of the display appears for a Settings Display few seconds. The name indicates the lower row information. Heart rate Lap time / Speed / Pace Stopwatch... - Page 20 ENGLISH Pace/Speed (available only with foot pod or GPS sensor) Stopwatch Distance Speed/pace (depending on the selected speed view) Distance (available only with foot pod or GPS sensor) Zone number and countdown timer or distance / Lap time (lap time will be displayed if you have not set any timers or distances that prompt you to change zones) Sport zones / Target heart rate zone / target speed/pace zone Distance...
- Page 21 ENGLISH Quick menu: To access the quick menu during training, press and hold LIGHT. The quick menu is a short cut to locking buttons, adjusting training sounds and other settings. : Check selected information during training by bringing the training computer close to the -Touch transmitter connector.
-
Page 22: Stop Training
ENGLISH Stop Training Continue Training: Press BACK to pause training recording. Continue recording the paused training session by Press BACK again or select Exit from the Stop selecting Continue from the Stop menu to stop recording altogether. menu Summary: Detach the transmitter connector from the strap and rinse the strap under running water after every View the summary information by selecting use. -
Page 23: After Training
ENGLISH 4. AFTER TRAINING Summary After training session is paused, a summary of training information can be viewed by selecting Summary from the . More detailed training information can be found under UP/DOWN > . See Review Stop menu File Training Data. -
Page 24: Review Training Data
Exercise Log becomes full, the oldest training file is replaced with the most recent one. If you want to save the file for a longer period, transfer it to the Polar web service on www.polarpersonaltrainer.com. For further information, see Transfer Data. - Page 25 ENGLISH appears above the button, even more detailed information is available. Basic information Training session type Date Time Duration Sport zones Relative durations in sport zones Lap information Number of laps Average duration of a lap Best lap and duration After Training 25...
- Page 26 ENGLISH Weekly In the Weekly log you can view accumulated data of your training sessions for previous weeks. You can toggle between the weeks with UP/DOWN. The bar on the right is entitled This Week and shows training summary for the current week. The other bars (named after the Sunday of the week in question) display the summaries for the past 15 weeks.
- Page 27 ENGLISH Totals includes cumulative values of information recorded during your training sessions. Total values can Totals be used as a seasonal (or monthly) counter of your training values. The values are automatically updated after each training session. Totals provides the following information, including the date of last reset: •...
- Page 28 ENGLISH Delete To delete training files, select from the menu. From the menu: Delete File Delete • select if you want to delete a training file. Next, select the training file you wish to delete. Exercise • select All exerc. if you want to delete all training files.
-
Page 29: Transfer Data
ENGLISH Transfer Data You can transfer your training data from RS300X to your diary in polarpersonaltrainer.com once you register for the service. A Polar FlowLink™ (can be purchased separately) and WebSync software are required for data transfer. Download the WebSync software from polarpersonaltrainer.com and install it onto your PC following the instructions on the screen. -
Page 30: Settings
ENGLISH 5. SETTINGS Watch Settings Event Select the value you want to change and press the You can create an event in the training computer's RED button. Adjust the values with UP/DOWN and memory. The computer will display the number of accept with the RED button. -
Page 31: Exercise Settings
ENGLISH Exercise Settings Alarm Access exercise settings by selecting UP/DOWN > Select from the settings menu. Set Alarm Watch > . In the menu there Settings Exercise Exercise the alarm to go on Once , from Monday to Friday are 5 exercise options which all have their own Daily , or turn it settings. - Page 32 ENGLISH All options, excluding Free , have the following Adjusting heart rate zones manually: settings: • HR zone 1 limits: Adjust your zone 1 limits. When setting the upper limit, the lower limit of • Select : Select the option as your exercise zone 2 is set automatically.
-
Page 33: Feature Settings
Options are Footpod See the foot pod calibration instructions in • Footp.calibr. the Polar S1 foot pod user manual for further • : Calibrate the foot pod by running. Turn information. the foot pod on. Set the Calibration... -
Page 34: User Settings
ENGLISH User Settings • : Set how the heart rate is displayed. HR view Options are (percentage of Access user settings by selecting UP/DOWN > maximum heart rate). > Settings User • Sport zones : Set the lower limits for 5 sport zones. - Page 35 • High : 3-5 hours a week. You participate at If you perform the Polar Fitness Test, your least 3 times a week in heavy physical OwnIndex value replaces this value. If you know training. For instance, you run 20-50 km or...
-
Page 36: General Settings
ENGLISH General Settings • : Select Language English Deutsch Español Français as the user interface language. Access general settings by selecting UP/DOWN > • : Select on or off. Activating the sleep Sleep > Settings General mode will help save the battery when the training computer is out of use for a long period •... -
Page 37: Customer Service Information
(a plastic bag or a sports bag) nor with conductive material (a wet towel). Do not expose to Your Polar RS300X is designed to help you achieve direct sunlight for extended periods. personal fitness goals and indicate the level of physiological strain and intensity during training sessions. - Page 38 You can purchase the sealing ring/battery kits at well-equipped Polar retailers and Danger of explosion if the battery is replaced with wrong authorized Polar Services. In the USA and Canada, the type. additional sealing rings are available at authorized Polar Service Centers only.
- Page 39 ENGLISH Open the battery cover of the connector with a coin by turning it from CLOSE to OPEN. Replace the old battery inside the cover with a new one. Make sure the positive (+) side is facing the cover. Replace the old sealing ring with a new one, fitting it snugly in the cover groove to ensure water resistance.
-
Page 40: Precautions
If you have a pacemaker, defibrillator or other implanted physician before starting any training program. electronic device, you use the Polar RS300X at your own risk. Before starting use, take a maximal training stress • Have you been physically inactive for the past 5 years? test under the supervision of a physician. - Page 41 Put the transmitter back on your chest and keep the wrist unit in this interference-free area as much as possible. If the RS300X still does not work, the piece of equipment may be electrically too noisy for wireless heart rate measurement.
-
Page 42: Troubleshooting
ENGLISH Troubleshooting Strong electromagnetic signals can cause erratic readings. Electromagnetic disturbances may occur near high-voltage If you don't know where you are in the menu, press and power lines, traffic lights, overhead lines of electric BACK hold until time is displayed. railways, electric bus lines or trams, televisions, car motors, bike computers, some motor-driven training If there are no reactions to any buttons or the training... -
Page 43: Technical Specifications
Transmitter Data Transfer System Requirements CR 2025 Battery type PC MS Windows (2000/XP/Vista) 32 bit Polar WebSync software Battery life Average 2 years (1 h/day, 7 days/week) and Polar FlowLink: Battery cap sealing ring O-ring 20.0 x 1.0 Material FPM Operating temperature -10 °C to +50 °C / 14 °F to 122 °F... -
Page 44: Guarantee And Disclaimer
No part of this manual may be used or reproduced in any form countries. or by any means without prior written permission of Polar Electro Oy. The Polar Electro Inc. / Polar Electro Oy guarantees to the original consumer/ names and logos marked with a ™... - Page 45 Directive 2002/96/EC of the European Parliament and of the Council on waste electrical and electronic equipment Polar Electro Inc. / Polar Electro Oy shall not be liable for any damages, (WEEE). These products should thus be disposed of losses, costs or expenses, direct, indirect or incidental, consequential or separately in EU countries.
- Page 46 Manufactured by Polar Electro Oy Professorintie 5 FIN-90440 KEMPELE Tel +358 8 5202 100 Fax +358 8 5202 300 www.polar.fi...
- Page 47 G1 GPS Sensor User Manual...
- Page 49 E N G L I S H Congratulations! You are now the proud owner of a Polar G1 GPS sensor. Polar G1 provides speed and distance data in all outdoor sports using Global Positioning System (GPS) technology. The Polar G1 sensor determines your location by measuring continuously the distance between itself and at least four satellites.
- Page 50 Position the armband round your upper arm and fasten (Picture 4). Place the sensor and the Polar product on the same arm. Make sure that the "POLAR" logo is in an upright position. Turning Polar G1 Sensor On/Off To best catch satellite signals, go outdoors and away from tall buildings and trees.
-
Page 51: Battery Replacement
E N G L I S H Switching Power Mode You can use the Polar G1 sensor in low or full power mode. The default mode is full power mode. By using the low power mode, you can increase battery life by up to 40 %. For maximum accuracy of speed and distance measurement, use full power mode. -
Page 52: Care And Maintenance
See Limited International Polar Guarantee. Using the G1 Sensor in Water Polar G1 sensor is water resistant. It can be safely worn in the rain or while crossing rivers or canoeing. The GPS reception system does not function under water. - Page 53 To avoid erratic readings, move away from possible sources of disturbance. • To avoid crosstalk from another person with a Polar G1 GPS Sensor, keep a distance of at least 2 meters/6’7” between the sensors. •...
-
Page 54: Limited International Polar Guarantee
Polar Electro Oy for the consumers who have purchased this product in other countries. • Polar Electro Inc. / Polar Electro Oy guarantees to the original consumer/purchaser of this product that the product will be free from defects in material or workmanship for two years from the date of purchase. - Page 55 ™ symbol in this user manual or in the package of this product are trademarks of Polar Electro Oy. The names and logos marked with a ® symbol in this user manual or in the package of this...
- Page 56 • Polar Electro Inc. / Polar Electro Oy shall not be liable for any damages, losses, costs or expenses, direct, indirect or incidental, consequential or special, arising out of, or related to the use of this material or...
- Page 57 Manufactured by Polar Electro Oy Professorintie 5 FIN-90440 KEMPELE Tel +358 8 5202 100 Fax +358 8 5202 300 www.polar.fi...