Table of Contents
Advertisement
Quick Links
Advertisement
Table of Contents

Related Manuals for NetComm 3G29WN2


Summary of Contents for NetComm 3G29WN2
-
Page 1: User Guide
Dual ADSL2+ / 3G Gateway 3G29WN2 USER GUIDE... - Page 2 Copyright©2012 NetComm Wireless Limited. All rights reserved. The information contained herein is proprietary to NetComm Wireless Limited. No part of this document may be translated, transcribed, reproduced, in any form, or by any means without prior written consent of NetComm Wireless Limited.
-
Page 3: Table Of Contents
3G29WN2 Default Settings .................................... 8 Integrated Interfaces ..................................9 Safety and Product Care ................................10 Transport and Handling ................................10 Installation and Configuration of the 3G29WN2 ......................... 11 Placement of your 3G29WN2 ..................................11 Avoid obstacles and interference .................................. 11 Cordless Phones ......................................11 Choose the “Quietest”... - Page 4 Appendix B: Samba Server ................................. 71 Legal & Regulatory Information..............................72 Intellectual Property Rights ................................... 72 Customer Information ....................................72 Consumer Protection Laws ..................................72 Product Warranty ......................................73 Limitation of Liability ..................................... 73 Contact......................................74 NetComm 3G29WN2 – Dual ADSL2+/3G Gateway www.netcommwireless.com...
-
Page 5: Overview
Target Users The individual reading this manual is presumed to have a basic understanding of telecommunications terminology and concepts. Prerequisites Before continuing with the installation of your 3G29WN2, please confirm that you comply with the minimum system requirements below. ADSL Requirement: An activated ADSL broadband connection to an ISP (Internet Service Provider) ... -
Page 6: Product Introduction
Product Features The NetComm 3G29WN2 Dual ADSL2+/ 3G Wireless N Gateway is designed for business and home users that rely on a constant and reliable high speed Internet connection. By integrating an ADSL2+ and HSPA+ (3G) modem into one device, users will have the flexibility to decide how they connect to the internet. -
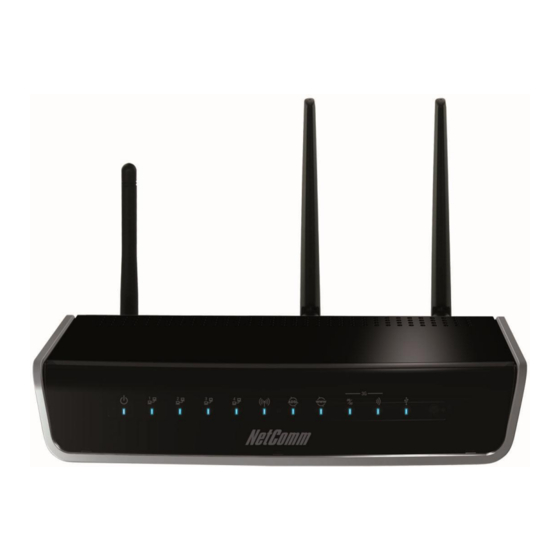
Page 7: Physical Dimensions And Indicators
LED Indicators The 3G29WN2 has been designed to be placed on a desktop. All of the cables exit from the rear for better organization. The LED indicator display is visible on the front of the router to provide you with information about network activity and device status. See below for an explanation of each of the indication lights. -
Page 8: 3G29Wn2 Default Settings
When the indicator lights return to steady blue, reset is complete. The default settings are now restored. The entire process takes about 45 seconds to complete; Once you have reset your 3G29WN2 to its default settings you will be able to access the device’s configuration web interface using http://192.168.1.1 with username ‘admin’ and password ‘admin’;... -
Page 9: Integrated Interfaces
Integrated Interfaces The following integrated interfaces are available on the 3G29WN2: Figure 2: 3G29WN2 Rear Panel REAR PANEL DESCRIPTION 3G Main / 3G Aux 3G antennas for connecting to a 3G service broadcast from a 3G base station. Power Connect the supplied power adapter to this connector to power up the router. -
Page 10: Safety And Product Care
Disconnect the power line from the device before servicing. Transport and Handling When transporting the 3G29WN2, it is recommended to return the product in the original packaging. This ensures the product will not be damaged. In the event the product needs to be returned, ensure it is securely packaged with appropriate padding to prevent damage during courier transport. -
Page 11: Installation And Configuration Of The 3G29Wn2
Placement of your 3G29WN2 Just like your mobile phone, the location of the 3G29WN2 will affect its signal strength to a 3G Mobile Base Station (Cell Tower). The data speed achievable is relative to the 3G signal strength, which is affected by many environmental factors. Please keep in mind that the 3G29WN2 will need adequate signal strength in order to provide Internet connectivity whilst choosing a location to place your 3G29WN2 router. -
Page 12: Hardware Installation
3G29WN2 – Dual ADSL2+/3G Gateway Hardware installation Connect the power adapter to the Power socket on the back of the 3G29WN2. Plug the power adapter into the wall socket and switch on the power. Wait approximately 60 seconds for the NetComm 3G29WN2 to power up. -
Page 13: Web Based Configuration Interface
Web Based Configuration Interface Quick Setup Please follow the steps below to configure your 3G29WN2 Wireless router via the web based configuration wizard. http://192.168.1.1/ Open your web browser (e.g. Internet Explorer/Firefox/Safari) and type into the address bar at the top of the window. - Page 14 Figure 6: Quick Setup - 3G Backup Click on the Next button to use save settings and continue the setup. You will then be asked to enter additional setup details. These additional steps are explained below. NetComm 3G29WN2 – Dual ADSL2+/3G Gateway www.netcommwireless.com...
- Page 15 If you enable USB storage you will be shown the Netbios and Directory name. These fields can be changed for your preference. Click the Next button once you are happy with the settings. To access the storage device open a web browser and type \\Netbios\Directory\. The default access path for the USB storage \\3G29WN2\USB-Storage\ NetComm 3G29WN2 Dual ADSL2+/3G Gateway www.netcommwireless.com...
- Page 16 The default password for all users is the same as the corresponding username. Once you have completed setting the passwords click the Finish button. You will be taken back to the home page where you can view your connection status. NetComm 3G29WN2 – Dual ADSL2+/3G Gateway www.netcommwireless.com...
-
Page 17: Advanced Configuration - Web User Interface
What can you do from here? By logging into the web user interface, you are able to configure your 3G29WN2 with a wide array of basic and advanced settings. From setting wireless security, to backing up your routers settings, uploading new firmware and setting parental controls, the web user interface is a handy tool for personalizing your device to maximize its potential. -
Page 18: Basic
NOTE: The menu options available within the web user interface are based upon the device configuration and user privileges (i.e. local or remote). The following table provides further details for each field: NetComm 3G29WN2 – Dual ADSL2+/3G Gateway www.netcommwireless.com... - Page 19 The gateway address of the 3G29WN2. Primary DNS Server The primary DNS address that the current internet connection of the 3G29WN2 is using. Secondary DNS Server The secondary DNS address that the current internet connection of the 3G29WN2 is using Date/Time The date and time currently set on the router.
-
Page 20: 3G Settings
Press the Connect button to reboot the router and to connect to the Internet. After rebooting, the Device Info for 3G network box in the GUI Basic screen should indicate an active 3G connection. NetComm 3G29WN2 – Dual ADSL2+/3G Gateway www.netcommwireless.com... -
Page 21: Pin Configuration
Figure 14: 3G Settings - PIN Configuration On the 3G Settings > PIN Configuration page PIN Code Protection for using a SIM card with the 3G29WN2 can be enabled or disabled. An existing PIN code can also be changed on this page. -
Page 22: 3G Backup Configuration
3G Backup Configuration On this page you are able to configure your 3G29WN2 to use the 3G connection as a backup internet connection to the ADSL service. If both connection options are made available, should the ADSL connection fail for any reason the 3G configuration will automatically initiate an Internet connection to ensure the 3G29WN2 remains connected to the Internet. -
Page 23: Wireless
Country enforces specific regulations limiting channel range. For Australia and New Zealand channels are limited to numbers 1-13. The maximum number of wireless clients that can be connected to the 3G29WN2 at any one Max Clients time. The Guest SSID (Virtual Access Point) can be enabled by selecting the Enable Wireless Guest Wireless Guest Network Network checkbox. -
Page 24: Security
Figure 17: Wireless - Security Settings FIELD DESCRIPTION Pre- configured to the default SSID of the NetComm Wireless settings. This field can be Select SSID changed in the Wireless > Settings section. The type of wireless security you prefer to use can be set using this field. -
Page 25: Advanced
In Auto (default) mode, your Router uses the maximum data rate and lowers the data rate 54g Rate dependent on the signal strength. The appropriate setting is dependent on signal strength. Other rates are discrete values between 1 to 54 Mbps. NetComm 3G29WN2 Dual ADSL2+/3G Gateway www.netcommwireless.com... - Page 26 It has been designed to improve wireless network efficiency. The default value is disabled. Transmit Power The option of decreasing the transmitting power of your wireless signal Table 11: Wireless - Advanced Settings NetComm 3G29WN2 – Dual ADSL2+/3G Gateway www.netcommwireless.com...
-
Page 27: Mac Filter
A maximum of 60 MAC addresses can be added. Table 12: Wireless - MAC Filter Settings Enter the MAC address on the screen below and click Apply/Save. Figure 20: Wireless – MAC Filter - Add MAC Address NetComm 3G29WN2 Dual ADSL2+/3G Gateway www.netcommwireless.com... -
Page 28: Wireless Bridge
Lists those devices with authorized access. SSID The SSID(Service Set Identifier) of your wireless network. Interface The wireless interface being used to connect to the network. Table 14: Wireless - Station Info Fields NetComm 3G29WN2 – Dual ADSL2+/3G Gateway www.netcommwireless.com... -
Page 29: Management
NOTE: The Restore Default function has the same effect as the reset button. The device board hardware and the boot loader support the reset to default button. If the reset button is continuously pushed for more than 5 seconds (and not more than 12 seconds), the boot loader will erase the configuration settings saved on flash memory. NetComm 3G29WN2 Dual ADSL2+/3G Gateway www.netcommwireless.com... -
Page 30: Snmp
To do this, the administrator typically runs an SNMP management station program such as MIB browser on a local host to obtain information from the SNMP agent, in this case the 3G29WN2 (if SNMP is enabled). An SNMP ‘community’... -
Page 31: Tr-069 Client
The connection used to send and receive data to the ACS server. Client Table 16: Management - TR-069 Settings SNTP This interface allows you to configure the time settings of the 3G29WN2. Figure 29: Management - SNTP FIELD DESCRIPTION First NTP Time Server Select the required internet time server. -
Page 32: Access Control
Use the fields illustrated in the screen below to change or create your password. Passwords must be 16 characters or less with no spaces. Click the Apply/Save button after making any changes to continue. Figure 31: Management - Access Control - Passwords NetComm 3G29WN2 – Dual ADSL2+/3G Gateway www.netcommwireless.com... - Page 33 Save/Reboot This option saves the current configuration settings and reboots the 3G29WN2 router. NOTE 1: It may be necessary to reconfigure your TCP/IP settings to adjust for the new configuration. For example, if you disable the Dynamic Host Configuration Protocol (DHCP) server you will need to apply Static IP settings.
-
Page 34: Advanced
This field shows the selected mode of connection. This field shows the status of the Quality of Service (QoS) function. Remove Select this field to remove the ATM configuration. Table 18:Advanced - ATM Interface Settings NetComm 3G29WN2 – Dual ADSL2+/3G Gateway www.netcommwireless.com... -
Page 35: Wan Service
This field indicates whether Network Address Translation (NAT) is enabled or disabled. Firewall This field indicates whether the inbuilt firewall is enabled or disabled for the selected PVC. Table 19: Advanced - WAN Service Settings NetComm 3G29WN2 Dual ADSL2+/3G Gateway www.netcommwireless.com... - Page 36 Enable IGMP Multicast Proxy Use this option to enable IGMP Multicast support on the connection. Enable MLD Multicast proxy Enable IPV6 IGMP Multicast support on the connection. Table 20: Advanced - WAN Service Settings NetComm 3G29WN2 – Dual ADSL2+/3G Gateway www.netcommwireless.com...
- Page 37 You can set a static DHCP address for a particular host by clicking the Add entries button and then entering the appropriate MAC and IP address for the nominated host. This effectively reserves an IP address for a particular LAN client. NetComm 3G29WN2 Dual ADSL2+/3G Gateway www.netcommwireless.com...
-
Page 38: Port Forwarding
Protocol Options include TCP, UDP or TCP/UDP. Enter the starting internal port number (when custom server is selected). When a service is connected Internal Port Start this field will be completed automatically. NetComm 3G29WN2 – Dual ADSL2+/3G Gateway www.netcommwireless.com... -
Page 39: Port Triggering
Trigger Protocol Options include TCP, UDP or TCP/UDP. Enter the starting open port number (when you select Custom Application). When an application is Open Port Start selected the port range values are automatically entered. NetComm 3G29WN2 Dual ADSL2+/3G Gateway www.netcommwireless.com... - Page 40 Enter the ending open port number (when you select Custom Application). When an application is Open Port End selected the port range values are automatically entered. Open Protocol Options include TCP, UDP or TCP/UDP. Table 23: Advanced - NAT - Add Port Trigger Settings NetComm 3G29WN2 – Dual ADSL2+/3G Gateway www.netcommwireless.com...
-
Page 41: Dmz Host
DMZ Host The 3G29WN2 will forward IP packets from the Wide Area Network (WAN) that does not belong to any of the applications configured in the Virtual Servers table to the DMZ host computer. Enter the computer’s IP address and click Apply to activate the DMZ host. To deactivate the DMZ Host function clear the IP address field and press the Save/Apply button. -
Page 42: Security
Enter the destination subnet mask.. Destination Port (port or Enter the destination port number or port range for the filter rule. port:port) Table 24: Advanced - Security - Add Outgoing IP Filter Settings NetComm 3G29WN2 – Dual ADSL2+/3G Gateway www.netcommwireless.com... - Page 43 To add an incoming IP filtering rule, click the Add button. The following screen will display. Figure 44: Advanced - Security - Add Incoming IP Filter Please refer to the Outgoing IP Filter table for field descriptions. Click Apply/Save to save and activate the filter. NetComm 3G29WN2 Dual ADSL2+/3G Gateway www.netcommwireless.com...
-
Page 44: Parental Control
Start Blocking Time The time of day when the restriction starts. End blocking time The time of day when the restriction ends. Table 25: Advanced - Parental Control - Add Time Restriction Settings NetComm 3G29WN2 – Dual ADSL2+/3G Gateway www.netcommwireless.com... - Page 45 With the URL filter, you are able to add certain websites or URLs to a safe or blocked list. This will provide you added security to ensure any website you deem unsuitable will not be able to be seen by anyone who is accessing the Internet via the 3G29WN2.
-
Page 46: Quality Of Service
Figure 49: Advanced - QoS - QoS Management Configuration To enable QoS select the Enable QoS checkbox and set the Default DSCP (Differentiated Services Code Point) Mark. Then press the Apply/Save button. Queue Setup Figure 50: Advanced -QoS - Queue Setup NetComm 3G29WN2 – Dual ADSL2+/3G Gateway www.netcommwireless.com... - Page 47 NOTE: Precedence level 1 relates to higher priority while precedence level 3 relates to lower priority. QoS Classification Figure 52: Advanced - QoS - Classification Setup Click the Add button to configure network traffic classes. Figure 53: Advanced - QoS - Add Network Traffic Rule NetComm 3G29WN2 Dual ADSL2+/3G Gateway www.netcommwireless.com...
-
Page 48: Routing
Figure 56: Advanced - Routing - Add Static Route Enter the Destination Network Address, Subnet Mask, Gateway IP Address and/or WAN Interface. Then click Apply/Save to add the entry to the routing table. NetComm 3G29WN2 – Dual ADSL2+/3G Gateway www.netcommwireless.com... -
Page 49: Policy Routing
To configure an individual interface, select the desired RIP version and operation, and enter a check in the Enabled checkbox for that interface. Click Apply/Save to save the configuration and to start or stop dynamic routing. Figure 59: Advanced - Routing - Dynamic Routing NetComm 3G29WN2 Dual ADSL2+/3G Gateway www.netcommwireless.com... -
Page 50: Dns
The name of the dynamic DNS provider. Interface Select the interface from the list. Username Enter the Dynamic DNS account username. Password Enter the Dynamic DNS account password. Table 26: Advanced - DNS - Add Dynamic DNS Settings NetComm 3G29WN2 – Dual ADSL2+/3G Gateway www.netcommwireless.com... -
Page 51: Dsl
256 separate routers were running in parallel. The tone range is from 0 to 31 for upstream traffic and from 32 to 255 for downstream traffic. Do not change these settings unless you are directed by your Internet Service Provider. NetComm 3G29WN2 Dual ADSL2+/3G Gateway www.netcommwireless.com... -
Page 52: Upnp
The Host Name and Domain name are combined to form a unique label that is mapped to the router IP address. This can be used to access the user interface of the router with a local name rather than by using the router IP address. NetComm 3G29WN2 – Dual ADSL2+/3G Gateway www.netcommwireless.com... -
Page 53: Usb Storage
USB Storage This page allows you to enable or disable the USB port of the 3G29WN2 so it can be used as a mass storage server. Please see Appendix B for more details on setting up your router to work with Storage Server functionality. - Page 54 Add support to automatically map LAN interfaces to PVC’s using DHCP vendor ID (option 60). The local DHCP server will decline and send the requests to a remote DHCP server by mapping the appropriate LAN interface. This will be turned on when Interface Grouping is enabled. NetComm 3G29WN2 – Dual ADSL2+/3G Gateway www.netcommwireless.com...
-
Page 55: Lan Ports
LAN Ports Use this page to enable or disable the Virtual LAN Ports feature. Figure 72: Advanced - LAN Ports NetComm 3G29WN2 Dual ADSL2+/3G Gateway www.netcommwireless.com... -
Page 56: Status
This may not have an effect on your internet connection. Therefore if this test fails but you are still able to connect to the internet there is no need to troubleshoot this issue. Table 27: Status - Diagnostics Fields NetComm 3G29WN2 – Dual ADSL2+/3G Gateway www.netcommwireless.com... -
Page 57: System Log
If remote mode is selected the view system log windows will not be able to display events saved to the remote system log server. When either Remote mode or both mode are selected you will be prompted for the system log server IP address and UDP port. NetComm 3G29WN2 Dual ADSL2+/3G Gateway www.netcommwireless.com... -
Page 58: 3G Network
The network information for the serving cell ID. Data Session Status This field displays whether the 3G module is connected or disconnected to the 3g network. Figure 77: Status - 3G Network Settings NetComm 3G29WN2 – Dual ADSL2+/3G Gateway www.netcommwireless.com... -
Page 59: Statistics
This page displays the inbound and outbound statistics of the 3G network. Figure 79: Status - Statistics - 3G This screen displays statistics for the Ethernet and Wireless LAN interfaces. Figure 80: Status - Statistics - WAN NetComm 3G29WN2 Dual ADSL2+/3G Gateway www.netcommwireless.com... - Page 60 In OAM RM CRC Errors The number of OAM and RM cells received with CRC errors. In GFC Errors The number of cells received with non-zero GFC. Table 30: Status - Statistics - ATM Fields NetComm 3G29WN2 – Dual ADSL2+/3G Gateway www.netcommwireless.com...
-
Page 61: Route
This option can be used to determine which IP address / MAC address is assigned to a particular host. This can be useful when setting up URL filtering, Time of Day filtering or Static DHCP addressing. Figure 84: Status - ARP NetComm 3G29WN2 Dual ADSL2+/3G Gateway www.netcommwireless.com... -
Page 62: Dhcp
You can use this to determine when a specific DHCP lease will expire, or to assist you with setting up Static DHCP addressing. PING Figure 86: Status - PING You can use this to verify your internet connection is active or to test whether a website is currently available or not. For example: www.google.com NetComm 3G29WN2 – Dual ADSL2+/3G Gateway www.netcommwireless.com... -
Page 63: Additional Product Information
You may then see a window prompting you to setup a "HomeGroup". Click "Cancel" on this. You can verify your wireless connection by clicking the "Wireless Signal" indicator in your system tray. After clicking on this, you should see an entry matching the SSID of your 3G29WN2 with "Connected" next to it. Mac OSX 10.6 Click on the Airport icon on the top right menu. -
Page 64: Troubleshooting
STEP CORRECTIVE ACTION Make sure you are using the correct IP address of the 3G29WN2. You can check the IP address of the device from the Network Setup configuration page. Check that you have enabled remote administration access. If you have configured an inbound packet filter, ensure your computer’s IP address matches it. -
Page 65: Technical Data
Regulatory Compliance C-Tick Electrical Specifications It is recommended that the 3G29WN2 be powered by the supplied 12V DC, 1.5A power supply. A replacement power supply is available from the NetComm Online shop. Environmental Specifications / Tolerances The 3G29WN2 housing enables it to operate over a wide variety of temperatures from 0˚C - 40˚C (operating temperature). -
Page 66: Appendix A: Print Server
‘Printers’ if you are using Windows Vista or select “Devices and Printers” if you are using Windows 7. Once in the ‘Printers’ page, click the ‘Add a printer’ button as shown below. NetComm 3G29WN2 – Dual ADSL2+/3G Gateway www.netcommwireless.com... - Page 67 “http://192.168.1.1:631/printers/Printer_Name” in the box below. Ensure the printer name is the name you entered in step 1 Click ‘Next’. NOTE: The PrinterName must be the same as the printer name entered into the Printer section of Dual-3G29WN2. Figure 91: Windows 7 - Add Shared Printer Name NetComm 3G29WN2 Dual ADSL2+/3G Gateway www.netcommwireless.com...
- Page 68 Figure 92: Add Printer Drivers Choose whether you want this printer to be the default printer, and then click ‘Next’. Figure 93: Add Printer Name Click ‘Finish’. Your device is now configured and ready for use. NetComm 3G29WN2 – Dual ADSL2+/3G Gateway www.netcommwireless.com...
- Page 69 To set up your printer, check the Apple menu and select the “System Preferences” option. In the System Preferences menu click on the “Print & Fax” option. Figure 95: System Preferences With your Printer driver installed, please add your printer from the Print &Fax menu. Figure 96: Print & Fax Menu NetComm 3G29WN2 Dual ADSL2+/3G Gateway www.netcommwireless.com...
- Page 70 Input the Address field with “192.168.1.1:631” and the Queue with “/printers/PrinterName” Figure 98: Add Printer Path NOTE: The Printer Name must be the same as the printer name entered into the Printer section of Dual-3G29WN2. From the “Print Using” drop down list and select your corresponding printer driver.
-
Page 71: Appendix B: Samba Server
In the address field of the Connect to Server dialog, type in the URL Smb:// “NetbiosName”/“DirectioryName” (eg smb://ntc- cpe/ntc-cpe) . Figure 102: USB Drive Access with Mac Select the Connect button to connect your USB driver. NetComm 3G29WN2 Dual ADSL2+/3G Gateway www.netcommwireless.com... -
Page 72: Legal & Regulatory Information
NetComm’s (or its licensors’) intellectual property rights to you. You are permitted to use this Manual for the sole purpose of using the NetComm product to which it relates. Otherwise no part of this Manual may be reproduced, stored in a retrieval system or transmitted in any form, by any means, be it electronic, mechanical, recording or otherwise, without the prior written permission of NetComm. -
Page 73: Product Warranty
Consumer Protection Laws which cannot be excluded, NetComm’s liability for any breach of that guarantee, condition or warranty is limited to: (i) in the case of a supply of goods, NetComm doing any one or more of the following: replacing the goods or supplying equivalent goods;... -
Page 74: Contact
3G29WN2 – Dual ADSL2+/3G Gateway Contact Address: NETCOMM WIRELESS LIMITED Head Office PO Box 1200, Lane Cove NSW 2066 Australia P: +61(0)2 9424 2070 F: +61(0)2 9424 2010 sales@netcomm.com.au www.netcomm.com.au NetComm 3G29WN2 – Dual ADSL2+/3G Gateway www.netcommwireless.com...