
Related Manuals for Navman M-Nav 760


Summary of Contents for Navman M-Nav 760
-
Page 1: User Manual
M-Nav 760 User Manual G P S T R A C K I N G A N D F L E E T M A N AG E M E N T S O L U T I O N S... - Page 2 Copyright © Copyright 2010 Navman Wireless Holdings LP. Navman Wireless is a registered trademark of Navman Wireless Holdings LP. All rights reserved. All other trademarks and registrations are the property of their respective owners.
-
Page 3: Table Of Contents
M-Nav 760 Specifi cations Install the M-Nav 760 in a Vehicle ....... 10... - Page 4 M-Nav 760 | User Manual Navigation Basics ........34 Display &...
-
Page 5: Introduction
• set a location as the start point, a via point, or the destination • have the M-Nav 760 calculate the route then guide you along it with clear visual and verbal instructions • check for places and points of interest such as fuel stops, nearby or along your route, •... -
Page 6: Glossary Of Terms
This manual represents the M-Nav 760 at the time of printing. Navman Wireless reserves the right to make changes to specifi cations without notice. -
Page 7: The M-Nav 760
2 The M-Nav 760 Box Contents The M-Nav 760 is supplied with a suction mount designed for installation on a vehicle windscreen. Check that you have ALL of these items before you start the installation. Contact your supplier if anything is missing. -
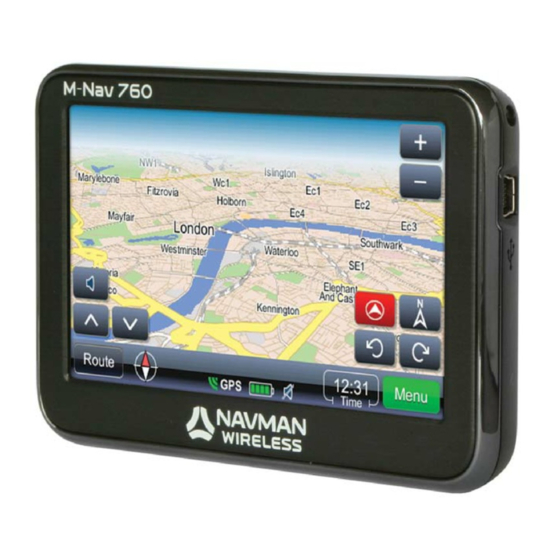
Page 8: M-Nav 760 Parts
M-Nav 760 | User Manual M-Nav 760 Parts Familiarise yourself with the parts of your M-Nav 760 before starting the installation. -
Page 9: M-Nav 760 Specifi Cations
Used for docking M-Nav 760 in the cradle. ON/OFF switch Switch the internal battery ON or OFF. Usually switched ON. Also used to reset the M-Nav 760 in the event of an upgrade. Speaker Provides system sounds and navigational voice prompts. -
Page 10: Install The M-Nav 760 In A Vehicle
M-Nav 760. When you have assembled the docking cradle, use the suction cup to attach the M-Nav 760 to the vehicle windscreen. -
Page 11: Add The M-Nav 760 To The Docking Cradle
Use the adjustment knobs on the docking cradle to change the viewing angle and the tilt angle, if necessary, to give a comfortable viewing position. If you are leaving the vehicle for a while, we recommend that you remove the M-Nav 760 from the docking cradle and store it in a safe place. -
Page 12: Get Started
Note: The following sequence of screens will appear the FIRST time that you use your M-Nav 760, OR whenever the internal battery in the M-Nav 760 has gone fl at (this can happen if you have not used your M-Nav 760 for several days). Otherwise, your M-Nav 760 will re-display the last screen that you used. -
Page 13: Driver Logon & Status
Vehicle Inspection Note: The ‘’Vehicle Inspection’ option may not be available in your market. Contact your supplier for more information. If these screens appear you cannot use the M-Nav 760 until you enter these details. If the ‘Vehicle Inspection’ screen appears, you must inspect your vehicle, and then touch Accept. -
Page 14: Check The Gps Status
Your M-Nav 760 has an internal GPS (Global Positioning System) antenna so that you can always receive a GPS signal, fi nd your current location and use the M-Nav 760 for navigation. For best operation, ensure that your M-Nav 760 is positioned where it has a good view of the sky. -
Page 15: Check The Qube Tracking Device Status
Menu then Main Menu. Check the Qube Tracking Device Status Your M-Nav 760 is connected to a Qube tracking device that communicates information about your vehicle to the OnlineAVL2 application. The Qube tracking device also enables you and your fl eet administrator to send and receive messages to each other (see section 5). -
Page 16: Driver Logoff
If you had to enter your Driver PIN and your work status details (as described in section 4.2) before you could use the M-Nav 760, you must use Logoff when you have fi nished work. Note: These screens appear only if your fl eet administrator has setup the Driver Logon and Driver Status functions in the OnlineAVL2 application. -
Page 17: Messages
M-Nav 760 | User Manual 5 Messages IMPORTANT: The M-Nav 760 must be in the docking cradle and connected to the Qube tracking device in order for you to send and receive messages and otherwise communicate with your fl eet administrator through the OnlineAVL2 application. - Page 18 M-Nav 760 | User Manual This example shows an information message. Touch: • Back to close the message without sending a reply • Reply (see section 5.4) • Delete (see section 5.10) This example shows a Route-To message. Route-To messages have two extra option buttons: •...
-
Page 19: Read A Received Message
The ‘Received Messages’ screen lists all your received messages. The most recent message is at top of the list, with the time that it was received by your M-Nav 760. Touch the up-arrow or down-arrow to move up or down the message list, if necessary. -
Page 20: Reply With A Canned Template Or Reply Form
M-Nav 760 | User Manual Reply with a Canned Template or Reply Form Note: This section assumes that the information or Route-To message you want to reply to is already displayed. Any previous replies to that message are also displayed in sequence (up to a maximum of 30 replies). -
Page 21: Use A Reply Form
Note: Some white boxes may require you to enter a date or a time. If you are entering a time and your M-Nav 760 uses a 12 hour clock, you must touch AM or PM then confi rm your... -
Page 22: View A Reply Or A Sent Message
fl eet administrator. Message read and reply sent. (The M-Nav 760 will display a maximum of 30 replies to any stored message.) Form message read and reply sent. -
Page 23: Create A New Message Or Free Text Reply
M-Nav 760 | User Manual Create a New Message or Free Text Reply If you want to create a new message, display the ‘Received Messages’ screen (see section 5.3) then touch New. If you want to create your own reply to an information or Route-To message that is already displayed on the M-Nav 760, touch Reply. -
Page 24: Show A Message Location
Touch Go to exit from Messages and navigate to the location specifi ed in the Route-To message. The M-Nav 760 immediately calculates the new route starting from your current location, then displays the navigation map and starts to give verbal directions. -
Page 25: Delete A Message
M-Nav 760 | User Manual 5.10 Delete a Message Note: This section assumes that the message you want to delete is already displayed. Touch Delete. The ‘Confi rm Message Delete’ box is displayed on the screen immediately. Touch Yes to delete the message immediately. The updated Message List is displayed. -
Page 26: Phone
M-Nav 760 | User Manual 6 Phone After pairing a Bluetooth-enabled mobile phone with your M-Nav 760, you can use the Phone option to make and receive mobile phone calls using the M-Nav as the hands-free device. IMPORTANT: The mobile phone must be compatible, be Bluetooth-enabled and Bluetooth must be ON (see the mobile phone manual if necessary). -
Page 27: Pair A Mobile Phone
M-Nav 760. If this happens, try removing the other device during the pairing process. From the ‘Main Menu’, touch Phone to display the ‘Bluetooth Main Menu’. - Page 28 If so, enter 0000. Note: The mobile phone may also ask you to confi rm whether the connection to the M-Nav 760 is allowed. If so, confi rm that the connection is allowed. The M-Nav 760 continues the pairing process with the mobile phone.
-
Page 29: Change The Active Mobile Phone
M-Nav 760 | User Manual Change the Active Mobile Phone Note: Use this option when you have paired more than one mobile phone to your M-Nav 760 and want to change the active mobile phone. IMPORTANT: The mobile phone must be searchable (or in ‘Listen’ mode). See the mobile phone manual if necessary. -
Page 30: Import A Phone Book
A confi rmation screen is displayed. Touch OK. Note: The mobile phone may ask you to confi rm whether the connection to the M-Nav 760 is allowed. If so, confi rm that the connection is allowed. The M-Nav 760 imports the phone book. -
Page 31: Make A Speaker Phone Call From Dial Pad
Make a Speaker Phone Call from Dial Pad Note: This section assumes that you have paired a Bluetooth-enabled mobile phone with the M-Nav 760 and that this mobile phone is selected as the active mobile phone. From the ‘Main Menu’, touch Phone to display the ‘Bluetooth Main Menu’... -
Page 32: Make A Speaker Phone Call From Phone Book
Make a Speaker Phone Call from Phone Book Note: This section assumes that you have paired a Bluetooth-enabled mobile phone with the M-Nav 760, this mobile phone is the active mobile phone and you have imported the mobile phone book. -
Page 33: Delete A Mobile Phone
M-Nav 760 | User Manual Delete a Mobile Phone Use this option to permanently delete a mobile phone from your M-Nav 760. If you imported the phone book, this will also be deleted from the M-Nav 760. Note: You may also need to delete the M-Nav 760 from the mobile phone. -
Page 34: Navigation Basics
M-Nav 760 | User Manual 7 Navigation Basics Display & Move the Map Display the ‘Main Menu’. Touch Nav. to display the map. Drag your fi nger across the screen to move the map in the same direction. Note: To exit from the Navigation option at any time, touch Menu then Main Menu. -
Page 35: Navigation Icons
A place that has been chosen as a via point. When the route is calculated, a thick blue line appears along the road and links all the via points to show the complete route. Your fi nal destination. A favourite place. Centre-on-me (shown only when the M-Nav 760 has a GPS signal). -
Page 36: Mute Or Set The Navigation Volume
M-Nav 760 | User Manual Navigation Icon Description Touch this to show your route pointing to the top of the screen. The map display will turn to match your road view ahead. Touch this to show North at the top of the screen. The map display will NOT turn to follow your route. -
Page 37: Night-Time Navigation
M-Nav 760 | User Manual Night-Time Navigation If you are driving at night, you can show the map in night vision mode. Note: We recommend that you use the Auto day/night option to automatically switch the map between day mode and night vision mode at dawn and dusk. Dawn and dusk are estimated automatically by your M-Nav 760. -
Page 38: How To Enter Data & Remove Errors
M-Nav 760 | User Manual How to Enter Data & Remove Errors WARNING: Do NOT enter data while you are driving. When you need to enter data such as a street address, the onscreen keyboard is displayed automatically. You can toggle the onscreen keyboard between numbers OR characters, whenever you want, by touching 123 (or ABC) in the lower right corner. -
Page 39: Find And Go To A Location
The street address that you touched is shown on the map with a list of options. Touch Navigate to if you want the M-Nav 760 to calculate a route to that location. If you want to add one or more via points along the route, see section 9.2. -
Page 40: Find A Postal Code
The navigation map displays the postal code location and a list of options. Touch Navigate to if you want the M-Nav 760 to calculate a route to that location. If you want to add one or more via points along the route, see section 9.2. -
Page 41: Find Other Types Of Location
M-Nav 760 | User Manual Find Other Types of Location You can use the M-Nav 760 to fi nd other types of location, such as an area. Display the ‘Main Menu’. Touch Nav. to display the map. Touch Menu to display the ‘Navigation main menu’. -
Page 42: Find A Poi
M-Nav 760 | User Manual Find a POI To fi nd a POI, display the ‘Main Menu’. Touch Nav. to display the map. Touch Menu to display the ‘Navigation main menu’. Touch Find POI to display the ‘Place lookup’ screen. -
Page 43: Navigate To Destination From Your Location
Note: If you take a wrong turn, the M-Nav 760 will automatically re-calculate a new route to your destination. For safety reasons, the M-Nav 760 will not advise a U-turn... -
Page 44: Set Location As Home
M-Nav 760 | User Manual Set Location as Home Note: When you have set a home location, a new menu option called ‘Take me home’ appears automatically at the top of the ‘Navigation main menu’. To set your home location, display the ‘Main Menu’. -
Page 45: Set A Location As A Favourite Place
M-Nav 760 | User Manual Set a Location as a Favourite Place To set a location as a favourite place, display the ‘Main Menu’. Touch Nav. to display the map. Touch Menu to display the ‘Navigation main menu’. You can either: •... -
Page 46: Plan A Route
WARNING: Plan and edit your route while your vehicle is stationary. A route can start from your present location or from any other location that you specify. As soon as you enter the destination, the M-Nav 760 will calculate the route for you. When the route is calculated, you can: •... -
Page 47: Add A Location As A Via Point
To see information about the planned route, see section 10. Add a Location as a Via Point Note: This section assumes that the M-Nav 760 is showing your current route on the map. When the M-Nav 760 has calculated a route, you can add one or more locations as via points to visit along the route or to detour to. -
Page 48: Show / Add Places Along The Route
M-Nav 760 | User Manual Show / Add Places Along the Route Note: This section assumes that the M-Nav 760 is showing your current route on the map. When the M-Nav 760 has calculated a route, you can search for useful places along the route, such as hotels or banks. -
Page 49: Optimise / Change The Order Of The Via Points
M-Nav 760 | User Manual Optimise / Change the Order of the Via Points Note: This section assumes that the M-Nav 760 is showing your current route on the map. When the M-Nav 760 has calculated a route, you can show a list of all the via points and optimise their order, if necessary, to make your route more effi... -
Page 50: Add A Detour To Avoid An Area
Add a Detour to Avoid an Area WARNING: Add a detour while the vehicle is stationary. Note: This section assumes that the M-Nav 760 is showing your current route on the map. To calculate a detour (e.g. to avoid extensive road works), touch Route to show the ‘Route’... -
Page 51: Delete A Saved Route
The route is immediately deleted and an updated list of your saved routes is displayed. Delete a Route Note: This section assumes that the M-Nav 760 is showing your current route on the map and that you have not saved the route. Touch Route to show the ‘Route’ menu. -
Page 52: Route Information
• show all the manoeuvres along the route. 10.1 Show an Overview of this Route Note: This section assumes that the M-Nav 760 has calculated the route and is showing it on the map. Touch Route. The ‘Trip’ menu is displayed. -
Page 53: Show Total Time & Distance
M-Nav 760 | User Manual 10.3 Show Total Time & Distance Note: This section assumes that the M-Nav 760 has calculated the route and is showing it on the map. Touch Route. The ‘Trip’ menu is displayed. Touch Trip Summary. -
Page 54: Set Your Preferences
If you are driving a truck and have specifi ed your truck attributes, the M-Nav will also use this information when calculating the routes. You can also setup the date format, time format, and language shown on the M-Nav 760 to suit your own preferences. -
Page 55: Set Truck Attributes
If you are driving a truck, you can specify some information about your truck, load and cargo. This information will be used by the M-Nav 760 when calculating the routes. Note: This option may not be available in your market. Contact your supplier for more information. -
Page 56: Set Road Types To Avoid
11.3 Set Road Types to Avoid WARNING: The M-Nav 760 can calculate a route that avoids certain types of road that you specify (e.g. toll roads) unless there is no alternative route. In this case, the route will use these road types but will not advise you of this. -
Page 57: Set Road Types To Exclude
The M-Nav 760 can calculate your routes so that they always exclude certain types of road that you specify (e.g. unpaved roads). Note: If there is no alternative road type, the M-Nav 760 will not be able to calculate a route. Note: This section assumes that no current route is displayed on your M-Nav 760. -
Page 58: Set Distance Units
M-Nav 760 | User Manual 11.5 Set Distance Units To set the distance units, display the ‘Main Menu’. Touch Nav. to display the map. Touch Menu to display the ‘Navigation main menu’. Touch the down-arrow to scroll through the listing then touch Settings to display the ‘Settings’... -
Page 59: Set Geographic / Custom Time Zone
M-Nav 760 | User Manual To change the date format, touch Date Format. The ‘Date Format’ menu is displayed. The red circle shows the current setting. Touch the new date format that you want to use (e.g. dd/mm/yy). The date format is immediately updated and the ‘Units’ menu is re-displayed. -
Page 60: Set Language
The ‘Time settings’ screen is re-displayed immediately with the new custom time zone. 11.8 Set Language The M-Nav 760 can operate in a variety of languages. To set the language, display the ‘Main Menu’. Touch Settings to display the ‘Settings’ menu. -
Page 61: Set The Choose Language At Startup Option
11.9 Set the Choose Language at Startup Option You can choose whether or not to show the ‘Language’ selection menu (described in the previous section) whenever you switch on the M-Nav 760. To change the current ‘Choose Language at Startup’ setting, display the ‘Main Menu’. -
Page 62: Restore Factory Default Settings
M-Nav 760 | User Manual 11.10 Restore Factory Default Settings In the unlikely case of any problems with your M-Nav 760 that you cannot otherwise resolve, you can restore the factory default settings. WARNING: This option will remove all of your customised settings and stored information except your map selection. -
Page 63: Contact Information
M-Nav 760 | User Manual Contact Information Navman Wireless welcomes your feedback. Navman Wireless UK Navman Wireless USA Innovation Centre 2, Navman Wireless North America Keele University Science Park 2701 Patriot Boulevard, Suite 150 Keele, Newcastle Under Lyme Glenview, IL 60026... - Page 64 MAN000004 Rev B Lat 42° 6’ 16.98” N Lon 87° 49’ 29.27” W...