Avaya 1120E User Manual
Ip deskphone
Hide thumbs
Also See for 1120E:
- User manual (318 pages) ,
- Configuring manual (16 pages) ,
- Reference manual (3 pages)
Table of Contents
Advertisement
Quick Links
Download this manual
See also:
User Manual
Advertisement
Table of Contents

Related Manuals for Avaya 1120E


Summary of Contents for Avaya 1120E
- Page 1 Avaya 1120E IP Deskphone User Guide Avaya Business Communications Manager Release 6.0 Document Status: Standard Document Number: NN40050-104 Document Version: 04.02 Date: May 2010...
- Page 2 Avaya customers and other parties through the Avaya Support Web site: http://www.avaya.com/support Please note that if you acquired the product from an authorized reseller, the warranty is provided to you by said reseller and not by Avaya. Licenses THE SOFTWARE LICENSE TERMS AVAILABLE ON THE AVAYA WEBSITE, HTTP://SUPPORT.AVAYA.COM/LICENSEINFO/...
-
Page 3: Table Of Contents
Chapter 1 About the Avaya 1120E IP Deskphone......5 Basic Features ............5 Telephone Controls . - Page 4 Contents Using a headset ............22 Muting the Microphone .
-
Page 5: About The Avaya 1120E Ip Deskphone
Chapter 1 About the Avaya 1120E IP Deskphone The Avaya 1120E IP Deskphone brings voice and data to the desktop by connecting directly to a Local Area Network (LAN) through an Ethernet connection. Note: In this guide, user-defined feature key labels appear beside the keys, and soft key labels appear directly above the keys. - Page 6 • hearing-aid compatibility Caution: Do not plug the Avaya 1120E IP Deskphone into a regular telephone jack. This results in severe damage to the IP Deskphone. Consult your system administrator to ensure that you plug your telephone into a 10/100/1000BaseT...
-
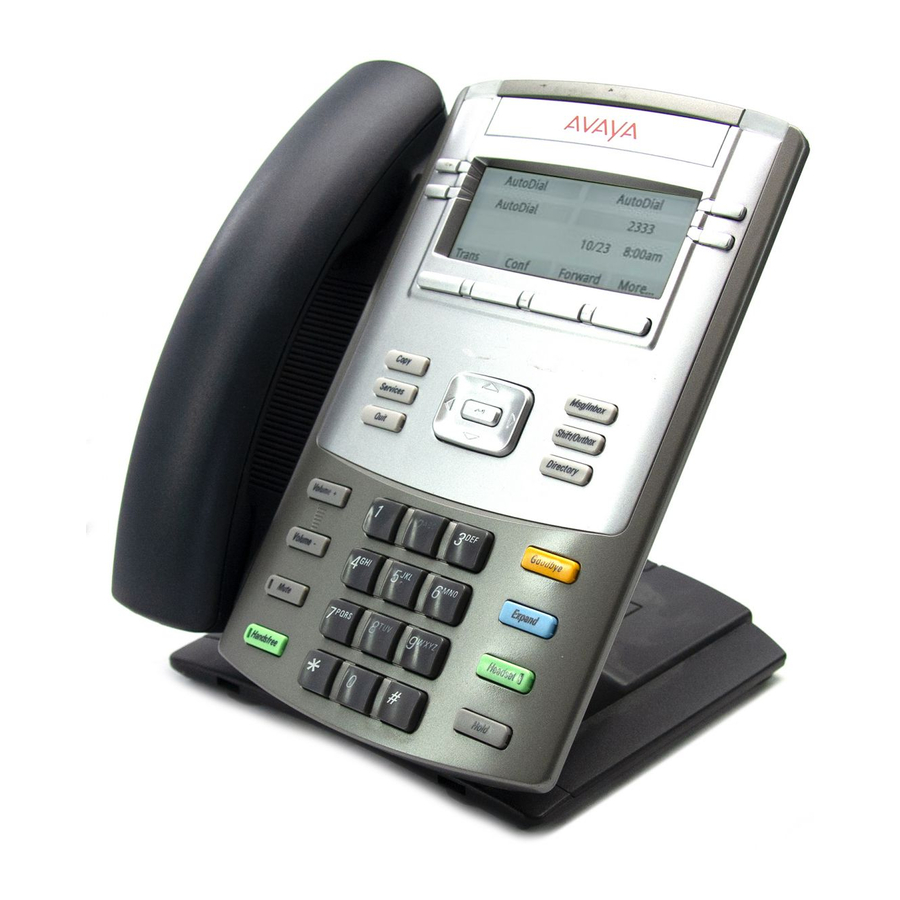
Page 7: Telephone Controls
Avaya 1120E IP Deskphone. Figure 1 Avaya 1120E IP Deskphone Telephone Controls Note: Some Avaya 1120E IP Deskphones are equipped with optional key caps. Text in parentheses indicates labels appearing on the key caps, for example, (Services). Soft keys are located below the display area. - Page 8 Chapter 1 About the Avaya 1120E IP Deskphone Feature Feature key is located on the bottom left of the display area and is used for accessing different phone options such as changing the ring type (Feature *6). The keys on either side of the display area...
- Page 9 Chapter 1 About the Avaya 1120E IP Deskphone Use the Navigation keys to scroll through menus and lists appearing on the LCD display screen. The outer part of this key cluster rocks for up, down, left, and right movements. Use the...
- Page 10 Chapter 1 About the Avaya 1120E IP Deskphone Programmable memory button. (Default: Blank) (Copy) Press the Services key to access the scrollable Feature Display menu (FEATURE (Services) *900), including the hot desking feature (programmable memory button). Press the Services key twice to access the...
-
Page 11: Telephone Display
Programmable memory button. (Default: Blank) (Directory) Telephone Display Your Avaya 1120E IP Deskphone has three display areas: • The upper display area provides labels for the four user-defined feature keys. • The middle display area contains single-line information for items such as caller number, caller name, feature prompt string, user-entered digits, date and time information, and telephone information. - Page 12 Chapter 1 About the Avaya 1120E IP Deskphone NN40050-104 NN40050-104...
-
Page 13: Entering And Editing Text
Chapter 2 Entering and editing text You can enter and edit text on your Avaya 1120E IP Deskphone using the following methods. Which method you use for text entry or editing depends on the application. Table 1 shows the applications and input devices that you can use for text entry. - Page 14 Chapter 2 Entering and editing text Volume down Copy Quit NN40050-104 NN40050-104...
-
Page 15: Configuring Options
Note: Many of the options discussed in this section are for administrator use only. Do not make any changes unless instructed by an administrator. Your Avaya 1120E IP Deskphone has both local and server-based options. Two methods are available to navigate in the Local Tools menu: •... -
Page 16: Local Diagnostics
The USB Devices tool provides information about any Universal Serial Bus (USB) devices that you connect to your phone. Your Avaya 1120E IP Deskphone automatically detects USB devices when you connect them to the USB port in the back of the telephone. -
Page 17: Network Configuration
The lock menu tool is not available on all systems. If the menu entry appears dimmed, it is not enabled on your phone. Contact your administrator to find out of this feature is available for your use. Avaya 1120E IP Deskphone User Guide... - Page 18 Chapter 3 Configuring options NN40050-104 NN40050-104...
-
Page 19: Telephone Setup
Press Feature *812 and use the navigation keys to scroll through and edit the call log. Time offset When your Avaya 1120E IP Deskphone is located in a different time zone than your system, the display shows the system time instead of the local time. The Time Offset feature allows you to adjust the time that appears on the display. -
Page 20: About Your Programmable Buttons
Chapter 4 Telephone setup Using the dialpad, enter the number of hours between local time and system time. Note: Press # to enter half-hour increments. Press OK. Note: It may take up to 1 minute for the change to appear on the display. About your programmable buttons Your System Administrator assigns the four programmable buttons as line, intercom, or memory buttons. -
Page 21: Making A Call
PRI lines, you do not hear a dial tone. Making internal calls using intercom soft keys Lift the handset. Tap an intercom soft key. Dial the extension number. Contact your system administrator for a list of extension numbers. Avaya 1120E IP Deskphone User Guide... -
Page 22: Answering A Call
Chapter 4 Telephone setup Answering a call When your telephone rings and the light flashes, or when an intercom or line soft key indicator flashes: • Lift the handset. • Press the line or intercom soft key with the flashing indicator before you lift the handset. -
Page 23: Accessing External Server Applications
(Mute) again to turn the microphone on. Accessing External Server Applications Use External Server Applications to access a variety of applications directly from your Avaya 1120E IP Deskphone. To find out what features and services are available, contact your system administrator. Depending on what is available on your system, your phone can provide information;... - Page 24 Chapter 4 Telephone setup NN40050-104 NN40050-104...