Troy-Bilt CSV 060 Operation Manual
Yard vacuum/chipper/shredder with vacuum/hose
Hide thumbs
Also See for CSV 060:
- Operator's manual (45 pages) ,
- Specifications (1 page) ,
- Operator's manual (40 pages)
Table of Contents
Advertisement
Available languages
Available languages
Safe Operation Practices • Set-Up • Operation • Maintenance • Service • Troubleshooting • Warranty
O
'
M
peratOr
s
anual
Yard Vacuum/Chipper/Shredder with Vacuum/Hose
Model CSV 060
WARNING
READ AND FOLLOW ALL SAFETY RULES AND INSTRUCTIONS IN THIS MANUAL
BEFORE ATTEMPTING TO OPERATE THIS MACHINE.
FAILURE TO COMPLY WITH THESE INSTRUCTIONS MAY RESULT IN PERSONAL INJURY.
TROY-BILT LLC, P.O. BOX 361131 CLEVELAND, OHIO 44136-0019
Printed In USA
Form No. 769-06154
(May 24, 2010)
Advertisement
Chapters
Table of Contents

Related Manuals for Troy-Bilt CSV 060


Summary of Contents for Troy-Bilt CSV 060
- Page 1 READ AND FOLLOW ALL SAFETY RULES AND INSTRUCTIONS IN THIS MANUAL BEFORE ATTEMPTING TO OPERATE THIS MACHINE. FAILURE TO COMPLY WITH THESE INSTRUCTIONS MAY RESULT IN PERSONAL INJURY. TROY-BILT LLC, P.O. BOX 361131 CLEVELAND, OHIO 44136-0019 Printed In USA Form No. 769-06154...
-
Page 2: Table Of Contents
Choose from the options below: ◊ Visit us on the web at www.troybilt.com ◊ Call a Customer Support Representative at (800) 828-5500 or (330) 558-7220 ◊ Write us at Troy-Bilt LLC • P.O. Box 361131 • Cleveland, OH • 44136-0019... -
Page 3: Safe Operation Practices
Important Safe Operation Practices WARNING: This symbol points out important safety instructions which, if not followed, could endanger the personal safety and/or property of yourself and others. Read and follow all instructions in this manual before attempting to operate this machine. Failure to comply with these instructions may result in personal injury. - Page 4 Safe Handling of Gasoline: If the impeller strikes a foreign object or if your machine should start making an unusual noise or vibration, To avoid personal injury or property damage use extreme care immediately shut the engine off. Allow the impeller to in handling gasoline.
- Page 5 Maintenance & Storage Do not modify engine Never tamper with safety devices. Check their proper To avoid serious injury or death, do not modify engine in any operation regularly. way. Tampering with the governor setting can lead to a runaway engine and cause it to operate at unsafe speeds.
- Page 6 Safety Symbols This page depicts and describes safety symbols that may appear on this product. Read, understand, and follow all instructions on the machine before attempting to assemble and operate. Symbol Description READ THE OPERATOR’S MANUAL(S) Read, understand, and follow all instructions in the manual(s) before attempting to assemble and operate WARNING—...
-
Page 7: Assembly & Set-Up
Assembly & Set-Up Contents of Carton • One Chipper/Shredder Vacuum • One Operator’s Manual • One Engine Operator’s Manual • One Upper and Lower Handle • One Hose Assembly • One Safety Glasses • One Bag • One Bottle of Oil •... - Page 8 Loosen the wing nut that secures the rope guide to the Pull spring loaded pin out on the base and align pin with right side of upper handle. the first hole (closest to the end of the tube) in the hose adapter.
- Page 9 Adjustments Grasp bag handle with one hand and slide locking rod on Nozzle Height mounting bracket with other hand toward engine. Use the end of mounting bracket as leverage when sliding the The nozzle can be adjusted to any six positions, ranging from locking rod.
-
Page 10: Controls & Features
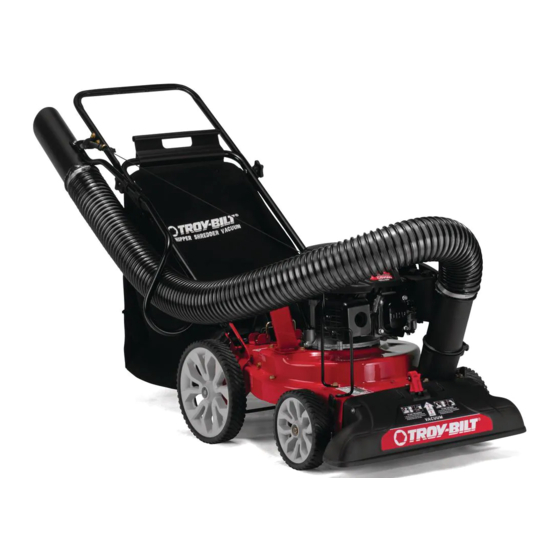
Controls and Features Recoil Starter Hose Handle Hose Assembly Hose Extension Chipper Chute Nozzle/Hose Vac Lever Nozzle Nozzle Height Adjustment Lever Figure 4-1 Hose Assembly WARNING: The operation of any chipper shredder can result in foreign objects being thrown into the Used as an alternative to the nozzle to vacuum yard waste such eyes, which can damage your eyes severely. -
Page 11: Operation
Operation Starting & Stopping Engine Refer to the Engine Operator’s manual packed with your chipper/ shredder vacuum for instructions on starting and stopping the engine. To Empty Bag Unhook bag straps from the lower handle. Unsnap bag clip from the top of lower handle. See Fig. 5-1. Buttons Inner Flap... - Page 12 Using The Nozzle Vacuum Using The Hose Assembly Yard waste such as leaves and pine needles can be vacuumed Place nozzle/hose vac lever in the bottom position on the up through the nozzle for shredding. After material has been nozzle to redirect vacuum to the hose assembly. See Fig. shredded by the flail blades on the impeller assembly, it will be 5-4.
-
Page 13: Maintenance & Adjustment
Maintenance & Adjustments Maintenance Equipment Care • Clean the chipper/shredder vacuum thoroughly after each General Recommendations use. • Always observe safety rules when performing any • Wash bag periodically with water. Allow to dry thoroughly maintenance. in shade. • The warranty on this chipper/shredder vacuum does not •... - Page 14 Removing the Flail Screen Remove and clean the screen by scraping or washing with water. See Fig. 6-3. If the discharge area becomes clogged, remove the flail screen and clean area as follows: Stop the engine. Make certain the chipper/shredder vacuum has come to a complete stop.
-
Page 15: Service
Service Blade Care Front Support Brace/ WARNING: Before performing any type of Lock Nut maintenance on the machine, wait for all parts to Bell Pivot Arm stop moving and disconnect the spark plug wire. Washer Assembly Failure to follow this instruction could result in personal injury or property damage. - Page 16 Carefully tilt and support the unit up to provide access The nuts on the flat head cap screws can be reached underneath to the nozzle mounting hardware and impeller. from underneath using a 1/2-inch socket, universal, and Remove the three shoulder bolts securing the black plastic extension.
-
Page 17: Troubleshooting
Troubleshooting Problem Cause Remedy Engine Fails to start Throttle lever (if equipped) not in correct Move throttle lever to FAST or START starting position. position. Engine switch (if equipped) in OFF position. Move engine switch to ON position. Spark plug wire disconnected. Connect wire to spark plug. -
Page 18: Replacement Parts
Replacement Parts Component Part Number and Description 664-04029 981-0490 Chipper Blade 719-0329 Flail Blade (2 total) 734-04033 Wheel (800) 828-5500 or (330) 558-7220 Phone to order replacement parts or a complete Parts Manual (have your full model number and serial number ready). Parts Manual downloads are also available free of charge at www.troybilt.com. - Page 19 Notes...
-
Page 20: Warranty
MANUFACTURER’S LIMITED WARRANTY FOR The limited warranty set forth below is given by Troy-Bilt LLC with c. Routine maintenance items such as lubricants, filters, blade respect to new merchandise purchased and used in the United States sharpening, tune-ups, brake adjustments, clutch adjustments,... -
Page 21: Spanish
Medidas importantes de seguridad • Configuración • Funcionamiento • Mantenimiento • Servicio • Solución de problemas • Garantía anual del OperadOr Aspiradora Para Patios — Modelo CSV 060 ADVERTENCIA LEA Y SIGA TODAS LAS INSTRUCCIONES DE ESTE MANUAL ANTES DE PONER EN FUNCIONAMIENTO ESTA MÁQUINA. - Page 22 Elija entre las opciones que se presentan a continuación: ◊ Visite nuestro sitio web en www.troybilt.com ◊ Llame a un representante de Asistencia al Cliente al (800) 828-5500 ó (330) 558-7220 ◊ Escríbanos a Troy-Bilt LLC • P.O. Box 361131 • Cleveland, OH • 44136-0019...
-
Page 23: Medidas Importantes De Seguridad
Medidas importantes de seguridad ADVERTENCIA: La presencia de este símbolo indica que se trata de instrucciones importantes de seguridad que se deben respetar para evitar poner en peligro su seguridad personal y/o material y la de otras personas. Lea y siga todas las instrucciones de este manual antes de poner en funcionamiento esta máquina. - Page 24 Manejo seguro de la gasolina Si el motor golpea un objeto extraño o si la máquina empieza a producir un sonido poco común o una vibración, Para evitar lesiones personales o daños materiales sea apague el motor de inmediato. Deje que el motor se sumamente cuidadoso al manipular la gasolina.
- Page 25 Mantenimiento y almacenamiento No modifique el motor Nunca manipule los dispositivos de seguridad de manera Para evitar lesiones graves o la muerte, no modifique el motor imprudente. Controle periódicamente que funcionen de bajo ninguna circunstancia. Si cambia la configuración del forma adecuada.
- Page 26 Símbolos De Seguridad Esta página representa y describe la seguridad los símbolos que pueden parecer en este producto. Lea, comprenda, y siga todas instrucciones en la máquina antes procurar para reunir y operar. Símbolo Descripción LEA EL MANUAL(S) DEL OPERADOR Lea, comprenda, y siga todas instrucciones en el manual (manuales) antes procurar para reunir y operar ADVERTENCIA—...
-
Page 27: Montaje Y Configuración
Montaje y Configuración Contenido de la caja • Una Aspiradora Para Patios • Uno Manual de Operador • Uno Manual de Operador de Motor • Una Manija superior e inferior • Uno Montaje de la manguera • Uno Anteojos de seguridad •... - Page 28 Tire de las dos uniones del cable unidas a los cables, ajuste Tire del perno con resorte del lado exterior de la base, aproximadamente 8 pulgadas de cada extremo de cable, y y ponga el perno en línea con el primer agujero (el ubique los cables en su guía.
- Page 29 Bolsa Oprima la palanca de ajuste de la altura del pico hacia la rueda. Vea la fig. 3-7. Sostenga la manija de la bolsa con una mano y deslice la varilla de seguridad del soporte de montaje hacia el motor con la otra mano.
-
Page 30: Controles Y Características
Controles Y Características Arrancador de Retroceso Bolsa Manija de la manguera Montaje de la manguera Extensión de Manguera Palanca del pico / Canal de la cortadora manguera de la aspiradora Palanca Palanca de ajuste de la altura del pico Figura 4-1 Montaje de la manguera ADVERTENCIA: Al operar una cortadora... -
Page 31: Funcionamiento
Funcionamiento Arranque y Parada del Motor Consulte el manual incluido con su Chipper El operador del motor de vacío / máquina destructora de documentos para obtener instrucciones sobre cómo iniciar y parar el motor. Descarga de la Bolsa Desenganche las tiras de la bolsa de la manija inferior. Suelte el broche de la bolsa a presión de la parte superior de la manija inferior. - Page 32 Uso Del Pico De La Aspiradora El desecho que se acumula en los patios como por ejemplo las hojas y las agujas de los pinos pueden aspirarse a través del pico para triturarlos. Después que ha triturado el material con las hojas de desgranar del montaje del motor, el mismo será...
-
Page 33: Mantenimiento Y Ajustes
Mantenimiento Y Ajustes Mantenimiento Siga el manual de motor separado embalado por su unidad para instrucciones de lubricación. Recomendaciones Generales Care de Equipo • Respete siempre las reglas de seguridad cuando realice • Limpie cuidadosamente la aspiradora para patios después tareas de mantenimiento. - Page 34 ADVERTENCIA: Saque el tornillo de cabeza hexagonal de la parte superior Antes de realizarcualquier tipo del de la caja posterior cerca del soporte de montaje, y la mantenimiento en la máquina, espere todas las tuerca de seguridad de la brida que une la pantalla de partes a dejar de moverse y desconectar el alambre desgranado.
-
Page 35: Servicio
Servicio Cuidado de la Cuchilla Traba de sostén ADVERTENCIA: Antes de realizarcualquier tipo del delantera/ mantenimiento en la máquina, espere todas las Arandela Montaje tuerca de seguridad partes a dejar de moverse y desconectar el alambre del brazo de bujía. El fracaso de seguir esta instrucción podría campana giratorio causar la herida personal o el daño a la propiedad. - Page 36 Incline la unidad con cuidado y apóyela hacia arriba para Es posible alcanzar las tuercas de los tornillos de cabeza obtener acceso por la parte inferior al material de montaje plana desde la parte inferior, mediante una llave universal del pico y al motor. Retire los tres tornillos con reborde de 1/2 pulg.
- Page 37 Notas...
-
Page 38: Solución De Problemas
Solución de problemas Problema Causa Remedio El motor no arranca La palanca del regulador (de ser equipado) Mueva la palanca del regulador a la posición no está en la posición de arranque correcta. START (inicio)/RUN (dirigido). Interruptor de motor (de ser equipado) en de Mueva el interruptor de motor a EN la posición. - Page 39 Problema Causa Remedio Saltos ocasionales La distancia disruptiva de la bujía es muy Quite la bujía y ajuste el hueco. (pausas) a pequeña. alta velocidad Ajuste de la mezcla del carburador mal Consulte el manual del motor. realizada. Demasiada vibración Hay partes que están flojas o el motor está...
-
Page 40: Piezas De Reemplazo
Las disposiciones de esta garantía cubren el recurso de reparación zapatas antideslizantes, ruedas de fricción, placas de raspado, gomas única y exclusiva que surge de la venta. Troy-Bilt no se hará helicoidales y neumáticos. responsable de ninguna pérdida o daño incidental o resultante, incluyendo sin limitación, los gastos incurridos para los servicios...