Advertisement
Table of Contents
- 1 Table of Contents
- 2 Important Precautions
- 3 Before You Begin
- 4 Assembly
- 5 How to Use the Chest Pulse Sensor
- 6 How to Use the Elliptical Exerciser
- 7 Maintenance and Troubleshooting
- 8 Conditioning Guidelines
- 9 Part List
- 10 Exploded Drawing
- 11 How to Order Replacement Parts
- 12 Limited Warranty
- Download this manual
Model No. NTE13921
Serial No.
Serial Number
Decal
QUESTIONS?
If you have questions, or if there
are missing parts, we will guar-
antee complete satisfaction
through direct assistance from
our factory.
TO AVOID DELAYS, PLEASE
CALL DIRECT TO OUR TOLL-
FREE CUSTOMER HOT LINE.
The trained technicians on our
customer hot line will provide
immediate assistance, free of
charge to you.
CUSTOMER HOT LINE:
1-888-825-2588
Mon.–Fri., 6 a.m.–6 p.m. MST
CAUTION
Read all precautions and instruc-
tions in this manual before using
this equipment. Keep this manual
for future reference.
_
USER'S MANUAL
Visit our website at
www.nordictrack.com
new products, prizes,
fitness tips, and much more!
Advertisement
Table of Contents

Related Manuals for NordicTrack Cx995 Elliptical


Summary of Contents for NordicTrack Cx995 Elliptical
- Page 1 CUSTOMER HOT LINE: 1-888-825-2588 Mon.–Fri., 6 a.m.–6 p.m. MST CAUTION Visit our website at Read all precautions and instruc- tions in this manual before using www.nordictrack.com this equipment. Keep this manual new products, prizes, for future reference. fitness tips, and much more!
-
Page 2: Table Of Contents
LIMITED WARRANTY ............. .Back Cover NordicTrack is a registered trademark of ICON IP, Inc. -
Page 3: Important Precautions
IMPORTANT PRECAUTIONS WARNING: To reduce the risk of serious injury, read the following important precau- tions before using the elliptical exerciser. 1. Read all instructions in this manual before 12. The pulse sensors are not medical devices. using the elliptical exerciser. Various factors, including the user's move- ment, may affect the accuracy of heart rate 2. -
Page 4: Before You Begin
BEFORE YOU BEGIN Congratulations for selecting the new NordicTrack ® tional questions, please call our Customer Service CX 995 elliptical exerciser. The CX 995 is an incredi- Department toll-free at 1-888-825-2588, Monday bly smooth exerciser that moves your feet in a natural through Friday, 6 a.m. -
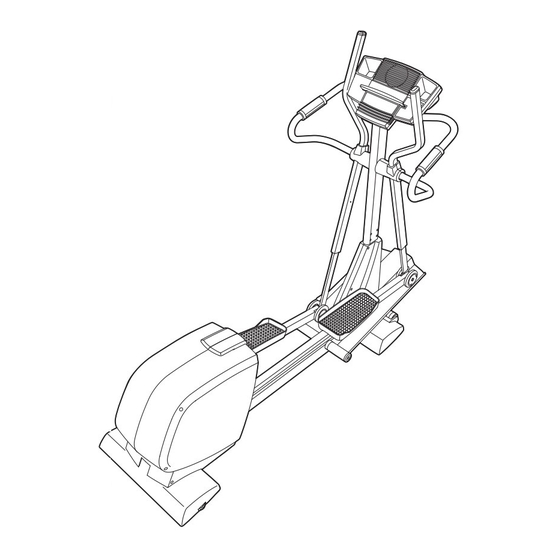
Page 5: Assembly
ASSEMBLY Assembly requires two persons. Place all parts of the elliptical exerciser in a cleared area and remove the packing materials. Do not dispose of the packing materials until assembly is completed. In addition to the included allen wrenches, assembly requires a phillips screwdriver , two adjustable wrenches , a rubber mallet... - Page 6 2. Identify the Pivot Axle (14), which is the longer of the two axles. Slide a Ramp Cover (48) onto an M6 x 16mm Patch Screw (76) as shown. Tighten the Patch Screw into one end of the Pivot Axle. Apply a small amount of the included grease to the Pivot Axle.
- Page 7 5. Slide a Weld Spacer (119) onto the axle on the left side of the Upright (2), with the open side of the Weld Spacer facing the Upright. Locate the Upper Body Arm (118) that has the Left Upper Body Leg (31) inside of it (the Left Upper Body Leg is marked with a sticker).
- Page 8 7. Identify the Left Pedal (10), which is widest at the rear and has an opening on the left side. Attach the Left Pedal to the Left Pedal Leg (4) with two M8 x 54mm Button Screws (83). Attach the Right Pedal (11) to the Right Pedal Leg (5) in the same way.
-
Page 9: How To Use The Chest Pulse Sensor
HOW TO USE THE CHEST PULSE SENSOR To get the best performance from the chest pulse sen- two electrode areas on the inner side. Using a sor, please read the instructions below. saline solution such as saliva or contact lens solution, wet both electrode areas. - Page 10 CHEST PULSE SENSOR CARE Next, hold the chest pulse sensor near the console. While holding one thumb stationary, begin tapping the other thumb against the electrode area at a rate • Thoroughly dry the chest pulse sensor after each of about one tap per second. Check the heart rate use.
-
Page 11: How To Use The Elliptical Exerciser
HOW TO USE THE ELLIPTICAL EXERCISER HOW TO PLUG IN THE POWER CORD The green-colored rigid ear, lug, or the like extending from the adapter must be connected to a permanent This product ground such as a properly grounded outlet box cover. must be Whenever the adapter is used, it must be held in Grounded Outlet Box... - Page 12 CONSOLE DIAGRAM Note: If there is a sheet of clear plastic on the face of the console, remove it before using the console. FEATURES OF THE CONSOLE special iFIT.com CD programs (CDs are available sep- arately). IFIT.com CD programs automatically control The state-of-the-art console offers an impressive array the resistance of the pedals and prompt you to vary of features.
- Page 13 Monitor your progress with the matrix, the HOW TO USE THE MANUAL MODE Training Zone bar, and the main display. The matrix—When Begin pedaling to activate the console. the manual mode or Make sure that the power cord is properly the iFIT.com mode is selected, the matrix plugged in (see HOW TO PLUG IN THE...
- Page 14 The right side of heart rate, hold the contacts; your palms must be the main display will resting on the upper contacts, and your fingers must be touching the lower contacts. Avoid mov- show the approxi- ing your hands. mate numbers of calories and fat calo- ries you have When your pulse is...
- Page 15 When only three seconds remain in the first seg- HOW TO USE PERSONAL TRAINER ment of the program, both the Current Segment PROGRAMS column and the column to the right will flash, a series of tones will sound, and all resistance set- tings will move one column to the left.
- Page 16 Monitor your progress with the main display. HOW TO USE HEART RATE PROGRAMS See step 4 on page 13. Each heart rate program helps you to keep your heart rate near a certain percentage of your maximum heart Measure your heart rate if desired. rate during your workout.
- Page 17 As you exercise, the Training Zone bar will help Enter your age. you to keep your heart rate near the current tar- get heart rate for the program. The lit indicators You must enter your age to use a heart rate pro- in the bar will show your actual pace.
- Page 18 HOW TO CONNECT YOUR PORTABLE STEREO HOW TO CONNECT YOUR CD PLAYER, VCR, OR COMPUTER Note: If your stereo has an RCA-type AUDIO OUT jack, see instruction A below. If your stereo has a 1/8” LINE OUT jack, see instruction B. If your To use iFIT.com CDs, the elliptical exerciser must be stereo has only a PHONES jack, see instruction C.
- Page 19 HOW TO CONNECT YOUR HOME STEREO HOW TO CONNECT YOUR COMPUTER Note: If your stereo has an unused LINE OUT jack, Note: If your computer has a 1/8” LINE OUT jack, see instruction A below. If the LINE OUT jack is see instruction A.
- Page 20 HOW TO CONNECT YOUR VCR B. Plug one end of the audio cable into the jack beneath the console. Plug the other end of the Note: If your VCR has an unused AUDIO OUT jack, cable into the adapter. Plug the adapter into an see instruction A below.
- Page 21 The program will function in almost the same way HOW TO USE IFIT.COM CD AND VIDEO as a personal trainer program (see step 3 on PROGRAMS page 15). However, an electronic “chirping” sound will alert you when the resistance setting and/or the pace setting is about to change.
- Page 22 Follow the desired links on our Web site to HOW TO USE PROGRAMS DIRECTLY FROM select a program. OUR WEB SITE Read and follow the on-line instructions for using a program. Our Web site at www.iFIT.com allows you to play iFIT.com audio and video programs directly from the Follow the on-line instructions to start the internet.
- Page 23 Enter your height. HOW TO MEASURE YOUR BODY FAT PERCENTAGE If you have already entered your height, press the Enter button. If you have not entered your height, press the Up Arrow or Down Arrow button to enter your height, and then press the Enter CAUTION button.
- Page 24 Enter a goal. HOW TO USE A CUSTOM PROGRAM If you selected a Fat Burn program, the main In addition to offering personal trainer programs, the display will show a body fat goal. If you have console can provide custom fat burn, weight loss, or already entered a body fat goal, press the Enter cardio programs based on the personal data that you button.
- Page 25 The main display will show the latest measure- HOW TO CHART YOUR PROGRESS ment of your body fat percentage, your body fat goal, and the number of times that you should Begin pedaling to activate the console. exercise per week. Note: If you have not mea- sured your body fat percentage (see page 23), See step 1 on page 13.
-
Page 26: Maintenance And Troubleshooting
MAINTENANCE AND TROUBLESHOOTING Inspect and properly tighten all parts of the elliptical HOW TO MOVE THE ELLIPTICAL EXERCISER exerciser regularly. Replace any worn parts immedi- ately. Stand in front of the elliptical exerciser, hold the han- dlebars firmly, and place one foot against the ramp in For smooth the location shown below. -
Page 27: Conditioning Guidelines
CONDITIONING GUIDELINES During the first few minutes of exercise, your body WARNING: uses easily accessible carbohydrate calories for ener- gy. Only after the first few minutes of exercise does Before beginning this or any exercise pro- your body begin to use stored fat calories for energy. gram, consult your physician. -
Page 28: Part List
PART LIST—Model No. NTE13921 R0304A Key No. Qty. Description Key No. Qty. Description Frame Clamp Upright Reed Switch/Wire Ramp Return Spring Left Pedal Leg Guide Rod Right Pedal Leg Resistance Cable Rear Stabilizer Flywheel Axle Rear Stabilizer Cover Flywheel Bearing Front Stabilizer Eye Bolt Front Stabilizer Cover... - Page 29 Key No. Qty. Description Key No. Qty. Description Lower Foam Grip Weld Spacer M4 x 25mm Tek Screw Sleeve 7.6mm Spacer Upper Body Foam Grip Wheel Bushing Upper Body Endcap M8 x 19mm Patch Screw Upper Body Bushing Wheel M5 x 4mm Screw Belt Right Upper Body Leg Pulse Extension Wire...
-
Page 32: How To Order Replacement Parts
Friday, 6 a.m. until 6 p.m. Mountain Time (excluding holidays). To help us assist you, please be prepared to give the following information when calling: • The MODEL NUMBER of the product (NTE13921) • The NAME of the product (NordicTrack ® CX 995 elliptical exerciser) •...