Advertisement
Quick Links
G E T T I N G
G E T T I N G
S T A R T E D
S T A R T E D
Mackie Control
(or other MIDI
MIDI
device)
IN
MIDI OUT
MIDI IN
MIDI
OUT
Guitar
Microphone
USB Connection
Laptop
™
™
SPDIF
IN
DAT, CD/DVD player
OUT
or CD-R recorder
IN
MIDI
OUT
MONITOR
L / R
INPUT 1
Mackie HR624 or other
Active Studio Monitors
INPUT 2
Power Supply
9V DC
750mA
USB
Headphones
(plug into
front panel)
Advertisement

Related Manuals for Mackie Spike


Summary of Contents for Mackie Spike
- Page 1 DAT, CD/DVD player or CD-R recorder MIDI OUT MIDI MIDI IN MIDI MONITOR L / R INPUT 1 Mackie HR624 or other Active Studio Monitors INPUT 2 Guitar Power Supply 9V DC 750mA Microphone Headphones (plug into USB Connection...
-
Page 2: Table Of Contents
Please visit: www.mackie.com/spikeauth “Mackie,” “Spike,” and the “Running Man” fi gure are trademarks or registered trademarks of LOUD Technologies Inc. All other brand names mentioned are trademarks or registered trademarks of their respective holders, and are hereby acknowledged. -
Page 3: Getting Started
Getting Started We hope this guide will help you get started making recordings with Spike. It describes how to in- stall the software, hook up your gear, and make a recording using the XD-2 USB interface and the Tracktion software. -
Page 4: Installing The Software
Installing the Software • The Spike CD contains an installer which will help you install the various software applications, plug-ins and drivers. • Visit www.mackie.com/spikeauth to register your Spike, and download any updates to the soft- ware and fi rmware. -
Page 5: To Install The Software On A Macintosh
To install the software on a Macintosh: 1. Turn off any (non-essential) applications. 2. Insert the Spike CD into your Macintosh’s CD drive. 3. Open the disk icon on your desktop. 4. StartHere.html contains the latest instructions for installing the software. Some software is drag and drop, and some use installers. -
Page 6: Installing And Connecting The Hardware
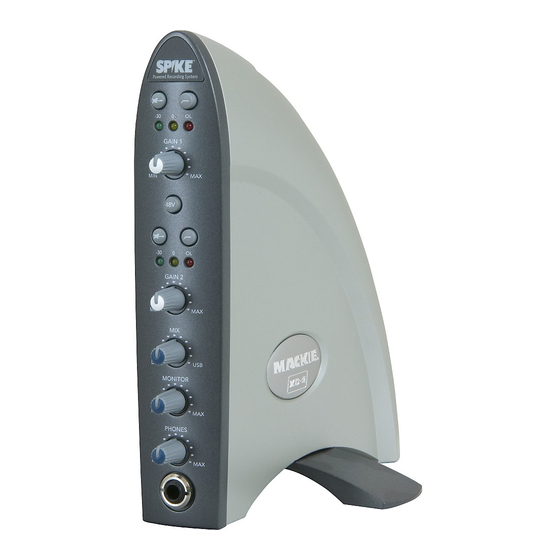
Installing and connecting the hardware • To stand the XD-2 upright, pull the stabilizer bar downwards and twist it out 90˚ from the body, as shown here. The spring is quite strong, so be careful not to nip yourself as it snaps back into place. •... -
Page 7: Typical Hookup Diagram
DAT, CD/DVD player or CD-R recorder MIDI OUT MIDI MIDI IN MIDI MONITOR L / R INPUT 1 Mackie HR624 or other Active Studio Monitors INPUT 2 Guitar Power Supply 9V DC 750mA Microphone Headphones (plug into USB Connection... -
Page 8: Making A Recording
Making a Recording The following example of a recording session uses a guitar plugged directly into the XD-2 channel 1 input, and a microphone plugged into the channel 2 input, to record audio tracks in the Tracktion soft- ware. We will also record some MIDI data that will trigger a softsynth within Tracktion. Before starting, make sure you have correctly installed the XD-2 and Tracktion software. - Page 9 On the XD-2 front panel (with the MIX knob set to DIR) turn the PHONES knob gently to hear yourself through your headphones. Remember – to avoid feedback, keep your monitor volume turned down while using a microphone, especially if your mic is close to the monitors. To eliminate any low-end bass rumble, push in the front panel HP fi...
- Page 10 10. Launch the Tracktion software and select the Mackie XD-2 hardware under Settings menu/WAVE devices. Also select Mackie XD-2 (for Mac), USB Audio Device (for PC) under the Settings/MIDI devices menu. For more details of the Tracktion software, press "F12" on your keyboard, or click the HELP button in Tracktion Settings screen the lower left of the Tracktion screen.
- Page 11 12. Navigate to a good location, enter a wonderful name for the new project in the pop-up dialog box, then click Save. All of this project's tracks, clips and edits will be saved here by Tracktion. Note: Do not create project folders inside the Tracktion main folder, or any software main folder.
- Page 12 The audio icon represents Tracktion's stereo audio input (from your XD-2). The MIDI icon repre- sents its MIDI input. If these icons do not appear, check the input selections in the "Settings" tab, and make sure the Mackie XD-2 is chosen as your audio input and output device. INPUT 1 + 2...
- Page 13 Click the audio icon and uncheck the "treat as stereo channel pair" button in the Properties area. Two independent audio icons will then appear. Ch.1 Icon INPUT 1 Ch.2 Icon INPUT 2 MACKIE XD2 Treat as INPUT 1 stereo channel pair (off)
- Page 14 (in the Properties area) will show the signal levels being recorded. M=Mute INPUT 1 S=Solo Channel Meter Pan and volume INPUT 2 MACKIE XD2 Play INPUT 1 Record Bit Depth Properties Area Transport Area Tracktion Edit Screen (with connected Input 1 Icon, shown larger than real size) Getting...
- Page 15 Tracktion lets you export your master- work in various formats for distribution, and lets you import previous work. For more details about using Spike please see page 59 of the user's guide. Getting...
- Page 16 23. MIDI data can be recorded using one of the softsynths supplied with Tracktion. Drag the MIDI icon to the left of a track, and Arm it. 24. Click the "New Filters" button, and drag down the new fi lter to the right of the track, in front of any existing fi...
-
Page 17: Computer System Requirements
Computer System Requirements Minimum PC requirements • WIN XP • Intel Pentium 3 or 4, or AMD Athlon (750 MHz or better is recommended for Tracktion). • At least 128 MB RAM; 256 MB or more is recommended for Tracktion work. •... - Page 18 O U D T E C H N O O G I E S I N C . 1 6 2 2 0 W O O D - R E D R O A D N E ¥ W O O D I N V I E , W A 9 8 0 7 2 U S A U S A N D C A N A D A : 8 0 0 .