Table of Contents

Related Manuals for Kenmore Kenmore 385.15108200


Summary of Contents for Kenmore Kenmore 385.15108200
- Page 1 ® SEWmNG MACHINE Owner's Manual MAQUINA DE COSER Manual de Instrucciones MACHmNE A COUDRE Manuel d'instructions 15108200 Model, Modelo, Modele 385. 744-800-!64 Sears, Roebuck and Co., Hoffman Estates, IL 60179 U.S.A. wvcwosears,com...
- Page 2 Never operate this sewing machine if it has a damaged cord or plug, if it is not working properly, if it has been dropped or damaged, or dropped into water, Return this sewing machine to the nearest Sears store or service center for examination, repair, electrical or mechanical adjustmenL 4..
- Page 3 mNSTRUCCK::)NE$ DE SEGURIDAD IMPORTANTES ATENCm6N Su mdquina de coser estd diseSada y construida sSIo para uso dom_stico. Antes de usar esta m_,quina de coser, lea este manual y todas las reglas de seguridad e instrucciones operativas Pa,a reduoir el ctrica: r iesgo de descarga La mdquina nunca se debe desatender cuando se ha conectado, Siempre debe desconectarla...
- Page 4 & I'eau Rapportez la machine au magasin Sears le plus proche pour une v_rification, une r_paration, un r_glage _lectrique ou m_canique. N'utilisez jamais une machine dont les ouvertures de ventilation sont obstru_es.. Maintenez les ouies d'a_ration libres de toute accumulation de charpie, de poussi_re et de fibres de tissu.
- Page 5 COMPLETA POR 25 ANOS EN LA CABEZA DE LA MAQUINA DE COSER Durante 25 aSos desde la fecha de ta compra, Sears ofrec,e, libre de co,sto_ reparar los defectos en material o de manufactura que pueaan presentarse en los componentes mec&nicos ae +acaDeza ae +a m&quina ae coser.
- Page 6 Machine Specifications Item Specification Sewing speed (Maximum): Over 730 rp_m, Stitch length: 4 mm (Maximum) Stitch width: 5 mm (Maximum) Stitch package (Stitch functions): (Built-in stitches): Buttonhole: 4 step built-in buttonhole Machine dimensions: W 15,4" (390 mm) x D 6,1" (155 mm) x H 11 4" (290 mm) Weight (Net): 13.5 Ibs (6,2kg)
-
Page 7: Table Of Contents
TABLE OF CONTENTS Use the Seam Guides .............. SECTION !. NAMES OF PARTS Turn a Square Corner ............... Cabinets and Sewing Machine Tote Bag ......... Topstitching ..................Names of Parts ......_,............ Zipper Sewing 34-36 Available Accessories and Attachments ......4 ............... - Page 8 INDBCE SECCION I. NOMBRE DE LAS PARTES SECCION IlL COSTURA DE PUNTADA RECTA Gabinete y botsa de mano ................ Puntada recta ................... • Para empezar a coser ............. Nombre de las partes ........... :........... • Para terminar la coser ............... Accesorios y refacciones disponibl_s ..........
- Page 9 TABLE DES MATllbRES SurpiqC_re ......................PARTIE I, IDENTIFICATION DES PI_:CES DE LA MACHINE La couture des fermetures & gtissi_re ........35-37 Maliette et sac de transport ..............3 ° Pr_paracion du tissu ................identification des pi_ces .................. ° La couture ....................Accessoires et pi_ces disponibles ..........5...
-
Page 10: Cabinets And Sewing Machine Tote Bag
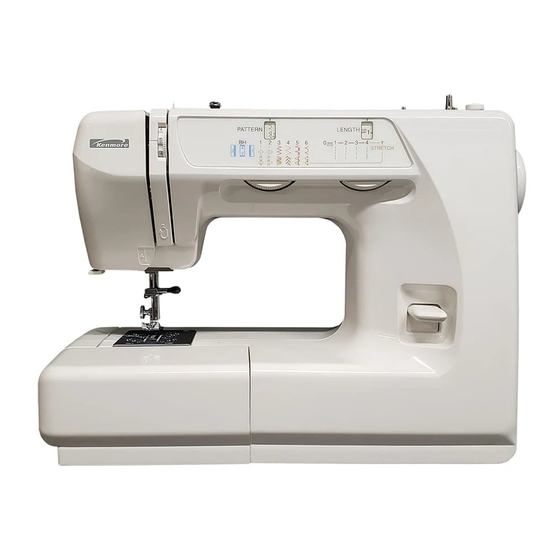
Cabinets and Sewing Machine Tote Bag (RSOS # 97605) Sewing Machine cabinets and Tote bags are available through the RSOS (Retail Special Order System) catalog at your nearest Sears retail store, Names of Parts (_ Stitch selector (_) Reverse stffch control... -
Page 11: Gabinete Y Botsa De Mano
Mallette et Sac de transport Usted encontrar_i una lfnea completa de gabinetes y bolsas de Vous trouverez dens les magasins Sears, ainsi que dens notre mano pare su m_quina de coser en e_cat,logo RSOS que est_ a catalogue une gamme complete de meubles et de sac de al venta en las tiendas Sears, transport pmzr les machines &... -
Page 12: Available Accessories And Attachments
Available Accessories and Attachments To order parts and accessories listed below, call: 1-800-366-PART (t-800-366-7278) 6 am - 11 pm, CST, 7 days a week When ordering parts and accessories, provide the following information: 1o Part Number 2,, Part Name 3, Model Number of Machine Part Nee Description 532096007... -
Page 13: Accesorios Y Refacciones Disponibl_S
Accesorios y refacciones disponibles Accessoires et pibces disponibles Pare ordenar tas partes y accesorios listados abajo, llame Pour commander des pi_ces ou accessoires, veuillez preparer 1-800-366-PART (1-800-366-7278) informations suivantes: de 6 AM a 11 PM, hera del centre, los siete d[as de la semana Num_ro de la piece 2. -
Page 14: Connecting Machine To Power Supply
SECTRON IL GE'FRNG READYTO Connecting Machine to Power Supply O Power supply plug (_) Power switch (_ Outlet (_ Machine socket (_) Machine plug (_) Light bulb Before connecting the power cord, make sure the voltage and frequency shown on the machine conform to your electrical power. -
Page 15: Para Coser
PARTIE II. PRFtPAREZ-VOUS _, COUDRE SECCION IlL PREPARACION DE LA iVtAQUINA PARA COSER Branchez la machine Conexi6n de la m_quina a la red el_ctrica rise _lectrique Interrupteur de courant Interruptor de corriente Red el_ctrioa Prise de courant Enchufe de la m&quina Prise de la machine lavija de toma de corriente Clavija de la m&quina... -
Page 16: Setting Spool Pins
Setting Spool Pins (_) Spool pin The spool pins are used for holding the spools of thread when feeding the thread to the machine.. To use, pull up the spool pins,. Push down for storage Presser Foot Lifter 0 Presser foot lifter (_) Normal up position (_ Highest position The presser foot lifter raises and lowers the presser foot. -
Page 17: Ajuste De Los Porta-Carretes
Pose de la broche b bobine Ajuste de los porta-carretes (_) Portacarrete (_ Broche & bobine Les broches & bobines servant & retenir les bobines de filen vue de Los portacarretes se utilizan para sostoner los carretes de hilo y alimentar asf ara m&quina con el hilo,, proc_der &... -
Page 18: Extension Table
Extension Table ® o Detaching the table Pull the table away from the machine, as illustrated, for "free-arm" sewing of cuffs and sleeves. o Attaching the table Push the extension table until it snaps into the machine. Extension table (_ Tab (_ Pin ®... -
Page 19: Ampliaci6N M6Vil De La Supefficie De Costura
Ralionge de plateau Ampliaci6n m6vil de la superficie de costura o Desmontaje de la ampliact6n m6vil o Pour retirer la rallonge _loignez-la de la machine comme iliustr& Tire de Ia ampliaci6n m6vil hacia afuera de la m,fiquina ta] como se ve en la ilustraci6n. - Pour fixer la rallonge •... -
Page 20: Changing Presser Foot
Changing Presser Foot OLever (_)Groove (_Pin o To remove: Turn the handwheel toward you to raise the needle to its highest position, Press the lever Oon the back of the foot holder. The presser foot will drop off. ° To attach: Place the presser foot so that the pin(_on foot lines up directly below the groove (_of the foot holder, Lower the foot holder to lock the foot in place. -
Page 21: Para Remover
Cambio de prensatelas Changement de pied presseur S Palanca Levier Encoche Ranura (_) Sujetador (_ Broche • Para remover: • Pour dettacher le pied-de-biche: Girar manuatmente, hacia uno mismo, e_volante qua la aguja Tournez le volant vet vous pour lever(_l'aiguille _ la position la alcance su posicibn mrs elevada;... -
Page 22: Selecting Needle And Fabric
Selecting Needle and Fabric For general sewing, use needle sizes 11 or 14, A fine thread and needle should be used for sewing lightweight fabrics, so the fabric wil! not be marred. Heavy fabrics require a needle large enough to pierce the fabric without fraying the needle thread In the needle set, there is one each of sizes 11, 14, 16, and 18, and a blue needle. - Page 23 Seleccibn de hilo y tela Para el cosido general se utilizan agujas del tamaro 1t o 14o Los hilos y agujas delgados deber&n utilizarse para coser tejidos ligeros evitando asi que _stos se puedan echar a perden Cosa tejidos gruesos con una aguja fo suficientemente gruesa come para que pueda penetrar el tejido sin que et hile de la aguja se deshilache En la caja de agujas hay una aguja de cada tamario 11, 14, 16, 18, y una de tatrn azut del tamaro...
- Page 24 Choix de I'aiguille et tissu Pour les coutures normales, utilisez une aiguille n°tt ou 14_ On devrait utiliser du fil fin et une aiguilfe fine avec les tissus t6gers pour ne pastes endommager_, Les tissus lourds nScessitent une aiguille assez grosse pour percer le tissu sans effilocher le fil de t'aiguifleo Dans un jeu d'aiguilles,,!l y a une aiguille de chaque grosseur 11, 14, 16, 18 et une aiguiile _ bout bieu, Uaiguille &...
- Page 25 (blank page) (p&gina blanca) (page blanche)
-
Page 26: Bobbin Winding
Bobbin Winding • Removing bobbin case Remove the extension table from the machine by pulling it to the left. Open the shuttle coverC) by pulling down the embossed part on the left of the cover° Raise the needle to its highest position by rotating the handwheel toward you_ Shuttle cover (_) Bobbin case... -
Page 27: Embobinado De Ta Canilla
Embobinado de la canilla Remplir ta canette o C6mo sacar el portacanillas o Retrait de la porte-canette Retire ta extenst6n desliz_ndola hacia ta izquierda, Abra la Retirez l'emboTture du socte en la tirant vers la gauche. tapa fanzadera(_jalando hacia abajo la parte hueca del A I'aide de la prise situ_e _ la gauche du couvercle(_ de la lado izquierdo de la tapao Levante ta aguja basra la posici6n... -
Page 28: Bobbin Winding
Bobbin winding (continued) [] Push the bobbin to the right,. [_With the free end of the thread held in your hand, depress the foot cohtrol. Stop the machine when it has made a few turns, and cut the thread close to the hole in the bobbin.. -
Page 29: Remplir La Canette
Embobinado de la canilla (Continuaci6n) Remplir la canette (suite) Poussez la canette vers la droite° Empuje la canilla a la derecha, En tenant rextr_mit8 libre du fil & la main, appuyez sur la Sujete et final del hilo con los dedos y pise el pedal de control, pSdate de contrSle_. -
Page 30: Inserting Bobbin
Inserting bobbin [_ Place a bobbin in the bobbin case, making sure the thread feeds clockwise from the bobbin.. Draw the thread through the slot of the case. []Continue to draw the thread under the tension spring 0 and through the opening° Pull out about 4"... -
Page 31: Colocaci6N De La Canilla
• Colocaci6n de la canilla =Insertion de la canette lntroduisez la canette dans le portecanette en prenant soin Coloque la canilla en el portacanillas asegur_ndose que el hilo se aiimente en el sentido alas agujas del re!oj y salga que le fil se d_roule vers fa droite et qu'il sorte de ]a canette_ de la bobina Tirez le fif par la fente du porte-canette+ [_Tire... -
Page 32: Threading The Machine
Threading, the Machine o Threading the machine * Raise the thread take-up lever to its highest position by turning the handwheel counterclockwise, * Raise the presser foot tifter_ * Place a spool on the spool pin, with thread coming off as shown, [] Draw the end of thread around the upper thread guide_ [] While holding the thread near the spool, draw the end of... -
Page 33: Enhebrado Del Hilo De La Aguja
Enhebrado del hilo de la aguja Enfilage de la machine o Enfilage de |a machine , Enhebrado del hito de la aguja " Fa_tes monter ie levier releveur tendeur de fil te plus haut * Suba el tirahi!os hasta su posici6n m_s alta girando et volante en el sentido contrario a las agujas def relojo possible en tournant le volant &... -
Page 34: Adjust The Needle Thread Tension For A Straight Stitch
Adjust the Needle Thread Tension for a Straight Stitch • Correct tension O Needle thread (Top thread) <_)Bobbin thread (Bottom thread) (_) To loosen (_) To tighten The ideal straight stitch has threads locked between two layers of fabric, as illustrated (magnified to show detail), if you look at the top and bottom of a seam, notice that there are no gaps Each stitch is smooth and even_ When adjusting the needle thread tension, the higher the... -
Page 35: Ajuste De La Tensi6N Dei Hilo De La Aguja Para Puntada Recta
Ajuste de la tensi6n del hilo de la aguja para Rdglage de la tension du fil de raiguille pour le puntada recta point droit oTensi6n correcta • Tension correcte S Fil de I'aiguille (Fil sup_rieur) Hilo de }a aguja (Hilo superior) Hilo de la canilla (Hiio inferior) Fil de la canette (Fil inf_rieur) Pour rel&cher la tension... -
Page 36: Adjust The Needle Thread Tension For Zigzag Stitch
Adjust the Needle Thread Tension for Zigzag Stitch For an ideal zigzag stitch, the bobbin thread does not show on the right side (Top side) of the fabric and needle thread shows slightly on the wrong side (Bottom side) of the fabric. -
Page 37: Si La Tension Est Trop Faible
4uste de la tensi6n del hilo de la aguja para Rdglage de la tension du fit de raiguille pour le point zig-zag p_ntada zig-zag Lorsqu'un point zig-zag est effectu_ correctement, le fil de la El la puntada zig_zag ideal, e! hilo de Jacanilta no aparecer_ an laparte de arriba de la tela y el hilo de la aguja se ver_ canette ne parait jamais sur le c6t8 endroit du tissu et le fit de ILeramente en la parte de abajo de la tel&... -
Page 38: Stitch Selector
Stitch Selector (_) Setting mark (_) Stitch selector The stitch selector not only determines the stitch you select, but also regulates the stitch width of zigzag stitch. NOTE: To avoid needle or fabric damage, make sure the needle is up and out of the fabric while selecting a stitch, •... -
Page 39: Bouton De Marche Arri_Re
S_iecteur de point Selector de patr6n (_ Marca de ajuste (_ RepUte de rSglage (_) S_lecteur de point (_) Selector de patr6n Gr&ce au s6tecteur de point, vous pouvez non seulement choisir El selector de patrSn no s6]o determina la puntada seleccionada, sino que tambi_n reguta el ancho de puntadas zig-.zag. -
Page 40: Straight Stitch
SECTION ill. STRARGHT STITCH SEWING ® Straight Stitch 1 or 2 (_) Stitch selector: Red zone Stitch length: PATTERN _ LENGTH _] 2to6 (_) Needle thread tension: (_) Presser foot: Zigzag foot ® ® (_) Presser foot: Straight stitch foot NOTE: There are two needle stitch position settings, left and center.. -
Page 41: Seccion Ill Costura De Puntada Recta 3 Puntada Recta
SECCtON BI. COSTURA DE PUNTADA RECTA PARTIE lii. COUTURE AU POINT DROIT Point droit Puntada recta Selecteur de point: I ou 2 elector de patr6n: 1 o 2 2_ Longueur du point: Zone rouge Control de la fongitud: Zona roja 3(_ Tension du fil de l'aiguille: 2 &... -
Page 42: Topstitching
Topstitching ® 1 or2 (_ Stitch selector: Red zone (_) Stitch length: 2to 6 (_) Needle thread tension: PATTERN LENGTH (_) Presser foot: Zigzag foot (_) Presser foot: Straight foot NOTE: When using the straight stitch foot, make sure to use the center needle position. -
Page 43: Costura A Ta Vista
Surpiq_re Costura a la vista 1 ou2 elector de patr6n: Zone rouge Longueur du point: Zona roja Control de la longitud: S_lecteur de point: 2&6 Tension du fif de I'aiguilte: Tensi6n del hilo de la aguja: Pied zig-zag Prensatelas pare zig-zag Pied presseur: Prensatelas: Pied &... -
Page 44: To Sew
Zipper Sewing (Continued) o To sew [] (_) Zipper teeth (_) Zipper tape (_)Wrong side (Bottom side) of fabric (1/8") Fold back the left seam allowance,, Turn under the right seam allowance to make a 1/8" (0.2 to 0.3 cm) ford, Place the zipper teethO next to the fold and pin in place. -
Page 45: Para Cbser
Costura de cremalleras (continuaci6n) Couture des fermetures _ glissibre (suite) o Para coser 0 La couture []C) Dientes de ta cremallera r_(_) Dents de la fermeture Cinta de ta crematlera Ruban de la fermeture Envers du tissu Parte de agajo de la teta Doble la teta superior de la costura izquierda hacia arriba todo Reptiez la ressource du c6t_ gauche. -
Page 46: To Drop Or Raise The Feed Dogs
To Drop or Raise the Feed Dogs O To drop the feed dogs, press the lever in the direction of the arrow, as illustrated ® To raise the feed dogs, push the lever in the direction of the arrow, as illustrated, Feed dogs must be up for normal sewing., ©... -
Page 47: C6Mo Bajar/Subir Los Dientes Del Transporte
C6mo bajar i subir los dientes del transporte Comment descendre ou monter les griffes d'entrainement (_ Para bajar los dientes det transporte mueva la palanca de mando en la direcci6n indicada por la flecha como se muestra (_ Pour faire descendre les grilles d'entrainement, poussez le en la ilustraciSn. -
Page 48: Basic Zigzag
SECTION iV, ZIGZAG STITCH SEWING ® Basic Zigzag (_ Stitch selector: PATTERN LENGTH [_ ® Stitch length: Red zone (_ Needle thread tension: 2 to 5 ® (_) Presser foot: Zigzag foot The zigzag stitch is one of the most common and versatile stitches. -
Page 49: Puntada De Zig-Zag
SECCION IV. PUNTADAS DE ZIG-ZAG PARTiE IV. POINTS ZIG-ZAG Zig-zag simple Puntada de zig-zag (T) Selector de patr6n: S_fecteur de point: Zona roja Zone rouge ontrol de la long_ud; 2_ Longueur du point: 2&5 3(,_) T ension du fil de I'aigu]t_e: Tensi6n del hilo de la aguja: Prensate]as: Prensateias para zig-zag... -
Page 50: Monogramming
Monogramming ® (_ Stitch selector: 05 to 1 (_) Stitch length: lto4 (_) Needle thread tension: PATTERN LENGTH_ Satin stitch foot (_ Presser foot: ® Attach a piece of stabilizer on the wrong side (Bottom side) of the fabric,. Draw letters on the fabric with tailor's chalk. Form each pattern with a satin stitch, adjusting the stitch width. -
Page 51: Monogramas
Monogramas Monogrammes etector de patr6n: _lecteur de point: 0,5at 0.5&1 Longueur du point: Control de ia longitud: 1&4 Tensi6n del hilo de la aguja: Tension du fil de ]'aiguitle: @ Prensatelas: Prensatelas para puntada Pied presseur: Pied & point lanc6 decorativa Fixez un tissu stabilisateur sur I'envers du tissu Coloque la entreteta por la parte de abajo de ta tela.. -
Page 52: Bar Tacking
Bar Tacking © ® (_) Stitch selector: (_ Stitch length: 0.5 to 'I (_) Needle thread tension: 1 to 4 PATTERN LENGTH ® Presser foot: Zigzag foot ® ..This is similar to a very short satin stitch, and is used to reinforce points of strain, such as corners, pockets and straps of lingerie Sew four (4) to six (6) stitches. -
Page 53: Puntada De Refuerzo
Brides de renfort Puntada de refuerzo elector de patr6n: QSal Longueur du point: 0.5 & 1 Control de la tongitud: Tensi6n del hilo de ta aguja: Tension du fil de raiguille: 1 & 4 S61ecteur de point: (_ Prensatefas: Prensatelas para zig-zag Pied presseur: Pied zig-zag Esta puntada es similar a una puntada de reatce muy corta y se... -
Page 54: Overcasting Stitch
Overcasting Stitch ® (_ Stitch selector: (_) Stitch length: 1 to 2 PATTERN LENGTH [_ (_ Needle thread tension: 1 to 4 (_ Presser foot: Zigzag foot ® This stitch is useful in garment construction, and in finishing the raw edges of any sewing project, Start overcasting about 1/8"(0_3 cm) inside the raw corner of a seam, The right tip of the stitch should just clear the seam edge°... -
Page 55: Puntada De Sobrehilado O Remate
Puntada de sobrehilado o remate Surfilage C) Selector de patr6n: S6fecteur de point:: Control de la longitud: 1 a 2 Longueur du point: 1 _ 2 Tensi6n del hito de Ia aguja: 1 a 4 Tension du fil de aiguille: 1 ,_ 4 Prensatelas: Prensatelas para zig-zag... -
Page 56: Blind Hem Stitch
SECTION V. UTILITY AND DECORATIVE ® STITCHES Blind Hem Stitch LENGTH 5 or6 0 Stitch selector: 1 to3 ® Stitch length: ® 1 to4 (_) Needle thread tension: Zigzag foot 0 Presser foot: (_ Lightweight fabric (_) Heavyweight fabric (_ Wrong side (Bottom side) of fabric On heavyweight fabrics that ravel, the raw edge should be overcast first. -
Page 57: Dobladillo Invisible
PARTIE V. POINTS UTILITAIRES ET POINTS SECCION V. PUNTADAS UTILESY DECORATIFS PUNTADAS DECORATIVAS Ourlet invisible Dobladillo invisible (_ S_tecteur du point: 5 ou 6 (_ Selector de patr6n: (_) Largeur du point: 1 & 3 ontrol de ta longitud: Tension du fi{ de !'aiguille: 1 &... -
Page 58: Multiple Zigzag Stitch
Multiple Zigzag Stitch ® ® (!) Stitch selector: (_ Stitch length: 0.5 to 1 (_) Needle thread tension: 1 to 4 < ,., PATTERN LENGTH (_) Presser foot: Zigzag foot This is used to finish the seam allowance on synthetics and other fabrics that tend to pucker, The stitch is also excellent for darning and mending tears. -
Page 59: Puntada De Mdltiple Zig-Zag
Puntada de mdltiple zig-zag Point zig-zag multiple (_) S_lecteur de point: C) Selector de patr6n: Longueur du point: 0,5 & 1 Controf de la iongitud: &5 a 1 Tension du fi] de l'aiguilte: 1 & 4 Tensi6n del hilo de la aguja: t a 4 (_ Pied presseur: Pied zig-zag... -
Page 60: Decorative Stitch
Decorative Stitch ® (_) Stitch selector: 8or 9 Green zone (_) Stitch length: 1 to4 (_ Needle thread tension: (_) Presser foot: Zigzag foot ® For a delicate appearance on fabric, such as chiffon, use a single layer with a tear-away backing, if necessary. --,_R... - Page 61 Puntadas decorativas Points ddcoratifs (_ Selector de patr6n: (_) S61ecteur de point: 8ou9 Zona verde Zone verte ongitud de la puntada: ongueur du point: 1&4 Tensi6n del hito de la aguja: Tension d[,_fil sup6rieur: @ Prensatelas: Prensatelas para zig-zag Pied presseur: Pied zig-zag Para conseguir una apariencia delicada en texas como la seda o Pour obtenir un aspect raffin6 sur ]es tissus tets que la...
-
Page 62: Buttonhole
SECTION VL BUTTONHOLE ® Buttonhole PATTERN [_ LENGTH (_) Stitch selector: _[_ _=_[_ ® (_) Stitch length: Blue zone (_) Needle thread tension: 1 to 5 (_ Presser foot: Sliding buttonhole foot Depending on your preference, you may adjust the stitch ®... -
Page 63: Para Empezar A Coser
SECCSON VI. OJALES PARTIE VI. BOUTONNII_RE Boutonnibre Ojai incorporado S_lecteur de point: _-_{_ C) Setector de patrSn: (_) Longueur du point: Zone bleue (_) Control de la longitud: Zona Azut (_) Tension du fil de I'aiguille: 1 & 5 (_) Tensi6n del hilo de la aguja: 1 a 5 (_) Pied presseur: Pied &... -
Page 64: Buttonhole
Buttonhole (continued) Set the stitch selector at _ • Sew four (4) to six (6) stitches_ Stop sewing at a right stitch, Set the stitch selector at El ,.Sew until you return to the start mark of the buttonhole.. Stop sewing at a right stitch Set the stitch selector at W _Sew four (4) to six (6) stitches. -
Page 65: Boutonniere
Ojal (continuaciSn) Boutonniere (suite) R_giez le s_lecteur de point sur _. Cousez quatre (4) _ six {6) Ajuste el selector de puntada a _, Cosa de cuatro(4) a sels (6) puntadas, Tarmine cosiendo con una puntadaderecha,, points° Arr_tez la couture avec i'aiguille _ cfroite Ajuste el selector de puntada a L_., Cosa hasta qua alcance la R_glez le sSlecteur de po}nt sur L_ Cousez jusqu'&... -
Page 66: Care Of Your Machine
SECTION VI.CARE OF YOUR MACHINE NOTE: Unplug the machine Do not dismantle the machine other than as explained in this section Do not store the machine in a high-humidity area, near a heat radiator or in direct sunlight Clean the outside of the machine with a soft cloth and mild soap Replacing the Light Bulb... -
Page 67: Limpieza De Los Dientes Del Transporte
PARTIE VII. ENTRETBEN DE VOTRE MACHINE SECCION Vii. MANTENIMIENTO DE LA MAQUINA REMARQUE: D6branchez la machine. NOTA: Ne dSmontez rien d'autre que ce qui est d6crit dans ce chapitre. Desenchufe fa m,_quina. N'entreposez pas la machine darts un endroit humide, pros d'ur No desmonte ta m&quina de ninguna otra forma qua ta radiateur de chauffage central ou expos#e _ la lumi_re directe explicada en esta secciSno... -
Page 68: Cleaning The Shuttle Race
Cleaning the Shuttle Race This area must be kept free of dust, lint and tangled thread_ Clean the shuttle race area every three months. , Cleaning the shuttle area 0 Bobbin case Levers (_) Shuttle race cover (_) Shuttle (_) Shuttle race (_ Center pin on the shuttle 1o Raise the needle bar to its highest point, and then remove the bobbin case 0... -
Page 69: T 9 Limpieza De La Corredera De La Lanzadera
Nettoyage de la coursibre Limpieza de la corredera de la lanzadera Esta .firea deber& mantenarse libre de polvo, pelusa y de La navette dolt _tre gard_e exempte de poussi_re, de charpie et de bouts de fil emmSl6s Nettoyez ia navette a ocasionales hiios atorados, Limpie la &rea de ta corredera de la tousles trois tools. -
Page 70: Oiling The Machine
Oiling the Machine Oil the points as shown at least once a year. Use good quality sewing machine oil+ One or two drops of oil is sufficient. Remove the excess oil, otherwise it may stain the fabric+ If the machine has not been used for a long time, oi! it before sewing. -
Page 71: Lubricaci6N De La Maquina
Huilage de la machine Lubricaci6n de la mdquina Huilez la machine une lois par an minimum _ tous Ies endroits Lubrique la m=fiquina, los puntos iiustrados per Io menos una vez al aSo.. Una o dos gotas de aceite ser_ suficiente.. montr_s sur cette page suivantes, sinon elle perdra son rendement d'origine et elle cognera bruyamment, Si vous utilisez... -
Page 72: Troubleshooting
Troubleshooting Reference Condition Cause The needle thread The needle thread is not threaded properly Page 24 breaks° The needle thread tension is too tight. Pages 26, 28 The needle is bent or blunt. Page 10 The needle is incorrectly inserted Page 10 The needle thread and the bobbin thread are not set properly Page 24, 26... - Page 73 Soluciones para problemas de funcionamiento ..Condicibn Causa Probable Referencia Se rompe el hilo de El hilo de la aguja no se ha enhebrado correctamente P&gina 25 La tensibn del hilo de la aguja es excesiv& P&ginas 27, 29 la agujao La aguja est_ despuntada o doblada, P&gina 11 P&gina 11...
- Page 74 En cas de problbme ........ Probibme Cause Reference Le fil d'aiguille 1o Le fil d'aiguille n'est pas pass_ correctement, Page 25 casse. 2. La tension du fil d'aiguilie est trop forte Pages 27, 29 & Ltaiguille est tordue ou 6mouss_e, Page11 44 Uaiguiile est mai instal]_e, Page11...
- Page 75 Sewing Machine Model 15108 M_.quina de Coser Modelo Machine _. Coudre Mod_le ® SETTING UP YOUR MACHINE Spool pin 1oYou'll find the spool pin on the top cover..Pulj up the spool pln_ Perta carmles 2_Plug foot control into machine receptacle. Then connect power supply plug into any 110/120 volt AoC_ wait outlet., 3oYour Kenmore sewing machine has been thoroughly oiled at the factory.
- Page 76 _wll Threading Carefree stitching depends on the Big Enhebrado Aguja Lanzadera Puntada libra de cuidado depende de las GRANDE Needle Shuttle Aiguille Navette Enfilage Le plaisir de coudre depends des GRANDS t*i _t_ _, L_t_'_'J J ,l_U,, ,i,,iml,,i,,i ..:l::l:Ulll,::l::: NEEDLE: Fia! side away fromyou, ijl_...
- Page 77 ::,:.;..Tension and the Little Feeding Oiling Lubrication Tension y los Peque_os Avance et des Petits Lubrification Tension Entra_nement Check sUtch length Vedfique el largo de puntada FEEDING VOdfiez la longueur du point (Material does not feed properly) AVANCE (Material no avanza bien) ENTRA|NEMENT (Avance irr_gui_redu tissu) OILING...
- Page 78 PRACTICAL STITCH CHART TABLF_=U SYNOPTIQUE REFERENCIA DE PUNTADA (._I_ Prensatelas p ara ,_2o PrensataIas p are punimda ___ 3,Prensatelas F aro puntada recta Zigzag decomtiva 1. Pied Point Zigzag 2, Pied Poin_ lance 3, Pied Point Dmit 4_ Zipper Foot 5, Sliding Buttonhole Foot 4.
- Page 79 ..(1-888-784-6427) !!iii i!i:i il;; ® Registered Trademark t "rM Trademark t sMService Mark of Sears, Roebuck and Co ® Marca Registrada f Marca de F,_brica I sMMarca de Servicio de Sears. Roebuck and Co © Sears, Roebuck end Co...