Table of Contents
Advertisement
Available languages
Available languages
C|eaner
ENGLISH
--_ pp. 1=16
ESPANOL-_
pkg. 17-25
FRAN(_AIS
--_ p. 26=35
Contents
important safeguards
...........
2
Parts needed for assembly
.......
3
Assembling
carpet cleaner
.....
3-5
Carpet cleaner description
.......
6
General operation
............
6-9
Filling the clean solution
tank.
7-8
Emptying
the recovery
tank
.. 8=9
Brush speed selector
.........
7
Brush indicator
..............
7
How to use
Before you begin
.............
9
After cleaning
.............
9-10
Cleaning
carpet
.............
10
Picking
up spills .............
10
Cleaning
bare floors
.......
10-11
Using the tools
...........
11-14
Cleaning
carpeted
stairs .....
13
Cleaning
upholstery
.....
13-14
if you have a problem
..........
15
Lubrication
...................
15
Service
......................
16
Storage
......................
16
Warranty
.....................
16
Parts & accessories
mail order
form .........................
35
HOOVER®
SteamVac
TM
cleans
carpet
fibers
by applying,
scrubbing
and
removing
hot tap water
and cleaning
solution,
hoove_com
Advertisement
Table of Contents

Related Manuals for Hoover F5917900 - SteamVac PowerMax With SpinScrub


Summary of Contents for Hoover F5917900 - SteamVac PowerMax With SpinScrub
- Page 1 ..13-14 if you have a problem ..Lubrication ....Service ...... Storage ...... Warranty ..... Parts & accessories mail order form ......HOOVER® SteamVac cleans carpet fibers by applying, scrubbing removing hot tap water and cleaning solution, hoove_com...
- Page 2 (513) 791-7930 Spring, TX 77388 Suite 1100 (651)644-8684 Phoeniz, AZ 85053 (513) 791-7934 fax (281) 288-5803 A]tamonte Springs, FL 32701 Hoover Canada (651) 644-6621 (281) 288-5876 (602) 439-2751 (407) 831-1444 4151 North Service Rd 5160 Great Northern Plaza (602) 564-0938...
- Page 3 Do not use with damaged cord or plug. if appliance is not working as it should, has been dropped, damaged, left out= doors, or dropped into water, take it to a Hoover Sales and Service Center or Authorized Hoover Warranty Service Dealer. Close supervision is necessary when any appliance is used by or near children.
- Page 4 HOOVER product. if you need a_3t_ assistance: Visit our website at hoover.corn Click on the "Service" button to find the service outlet nearest you OR Call 1-800-944-9200 for an automated referral of service outlet locations (US only) OR Call 1-330-499-9499 to speak with a representative in our Consumer Response Center.
- Page 5 Theassembled c leaner w ill looklike thisdrawing. Attach upper handle Remove clean solution tank (upper tank) from carpet cleaner. With cord hook (A) to back d carpet cleaner, push upper handle down onto lower handle. Push bolts into holes on front of handle.
- Page 6 Storing hose Start with converter end of hose (H). Fit converter over tab near tool hold- Stretch hose out and identify ends. er (I). Press converter firmly to snap E. Nozzle connector end of hose G. Solution tube in place. Press solution tube (G) into R Trigger H.
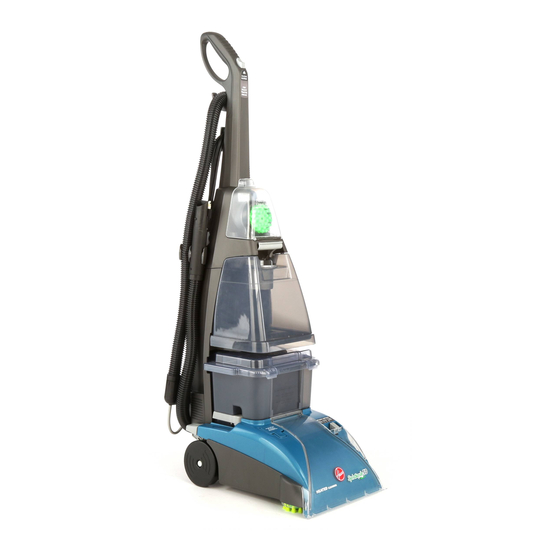
- Page 7 Carpet cleaner description The assembled carpet cleaner will look like the drawing. 1. Hand grip 16. Recovery tank front 2. Solution trigger: press to panel release clean solution. 17. Hood 3. Clean Surge button 18. Brush speed selector: slide selector to set brush 4.
- Page 8 Automatic "shut off" Brush indicator Brush speed selector When the recovery tank (lower tank) is Your SteamVac carpet cleaner has The brush indicator will spin (F) full the automatic shutoff mechanism three agitator brush settings. when the carpet cleaner is turned will shut off the carpet cleaner suction HI - for normal cleaning of carpet ON and the brushes are rotating.
- Page 9 Using cap, measure detergent fol- For heavy traffic areas: lowing the chart below. Pre=treat with HOOVER Spot and 5 OUNCES/ Stain Spray Cleaner. For carpet, carpeted stairs and upholstery: if you do not have access to the Spot and Stain Spray Cleaner,...
- Page 10 Rotate latches (E) (one on each b. For upholstery, check cleaning wood finishes from staining carpet. side of tank) inward to lock tank code - Use your HOOVER Pin up furniture skirts and draperies. in place. SteamVac carpet cleaner only if e.
- Page 11 1. Fill clean solution tank (upper low the same procedure for cleaning on a non-carpeted floor. Do not tank) with HOOVER Carpet/ only using hot tap water with no pour water onto a wood floor. Upholstery Detergent according to detergent in the upper clean solu- instructions on pages 8 and 9.
- Page 12 Fill clean solution tank with bing action some spots may need HOOVER Hard Floor Cleaning for removal. Solution (available at additional cost if not included with your model) accord- ing to instructions on pages 8 and...
- Page 13 3. Remove recovery tank front panel 4. Replace panel with converter (G). 5 Before connecting tube (H) to (F) by sliding it straight up. Slide converter halfway down open- cleaner, make sure black tabs are ing until it is firmly in place. extended by pulling tan collar toward tube.
- Page 14 Be sure to check the cleaning code instructions on page 10. on your upholstery. Use your 1 Place handle in upright position HOOVER SteamVac carpet Agitator brushes will not rotate cleaner only on upholstery while handle is in upright position.
- Page 15 Make no more than 2 passes with When finished cleaning, follow "After the solution over any one area to cleaning" instructions on pages 10 prevent over=wetting and damage and 11 and "After using tool" instruc- to fabric. tions on pages 13 and 14. If additional cleaning is necessary, wait until the upholstery is complete- ly dry before using the tool again.
- Page 16 Possible solution this cleaner OR - mail your appliance to a Hoover Sales • Solution tank not firmly in place and Service Center for warranty service, • calling 1-800-944-9200 for an •...
- Page 17 LEA TODA LAS INSTRUCCIONES ANTES DE USAR ESTE ARTE FACTO A TIERRA ADVIERTENCiA: Parareducir Hoover, o al Concesionario Autorizado de Servicio de Garant{a de Hoover. el riesgo de incendio, cheque el_ctrico o Este artefacto debe conectarse a tierra. • Es necesaria una supervisi6n cuidadosa lesiones.
- Page 18 (tanque superior) colocando para obtener el servicio de garantia de su producto HOOVER puede requerirse la veri- primero la parte inferior. Presione el asa ficaciOn de la fecha de compra. del tanque para que la parte superior Con el gancho para el cordon (A) orien- del tanque encaje en su lugar.
- Page 19 lugar. Presione eltubodesoluci0n (G) Pise el pedal (B) para bajar el mango a enelenganche al lado delapieza de la posicion de operaci0n. El mango no conversion como semuestra. se queda fijo en una sola posicion sino 1. Asa del mango que "flota"...
- Page 20 Indicador de escobilla HOOVER pare pisos expuestos*. apagado automa.tico funcionar_t (vea la El indicador de escobilla girara (F) No use el limpiador HOOVER pare figure 2-5) y se debe vaciar. cuando la limpiadora para alfombras pisos expuestos en alfombras o...
- Page 21 HOOVER con agita- Enjuague la tapa del tanque para la dor. Aspire la tapiceria con una aspi- cantidad el detergente para alfombras soluciOn y del tanque de recuperaciOn y radora accesorio de limpieza.
- Page 22 HOOVER para pisos expuestos fabricante de la alfombra,la tapiceria o (disponible a un costo adicional si no se Es mejor alternar las pasadas humedas...
- Page 23 2. Coloque el accesorio sobre una bras y tapiceria de HOOVER siguiendo extraiga la tapa. superficie dura o contra su mano para las instrucciones en la pagina 20.
- Page 24 3-18 2. Llene el tanque para le detergente aspiradora de la toma de corriente alfombras y tapiceria de HOOVER sigu- electrica. 5. Sequese las manos y enchufe la iendo las instrucciones de las figuras 2- Para evitar la posibilidad...
- Page 25 Response Center, un centro de ventes y servicio de Telefono: 330-499-9499. • La tapa del tanque de recuperaci6n Hoover para un servicio de garantia, el En Canada, comuniquese con Hoover esta bien puesta transporte sera pagado en una sola...
- Page 26 _loign_s jusqu'a amenez-le a un centre de vente et de qu'elle soit completement seche. service Hoover ou & un centre de ser- Gardez darts un endroit sec. vice sous garantie agre_ Hoover. N'exposez pas I'appareil au gel. © 2004, 2007 The Hoover Company hoover.com...
- Page 27 Un d_clic se fera entendre Si vous avez besoin d'aide pour Iorsque la tige de la g;}chette sera en I'assemblage ou I'utilisation, appelez place. Hoover Canada - A. Shampouineuse 1-800-463=3923 (Montreal) B. Section sup_rieure du manche PRIE_RE DE NE PAS RENVOYER CE C. Boulons et ecrous pour le manche PRODUIT AU MAGASIN.
- Page 28 surlapartie superieure dusupport 7. Crochets de rangement du cordon tuyau (K). au moment de ranger I'appareil, enrouler le cordon autour des crochets. II est aussi possible de soulever I'ap- Le crochet superieur tourne vers la pareil pour le transporter. Placer une 1-13 droite ou la gauche, ce qui aide au main sous la poignee du reservois...
- Page 29 Pour les zones tr_s fr_quentees N'utiliser votre appareil "SteamVac" de Pr_-traiter avec le vaporisateur pour 2-16 HOOVER que si le tissu de recouvrement taches et endroits passants* de est identifie "W" (nettoyage humide) ou HOOVER. Appuyer sur la pedale de deblocage "S/W"...
- Page 30 HOOVER@. Tester de nouveau la b. Si desire, le tapis peut aussi _tre rince. Le rin cage n'est pas n6cessaire, 4. Pour eviter d'avoir b. marcher sur le solidite des couleurs en vaporisant...
- Page 31 Le bouton - Clean Surge - peut _tre humides et & sec, tel que decrit plus haut. surface dure de HOOVER (disponible utilise pour appliquer une quantite option s'il n'est pas inclus avec votre...
- Page 32 4. Remettez en place le panneau avec propre avec le detergent a_ 3. Attendre quelque secondes (cela le connecteur de flexible (G). Faites tapis/meubles capitonnes HOOVER, peut prendre jusqu'a. 15 secondes). glisser le connecteur vers le bas jusqu'a. conformement aux Figures 2-9 a 2-15.
- Page 33 Pour obtenir le service autorise puis brancher I'appareil dans une prise HOOVER ou des pieces d'origine correctement mise & la terre. Enfoncer le pedale de d@lenchement HOOVER, il vous faut I'adresse du du manche pour abaisser le manche. T.S. V.P Retourner I'aspirateur a. I'envers.
- Page 34 • S'assurer que le couvercle est bien en Pour c efaire, v ous pouvez : place ,,Consulter lespages jaunes s ous la Votre appareil HOOVER® est garanti, en • Le panneau avant du r6servoir cas d'utilisation domestique normale rubrique "Aspirateurs...
- Page 35 Check or Money Order made payable to: The Hoover Company Replacement parts and accessory items may be purchased from your Authorized Hoover Dealer, Leading Retailers, Hoover Sales & Service Centers, on-line at hoover.corn, or by completing this order form. Visa Q MasterCard Q Discover Mail orders limited to U.S.
- Page 36 Hoover. las prin- Cheque o giro postal pagadero a: The Hoover Company ,cipales tiendas, los Centros de ventas y servicio de Hoover. en Internet en www.hoover.com, o rellenando este for- Visa _ MasterCard _ Discover 'mulario de pedido.
- Page 37 Consumer Response Center;, 240Edwerds Street,Cievdand, TN3731I envelope to: "$100,000 Give Aw_ Vl", BO, Box 173133, Denver, CO 80217-3133, Call (330) 499=9499 or visit us online at: www,hoover, com Copyright @ 2006 All rights I esel ved Fold here. Seal with tape (do not staple), Pliez tel Veuillezcaeheter (Nepan agrafer), Doble aquL Favor de sellar con cinta adhesiva, No usar grapas.
- Page 38 To help us understand ourcustomers'lifestyles, p lease indicatethe interestsand activitiesin whichyouoryouE spouse enjoyparticipating on a _ basis: RETURNTHiS CARDNOW FOR: Bicycling 19. U Automotive Work 35. _ Wines Golf Electronics Stamp/Coin Collecting Physical Fitness/ 21. [I Recreaton Vencles 37. { Collectbles w Warranty Confirmation Exercise...
- Page 40 HOOVER et sont des marques deposees HOOVER y son marcas registradas HOOVER and are registered trademarks 2-07 F5915-900/-950 Printed in U.S.A. 56518-206...