Table of Contents
Advertisement
Quick Links
Advertisement
Table of Contents

Related Manuals for Fisher-Price N9326


Summary of Contents for Fisher-Price N9326
- Page 1 N9326 N9326...
- Page 2 Important! DANGER To prevent electric shock, do not immerse in water; wipe clean with damp cloth. WARNING To prevent strangulation with power cord, never place transmitter within reach of child. CAUTION This product cannot replace responsible adult supervision.
- Page 3 fi re, excessive heat or other appliances that produce heat. ® • Fisher-Price does not recommend the use of two monitors in one house. • Always remember that you are using public airwaves when using your monitor. Conversations, even from rooms near your transmitter, may broadcast to other nursery monitors, radios, cordless telephones or scanners outside your home.
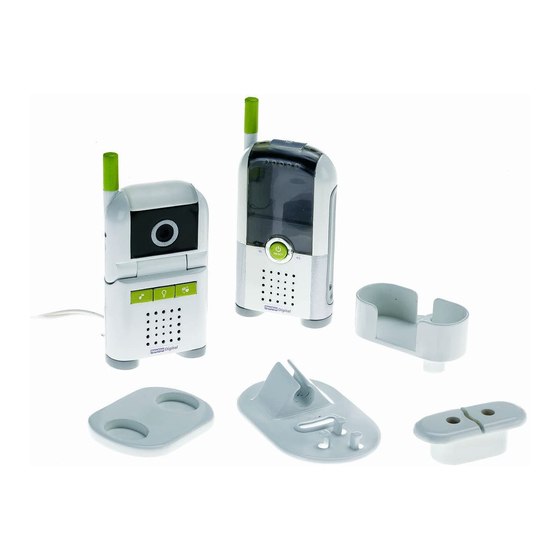
- Page 4 Features Receiver Transmitter AC Adaptor/Charger Transmitter Tabletop Stand...
- Page 5 Main Power/Menu Button – Press to turn receiver main power ON; press again for the main menu; press and hold for approximately fi ve seconds to turn main power OFF. Power L.E.D. – Turns on when receiver power is ON. Menu Navigation/Volume Control Button –...
- Page 6 Wall Mount Parts Wall Mount Bracket Cord Wrap Base Stand Fasteners Shown Actual Size Wall Anchor – 4 #8 x 2" Screw – 4...
-
Page 7: Charging The Battery
Charging the Battery (Inside the Receiver) DC Input Jack IMPORTANT! Fully charge the receiver (with battery pack inside) for four hours before fi rst-time use. Use only the included AC adaptor charger! Do not use any other adaptor charger. • Fit the AC adaptor charger pin into the DC input jack on the receiver. •... - Page 8 Testing Sound/Video Reception Test transmitter transmission and receiver reception before installing the wall mount bracket and cord wrap (if used) and each time you change location of use. Power Dial Radio • Place the transmitter in the room where you intend to use it. •...
- Page 9 Testing Sound/Video Reception • Place the receiver in the room where you intend to use it. • Press the main power/menu select button on the front of the receiver to turn power ON. • Adjust the receiver location for best reception. •...
- Page 10 Transmitter Wall Mount Installation WARNING To prevent strangulation with power cord, never place transmitter within reach of child. IMPORTANT! Test the reception of the monitor before installing the wall mount bracket and cord wrap. Use the assistance of one adult to hold the transmitter against the wall in the spot you want to install it. Then, test the reception of the receiver in several locations around your house.
- Page 11 Transmitter Wall Mount Installation 6 ft. 6 ft. • To provide the greatest viewing range, we recommend you install the wall mount bracket at least six feet from the fl oor. • Make sure the camera lens does not have an obstructed view of your baby. Adjust the camera up or down. •...
- Page 12 Transmitter Wall Mount Installation • Hold the wall mount bracket against the wall in the location you want to install it. Make sure the wall mount bracket is straight. • Using a pencil, make a mark on the wall inside the upper hole and lower slot on the wall mount bracket. •...
- Page 13 Transmitter Wall Mount Installation • Fit a wall anchor into each of the drilled holes. • Tap each wall anchor lightly with a hammer until the ends of each wall anchor are even with the surface of the wall. • Align the holes on the wall mount bracket with the wall anchors. •...
- Page 14 Transmitter Wall Mount Installation Wall Mount Bracket Cord Wrap • Position the cord wrap against the wall, so that it is centered below the wall mount bracket and as close to the fl oor as possible. • Move the cord wrap approximately ½" towards the wall outlet. •...
- Page 15 Transmitter Wall Mount Installation • Using a ¼" drill bit, drill one hole through each pencil mark you made on the wall. Wall Anchor • Place a wall anchor into each of the drilled holes. • Tap each wall anchor lightly with hammer until the ends of each wall anchor are even with the surface of the wall.
- Page 16 Transmitter Wall Mount Installation • Align the holes on the cord wrap with the wall anchors. • Insert two screws into the holes in the cord wrap and tighten with a Phillips screwdriver. Do not over-tighten. • Put the transmitter into the base stand. •...
- Page 17 Transmitter Wall Mount Installation 6 ft. 6 ft. IMPORTANT! Make sure the cord is taught between the transmitter and cord wrap. Excess cord can form loops or extend into the crib and present a strangulation hazard. • Extend the transmitter cord straight down the wall to the cord wrap. •...
-
Page 18: Main Menu
Setup/On Screen Displays MAIN POWER/ MENU SELECT Main Menu • First, turn both transmitter and receiver power ON. Then press the main power/ menu select button on the receiver to see the main menu. • Press the up, down or side arrows to scroll through menu options. - Page 19 Setup/On Screen Displays Music Turn music off Turn music on and cycle through all fi ve songs Select song number one Select song number two Select song number three Select song number four Select song number fi ve Return to previous menu Exit menu If you turn the music ON the music icons...
- Page 20 Setup/On Screen Displays Night Light Turn night light off Turn night light on Return to previous menu Exit menu If you turn the night light on the night light icon will appear on the bottom of the screen. Voice Activated (For Nighttime Use) Video screen turns on for 30 seconds and then turns off.
- Page 21 Setup/On Screen Displays Contrast/Brightness Press left or right side arrows to adjust contrast on the screen. Return to previous menu Exit menu Press left or right side arrows to adjust brightness on the screen. Return to previous menu Exit menu...
-
Page 22: Battery Indicators
Setup/On Screen Displays Out of Range The out of range warning will fl ash on the screen and you will hear a tone when the receiver is out of range or the transmitter is turned off. Battery Indicators Indicates receiver is using battery power (only on the menu screen). - Page 23 IMPORTANT! Test the sound and video reception of the monitor before fi rst time use and whenever you change the location of the transmitter (see Testing Sound/Video Reception section of these instructions). • Place the transmitter in the same room with child. Fit the transmitter into the tabletop base. Position the camera lens so it is facing child.
- Page 24 • To use AC current, unwrap and fully extend the AC adaptor cord (for best reception). Insert the AC adaptor pin into the DC input jack on the receiver and plug into a standard wall outlet. • Press the main power/menu button on the receiver to turn the power on. •...
-
Page 25: Night Vision Mode
Night Vision Mode When the light in baby’s room is too low, the transmitter will automatically switch to night vision mode. The image on the receiver screen will appear in black and white, not color. -
Page 26: Battery Replacement
• Always remove an exhausted battery pack from the product. Dispose of the battery pack safely. Do not dispose of product in a fi re. The battery pack inside may explode or leak. Contact Fisher-Price Consumer Relations at service.fi sher-price.com or call 1-800-432-5437 to purchase a battery pack. -
Page 27: Problem Solution
Problems & Solutions Problem No image on receiver screen Receiver beeps and out of range screen displays Receiver power L.E.D. does not light Solution Press the video screen on/off button. You can also change the voice activated setting to turns on when baby makes noise. Batteries in receiver are weak or dead. - Page 28 Hint: If, after checking all of these solutions, you believe that your transmitter power cord or AC adaptor are damaged, please contact Fisher-Price Solution Battery pack in receiver is weak or dead. Use AC adaptor as power source and to charge the battery for four hours.
-
Page 29: Fcc Statement
Video Monitor Model Number: N9326 This device complies with Part 15 of the FCC Rules. Operation is subject to the following two conditions: (1) This device may not cause harmful interference and (2) this device must accept any interference received, including interference that may cause undesired operation. - Page 30 RSS-210 ICES-003 CNR-210 NMB-003 RSS-210 This device complies with RSS-210 of Industry Canada. Operation is subject to the following two conditions: (1) this device may not cause harmful interference and (2) this device must accept any interference received, including interference that may cause undesired operation. ICES-003 This Class B digital apparatus complies with Canadian ICES-003.
-
Page 31: One (1) Year Limited Warranty
One (1) Year Limited Warranty (United States Only) Fisher-Price, Inc., 636 Girard Avenue, East Aurora, New York 14052 warrants to the original owner that this product is free from all defects in material and workmanship when used under normal conditions for a period of one (1) year from the date of purchase. - Page 32 Fisher-Price, Inc., a subsidiary of Mattel, Inc., East Aurora, New York 14052, U.S.A. ©2008 Mattel, Inc. All Rights Reserved. ® and ™ designate U.S. trademarks of Mattel, Inc PRINTED IN CHINA N9326a-0920...