Advertisement
Quick Links
Advertisement

Related Manuals for Fisher-Price T4838


Summary of Contents for Fisher-Price T4838
- Page 1 T4838 www.fi sher-price.com...
- Page 2 IMPORTANT! DANGER To prevent electric shock, do not immerse in water; wipe clean with damp cloth. WARNING To prevent strangulation with power cord, never place transmitter within reach of child. CAUTION This product cannot replace responsible adult supervision.
-
Page 3: Consumer Information
• The AC adaptor is not a toy. • Disconnect the AC adaptor from the receivers before cleaning. • Fisher-Price ® does not recommend the use of two monitors in one house. • Always remember that you are using public airwaves when using your monitor. Conversations, even from rooms near your transmitter, may broadcast to other nursery monitors, radios, cordless telephones or scanners outside your home. - Page 4 Fisher-Price, Inc., 636 Girard Avenue, East Aurora, NY 14052. Hearing-impaired consumers/Clientes con problemas auditivos/ Pour les malentendants : 1-800-382-7470. En México: 59-05-51-00 Ext. 5205 ó 01-800-463-59-89 Fisher Price, Inc., a subsidiary of Mattel, Inc., East Aurora, NY 14052 U.S.A. ©2010 Mattel, Inc. All Rights Reserved. ® and ™ designate U.S. trademarks of Mattel, Inc.
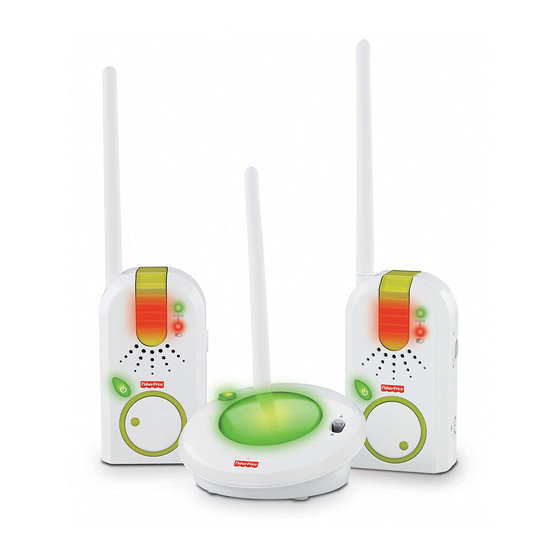
- Page 5 Features Receiver Receiver Transmitter Back View...
- Page 6 Power Button Nightlight – press to turn on a soft glow. Channel Switch Microphone Power/Volume Dial Power L.E.D. Sound Lights (on front and back of receiver) – watch the light to see baby’s sounds. Range Indicator – lights when power is on and receiver is in range of the transmitter. Flashing light indicates the receiver is out of range.
- Page 7 Assembly Antenna Antenna Antenna Antenna • Fit each antenna into the socket in the receivers and the transmitter. Turn the antennas to secure in place. IMPORTANT! This product is designed to operate properly with the antennas provided. To reduce the chance of potential radio interference to other users, assemble and use only the antennas provided.
- Page 8 Receiver Battery Installation (Optional) 1,5V x 6 “AAA” (LR03) • Locate the battery compartment door on the back of each receiver. • Loosen the screw in each battery compartment door with a Phillips screwdriver. Remove each battery compartment door. • Insert three “AAA” (LR03) alkaline batteries into each battery compartment. Hint: We recommend using alkaline batteries for longer battery life.
-
Page 9: Battery Safety Information
Battery Safety Information In exceptional circumstances, batteries may leak fl uids that can cause a chemical burn injury or ruin your product. To avoid battery leakage: • Do not mix old and new batteries or batteries of different types: alkaline, standard (carbon-zinc) or rechargeable (nickel-cadmium). - Page 10 Channel Switch • Set the transmitter channel switch to the same channel as the receiver(s). • Place the transmitter in the same room with child. Point the microphone towards the crib or play area. • Unwrap and fully extend the AC adaptor for best transmission. Insert the AC adaptor pin into the DC input jack on the transmitter and plug the power cord into a standard wall outlet.
- Page 11 Testing Sound Reception Test transmitter and receiver reception each time you change location of use. Power Button Power Button • Place the transmitter in the room where you intend to use it. • Press the transmitter power button to turn the power ON (the button lights up). •...
- Page 12 Testing Sound Reception Power/Volume Dial Power/Volume Dial • Place a receiver in the room where you intend to use it. • Rotate the power/volume dial to turn the power ON. Wait a few seconds to see if you have a good signal.
- Page 13 • Place a receiver where you can see and hear it. • Unwrap and fully extend the AC adaptor cord for best reception. Insert the AC adaptor pin into the DC input jack on the receiver and plug into a standard wall outlet. Note: To use battery power, refer to the Receiver Battery Installation section.
-
Page 14: Problems And Solutions
Hint: If, after checking all of these solutions, you believe that your transmitter power cord or AC adaptor are damaged, please contact Fisher-Price Solution Receiver is out of range of transmitter. Move receiver closer to transmitter. -
Page 15: Fcc Statement
à faire fonctionner le produit. Moniteur Numéro de produit : T4838 Cet appareil est conforme à l’article 15 de la réglementation de la FCC. L’utilisation de ce dispositif est autorisée seulement aux deux conditions suivantes : (1) il ne doit pas produire de brouillage nuisible, et (2) l’utilisateur du dispositif doit être prêt à... - Page 16 RSS-310 This Category II radio communication device complies with Industry Canada Standard RSS-310. Operation is subject to the following two conditions: (1) this device may not cause harmful interference and (2) this device must accept any interference received, including interference that may cause undesired operation. ICES-003 This Class B digital apparatus complies with Canadian ICES-003.