Table of Contents
Advertisement
Quick Links
Manuals for This Machine
The following manuals describe the operational procedures of this machine. For
particular functions, see the relevant parts of the manual.
Note
❒ Manuals provided are specific to machine type.
❒ Adobe Acrobat Reader / Adobe Reader is necessary to view the manuals as
a PDF file.
❒ Two CD-ROMs are provided:
• CD-ROM 1 "Operating Instructions"
• CD-ROM 2 "Scanner Driver and Utilities"
❖ ❖ ❖ ❖ General Settings Guide (this manual)
Provides an overview of the machine and describes System Settings (such as
Tray Paper Settings), Document Server functions, and troubleshooting.
Refer to this manual for Address Book procedures such as registering e-mail
address, and user codes.
❖ ❖ ❖ ❖ Security Reference
This manual is for administrators of this machine. It describes security func-
tions that the administrators can use to protect data from being tampered, or
prevent the machine from unauthorized use.
Also refer to this manual for the procedures for registering administrators, as
well as setting user and administrator authentication.
❖ ❖ ❖ ❖ Network Guide (PDF file - CD-ROM1)
Provides information about configuring and operating the scanner (Type 480)
in a network environment.
For details about network settings of the scanner (RW480) and printer
(RW480), see the manual that comes with the related option.
❖ ❖ ❖ ❖ Copy Reference
Describes operations, functions, and troubleshooting for the machine's copier
function.
❖ ❖ ❖ ❖ Scanner Reference (Scanner Unit Type 480) (PDF file - CD-ROM1)
Describes operations, functions, and troubleshooting for the machine's scan-
ner function.
i
Advertisement
Table of Contents

Related Manuals for Savin 4800WD


Summary of Contents for Savin 4800WD
-
Page 1: Manuals For This Machine
Manuals for This Machine The following manuals describe the operational procedures of this machine. For particular functions, see the relevant parts of the manual. Note ❒ Manuals provided are specific to machine type. ❒ Adobe Acrobat Reader / Adobe Reader is necessary to view the manuals as a PDF file. - Page 2 ❖ ❖ ❖ ❖ Manuals for DeskTopBinder Lite DeskTopBinder Lite is a utility included on the CD-ROM labeled “Scanner Driver and Utilities”. • DeskTopBinder Lite Setup Guide (PDF file - CD-ROM2) Describes installation of, and the operating environment for DeskTop- Binder Lite in detail.
-
Page 3: What You Can Do With This Machine
What You Can Do with This Machine The following introduces the functions of this machine, and the relevant manu- als containing detailed information about them. Products marked with * are optional. For details about optional products, see p.22 “Options”, or contact your local dealer. Note ❒... -
Page 4: Using The Scanner In A Network Environment
Using the Scanner in a Administrating the Machine/ Network Environment Protecting Documents (Security Functions) AGL012S • You can send scanned documents AGL013S to other network computers using • You can protect documents from e-mail (Sending stored scan file by unauthorized access and stop e-mail). -
Page 5: Monitoring The Machine Via Computer
Monitoring the Machine Via Computer AGL014S You can monitor machine status and change settings using a computer. • Using SmartDeviceMonitor for Ad- min, or a Web browser, you can use a computer to view the ma- chine's status, such as checking on paper quantities or misfeeds. -
Page 6: Table Of Contents
TABLE OF CONTENTS Manuals for This Machine ..................i What You Can Do with This Machine..............iii Copier, Printer, and Scanner Functions ..............iii Utilizing Stored Documents ..................iii Using the Scanner in a Network Environment ............iv Administrating the Machine/ Protecting Documents (Security Functions) ....iv Monitoring the Machine Via Computer............... - Page 7 3. Document Server Relationship between Document Server and Other Functions ....... 39 Document Server Display ..................40 Using the Document Server................41 Storing Data ......................41 Changing a Stored Document's File Name, User Name, or Password....44 Searching for Stored Documents ................44 Printing Stored Documents ..................
- Page 8 Registering Names to a Group ................90 Registering a New Group ..................90 Registering Names to a Group................. 91 Adding a Group to Another Group ................91 Displaying Names Registered in Groups ..............92 Removing a Name from a Group ................92 Deleting a Group within a Group................
- Page 9 Other Functions ....................125 Inquiry ........................125 Changing the Display Language ................126 Counter ....................... 127 Displaying the Total Counter..................127 8. Entering Text Entering Text ...................... 129 Available Characters ....................129 Keys ........................129 Entering Text......................130 9. Specifications Main Unit......................131 Options ....................... 135 Roll Feeder Type 480.....................135 Paper Cassette Type 480 ..................135 Carrier Sheet......................136...
-
Page 11: Notice
Notice Notice To Wireless LAN Interface (optional) Users Notes to users It is strictly forbidden to use antenna(s) except designated. The antenna(s) of this device must not be co-located or operating in conjunc- tion with any other antenna or transmitter. This equipment complies with FCC RF radiation exposure limits set forth for an uncontrolled environment. - Page 12 Note to users in Canada Note: This Class B digital apparatus complies with Canadian ICES-003. Operation is subject to the following two conditions: (1) This device may not cause interference, and (2) this device must accept any interference, including interference that may cause undesired operation of the device.
- Page 13 Remarque concernant les utilisateurs au Canada Avertissement: Cet appareil numérique de la classe B est conforme á la norme NMB-003 du Can- ada. L'utilisation de ce dispositif est autorisée seulement aux conditions suivantes: (1) il ne doit pas produire de brouillage et (2) l'utilisateur du dispositif doit être prêt á...
-
Page 14: Copyrights And Trademarks
Copyrights and Trademarks Trademarks ® ® ® Microsoft , Windows and Windows NT are registered trademarks of Mi- crosoft Corporation in the United States and/or other countries. ® Acrobat is a registered trademark of Adobe Systems Incorporated. Other product names used herein are for identification purposes only and might be trademarks of their respective companies. -
Page 15: Information About Installed Software
Information about Installed Software expat • The software including controller, etc. (hereinafter "software") installed on this product uses the expat under the conditions mentioned below. • The product manufacturer provides warranty and support to the software of the product including the expat, and the product manufacturer makes the ini- tial developer and copyright holder of the expat, free from these obligations. - Page 16 Redistribution and use in source and binary forms, with or without modifica- tion, are permitted provided that the following conditions are met: Redistributions of source code must retain the above copyright notice, this list of conditions and the following disclaimer. Redistributions in binary form must reproduce the above copyright notice, this list of conditions and the following disclaimer in the documentation and/or other materials provided with the distribution.
- Page 17 • This product includes software developed by Jonathan Stone and Jason R. Thorpe for the NetBSD Project. • This product includes software developed by the University of California, Lawrence Berkeley Laboratory and its contributors. • This product includes software developed by Christos Zoulas. •...
- Page 18 e) The source code of the Sablotron software is available at: http://www.ginger- all.com f) MPL 1.1 is available at: http://www.mozilla.org/MPL/MPL-1.1.html JPEG LIBRARY • The software installed on this product is based in part on the work of the In- dependent JPEG Group. SASL CMU libsasl Tim Martin...
- Page 19 Copyright © 1990-2, RSA Data Security, Inc. All rights reserved. License to copy and use this software is granted provided that it is identified as the "RSA Data Security, Inc. MD4 Message-Digest Algorithm" in all material mentioning or referencing this software or this function. License is also granted to make and use derivative works provided that such works are identified as "derived from the RSA Data Security, Inc.
- Page 20 ® RSA BSAFE ® • This product includes RSA BSAFE cryptographic or security protocol soft- ware from RSA Security Inc. • RSA and BSAFE are registered trademarks of RSA Security Inc. in the United States and/or other countries. • RSA Security Inc. All rights reserved. Samba(Ver 2.2.2-ja-1.1) For SMB transmission, this machine uses Samba ver 2.2.2-ja-1.1 (hereinafter re- ferred to as Samba 2.2.2-ja-1.1).
-
Page 21: How To Read This Manual
How to Read This Manual Symbols This manual uses the following symbols: R WARNING: This symbol indicates a potentially hazardous situation that might result in death or serious injury if you misuse the machine by not following these instruc- tions under this symbol. Be sure to read these instructions, all of which are in- cluded in the Safety Information section. -
Page 22: Names Of Major Options
Names of Major Options Major options for this machine are referred to as follows: • Roll Holder Unit Type A → Roll holder • Roll Feeder Type 480 → Lower Tray • Paper Cassette Type 480→ Cut paper tray • Original Tray Type G→ Original tray Terms •... -
Page 23: Safety Information
Safety Information When using this machine, the following safety precautions should always be fol- lowed. Safety During Operation In this manual, the following important symbols are used: R WARNING: Indicates a potentially hazardous situation which, if instructions are not followed, could result in death or serious injury. R CAUTION: Indicates a potentially hazardous situation which, if instructions are not followed, may result in minor or moderate injury or damage to property. - Page 24 R CAUTION: • Keep the machine away from humidity and dust. Otherwise a fire or an elec- tric shock might occur. • Do not place the machine on an unstable or tilted surface. If it topples over, an injury might occur. •...
-
Page 25: Positions Of R R R R Warning And R R R R Caution Labels
Positions of R R WARNING and R R CAUTION Labels This machine has labels for RWARNING and RCAUTION at the positions shown below. For safety, please follow the instructions and handle the machine as indicated. AHD016S... - Page 26 AHD017S...
-
Page 27: Energy Star Program
ENERGY STAR Program As an ENERGY STAR Partner, we have determined that this machine model meets the ENERGY STAR Guidelines for energy efficiency. The ENERGY STAR Guidelines intend to establish an international energy-saving system for developing and introducing energy-efficient office equipment to deal with environmental is- sues, such as global warming. - Page 28 Specification Copier only Printer and Scanner installed Low power mode Power consumption 195 Wh — Default interval 15 minutes Recovery time 60 seconds Auto Off mode Power consumption 45 W — Default interval 60 minutes — Recovery time 120 seconds —...
-
Page 29: Getting Started
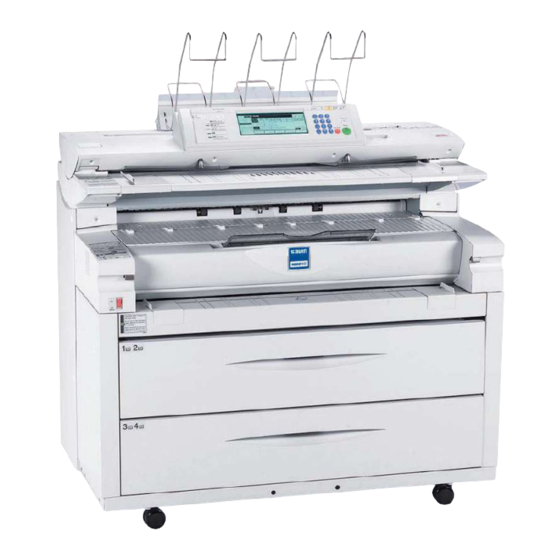
1. Getting Started Guide to Components ❖ ❖ ❖ ❖ Front AGL050S Upper output stacker Main power switch When the top original exit is selected, Use to turn the main power on or off. originals are stacked here. See “Origi- If you will not use the machine for a nal Output Locations”, Copy Reference. -
Page 30: Original Table
Getting Started { { { { Scanner Stop} } } } key Important Use if originals are feeding in slanted, ❒ Do not leave the imaging unit or to cancel scanning while an original open more than 10 minutes, is feeding in. You can also use this to otherwise copy quality may de- release the paper edge hold function. - Page 31 Guide to Components Rear output Copy output (rear) auxiliary guide Stacks copies delivered to the rear out- put. When ejecting A0(E) size paper to the rear output, this guide prevents the leading edge of the paper to be caught in the copy output tray. ❖...
-
Page 32: Options
Getting Started Options Trays AHD019S Original tray Cut paper trays This can stack originals that consist of Load cut paper here. You can load up to many sheets. 250 sheets of A2 size paper for each. See p.135 “Paper Cassette Type 480”. Lower tray (paper roll tray) You can load two paper rolls. - Page 33 Guide to Components Paper feed knob Auto feed button Use when loading paper rolls or clear- Use this to clear misfeeds in the paper ing paper jams. See p.105 “Loading feed area. Keep this button pressed to Paper” and p.110 “xClearing Mis- feed the roll paper continuously.
- Page 34 Getting Started Other Options ❖ ❖ ❖ ❖ Printer unit Allows you to use the printer function. ❖ ❖ ❖ ❖ Scanner unit Allows you to use the scanner function. You can install either Type 480 or RW480 scanner unit. ❖...
-
Page 35: Control Panel
Control Panel Control Panel This illustration shows the control panel of a machine that has all options fully installed. AHD100S { { { { Program} } } } key (copier mode) Screen contrast knob Adjusts the brightness of the screen. Press to store or select the program mode. -
Page 36: Display Panel
Getting Started Operation switch Press to stop a copy job in progress. Press to stop scanning and printing in Press to turn the power on (the On indi- Document Server mode. cator goes on). To turn the power off, { { { { #} } } } key press it again (the On indicator goes off). -
Page 37: When The Authentication Screen Is Displayed
Control Panel ❖ ❖ ❖ ❖ When the cut paper trays are installed Common Key Operations The following keys are common to all screens: ❖ ❖ ❖ ❖ Key list [OK] Acknowledges a selected function or entered values, and then returns to the previous display. - Page 38 Getting Started B B B B Enter a login user name, and then press [OK]. C C C C Press [Enter] for Login Password. D D D D Enter a login password, and then press [OK]. E E E E Press [Login].
-
Page 39: Turning On The Power
Turning On the Power Turning On the Power This machine has two power switches: Important ❒ Do not turn off the main power ❖ ❖ ❖ ❖ Operation switch (right side of the switch immediately after turn- control panel) ing it on. Doing so may result in Press to activate the machine. -
Page 40: Turning Off The Power
Getting Started ❒ Immediately after the machine Turning Off the Main Power is turned on, or if the tempera- ture is low, or if making a lot of continuous copies (more than Important 30 sheets/A0(E) size), the con- ❒ When the On indicator lights, do tinuous copy speed may be re- n o t t u r n o f f t h e m a i n p o w e r duced to ensure the toner fuses... -
Page 41: Saving Energy
Turning On the Power Saving Energy - Auto Off mode If you do not use the machine for a certain period (default: 60 minutes), it - Energy Saver mode automatically turns itself off. This function is called “Auto Off”. When If you do not use the machine for a you press the operation switch, the certain period (default: 60 seconds) -
Page 42: Anti-Humidity Heater Switch
Getting Started Anti-humidity Heater Switch During winter or humid periods when there can be sudden changes in temperature, the paper in the paper roll tray, or the cut paper tray can ab- sorb moisture. This may cause copy quality to deteriorate. To prevent this, the machine has a built-in anti-humidity heater. -
Page 43: Combined Function Operations
2. Combined Function Operations Switching between Functions You can use this machine not only as a copier, but also as a printer or scanner. The default setting is to display the screen for copying when you turn the power on. You can change the setting. For details about settings, see p.56 “Function Pri- ority”. - Page 44 Combined Function Operations Checking the Job List A A A A Press the { { { { Job List} } } } key. AHD102S B B B B Select the job number of the list you want to check. The job list is displayed. The icons below show the operation mode of stored documents.
- Page 45 Switching between Functions Deleting Jobs Note ❒ If you are unable to delete the job, contact the administrator. A A A A Press the { { { { Job List} } } } key. AHD102S B B B B Select the job number to be deleted. C C C C Press [Delete Job].
-
Page 46: Multi-Access
Combined Function Operations Multi-Access You can carry out another job using a different function while the current job is being performed. Performing multiple functions simultaneously in this manner is called “Multi-Access”. This allows you to handle your jobs efficiently, regardless of how the machine is being used. - Page 47 Multi-Access Function you want to select Function in progress × × ❍ ❍ Operations for Copying ❍ ❍ → Sort ❍ ❍ × × × × × × × Operations for Copying ❍ ❍ × × × × × × ×...
- Page 48 Combined Function Operations Simultaneous operations are only available after the preceding job documents are all scanned and [New Job] appears. You can scan a document after the preceding job documents are all scanned. Simultaneous operations are possible once you press [New Job]. Depending on the scanner type installed, you may not be able to make copies while the scanner is scanning data to store into the Document Server.
-
Page 49: Document Server
3. Document Server Relationship between Document Server and Other Functions The following table describes the relationship between the Document Server and other machine functions. Where to store Printing stored Sending docu- Function name Displaying a list documents documents ments Copy/Docu- Copy Available Enabled... -
Page 50: Document Server Display
Document Server Document Server Display ❖ ❖ ❖ ❖ Document Server Main Display AHD049S Operating status and messages The numbers of originals, copies, are displayed. and printed pages are displayed. The title of the currently selected The operation keys are displayed. screen is displayed. -
Page 51: Using The Document Server
Using the Document Server Using the Document Server ❒ Avoid using a single number or Storing Data consecutive numbers for a pass- word such as “0000” or “1234”, since the numbers like this are easy ❖ ❖ ❖ ❖ File Name to guess, so using them will not Stored documents will automati- provide a worthwhile level of se-... - Page 52 Document Server A A A A F F F F Press the { { { { Document Server} } } } key. Press the { { { { Start} } } } key. The document is stored in the Doc- ument Server.
- Page 53 Using the Document Server When using a name registered in To change a file name the Address Book A A A A Press [Scan Original]. A Select a name from the list, and The Scan Original display appears. then press [OK]. B B B B Press [File Name].
-
Page 54: Changing A Stored Document's File Name, User Name, Or Password
Document Server C C C C p.43 “To set or change a pass- Enter a four- to eight-digit pass- word”. word using the number keys, and F F F F then press the { { { { #} } } } key. Press [OK]. -
Page 55: Printing Stored Documents
Using the Document Server Note To Check Details of Stored Documents ❒ To display all files stored in the A A A A Document Server, press [File Select the document. List]. Note ❒ If a password has been set for To Search by User Name the document, enter the pass- A A A A... - Page 56 Document Server ❒ If you cannot determine the Note contents of a document by its ❒ The print settings made for print- file name, you can print only the ing in copier mode remain effec- first page of the document for t ive aft er prin ting an d are checking purposes.
- Page 57 Using the Document Server E E E E A A A A Press the { { { { Start} } } } key. Select the document to be printed. The machine starts printing. To stop printing A Press the { { { { Clear/Stop} } } } key. B Press [Stop].
-
Page 58: Deleting Stored Documents
Document Server Printing the First Page Deleting Stored Documents You can print the first page of a docu- Important ment selected in the Select Files to ❒ You can store up to 3,000 documents Print display to check its contents. in the Document Server. -
Page 59: Viewing Stored Documents Using A Web Browser
Using the Document Server C C C C Note Press [Delete File]. ❒ To enlarge the document pre- view, click [Enlarge Image]. Downloading Stored Documents D D D D Press [Delete] to delete the docu- Note ment. ❒ The optional scanner unit (Type 480) is required to use this func- Viewing Stored Documents tion. -
Page 60: Settings For The Document Server
Document Server Settings for the Document Server ❖ ❖ ❖ ❖ System Settings (See p.51 “User Tools (System Settings)”.) Items Default settings General Features Warm Up Notice Copy Count Display Paper Output Exit: Document Front Server Tray Paper Settings Paper Tray Priority: Copier Tray 1 Timer Settings Copier / Document Server... -
Page 61: User Tools (System Settings)
4. User Tools (System Settings) User Tools Menu (System Settings) Note ❒ Depending on the options installed, not all items listed below may be displayed. Reference For details about Interface Settings and File Transfer, see “Setting Up the Ma- chine on a Network”, Network Guide. To register addresses and users, specify them under Address Book Manage- ment. - Page 62 User Tools (System Settings) User Tools item menu Default Fine Ratio Adjustment: Copier — Fine Ratio Adjustment: Printer — Paper Output Exit: Copier Front Paper Output Exit: Document Serv- Front Job List Time Display On, 15 seconds ❖ ❖ ❖ ❖ Tray Paper Settings (see p.62 “Tray Paper Settings”) User Tools item menu Default Paper Tray Priority: Copier...
- Page 63 User Tools Menu (System Settings) ❖ ❖ ❖ ❖ Timer Settings (see p.63 “Timer Settings”) User Tools item menu Default Auto Off Timer 60 minute(s) Energy Saver Timer 15 minute(s) Panel Off Timer 1 minute System Auto Reset Timer On, 60 seconds Copier/Document Server Auto On, 60 seconds Reset Timer...
- Page 64 User Tools (System Settings) ❖ ❖ ❖ ❖ Administrator Tools (see p.65 “Administrator Tools”) For details about Address Book Management, Address Book: Pro- gram/Change/Delete Group, see p.71 “Address Book”. User Tools item menu Default User Authentication Management Administrator Authentication Management Off Program /Change Administrator —...
-
Page 65: Accessing User Tools (System Settings)
Accessing User Tools (System Settings) Accessing User Tools (System Settings) C C C C User Tools allow you to change or set Select the desired menu, and then defaults. press the desired key. Note Reference ❒ Operations for System Settings dif- p.51 “User Tools Menu (System fer from normal operations. -
Page 66: Settings You Can Change With User Tools
User Tools (System Settings) Settings You Can Change with User Tools Reference To access User Tools, see p.55 “Accessing User Tools (System Settings)”. General Features ❖ ❖ ❖ ❖ Panel Tone The beeper (key tone) sounds when a key is pressed. Note ❒... - Page 67 Settings You Can Change with User Tools ❒ You can specify an output tray for each function. See the following sec- tions: • p.62 “Paper Tray Priority: Copier” ❖ ❖ ❖ ❖ Function Reset Timer You can set the length of time the machine waits before changing modes when using the multi-access function (see p.36 “Multi-Access”).
- Page 68 User Tools (System Settings) ❖ ❖ ❖ ❖ Feed Start Method You can specify whether feeding starts automatically or after pressing the { { { { Start} } } } key. Note ❒ Default: Auto ❖ ❖ ❖ ❖ Original Output You can specify the original output tray to use when the power is turned on or the { { { { Clear Modes} } } } key is pressed.
- Page 69 Settings You Can Change with User Tools ❒ Depending on paper type, operating conditions (low temperature and hu- midity), and paper feeding settings (multiple copies on paper of 542 mm, 22" width or less), toner fusing conditions vary. To improve toner fusing, change the thickness level to 3→2→1.
- Page 70 User Tools (System Settings) ❖ ❖ ❖ ❖ Fine Ratio Adjustment: Copier ABB009S Depending on paper type, environment, and humidity, copy paper can ex- pand or shrink slightly. This means that the size of the copy and the original do not match. If this happens, specify the vertical and horizontal correction ratio.
- Page 71 Settings You Can Change with User Tools ❖ ❖ ❖ ❖ Fine Ratio Adjustment: Printer Specifies the fine ratio when the optional printer is installed. Depending on paper type, environment, and humidity, copy paper can expand or shrink slightly. This means that the size of the copy and the original do not match. When the horizontal ratios are almost the same and there are differences be- tween the vertical ratios, you can specify the vertical correction ratio.
-
Page 72: Tray Paper Settings
User Tools (System Settings) Tray Paper Settings ❖ ❖ ❖ ❖ Paper Tray Priority: Copier You can specify the tray to supply paper for output. Note ❒ Default: Tray 1 ❖ ❖ ❖ ❖ Tray Paper Size: Tray 1, Tray 2 You can specify the size of paper in Tray 1 and Tray 2. -
Page 73: Timer Settings
Settings You Can Change with User Tools ❖ ❖ ❖ ❖ Tray Paper Size: Tray 3, Tray 4 (when Cut Paper Trays are installed) You can specify the size of paper in Tray 3 and Tray 4. • The paper sizes you can select are as follows: •... - Page 74 User Tools (System Settings) ❖ ❖ ❖ ❖ Energy Saver When no other key operations are performed, the machine switches to low power mode after a specified period. Note ❒ Default: 15 minutes ❒ Enter a time interval between 1 and 240 minutes in one minute increments using the number keys.
-
Page 75: Administrator Tools
Settings You Can Change with User Tools ❖ ❖ ❖ ❖ Set Date Set the date for the machine's internal clock using the number keys. Note ❒ To change between year, month, and day, press [← ← ← ← ] and [→ → → → ]. ❒... - Page 76 User Tools (System Settings) Note ❒ Default: Off Reference For details about Basic Authentication, Windows Authentication, and LDAP Authentication, see Security Reference. ❖ ❖ ❖ ❖ Administrator Authentication Management See Security Reference. ❖ ❖ ❖ ❖ Program / Change Administrator See Security Reference.
- Page 77 Settings You Can Change with User Tools ❖ ❖ ❖ ❖ Display / Clear / Print Counter per User Allows you to view and print the various counters accessed with users and to set the values to 0. Note ❒ Press [U U U U Prev.] and [T T T T Next] to show all counters. ❒...
- Page 78 User Tools (System Settings) Note ❒ You can register up to 2,000 names. ❒ You can register up to 500 user codes. ❒ You can also register user codes from SmartDeviceMonitor for Admin. ❖ ❖ ❖ ❖ Address Book: Program / Change / Delete Group Names registered in the Address Book can be added into a group.
- Page 79 Settings You Can Change with User Tools Press the name key in the place that you want to move to. The name selected in step E moves to the place selected in step F, and the keys for other names will be shifted accordingly. Note ❒...
- Page 80 User Tools (System Settings) Enter the new name, and then press [OK]. Press [OK]. ❖ ❖ ❖ ❖ Address Book: Select Title You can specify the title to select a name. Note ❒ Default: Title 1 ❖ ❖ ❖ ❖ Auto Delete File You can specify whether documents stored in the Document Server will or will not be deleted after a specified period of time.
-
Page 81: Registering Addresses And Users
5. Registering Addresses and Users Address Book Registering information such as the You can register and manage the fol- names of users and their e-mail ad- lowing items in the Address Book: dresses in the Address Book allows ❖ ❖ ❖ ❖ Name you to manage them easily. - Page 82 Registering Addresses and Users ❖ ❖ ❖ ❖ Protection Managing names in the Address Book You can set protection codes to stop sender's name from being By registering a name and key dis- used or folders from being access- play beforehand, you can specify e- ed without authorization.
- Page 83 Address Book Preventing unauthorized user access to shared folders from the machine After registering a protection code, you can specify the object of protec- tion to prevent an e-mail destination from being used without permission. You can prevent unauthorized access to registered folders.
-
Page 84: Registering Names
Registering Addresses and Users Registering Names If you register data such as a name or Note title in advance, you can enter addi- ❒ The name can be used for docu- tional associated information such as ments in the Document Server. an e-mail address or a folder later by For details about the Document selecting the registered names. -
Page 85: Changing A Registered Name
Registering Names Changing a Registered Name Deleting a Registered Name A A A A If you delete a name, data associated Press the { { { { User Tools/Counter} } } } key. with that name, such as e-mail ad- B B B B dresses and folder name, are also de- Press [System Settings]. -
Page 86: Registering User Codes
Registering Addresses and Users Registering User Codes D D D D Register user codes to limit users to Press [Address Book Management]. the following functions and check E E E E their use of each function: Press the name whose code is to be registered, or enter the regis- •... -
Page 87: Changing A User Code
Registering User Codes K K K K H H H H Press [Exit]. Press [#]. L L L L Press the { { { { User Tools/Counter} } } } key. To change the available functions A Press [T T T T Next] twice. Changing a User Code B Press the key to select the func- tions to enable them. -
Page 88: Displaying The Counter For Each User Code
Registering Addresses and Users F F F F C C C C Press [Auth. Info]. Press [Administrator Tools]. G G G G D D D D Press [Change] to delete the user Press [Display / Clear / Print Counter code, and then press [#]. per User]. -
Page 89: Clearing The Counters
Registering User Codes E E E E Press [Print Counter List] under All To clear the counters for all user Users. codes A Press [Clear] under All Users. Note ❒ Enter the user code, and then B Select the function usage you press [#] if the user code is regis- w a n t t o c l e a r f r o m [ P r i n t tered. -
Page 90: E-Mail Destination
Registering Addresses and Users E-mail Destination B B B B Register e-mail destinations so you Press [System Settings]. do not need to enter an e-mail address every time, and can send scan files from scanner function by e-mail. • It is easy to select the e-mail desti- nation if you register “Name”... -
Page 91: Changing A Registered E-Mail Destination
E-mail Destination C C C C Press [Administrator Tools], and then Using the e-mail address as the press [T T T T Next]. sender D D D D Press [Address Book Management]. To enable this selection, you have E E E E to register a user code in advance. -
Page 92: Deleting A Registered E-Mail Destination
Registering Addresses and Users Deleting a Registered E-mail Destination To delete a name entirely, see p.75 “Deleting a Registered Name”. A A A A Press the { { { { User Tools/Counter} } } } key. B B B B Press [System Settings]. -
Page 93: Registering Folders
Registering Folders Registering Folders By registering a shared folder, you Using SMB to Connect can send scan files to it directly. There are two types of protocol you can use: Note ❒ To register a folder in an FTP serv- •... - Page 94 Registering Addresses and Users F F F F L L L L Press [Auth. Info], and then press Enter the password again for con- [T T T T Next]. firmation, and then press [OK]. G G G G M M M M Press [Specify Other Auth.
- Page 95 Registering Folders Note Using Browse Network to locate ❒ If the entered user name or the folder password is not correct, a A Press [Browse Network]. message appears. Press [Exit], and then enter the user name The client computers sharing and password again.
- Page 96 Registering Addresses and Users G G G G K K K K Select the items you want to change. Press [Exit]. L L L L Press the { { { { User Tools/Counter} } } } key. To change the protocol A Press [FTP].
-
Page 97: Using Ftp To Connect
Registering Folders G G G G Press [Specify Other Auth. Info] on Using FTP to Connect the right side of Folder Authenti- cation. Note Note ❒ To register a shared folder config- ❒ When [Do not Specify] is selected, ured in Windows, see p.83 “Using the SMB User Name and SMB SMB to Connect”. - Page 98 Registering Addresses and Users N N N N T T T T Press [FTP]. Press [Connection Test] to check the path is set correctly. U U U U Press [Exit]. Note ❒ If the connection test fails, check the settings, and then try again. O O O O Press [Change] under Server Name.
- Page 99 Registering Folders G G G G K K K K Select the items you want to change. Press [Exit]. L L L L Press the { { { { User Tools/Counter} } } } key. To change the protocol A Press [SMB]. Deleting a registered folder Note ❒...
-
Page 100: Registering Names To A Group
Registering Addresses and Users Registering Names to a Group D D D D You can register names to a group to Press [Address Book: Program / Change / enable easy management of e-mail Delete Group]. addresses and folders for each group. E E E E Press [New Program]. -
Page 101: Registering Names To A Group
Registering Names to a Group The group keys that you have se- Registering Names to a Group lected becomes highlighted, and the name is added to them. You can put names that have been registered in the Address Book into a group. -
Page 102: Displaying Names Registered In Groups
Registering Addresses and Users The group key that you have se- Removing a Name from a lected becomes highlighted, and the group is added to it. Group A A A A Press the { { { { User Tools/Counter} } } } key. B B B B Press [System Settings]. -
Page 103: Deleting A Group Within A Group
Registering Names to a Group Deleting a Group within a Changing a Group Name Group A A A A Press the { { { { User Tools/Counter} } } } key. A A A A B B B B Press the { { { { User Tools/Counter} } } } key. Press [System Settings]. -
Page 104: Deleting A Group
Registering Addresses and Users G G G G Press [OK]. H H H H Press [Exit]. I I I I Press the { { { { User Tools/Counter} } } } key. Deleting a Group A A A A Press the { { { { User Tools/Counter} } } } key. B B B B Press [System Settings]. -
Page 105: Registering A Protection Code
Registering a Protection Code Registering a Protection Code D D D D You can stop sender's names or fold- Press [Address Book Management]. ers being accessed by setting a protec- E E E E tion code. Select the name whose protection code you want to register. -
Page 106: Registering A Protection Code For A Group
Registering Addresses and Users E E E E Note Press the group key you want to ❒ You have to select [Sender] protect or enter the registered number using the number keys. under Use Name as in ad- vance. F F F F Press [Protection]. -
Page 107: Registering Smtp And Ldap Authentication
Registering SMTP and LDAP Authentication Registering SMTP and LDAP Authentication C C C C Press [Administrator Tools], and then SMTP Authentication press [T T T T Next]. D D D D For each user registered in the Ad- Press [Address Book Management]. dress Book, you can register a login E E E E user name and login password to be... -
Page 108: Ldap Authentication
Registering Addresses and Users K K K K A A A A Press the { { { { User Tools/Counter} } } } key. Enter the password, and then press [OK]. Note ❒ You can enter up to 64 charac- ters for the password. - Page 109 Registering SMTP and LDAP Authentication I I I I Enter the login user name, and then press [OK]. Note ❒ You can enter up to 128 charac- ters for the user name. Reference p.129 “Entering Text” J J J J Press [Change] under Login Pass- word.
- Page 110 Registering Addresses and Users...
-
Page 111: Troubleshooting
6. Troubleshooting If Your Machine Does Not Operate As You Want The following chart gives explanations of common problems and messages. If other messages appear, follow the instructions displayed. Note ❒ If you cannot make copies as you want because of paper type, paper size, or paper capacity problems, use recommended paper. - Page 112 Troubleshooting Problem Causes Solutions Original images are print- You may have loaded the Load paper correctly. Load paper ed on the reverse side of paper incorrectly. into the cut paper tray print side the paper. down, and into the paper bypass print side up.
-
Page 113: Document Server
If Your Machine Does Not Operate As You Want Problem Causes Solutions You have tried to delete Files can be deleted by the file cre- “ Selected files files without the authority ator or file administrator. To delete contain file(s) to do so. - Page 114 Troubleshooting Problem Action The Copy function is in use. To cancel the job “ Original is being scanned by in process, first press [Exit], and then press the ” appears. another function. { { { { Copy} } } } key. Next press the { { { { Clear/Stop} } } } key. When the message “...
-
Page 115: Loading Paper
Loading Paper Loading Paper R CAUTION: • Be careful when replacing the roll paper or removing misfed paper by follow- ing the operating instructions properly. Otherwise, an injury may result from the paper cutter inside. R CAUTION: • The fusing section of this machine might be very hot. Caution should be tak- en when removing misfed paper. -
Page 116: Loading Paper Roll
Troubleshooting Loading Paper Roll AHD027S Note ❒ Set the paper volume again after loading the paper roll. See p.59 “Paper Vol- ume”. ❒ When you change the paper size or paper type, make settings under System Settings, see p.62 “Tray Paper Size: Tray 1, Tray 2”, p.62 “Tray Paper Size: Tray 3, Tray 4 (when Paper Roll Trays are installed)”... -
Page 117: Loading Cut Paper
Loading Paper Loading Cut Paper AHD028S Note ❒ When you load paper of size that cannot be detected automatically, select the paper size in System Settings. See p.63 “Tray Paper Size: Tray 3, Tray 4 (when Cut Paper Trays are installed)”. - When using translucent paper Note ❒... -
Page 118: D Adding Toner
Troubleshooting D Adding Toner R WARNING: • Do not incinerate used toner or toner containers. Toner dust might ig- nite when exposed to an open flame. Dispose of used toner containers in accordance with local regulations. R CAUTION: • Keep toner (used or unused) and toner containers out of reach of children. R CAUTION: •... - Page 119 DAdding Toner...
-
Page 120: Clearing Misfeeds
Troubleshooting x Clearing Misfeeds AGL022S R CAUTION: • The fusing section of this machine might be very hot. Caution should be tak- en when removing misfed paper. R CAUTION: • Be careful when replacing the roll paper or removing misfed paper by follow- ing the operating instructions properly. -
Page 121: Original Misfeeds (P)
xClearing Misfeeds Original Misfeeds (P) AHD029S Paper Misfeeds in the Paper Tray (A1, A2) AHD030S When you can see the edge of the paper AHD031S... - Page 122 Troubleshooting When you cannot see the edge of the paper AHD032S Paper misfeeds in the cut paper trays AHD033S...
-
Page 123: Paper Misfeeds In The Paper Bypass (A3, B)
xClearing Misfeeds Paper Misfeeds in the Paper Bypass (A3, B) AHD034S... -
Page 124: Paper Misfeeds In The Rear Paper Output (C)
Troubleshooting Paper Misfeeds in the Rear Paper Output (C) Important ❒ When clearing the paper, be careful of the auxiliary guide and other protru- sions. Note ❒ Even if only C is displayed, check the front area first and clear any misfed pa- per there. -
Page 125: Changing The Paper Size
Changing the Paper Size Changing the Paper Size Preparation When changing the paper size, make sure the paper size in the User Tools menu are correctly set. If you do not, misfeeds might occur. If you load a paper size that is not selected automatically, you need to specify the paper size with the User Tools. - Page 126 Troubleshooting Setting the roll holder AHD050S Reference For details about the procedure of loading paper, see p.106 “Loading Paper Roll”. Confirm paper width using the paper roll tray's scale.
-
Page 127: Changing The Cut Paper Size
Changing the Paper Size Changing the Cut Paper Size AHD028S... - Page 128 Troubleshooting...
-
Page 129: Remarks
7. Remarks Dos and Don'ts R WARNING: • Do not leave the main unit open more than 10 minutes, otherwise • Keep the machine away from copy quality may deteriorate. flammable liquids, gases, and aerosols. A fire or an electric •... -
Page 130: Toner
Remarks Toner Handling Toner R WARNING: • Do not incinerate used toner or toner containers. Toner dust might ig- nite when exposed to an open flame. Dispose of used toner containers in accordance with local regulations. R CAUTION: • Keep toner (used or unused) and toner containers out of reach of children. Important ❒... -
Page 131: Where To Put Your Machine
Where to Put Your Machine Where to Put Your Machine • Near machines generating ammo- Machine Environment nia, such as a diazo copy machine. • Places where the machine will be Choose your machine's location care- subject to frequent strong vibra- fully. -
Page 132: Power Connection
Remarks Power Connection Clearance Around the Machine R WARNING: Place the machine near a power source, and provide the clearance as • Connect the machine only to shown. the power source described on the inside front cover of this manual. Connect the power cord directly into a wall outlet and do not use an extension cord. -
Page 133: Maintaining Your Machine
Maintaining Your Machine Maintaining Your Machine If the exposure glass or feed roller are Cleaning inside the Original dirty, you will not be able to make clear copies. Clean them when they Cover become dirty. If you open the original cover, you ❖... -
Page 134: Cleaning The Imaging Unit
Remarks Cleaning the feed roller Cleaning the Imaging Unit A Wipe the feed roller with a soft, Clean off toner that may have collect- dry cloth while turning the roller. ed on the imaging area. A A A A Lift the imaging unit opening le- vers on both sides and open the imaging unit. -
Page 135: Other Functions
Other Functions Other Functions B B B B Press [Inquiry]. Inquiry The inquiry functions let you confirm the telephone numbers to contact for repairs or to order toner. Be sure to contact your service engineer to veri- fy the following: Inquiry information is displayed. -
Page 136: Changing The Display Language
Remarks Changing the Display Language You can change the language used on the display. English is set as default setting. A A A A Press the { { { { User Tools/Counter} } } } key. AHD101S B B B B Press [Español]. -
Page 137: Counter
Counter Counter Displaying the Total Counter You can display the total length of sheets used or the total area of sheets used. You can also print the counter list. Note ❒ The total length display is set as default. If you want to change it to the total area display, contact your service representative. - Page 138 Remarks...
-
Page 139: Entering Text
8. Entering Text Entering Text This section describes how to enter characters. When you enter a character, it is shown at the position of the cursor. If there is a character at the cursor position, the entered character is shown before that character. Available Characters •... -
Page 140: Entering Text
Entering Text Entering Text Entering letters A A A A Press [Shift] to switch between uppercase and lowercase. B B B B Press the letters you want to enter. Deleting characters A A A A Press [Backspace] or [Delete All] to delete characters. -
Page 141: Specifications
9. Specifications Main Unit ❖ ❖ ❖ ❖ Configuration: Console ❖ ❖ ❖ ❖ Photosensitivity type: OPC drum ❖ ❖ ❖ ❖ Copy process: Dry electrostatic transfer system ❖ ❖ ❖ ❖ Development: Dry two-component magnetic brush development system ❖ ❖ ❖ ❖ Fusing: Heating roll pressure system ❖... - Page 142 Specifications ❖ ❖ ❖ ❖ Reproduction ratio: • Metric version: Full-size: 100% Reduce: 25.0%, 35.4%, 50.0%, 70.7% Enlarge: 141.4%, 200.0%, 282.8%, 400.0% Zoom: 25.0 – 400.0% (0.1% increments) • Inch version (Engineering): Full-size: 100% Reduce: 25.0%, 32.4%, 50.0%, 64.7% Enlarge: 129.4%, 200.0%, 258.8%, 400.0% Zoom: 25.0 –...
- Page 143 Main Unit ❖ ❖ ❖ ❖ Non-reproduction area: • Metric version: • Top: 8 mm • Bottom: 10 mm • Left and Right 2 ± 2 mm • Inch version: • Top: 0.32" • Bottom: 0.40" • Left and Right 0.08" ± 0.08" ❖...
- Page 144 Specifications ❖ ❖ ❖ ❖ Noise emission Sound Power Level: Stand-by Less than 50.6 dB (A) Copying Less than 65.7 dB (A) Sound Pressure Level Stand-by Less than 38 dB (A) Copying Less than 54.7 dB (A) The above measurements are in accordance with ISO 7779 and are actual values. Measured at the position of the operator.
-
Page 145: Options
Options Options Roll Feeder Type 480 ❖ ❖ ❖ ❖ Paper sizes: width: 210 – 914 mm, length: 210 – 15000 mm (diameter: 175 mm) ❖ ❖ ❖ ❖ Paper widths: • Metric version 210 mm, 257 mm, 297 mm, 364 mm, 420 mm, 440 mm, 490 mm, 515 mm, 594 mm, 660 mm, 680 mm, 728 mm, 800 mm, 841 mm, 880 mm, 914 mm •... -
Page 146: Carrier Sheet
Specifications Carrier Sheet Allows you to load bent, folded, creased, thin, or pasted originals using this sheet. Roll Holder Unit Type A When using several types of paper roll, you can set each type of paper roll with a roll holder unit in advance. Original Tray Type G It is installed in the back of the machine. -
Page 147: Copy Paper
Copy Paper Copy Paper Recommended Size and Type The following limitations apply to each paper tray. ❖ ❖ ❖ ❖ Metric version Where paper is Paper type Paper size Number of placed sheets that can be placed Paper roll tray (Tray 3 Plain paper Paper roll –... - Page 148 Specifications ❖ ❖ ❖ ❖ Inch version Where paper is Paper type Paper size Number of placed sheets that can be placed Paper roll tray (Tray 3 Plain paper Paper roll – and Tray 4 are option- 13.9 – 29.3 lb 13.9 –...
- Page 149 Copy Paper Paper roll • If humidity is high, and the paper roll has expanded due to moisture, be sure to cut off approximately 1000 mm (40"), before making copies. • Use a paper roll that has a black core. •...
-
Page 150: Unusable Paper
Specifications Unusable Paper R CAUTION: • Do not reuse stapled paper. Do not use aluminum foil, carbon-containing paper or other conductive paper. If you do, there is a danger of fire. Important ❒ To prevent faults, do not use any of the following kinds of paper: •... -
Page 151: Paper Storage
Copy Paper Paper Storage Note ❒ When storing paper, the following precautions always should be followed: • Do not store paper where it will be exposed to direct sunlight. • Avoid storing paper in humid areas (humidity: 70% or less). •... -
Page 152: Handling Paper
Specifications Handling paper Depending on the humidity of the storage environment, handle the paper as fol- lows: AHD039S Note ❒ If humidity is above 60%, turn on the anti-humidity heater. Reference p.32 “Anti-humidity Heater Switch”... -
Page 153: Index
INDEX Checking Stored Documents , 45 Checking the job list , 34 A1 is displayed , 111 Check Modes key , 25 A2 is displayed , 111 C is displayed , 114 A3 is displayed , 113 Cleaning inside the original cover , 123 Accessing user tools (System Settings) , 55 Cleaning the imaging unit , 124 Adding a group to another group , 91... - Page 154 E-mail destination , 80 Key Counter Management , 66 Energy Saver , 64 Energy Saver key , 25 Energy saver mode , 31 LDAP authentication , 97 ENERGY STAR program , 17 Loading Entering Text , 129 cut paper , 107 Exiting user tools , 55 paper roll , 106 Extended Security , 66...
- Page 155 Paper output exit Registering SMTP and LDAP authentication , 97 copier , 61 Registering user codes , 76 Document Server , 61 Removing a name from a group , 92 Paper roll , 139 Removing the roll holder , 115 Paper roll tray , 22 Paper size detect method , 59 Paper storage , 141...
- Page 156 Trays , 22 Turning off the main power , 30 the power , 30 Turning on the main power , 29 the power , 29 Unusable paper , 140 Upper output stacker , 19 Upper tray , 19 , 21 Use LDAP Server , 70 User Authentication Management , 65 User Name...