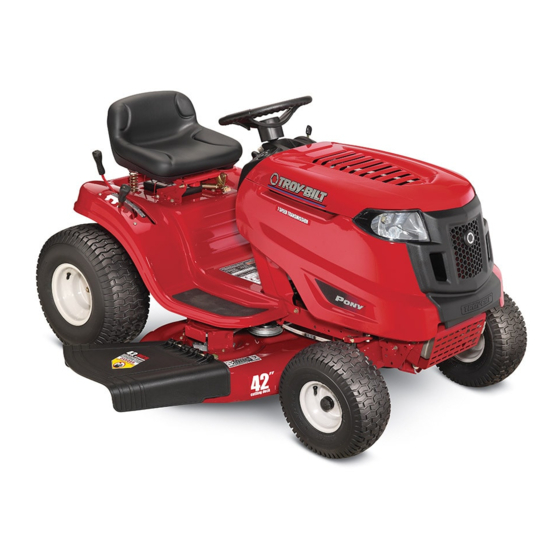
Troy-Bilt Pony Operator's Manual
Hide thumbs
Also See for Pony:
- Operator's manual (64 pages) ,
- Owner's/operator's manual (55 pages) ,
- Technical manual (24 pages)
Table of Contents
Advertisement
Available languages
Available languages
Advertisement
Table of Contents

Related Manuals for Troy-Bilt Pony


Summary of Contents for Troy-Bilt Pony
- Page 1 Safe Operation Practices • Set-Up • Operation • Maintenance • Service • Troubleshooting • Warranty 0 TRD ° PERATOR_5MANUAL Lawn Tractor -- Pony TROY-BILT LLC, P.O. BOX 361131 CLEVELAND, OHiO 44136-0019 Form No.769-03502 PrintedIn USA (November 13, 2 007)
-
Page 2: Customer Support
This product has met the rigid safety standards of the Outdoor Power Equipment Institute and an independent testing Troy-Bilt LLC. It was carefully engineered to provide excellent performance when properly operated and maintained. laboratory. If you have any problems... -
Page 3: Important Safe Operation Practices
important SafeOperation Practices WARNING: This symbol points out important safety instructions which, if not followed, could endanger the personal safety and/or property of yourself and others. Read and follow all instructions in this manual before attempting to operate this machine. Failure to comply with these instructions may result in personal... -
Page 4: Slope Operation
A missing or damaged discharge cover can cause blade SlopeOperation contact or thrown object injuries. Slopes are a major factor related to loss of control and tip-over Stop the blade(s) when crossing gravel drives, walks, or accidents which can result in severe injury or death. All slopes roads and while not cutting grass. -
Page 5: General Service
Children Use only an approved gasoline container. Never fill containers inside a vehicle or on a truck Tragic accidents can occur if the operator is not alert to the or trailer bed with a plastic liner. Always place presence of children. Children are often attracted to the... -
Page 6: Spark Arrestor
Check the blade(s) and engine mounting bolts at frequent Notice RegardingEmissions intervals for proper tightness. Also, visually inspect blade(s) Engines which are certified to comply with California and federal for damage (e.g., excessive wear, bent, cracked). Replace EPA emission regulations for SORE (Small Off Road Equipment) the blade(s) with the original equipment... - Page 7 ,_t_.._ or a corner of a building... or a fence post < ¢N 15 ° Usethis page as a guide to determine slopeswhere you may not operate safely. (a rise of approximately 2-1/2 feet every 10 feet). A riding mower could overturn and cause serious injury.
-
Page 8: Assembly And Setup
Assembly & Set=Up Shipping BraceRemoval Tractor Set-Up Attaching the Battery Cables off, remove the ignition key, and set the parking NOTE:This unit may have been shipped with the battery cables WARNING[ brake before removing Make sure the riding the shipping mower's engine brace. - Page 9 AttachingTheSteering Wheel If the steering wheel for your tractor did not come attached, tile hardware for attaching it has been packed within the steering wheel, beneath the steering wheel cap. Carefully pry off the steering wheel cap and remove the hardware. With the wheels of the tractor pointing straight forward,...
-
Page 10: Controls And Features
Controls & Features Speed Control & Parking Brake Lever Clutch/Brake Pedal Throttle/Choke Lever Ignition Switch Shift Lever PTO (Blade Engage) Lever Deck Lift Lever NOTE: Steering wheel not shown for clarity Figure 4-1 Lawn Tractor controls and features are illustrated in Fig 4-1 and described on the following pages. - Page 11 Throttle / ChokeControl The throttle control lever is located on the right side of the On/Lights tractor's clash panel, see Fig. 4-1. This lever controls the speed of the engine, as well as the choke when it is pushed all the way forward.
-
Page 12: Speed Control Lever
DeckLift Lever SpeedControlLever The speed control lever, located on the left side of Found on your tractor's right fender, the deck lift lever the tractor's dash console, allows you to regulate is used to change the height of the cutting deck. -
Page 13: Operation
Operation Engaging the ParkingBrake Toengage the parking brake: TO AVOID SERIOUS INJURY Fully depress the clutch-brake pedal and hold it down with DEATH your foot. Move the speed control lever all the way clown and into the " GO UP ANDDOWNSLOPES,NOT ACROSS. parking brake position. -
Page 14: Stopping The Engine
Engage the parking brake, Stoppingthe Engine Shut engine off and remove the key. Doing so will minimize the possibility of having your lawn engine, disconnect the spark plug wire(s) and "browned" by hot exhaust from your tractor's running engine. WARNING! ground against If you strike a foreign... -
Page 15: Usingthe Deck Lift Lever
Usingthe Deck Lift Lever Headlights To raise the cutting deck, move the deck lift lever to the left, then The Headlights are ON whenever the tractor's engine is place it in the notch best suited for your application. Refer to running. -
Page 16: Maintenance And Adjustments
Maintenance & Adjustments Air Cleaner Maintenance Service the pre-cleaner and cartridge/air cleaner element instructed in the Engine Operator/Owner Manual packed with repairs, disengage PTO, move shift lever into neutral your unit. WARNING: position, set parking Before performing brake, stop engine and remove any maintenance key to prevent unintended... - Page 17 Adjustments adjustments while the engine is running, except WARNING: Never attempt to make any where specified in the operator's manual. Leveling the Deck NOTE: Check the tractor's tire pressure before performing deck leveling adjustments. Refer to Tires in the Service section of this manual for information regarding tire pressure.
-
Page 18: Seat Adjustment
SidetoSide Seat Adjustment If the cutting deck appears to be mowing unevenly, a side to side Refer to tile Set-Up and Assembly section of this manual for seat adjustment can be performed. Adjust if necessary as follows: adjustment instructions. With the tractor parked on a firm, level surface, place the ParkingBrakeAdjustment deck lift lever in the top notch (highest position) -
Page 19: Maintenance Schedule
MaintenanceSchedule Before Prior Every Every Every Every 10Hours 50Hours 100Hours Each use 25 Hours toStoring ¢- CleanHood/Dash Louvers Check Engine Oil Level y '/" y '/" Check Air Filterfor Dirty,Loose or Damaged Parts CleanandRe-oilAir Filter's Foam Precleaner Replace A ir FiLter Element ChangeEngine Oil andReplace Oil Filter Clean Battery Terminals LubeFrontAxlesand Rims... -
Page 20: Cutting Deckremoval
Service Cutting DeckRemoval To remove the cutting deck, proceed as follows: Place the PTO (Blode Engage) lever in the disengaged (OFF) position and engage the parking brake. Lower the deck by moving the deck lift lever into the bottom notch on the right fender. Remove the belt-keeper rod, from around the tractor's engine... -
Page 21: Cutting Blades
Tires WARNING! Batteries give offan explosive while charging. Charge the battery in a well pressure shown on the sidewall of the tire. WARNING! Never exceed the maximum inflation ventilated area and keep away from an open flame or pilot light as on a water heater, space heater, furnace, clothes dryer or other gas appliances. -
Page 22: Changing The Deck Belt
NOTE: When replacing the blade, be sure to install the blade with the side of the blade marked "Bottom" (or with a part number stamped in it) facing the ground when the mower is in the operating position. blade spindle hex flange nut to between 70 Ibs-ft... - Page 23 Remove the deck belt from around all pulleys, including Changing the TransmissionDrive Belt the deck idler pulley. NOTE: Several components must be removed and special tools Route the new belt as shown in Fig. 7-7. (i.e. air/impact wrench) in order to change the tractor's drive belt.
-
Page 24: Troubleshooting
Troubleshooting Problem Cause Remedy 1. Move the throttle contol out of the CHOKE 1. Unit running with CHOKE activated. Engine runs erratic position. 2. Spark plug wires loose. 2. Connect and tighten spark plug wire. 3. Blocked fuel line or stale fuel. 3. -
Page 25: Replacement Parts
Replacement P arts 754-04060B Drive Belt (Mowing Deck) 618-04456 Deck Spindle 742-0616A Blade 734-0973 Rear Deck Wheel 925-1707D Battery 951-8111 Fuel Tan k Cap 925-1745 734-1731 Tire (Front) 15 x 6 x 6 Square Shoulder 734-1730 Tire (Rear) 20 x 8 x 8 Square Shoulder 746-04364 Throttle Control/Cable... -
Page 26: Attachments& Accessories
Attachments& Accessories Thefollowingattachments and accessoriesare compatiblefor theTroy-biltPonyLawnTractor.Seethe retailerfromwhich you purchased yourtractor,an authorized Troy-biltServiceDealeror phone(800) 828-5500for informationregardingprice andavailability. plow).Use of this type of equipmentWILL voidthe tractor'swarranty. AUTION: ThisTroy-Bilt LawnTractoris NOTdesignedfor use with anytype of ground-engaging attachments (e.g. tilleror Model Number Description 0EM-190-183 Deck Wheel Kit OEM-190-607... - Page 27 CALiFORNiA EMiSSiON CONTROL WARRANTY STATEMENT YOUR WARRANTY RIGHTS AND OBLiGATiONS The CaliforniaAir ResourcesBoardand MTDConsumerGroup Inc are pleasedto explainthe evaporative emissioncontrolsystemwarrantyon your2007 lawnmower.In California,new lawnmowermustbe designed,built and equippedto meetthe State'sstringentanti-smogstandards. MTDConsumerGroup Inc mustwarrantthe EECSon your lawnmowerfor the periodof time listedbelowprovidedtherehas beenno abuse, neglector impropermaintenance of your lawnmower.
- Page 28 In the U.S.A. the product shall void this warranty. You assume the risk and liability Check your Yellow Pages, or contact Troy-Bilt LLC at RO. Box 361131, for loss, damage, or injury to you and your property and/or to others...
- Page 29 Medidas irnportantes de seguridad * Configuraci6n * Funcionarniento • Mantenimiento * Servido * Soiud6n de probiemas * Garantia O/'Rn MANUAL PERAI Tractor de C_sped B Pony MTD LLC, P.O. BOX 361131 CLEVELAND, OHiO 44136-0019 Impresoen Estados Unidosde America...
-
Page 30: Asistencia Al Cliente
Gradas Gracias pot comprar un tractor corta c_sped fabricado modificar las especificaciones de los productos, los diseffos y Troy-Bilt LLC. El mismo ha sido diseffado cuidadosamente el equipo sin previo aviso y sin generar responsabilidad para brindar excelente rendimiento si se Io opera y mantiene... -
Page 31: Medidas Importantes De Seguridad
Medidas importantesde seguridad seguridad que se deben respetar para evitar poner en peligro su seguridad personal y/o material y la DVERTENCIA: La presencia de este simbolo indica que se trata de instrucciones importantes de otras personas. Lea y siga todas las instrucciones de este manual antes de poner en funcionamiento esta m_quina. - Page 32 Una cubierta de descarga faltante o da_ada puede provocar Funci0narnient0 en pendientes el contacto con la cuchilla o lesiones por objetos arrojados. Las pendientes son un factor importante relacionado Detenga la(s) cuchilla(s) cuando atraviese senderos, sendas o accidentes por derrape y vuelcos que pueden producir lesiones...
- Page 33 Niff0s Utilice s61o los recipientes para gasolina autorizados. Nunca Ilene los recipientes en el interior Pueden ocurrir accidentes tr_gicos si el operador un vehiculo o cami6n o caja de remolque est_ atento a la presencia de ni_os. Pot lo general, los recubrimiento pl_stico.
- Page 34 Avisoreferidoa emisiones Revise los pernos de montaje de la(s) cuchilla(s) y del motor a intervalos frecuentes para verificar que est_n bien apretados. Adem_s, inspeccione visualmente la(s) Los motores que est_n certificados y cumplen con las cuchilla(s) en busca de dahos (par ejemplo, desgaste regulaciones de emisiones...
- Page 35 0 laesquinade un edifid0... 0 el p0stede unaempalizada i_iii iiii 15 ° Useesta p_gina comoguia para determinar en qu_ pendientes no puede operar el tractor de manera segura. (elevaci6n aproximada de 2 I/2 pies por cada 10 pies). El tractor corta c_sped podria voltearse y causar lesiones graves.
- Page 36 Montajey Configuraci6n CONFIGURACION DEL TRACTOR Extracci6n de la traba de seguridad utilizada en el envi0 Instalaci6n de loscables de la bateria tractor corta c_asped estG apagado, quite la Ilave NOTA: Algunos modelos se envian con loscables de labateria ya IADVERTENClA! Aseg0rese de que el motor del de encendido...
- Page 37 Instalad6n del v01ante Si el volante del tractor no se envia instalado, debajo de la tapa del volante, dentro del mismo, se entregan embalados elementos de ferreteria para su instalaci6n. Extraiga con cuidado el casquete del volante mediante palanca y retire los elementos de ferreteria.
-
Page 38: Controles Y Caracteristicas
Controles y Caracteristicas Palanca de control velocidad _' freno de mano Pedal de freno/ embrague Palanca de IVl6dulo del interruptor est rangulador/obturador encendido Palanca cambios Palanca de potencia cle arranque Palanca de elevaci6n (PTO} (enganche de cuchilla) de la plataforma Figura 4-1 Los controles y caracteristicas... -
Page 39: Palanca Decontrol
PALANCA DECONTROL REGULADOR La palanca de control del estrangulador est_ ubicada del lado En/luces derecho del tablero de instrumentos del tractor. Esta palanca controla la velocidad del motor y, en algunos modelos, cuando se la empuja totalmente hacia adelante, tambien controla el obturador. - Page 40 Palanca de control de velocidad Palanca de elevad6n de la plataforma La palanca de control de velocidad, ubicada Ubicada en el guardabarros derecho del tractor, la lado izquierdo del tablero de instrumentos palanca de elevaci6n de la plataforma se utiliza para tractor, le permite regular la velocidad absoluta...
- Page 41 Funci0namient0 Colocadbn del freno de mano Para colocarel freno de mano: Presione totalmente el pedal del embrague-freno PARA EVITAR LESIONES mant_ngalo hacia abajo con el pie. PERSONALES GRAVES 0 LA MUERTE Mueva la palanca de control de velocidad totalmente hacia abajo en la posici6n de freno de mano.
- Page 42 Detenci6ndel motor Coloque ]a palanca de cambios en neutral, Coloque el freno de estacionamiento, Apague el motor y retire la Ilave. Eso permitir_ reducir al extra6o, detenga el motor, desconecte el(los) minimo la posibilidad de que su c_sped resulte quemado cable(s) de la bujia y conecte el motor a masa.
- Page 43 NOTA: Modelos con modo de precaucibn en marcha arras: El Far0s delanteros motor se apagar_ autom_ticamente si la potencia de arranque (PTO) est_ enganchada con la palanca de cambios en posicibn En algunos modelos, los faros se encienden (ON) cada vez marcha arras con la Ilave de encendido en la posicibn de CORTE...
-
Page 44: Mantenimiento Y Ajustes
Mantenimiento y Ajustes MANTENIMIENTO Depurad0r de aire Realice el mantenimiento del pre-filtro, en caso de estar mantenimiento o reparaciones, desconecte instalado y del elemento de filtro de aire/cartucho, segOn las IADVERTENCIA! Antes de realizar tareas de instrucciones del Manual del propietario/operador del motor potencia de arranque... - Page 45 Ajustes cualquier ajuste mientras el motor corre, excepto ll_ll ADVERTENCIA: Nunca la tentativa de hater donde especificado en el manual del operador. Nivelaci6n de la plataf0rma NOTA: Controle la presi6n de neum_ticos del tractor antes de realizar cualquier nivelaci6n de la plataforma. Consulte Neum_ticos en la secci6n Servicio de este manual...
- Page 46 Nivelad6n lad0 a lad0 Ajuste del asient0 Si ]a piataforma de corte estuviera realizando el corte de cesped Consulte la secci6n Configuraci6n y Montaje de este manual para de forma despareja, puede realizarse un ajuste lado a lado. De ver instrucciones para el ajuste del asiento.
-
Page 47: Calendario De Mantenimiento
Calendario de mantenimiento Antes Cada Cada Cada Cada Antes decadauso 10horas 25 horas 50 horas 100horas de almacenar ¢- Limpieel cap6/losrespiraderos Inspecdoneel nivelde aceitedel motor Controleelfiltro de aireparavet si haypiezas V/" sucias,sueltasoda_adas Limpiey vuelva a lubricarel depuradorde V/" espumadelfiltro de aire Reemplace e l elementodel filtro deaire V/"... - Page 48 Servicio E×tracci6n de la plataforrna decorte Para extraer la plataforma de corte, proceda de la siguiente manera: Coloq ue la toma de fuerza (PTO) (enganche de cuchilla) en la posici6n OFF (desconectada) y coloque el freno de mano_ Baje la plataforma colocando la palanca de elevaci6n...
- Page 49 CARGA Neum_tk0s IADVERTENClA! AI cargarse, las baterias emiten un gas que puede causar explosiones. Cargue la de inflado que se indica en los laterales de los bateria en un _rea bien ventilada y alejela de una IADVERTENCIA! neum_ticos. Nunca exceda la presi6n m_xima llama abierta o luz piloto, como pot ejemplo...
- Page 50 Cuchillasde torte IADVERTENCIA! Antes de extraer la(s) cuchilla(s) para afilarla(s) o reemplazarla(s), asegQrese de apagar el motor, retirar la Ilave de encendido, desconectar el(los) cable(s) de la bujia y hater masa contra el motor para impedir el encendido accidental del motor. Proteja sus manos utilizando guantes pesados o un paso para asir la cuchilla corte.
- Page 51 Ruta el nuevo cintur6n como mostrado en el Higo 7-7. Poleaslocas Reensamble las defensas de la correa que extrajo anteriormente. Cambi0 de la c0rrea de transmisi6n NOTA: Para cambiar la correa de transmisi6n del tractor, se deben retirar varios componentes y se requieren herramientas especiales...
- Page 52 Solud6nde Problemas Problema Causa Solud6n El motor funciona de manera 1. La unidad est_ funcionando con el 1. Saque el control del regulador de la posici6n err_tica OBTURADOR activado. OBTURADOR. 2. Los cables de la bujfa estan flojos. 2. Conecte y ajuste el cable de la bujfa. 3.
-
Page 53: Piezas De Reemplazo
Piezasde reemplazo 754-04060B Cintur6n de Paseo (Segando Cubierta) 618-04456 Huso de Cubierta 742-0616A L_mina 734-0973 Rueda de Cubierta Trasera 925-1707D Bateria 951-3111 Gorra de Dep6sito de combustible 925-1745 Llave Hombro Cuadrado 734-1731 Neum_tico (delanteros) 15 x 6 x 6 734-1730 Neum_tico (delanteros) 20 x 8 x 8 Hombro... -
Page 54: Aditamentos Y Accesorios
Aditamentos y accesorios Los accesorios siguientes y los accesorios son compatibles para el Tractor de C_sped de Poni de Troy-bilt. Vet al detallista del cual usted compr6 su tractor, un Distribuidor de Servicio de Troy-bilt autorizado o telefonear (800) 828-5500... - Page 55 DECLARAClON DE GARANTiA DEL CONTROL DE LAS EMISIONES DE CAMFORNIA DERECHOS Y OBMGAClONES DE SU GARANTiA El Departamento de los Recursos de Aire de California y MTD Consumer Group Inc, se complacen en explicar la garantia del sistema de control de emisiones por evaporaci6n de su cortadora de cesped 2007.
- Page 56 Piezas de reemplazo que no son piezas originales de Troy-Bilt. vandalismo, robo, incendio, inundaciOn o algOn da_o debido a otro g. Gastos de transporte y visitas tOcnicas.