Table of Contents
Advertisement
Advertisement
Table of Contents

Related Manuals for Omron electroTHerapy PM3030


Summary of Contents for Omron electroTHerapy PM3030
- Page 1 INSTrUCTION MaNUaL electroTHerapy pain relief pM3030 Model:...
-
Page 2: Table Of Contents
TaBLe OF CONTeNTS Before Using the Unit Step 3 – Select the Correct Intensity Level (1 Low – 5 High) ...22 Introduction .................2 How to Control and Reduce Your Pain ........23 Important Safety Precautions and Warnings ......3 When Should the Device be Used? ........23 How electroTHERAPY pain relief Works .......10 Get to Your Pain Early ............23 Know Your Unit ................11... -
Page 3: Introduction
INTrODUCTION Thank you for purchasing Omron’s electroTHERAPY for pain The Omron PM3030 electroTHERAPY pain relief solution ® relief solution. is intended for the relief of pain associated with sore or aching muscles of the lower back, arms, or legs due to strain from In order to use the device safely, read the complete manual exercise or normal household and work activities. -
Page 4: Important Safety Precautions And Warnings
IMpOrTaNT SaFeTy preCaUTIONS aND WarNINGS It is important that you read all the warnings and DaNGer precautions included in this instruction manual because This unit must not be used in combination with the they are intended to keep you safe, prevent injury and avoid a following medical devices: situation that could result in damage to the device. - Page 5 IMpOrTaNT SaFeTy preCaUTIONS aND WarNINGS DO NOT USE THIS DEVICE UNDER THESE CONDITIONS On the opposite sides of your head since the effects of Consult with your physician before using this device, stimulation of the brain are unknown. because the device may cause lethal rhythm disturbances in certain susceptible individuals.
- Page 6 IMpOrTaNT SaFeTy preCaUTIONS aND WarNINGS NEVER APPLY THE PADS TO: PAIN MANAGEMENT WARNINGS If you have had medical or physical treatment for your pain, The head or any area Both sides of the thorax consult with your physician before using this device. of the face.
- Page 7 IMpOrTaNT SaFeTy preCaUTIONS aND WarNINGS WARNINGS AND PRECAUTIONS REGARDING THE PADS DO NOT USE YOUR PADS THIS WAY Pads should not touch each other when placed onto your skin. (continued) Do not bend or fold because the pad may not function Do not place on your spine or backbone.
- Page 8 IMpOrTaNT SaFeTy preCaUTIONS aND WarNINGS CAUTION WHILE USING UNIT Do not throw the batteries into a fire. The batteries may explode. If the unit is not functioning properly or you feel discomfort, Dispose of the device, batteries, and components according immediately stop using the device.
- Page 9 IMpOrTaNT SaFeTy preCaUTIONS aND WarNINGS General Precautions • If you have suspected or diagnosed heart disease, you should • The long-term effects of electrical stimulation are unknown. follow precautions recommended by your physician. • Apply stimulation to only normal, intact, clean, dry, and • If you have suspected or diagnosed epilepsy, you should follow healthy skin. precautions recommended by your physician. • TENS is not effective in treating the original source or cause of • Use caution if you have a tendency to bleed internally, such as the pain, including headache. following an injury or fracture. • TENS is not a substitute for pain medications and other pain • Consult with your physician prior to using the device after a management therapies.
- Page 10 IMpOrTaNT SaFeTy preCaUTIONS aND WarNINGS General Precautions (continued) Possible Adverse Reactions • Do not use to treat one region for extended periods of time • Use this device only with the leads, electrodes, and accessories (more than 30 minutes a session, up to 3 times/day) or recommended by the manufacturer. Keep unit out of the reach of young children.
-
Page 11: How Electrotherapy Pain Relief Works
HOW electroTHerapy FOr paIN reLIeF WOrKS What is it? How does it work? The electroTHERAPY for pain relief device is a 3-program, Scientific theory suggests that electrical stimulation therapy may portable device designed for adults only. It is designed to reduce work in several ways: and relieve muscle and joint pain, stiffness and numbness in the 1. -
Page 12: Know Your Unit
KNOW yOUr UNIT paCKaGe CONTeNTS Pad Holder Unit Electrode Cords Two Pads THERAPY electro p a i n r e l i e f (98mm x 64mm) Instruction Manual THERAPY electro p a i n r e l i e f PM3030 For Muscle and Joint Pain d r u g - f r e e Instruction Manual... -
Page 13: Features
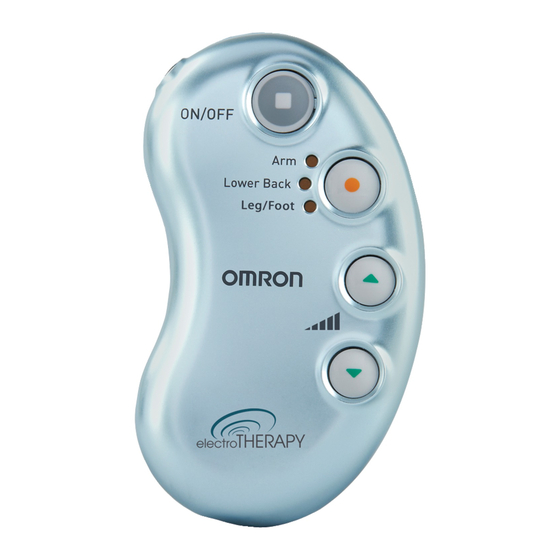
KNOW yOUr UNIT FeaTUreS BUTTONS aND THeIr FUNCTIONS 1. Three pre-set programs (Arm, Lower Back, Leg/Foot). Power Button Electrode 2. Five intensity levels of therapy, 1 low intensity to When the button is pressed, low Cord Jack 5 high intensity. frequency therapy will start. 3. Pair of pads (durable, re-usable, washable, up to 150 uses). Program Circle Button (Do not use with non-manufacturer’s pads or electrode cord). -
Page 14: Simple Assembly Steps
SIMpLe aSSeMBLy STepS STep 1 – INSerT BaTTerIeS 3 Reinstall the battery cover. 1 Remove the battery cover on the back. NOTES: 2 Insert batteries. Make sure the signs correspond when • During battery replacement, replace both batteries with new ones. inserting batteries. • Dispose the used batteries according to the local regulations. -
Page 15: Step 2 - Attach Electrode Cord To The Unit
SIMpLe aSSeMBLy STepS STep 2 – aTTaCH eLeCTrODe COrD STep 3 – aTTaCH paDS TO THe TO THe UNIT eLeCTrODe COrD For the first time, take the pads out of the sealed package and Attach the clip of the electrode cord to the top and plug into the main unit. -
Page 16: Step 4 - Connect Either Electrode To Each Of The Pads
SIMpLe aSSeMBLy STepS STep 4 – SNap eITHer eLeCTrODe COrD TO eaCH OF THe paDS... -
Page 17: Easy Steps To Get Started With Your Therapy
eaSy STepS TO GeT STarTeD WITH yOUr THerapy (USe FOr a MaXIMUM OF 30 MINUTeS) STep 1 – paD pLaCeMeNT Place pads on clean, dry and healthy skin near the area with pain at least 1" apart, and do not let them touch. OK to place near or surrounding the pain. - Page 18 eaSy STepS TO GeT STarTeD WITH yOUr THerapy STep 1 – paD pLaCeMeNT (continued) DeLTOID Upper arM eLBOW HIp & THIGH Attach one pad in front and Attach both pads on either Attach both pads on either Attach both pads on either one in back of the muscle.
- Page 19 eaSy STepS TO GeT STarTeD WITH yOUr THerapy STep 1 – paD pLaCeMeNT (continued) Outside Inside KNee CaLF aNKLe/FOOT Attach both pads above the knee Attach both pads on the calf/leg Attach pads per the illustration, on the left for pain on or above and below the joint where you feel pain.
-
Page 20: Step 2 - Select 1 Of 3 Programs
eaSy STepS TO GeT STarTeD WITH yOUr THerapy STep 2 – SeLeCT 1 OF 3 prOGraMS How do you switch programs? • Push “ON” and the default program “blinks” (device defaults to Each time you push the orange circle button, it switches to the the last program at the lowest intensity level). next program at the lowest intensity level. - Page 21 eaSy STepS TO GeT STarTeD WITH yOUr THerapy STep 2 – SeLeCT 1 OF 3 prOGraMS (continued) Lower Back Leg/Foot Therapies designed for Upper & Lower Arm, Elbow Lower Back Leg, Knee, Foot, Hip & Thigh Potential conditions Swelling, stiffness, sore or achy, Stiffness, soreness, muscle spasm, Swelling, fatigue, chilling feeling, muscle or nerve pain...
- Page 22 eaSy STepS TO GeT STarTeD WITH yOUr THerapy STep 2 – SeLeCT 1 OF 3 prOGraMS (continued) Lower Back Leg/Foot Therapies designed for Upper & Lower Arm, Elbow Lower Back Leg, Knee, Foot, Hip & Thigh How do I personalize the You set the program.
-
Page 23: Step 3 - Select The Correct Intensity Level (1 Low - 5 High)
eaSy STepS TO GeT STarTeD WITH yOUr THerapy STep 3 – SeLeCT THe COrreCT INTeNSITy LeVeL (1 LOW – 5 HIGH) What intensity level is my unit on? Start at the lowest intensity level and slowly increase it by The program’s blinking light indicates the level you have selected. pushing the green “UP”... -
Page 24: How To Control And Reduce Your Pain
HOW TO CONTrOL aND reDUCe yOUr paIN When should the device be used? How long should you use it? Use as soon as your pain begins. Start with one session (unit Start with one 15 minute session. Always turn unit off with pads automatically turns off at 15 minutes). -
Page 25: What Type Of Pain Is It Best For
HOW TO CONTrOL aND reDUCe yOUr paIN What type of pain is it best for? This therapy works best on acute pain because it is localized. Acute pain is pain in one area for less than 3 months. If you have chronic pain, you may have pain in more than one area and for longer than 6 months. -
Page 26: Cleaning And Storing
CLeaNING aND STOraGe The unit is designed for repeated use over time. The pads will 5. Pads are replaceable and can be purchased when needed by last up to 150 uses, or 5 months (based on use 1/day). Here are calling 1-800-634-4350 or go to www.omronhealthcare.com. -
Page 27: Cleaning The Unit
CLeaNING aND STOraGe Cleaning the unit 2. Remove the pads from your body. 1. Turn unit off and disconnect the electrode cords from the pads. 3. Leave the electrode cords connected to 2. Clean with a lightly moistened cloth (or a cloth soaked in a the pads and place the pads on the pad neutral cleaning solution) and wipe gently. -
Page 28: Troubleshooting Tips
TrOUBLeSHOOTING If this happens... Possible causes... Try this solution... If this happens... Possible causes... Try this solution... The intensity is not Are both pads Attach both to the The skin turns red or Is the adhesive Wash adhesive felt. Very weak attached to the body? body. - Page 29 TrOUBLeSHOOTING If this happens... Possible causes... Try this solution... If this happens... Possible causes... Try this solution... No power source. Are the polarities Insert batteries in It is difficult to attach Have you removed the Peel off film on the of battery (+ and -) correct alignment, OR the pad to the skin. transparent film from adhesive surface of aligned in the wrong replace batteries.
- Page 30 Have pads been Leave the pad in washed too long and/ freezer for overnight. or too frequently? Were the pads Replace the pad. stored under high temperature, high humidity, or direct sunshine? If the above measures are not effective, contact OMRON at www.omronhealthcare.com...
-
Page 31: Limited Warranty
THE FOREGOING IS THE SOLE WARRANTY PROVIDED provided. The above warranties extend only to the original retail BY OMRON IN CONNECTION WITH THIS PRODUCT, purchaser. We will, at our option, repair or replace without charge AND OMRON HEREBY DISCLAIMS ANY OTHER any device covered by the above warranties. Repair or replacement... - Page 32 LIMITeD WarraNTy This warranty provides you with specific legal rights, and you may have other rights that vary by jurisdiction. Because of special local requirements, some of the above limitations and exclusions may not apply to you. FOR CUSTOMER SERVICE Visit our web site at: www.omronhealthcare.com Call toll free: 1-800-634-4350...
-
Page 33: Specifications
2 AAA manganese batteries) Outer Dimension Width 55mm x Height 95mm x Depth 18mm Battery Life New batteries will last for approx. 3 months (when used This OMRON product is produced under the strict quality system for 15 minutes a day, Back of OMRON HEALTHCARE Co. Ltd., Japan. Mode, max. intensity). Accessories/replacement parts Output Frequency Approx. 1–100Hz • electroTHERAPY Long-Life Pads (2 pads per box),... -
Page 34: Important Information Regarding Electro Magnetic Compatibility (Emc)
(cellular) telephones, medical devices in use may be • The use of accessories and cables other than those specified susceptible to electromagnetic interference from other devices. by OMRON, with the exception of cables sold by OMRON Electromagnetic interference may result in incorrect operation of as replacement parts for internal components, may result in the medical device and create a potentially unsafe situation. - Page 35 NOTeS...
- Page 36 NOTeS...
- Page 37 Manufactured by OMRON HEALTHCARE Co., Ltd. Made in China Distributed by: OMRON HEALTHCARE, INC. 1925 West Field Court Lake Forest, IL 60045 USA www.omronhealthcare.com © 2012 OMRON HEALTHCARE, INC.