Advertisement
Quick Links
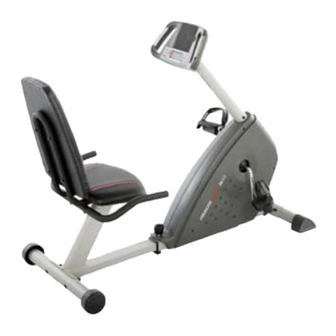
Model No. HREX2076.99
Serial No.
Serial
Decal
QUESTIONS?
As a manufacturer, we are com-
mitted to providing complete
customer satisfaction.
If you
have questions, or if parts are
damaged or missing, PLEASE
CONTACT OUR CUSTOMER
SERVICE DEPARTMENT
DIRECTLY.
CALL TOLL-FREE:
1-888-922-4222
Mon.-Fri.,
6 a.m.-6 p.m. MST
ON THE WEB:
www.healthriderservice.com
Read all precautions and instruc-
tions in this manual before using
this equipment. Keep this manual
for future reference.
USER'S MANUAL
_-
Visit our webs!e
a
www.healthrider.com
new products,
prizes,
fitness
tps,
and much
more!
Advertisement

Related Manuals for Healthrider N35


Summary of Contents for Healthrider N35
- Page 1 Model No. HREX2076.99 Serial No. USER'S MANUAL Serial Decal QUESTIONS? As a manufacturer, we are com- mitted to providing complete customer satisfaction. If you have questions, or if parts are damaged or missing, PLEASE CONTACT OUR CUSTOMER SERVICE DEPARTMENT DIRECTLY. CALL TOLL-FREE: 1-888-922-4222 Mon.-Fri.,...
- Page 2 TABLE OF CONTENTS IMPORTANT PRECAUTIONS ..............BEFORE YOU BEGIN ..............ASSEMBLY ................HOW TO OPERATE THE EXERCISE CYCLE ............ MAINTENANCE AND TROUBLESHOOTING ........... CONDITIONING GUIDELINES ............... PART LIST ................EXPLODED DRAWING ..............HOW TO ORDER REPLACEMENT PARTS ..........Back Cover LIMITED WARRANTY ..............
- Page 3 BEFORE YOU BEGIN uct model number and serial number before contact- Congratulations for selecting the new HEALTHRIDER ® N35 exercise cycle. Cycling is one of the most effec- ing us. The model number is HREX2076.99. The seri- al number can be found on a decal attached to the tive exercises for increasing cardiovascular fitness, building endurance, and toning the body.
- Page 4 ASSEMBLY To hire an authorized service technician to assemble the exercise cycle, call toll-free 1-800-445-2480. Assembly requires two persons. Place all parts of the exercise cycle in a cleared area and remove the pack- ing materials. Do not dispose of the packing materials until assembly is completed. In addition to the included hex keys, assembly requires...
- Page 5 1. Whileanother person liftsthefrontofthe Frame (1) slightly, a ttach the FrontStabilizer (3)tothe Frame withtwoM10x 75mmCarriage Bolts(51)andtwo M10NylonLocknuts ( 63). Seetheinsetdrawing. L oosen theAdjustment Knob (17),slidethe RearFrame (2)outofthe Frame (1), andthenretighten t heAdjustment Knob. Note: A ftertheexercise cycleis assembled, adjust t he Seat(notshown) t o theproper p osition.
- Page 6 5. Haveanother p erson holdtheSeatFrames (7)under the RearFrame (2)as shown. A ttach theSeatFrames andtheSeat(12)to theRearFrame withfourM6x 42mmButton Screws (49)andfourM6Washers (55). Seestep 3.Tighten thetwoM8x 70mmButton Bolts(54). Seestep 4,Tighten thefourM6x 38mmButton Screws (48). 6. TheConsole (16)requires fourD batteries ( notinclud- ed);alkaline batteries a rerecommended. Press the tabonthe battery doorandremove it.
- Page 7 Connect the Upper Wire Harness (36) to the Lower Wire Harness (65). Attach the Upright (13) to the Frame (1) with three M8 x 25mm Button Screws (33) and three M8 Split Washers (59). Be careful to avoid pinching the Wire Harnesses. Identify the Left Pedal (24), which is marked with an "L."...
- Page 8 HOW TO OPERATE THE EXERCISE CYCLE il I Increase Program Button Profiles < k_ [ i/jJ i i i Button "/ aL!0 l, RPM \ / //', Program/Manual Program Display Pace Decrease Button Indicator Guide Button FEATURES OF THE CONSOLE HOW TO USE THE MANUAL MODE The advanced console offers a selection of features designed to make your workouts more enjoyable and...
- Page 9 Next, hold the handgrip pulse sensor with your Monitor your progress with the display. palms resting on the contacts. When your pulse is detected, the heart-shaped indicator in the The upper half of the display will lower half of the display will flash each time your heart beats, and your heart rate will be shown.
- Page 10 Begin pedaling to start the program, HOW TO USE A PULSE PROGRAM Pulse program 1 is 30 minutes long, and is divided into several time periods of different Pulse program 1 is designed to keep your heart rate lengths. One target heart rate is programmed for within a set range during your workout.
- Page 11 automatically change to the resistance level that Turn on the fan if desired. is programmed for the next period. Note: If the See step 6 on page 9. resistance level is too high or too low, you can override it by pressing the Increase and Decrease buttons.
- Page 12 MAINTENANCE AND TROUBLESHOOTING With the left side shield removed, locate the Reed Inspect and properly tighten all parts of the exercise cycle regularly. Replace any worn parts immediately. Switch (43). Turn the Crank (31) until the Magnet (38) is aligned with the Reed Switch. Next, loosen, but do To clean the exercise cycle, use a damp cloth and a not remove, the indicated M4 x 16mm Screw (57).
- Page 13 CONDITIONING GUIDELINES The following guidelines will help you to plan your During the first few minutes of exercise, your body exercise program. Remember that proper nutrition uses easily accessible carbohydrate calories for ener- and adequate rest are essential for successful results. gy.
- Page 14 PART LIST--Model No. HREX2076.99 R0806A Key No. Qty, Description Key No. Qty, Description Frame Crank Bearing Assembly Rear Frame Upper Wire Harness Front Stabilizer Bearing Rear Stabilizer Magnet Backrest Tension Bolt Handlebar Tension Bracket Seat Frame M8 Washer Seat Frame Top Flywheel Washer Left Side Shield Reed Switch/Wire...
- Page 15 EXPLODED DRAWING--Model No. HREX2076.99 Roso6A 57 57..- --_...
- Page 16 HOW TO ORDER REPLACEMENT PARTS To order replacement parts, see the front cover of this manual. To help us assist you, please be prepared to give the following information when contacting us: • the MODEL NUMBER of the product (HREX2076.99) •...