Table of Contents
Advertisement
Quick Links
Owner's Manual
CRRFTSMRN °
46"- 2 STAGE SNOW THROWER
TRACTOR ATTACHMENT
Model No. 486.248460
CAUTION:
Before using this product,
read this manual and follow
all Safety Rules and
Operating
Instructions.
• Safety
• Assembly
• Operation
• Maintenance
• Parts
Sears, Roebuck and Co., Hoffman Estates, IL 60179 U.S.A.
PRINTED IN U,S,A.
Advertisement
Table of Contents

Related Manuals for Craftsman 486.248460


Summary of Contents for Craftsman 486.248460
- Page 1 Owner's Manual CRRFTSMRN ° 46"- 2 STAGE SNOW THROWER TRACTOR ATTACHMENT Model No. 486.248460 • Safety CAUTION: • Assembly Before using this product, • Operation read this manual and follow • Maintenance all Safety Rules and • Parts Operating Instructions. Sears, Roebuck and Co., Hoffman Estates, IL 60179 U.S.A.
-
Page 2: Table Of Contents
SERVICE AND ADJUSTMENTS ......16 ACCESSORIES .._,...:..::::;:;; ........ SAFETY RULES ............3 STORAGE ............... FULL SIZE HARDWARE CHART ......TROUBLESHOOTING ..........CARTON CONTENTS ..........REPAIR PARTS ILLUSTRATION ....18,20 ASSEMBLY ..........L....6 REPAIR PARTS LIST ........19,21 OPERATION ............ -
Page 3: Safety Rules
Any power equipment can cause injury if operated improperly or if the user does not understand how to operate the equipment. Exercise caution at all times, when using power equipment. • Read this owner's manual carefully and know how • Stop the engine whenever you leave the operating to operate your snow thrower and how to stop the position, before unclogging the snow thrower or... -
Page 4: Full Size Hardware Chart
SHOWN ACTUAL SIZE NOT SHOWN ACTUAL SIZE Two shear bolts (R) and hex lock nuts (S) are provided as replacement parts for the spiral augers. Store in a safe place until needed. (See page 16.) REF. QTY. DESCRIPTION REF. QTY. DESCRIPTION Hex Bolt, 3/8"... -
Page 5: Carton Contents
CARTON CONTENTS Frame Brackets (2) Chute Crank Assembly Hanger Bracket, L.H. 1 1. Lift Handle with Cable Hanger Bracket, R.H. Clutch/Idler Assembly Side Plate, L.H. Drive "V" Belt Side Plate, R.H. Auger "V" Belt (Attached to Housing Assembly) Cross Brace Anti-rotation Bracket Plastic Weight Keg Chute and Control Cable Assembly... - Page 6 ASSEMBLING PARTS TO TRACTOR FRAME . TOOLS REQUIRED FOR ASSEMBLY (2)" 7/16" Wrenches Right hand (R.H.) and left hand (L.H.) are determined 1/2" Wrenches from the operators position while seated on the tractor. 9/16" Wrenches • Remove the hex bolt from the threaded hole at the 5/8"...
- Page 7 • Rer_ove the mower stop bracket and its two bolts Assemble the L.H. hanger bracket to the left side of and nuts from the R.H. side of the tractor frame as the tractbr frame using two 3/8" xl" hex bolts, two 3/8"...
-
Page 8: Assembly
ASSEMBLY OF SNOW-THROWER • Assemble the L.H. frame'bracket (with bend) to the holes in the bottom of the L.H. foot rest and the sway bar bracket as shown in figure 7. Use two Place the lift handle into the lift bracket on the right side of the snow thrower. - Page 9 • Remove the nylon tie which fastens the chutecrank rod to the crank support tube. • Assemble the crank support tube (flat side) to the two brackets on the left side of the thrower housing using two 3/8" x 1-1/2" hex bolts, 3/8" lock washers and 3/8"...
- Page 10 MOUNTING SNOW THROWER TO TRACTOR ASSEMBLING THE BELTS NOTE: The help of another person may be required to IMPORTANT: The tapered "V" section of the belts must mount the snow thrower to the front of the tractor. be seated into the grooves of the V-pulleys. •...
- Page 11 AUafkeB,T • Raise the snow thrower to this transport position. • Make sure the auger belt is correctly assembled to • Place the auger belt around the bottom rear pulley the snow thrower. The belt must pass over the top on the clutch/idler assembly and between the two of the auger pulley and then twist 1/4 turn to pass pulleys on the lower idler arm.
-
Page 12: Weight Tray
• Place the weigh;_keg on the weight tray and fill with ATTACHING WEIGHT; TRAY TO TRACTOR approximately 100 Ibs. of dry sand. • Secure the keg with the rubber tarp strap hooked • Loosen the two hex bolts and nuts which fasten the into the holes in the cross brace. -
Page 13: Operation
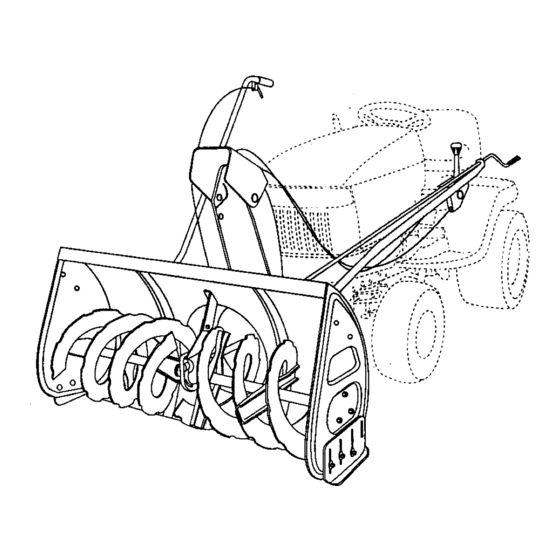
KNOW YOUR SNOW THROWER Read this owner's manual and safety rules before operating your snow thrower. Compare the illustration below with your snow thrower to familiarize yourself with the various control_s and their locations. CHUTE_LTHANDLE LIFT HANDLE CRANK ROD UPPER CHUTE LOWER CHUTE "------ LEVELING SHOE (Behind housing) - Page 14 HOW TO USE YOUR SNOW THROWER • In extremely deep snow, raise.the snow thrower from the ground to remove the top layer and drive forward only until the tractors front tires reach the & CAUTION: Never direct discharge uncleared bottom layer of snow. Depress the towards bystanders or windows.
-
Page 15: Maintenance
CUSTOMER RESPONSIBILITIES Read and follow the maintenance schedule and the maintenance procedures listed in this section. MAINTENANCE SCHEDULE Fill in dates as you _,_,_,,_ Service Datas complete regular service. Check for loose fasteners Check belts for wear Check scraper and shoes for wear Cleanina Lubrication Section CHECK... -
Page 16: Service And Adjustments
CAUTION: Before servicing or adjusting SKID SHOE, LEVELING SHOE ADJUSTMENT & the snow thrower, shut off the engine, (The snow thrower must be attached to the tractor for remove the spark plug wire(s), set the correct adjustment of the shoes.) parking brake and remove the key from the tractor ignition, •... -
Page 17: Storage
STORAGE RECOMMENDATIONS PARTS TO REMOVE AT END OF SEASON • Remove the "V" belt from the engine pulley and the • Lower the snow thrower to the ground and remove it from the tractor. clutch/idler assembly, See figure 16 on page 10. •... - Page 18 REPAIR PARTS FOR MODEL 486.248460 46" SNOW THROWER 13 14 _..111...
-
Page 19: Repair Parts List
REPAIR PARTS FOR MODEL 486.248460 46" SN()WTHROWER REF. PART QTY. DESCRIPTION REP'. PART QTY. DESCRIPTION 63576 684-0061 Housing Assembly Chute Crank Assembly 63795 784-5149 U-Joint Impeller Assembly 43850 47368 Spring Pin, 5/16" x 1-3/4" Roll Pin, 1/8" x 5/8" 47369 43070 Flat Washer, 3/8"... - Page 20 REPAIR PARTS FOR MODEL 486.248460 46" SNOW THROWER 52 51 --/20...
- Page 21 REPAIR PARTS FOR MODEL 486.248460 46" SNOW THROWER REF. PART QTY. DESCRIPTION REF. PART QTY. DESCRIPTION 24298 Uft Br.acket 46957 Chute Crank Rod 63773 720-0201A Handle Uft Bracket Assembly Knob, Crank 747-3248A Index Lift Rod 44917 Palnut, 3/8" 47277 Hex Screw, #10 x 1/2"- 741-0475 Plastic Bushing, 3/8"...
- Page 22 NOTES-...
-
Page 23: Slope Guide
SLOPE GUIDE (Keep this sheet in a safe place for future reference.) Use this guide to determine if a slope is safe for the operation of your tractor snow thrower. Refer also to the instructions in your vehicle owners manual. - Page 24 For in-home major brand repair service: Call 24 hours a day, 7 days a week 1-800-4-MY-HOME s" (1-800-469-4663) Para pedir servicio de reparaci6n a domicilio - 1-800-676-5811 In Canada for all your service and parts needs call - 1-800-665-4455 Au Canada pour tout le service ou les pi_ces For the repair or replacement parts you need: Call 7 am - 7 pm, 7 days a week...