Table of Contents
Advertisement
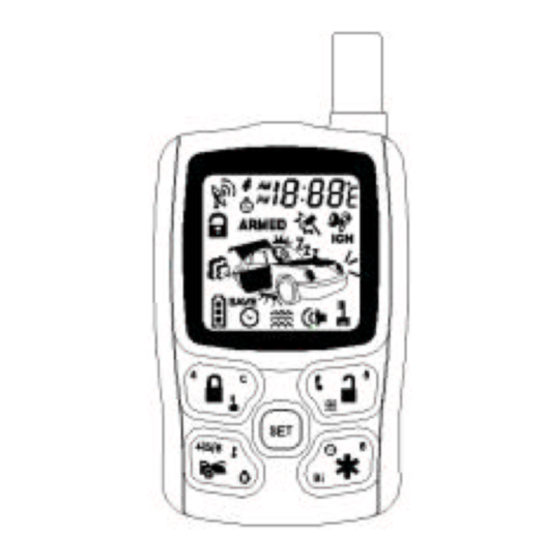
C3-RS-727A LCD
PROFESSIONAL 2-WAY LCD REMOTE CAR
STARTER & ALARM SYSTEM
Built in Temperature sensor
And Two-way Serial Port Data Link
Please see page 23 of this manual for more details
OPERATION MANUAL
Please register your product at:
www.autopageusa.com
THIS PRODUCT IS DESIGNED FOR PROFESSIONAL INSTALLATION ONLY
With
Compatible
1
Advertisement
Table of Contents

Related Manuals for Auto Page C3-RS-727A LCD


Summary of Contents for Auto Page C3-RS-727A LCD
- Page 1 C3-RS-727A LCD PROFESSIONAL 2-WAY LCD REMOTE CAR STARTER & ALARM SYSTEM With Built in Temperature sensor And Two-way Serial Port Data Link Compatible Please see page 23 of this manual for more details OPERATION MANUAL Please register your product at: www.autopageusa.com THIS PRODUCT IS DESIGNED FOR PROFESSIONAL INSTALLATION ONLY...
-
Page 2: Table Of Contents
TABLE OF CONTENTS: LCD REMOTE TRANSMITTER: BATTERY REPLACEMENT THE REMOTE LCD ICONS WITH FUNCTION PROGRAMMING OF THE LCD REMOTE TRANSMITTER 1. Screen Lamp ON 2. Power Save Mode 3. Clear The Flash Icon and Melody Sound 4. Stop The Melody Sound. 5. - Page 3 PANIC FUNCTION TRIGGER THE SYSTEM Clear The Trigger Icons and Melody Sound Stop The Melody Sound Only Noise Abatement Circuit ANTI CAR- JACKING Active Anti Car Jacking Passive Anti Car Jacking Trigger The Anti Car Jacking Mode Override The System To Turn Off Anti Car Jacking SYSTEM’S TRIGGER CHECK SYSTEM’S STATUS CHECK DRIVER PAGING (OPTION)
-
Page 4: Changing Battery In Transmitters
Auto Page, Inc. has over 25 years of experience in the vehicle security industry in the United States and is a wholly owned subsidiary of Iwata Electric Co., of Tokyo, Japan. Iwata has been an industry leader for over 50 years, establishing a reputation for ingenuity in its engineering capability and innovative communication products. -
Page 5: Lcd Remote Transmitter
WARNINGS: As with any product that performs automatic functions, there are certain safety precautions that you must practice and be aware of. 1. Keep the transmitter out of children’s reach. 2. Do not leave anyone in the vehicle while running on remote control. 3. -
Page 6: Bthe Remote Lcd Icons With Function
A. BATTERY REPLACEMENT: A 1.5V type AAA Alkaline battery powers the Remote Transmitter. When the power of the battery weakens a icon shall be displayed on the LCD screen. When the old battery is replaced to new one, there will be beep sounds indicate the power is up and the clock on the LCD screen returns to AM12:00 after displaying all the icons. -
Page 7: Programming Of The Lcd Remote Transmitter
Vibration Mode Button Lock Remote Control vibrates Disable the transmission when the system is function temporarily triggered Driver paging Low Battery Someone is paging you in You have to replace the front of your vehicle battery of remote control. C. PROGRAMMING OF THE LCD REMOTE TRANSMITTER: Transmitter Button Description Operation... -
Page 8: Vibration / Melody Mode
exit the “Power Save Mode”. 3. Clear the Flash Icon and Melody Sound: Pressing the button 3 times within 3 seconds will clear the flash icon and the melody sound on the LCD screen transmitter. 4. Stop The Trigger Melody Sound: While triggering the alarm the LCD screen will alert the user through a melody sound and a flashing trigger icon. -
Page 9: Clock & Timer Setting
2. Press the button again showing next order time on the screen (ie.0: 20), press them again (ie.0: 30)…and so on. 3. After the timer is set the count down begins when the icon flashes Note: 1.The count down period is fixed as 10 minutes, 20 minutes, 30 minutes, 1 hour, 1.5 hours and 2 hours maximum. - Page 10 Count down Timer Setting ON / Press button once for OFF and Daily Timer Start Timer Setting Press & hold the for – and for + button for 2 seconds. Flash icon and “Hours” for adjusting EXIT: Press and hold the button for 2 seconds or leave it for 10 seconds, the system will exit the programming mode.
-
Page 11: Time Set-Up For "Daily Timer Start
timer program mode. Note: Maximum is 19 hours. 4. Time Set-Up For “Daily Timer Start”: Example to AM 6:30 1. Press & hold the button for 3 seconds, two-melodies will sound and the “Hours” digit will flash for adjustment. 2. Press & hold the button for 2 seconds, the LCD screen will flash the icons and “Hours”... -
Page 12: C Led Display
Optional Driving Pager Press within 3 seconds Monitor Indoor Temperature Press within 3 seconds Daily Timer Start Press within 3 seconds LCD screen lamp turns on for Press and hold for 1 second 5 seconds. Clear the Flash Icon and Melody Sound on the LCD Press within 3 seconds Screen Transmitter... -
Page 13: Shock Sensor By-Pass
button 1. Press on the transmitter. The siren will chirp once and parking light will flash once indicating that the system is now armed. The vehicle’s doors will lock upon arming if interfaced with the security system. System Arm Door Ajar Trunk / Hood Ajar Clear The Flash Icon: Press the... -
Page 14: Tamper Disarming
2. The siren will chirp twice and the parking lights will flash twice indicating that the security system is now disarmed. The vehicle’s doors will unlock and the dome light will turn on for 30 seconds upon disarming. (Note: Power door locks and dome light must be installed with the security system.) System Disarm Doors Trigger... -
Page 15: Valet Mode
releasing the Valet Switch. 5. Turn the ignition switch “OFF” position. 4 Chirps from siren/horn and 3 flashes from the parking lights will indicate the system has disarmed. Note 1: You must override the alarm within 60 seconds. If not, the system will automatically re-arm. -
Page 16: Ntrigger The System
1. Press and hold the button for 3 second. The alarm will immediately sound. 2. During panic mode, the normal function of this transmitter button will be disabled. The transmitter buttons can be used to lock and unlock the door (if the option is installed), however once the button is pressed, the vehicle’s starter disable device, (where... -
Page 17: Oanti Car- Jacking
“Noise Abatement Circuit” covers doors (Hood/Trunk) differently: If the alarm is triggered by an open door for six full cycles, the doors will be bypassed until the trigger ceases. O. ANTI CAR- JACKING Warning: If you don't need the car jacking function in this alarm system, be sure to set car jacking feature “OFF”. -
Page 18: Qsystem's Status Check
Q. SYSTEM’S STATUS CHECK When you want to check the system’s present status through the LCD screen, Press the transmitter button twice. Within 3 seconds press the button. It will respond with one melody sound. Note: If it has no response then you are out of range. R. -
Page 19: Vchannel 4 Timer Control Output
U. CHANNEL 3 (TRUNK RELEASE) OUTPUT. Press and hold button on the transmitter for two seconds to remote control the trunk release or other electric devices. (If Installed as an Available Option) V. CHANNEL 4 TIMER CONTROL OUTPUT Press the transmitter (4) and (4) buttons at the same time to active Channel 4 function. -
Page 20: Remote Start Operation
1. Press first, within 3 seconds press and hold buttons at the same time for 2 seconds. Two beeping sound and the “ ” icon will be displayed on the LCD screen to indicate the second transceiver pin code is programmed. -
Page 21: Safe Start (Child Safety Mode)
4. The gear selector is in any gear other then “PARK” or “NEUTRAL” SAFE START (Child safety mode) Factory default is set to press the button once on the transmitter to start the vehicle. You can program this feature to eliminate an accidental remote start: 1. -
Page 22: Daily Timer Start
-- The LED will flash indicating the remote start has entered the turbo charge mode. 3. Take the “Ignition Key” from the key cylinder. -- Engine keeps running. -- 4. Exit and secure the vehicle. -- Engine continues running until the pre -programmed time elapsed. -- NOTE: This feature only applies to vehicles with Turbo Engines. -
Page 23: Gto Turn Off The Remote Start
After one (1) year, the purchaser should ship the unit prepaid to Auto Page with a money order in the amount of $30.00 to cover shipping and handling charges. - Page 24 Auto Page OPERATIONS MANUAL. Or, if used with accessories not approved by Auto Page, which may have c ontributed to the defect. See note below regarding product installation**.
- Page 25 It is recommended to have a minimal digital service plan on your cell phone Your RS-727A is CI3 compatible and will open your world to the true power of two way communication. Complete tracking and full cell phone functionality can be added to your system.
- Page 26 Compatible 2-Way Communication to the Power of 3 960 Knox Street Unit B, Torrance, CA 90502 Tel: (310) 323-1800 or (800) 262-2527 www.autopageusa.com...