Table of Contents
Advertisement
upeira!:o_°s
_vJanuaM
14"
SAW
MODEL
NO.
137.224240
1.5 HP (Max.
Developed),
2 speed
1630/2730
RRM.
(No load)
CAUTION:
Before using this Band Saw,
read this manual and follow
all its Safety Rules and
Operating
Instructions.
Customer
He_p
Line
I °8,,00=843= 1682
Safety ]nstrucLions
Installation
,, Operation
Maintenance
Parts List
Spanish
Sears,
Roebuck
and Co.,
Hoffman
Estates,
tL 60179
USA
Part No. 137224240001
Advertisement
Table of Contents

Related Manuals for Craftsman 137.224240


Summary of Contents for Craftsman 137.224240
- Page 1 upeira!:o_°s _vJanuaM 14" MODEL 137.224240 1.5 HP (Max. Developed), 2 speed 1630/2730 RRM. (No load) CAUTION: Safety ]nstrucLions Installation Before using this Band Saw, read this manual and follow ,, Operation Maintenance all its Safety Rules and Operating Instructions. Parts List Spanish Customer He_p...
- Page 2 SECTION PAGE Warranty ..............Product Specifications ............. Safety ]nstructiQns ............Accessories Attaci_ments ......: ..... Cartoi_ Contents ............Know Your Band ............Glossary of Terms ........; ....Assembly Adjustments ..........
- Page 3 GENERAL SAFETY iNSTRUCTiONS 11. WEAR PROPER APPAREL. DO NOT wear loose clothing, gloves, neckties, rings, bracelets, or other BEFORE USnNG THE BAND jewelry which may get caught in moving parts. Non-slip footwear is recommended. Wear protective hair covering to contain long hair. Safety is a combination of Comrnorl sense, staying alert and knowing how to use your band saw.
- Page 4 PLAN intricate and small work carefully to avoid NEVER LEAVE TOOL RUNNING UNATTENDED. pinching the blade. Avoid awkward operation and TURN THE POWER OFF. Don't leave the tool until it hand positions to prevent accidental contact with the comes to a complete stop.
- Page 5 GROUNDING INSTRUCTIONS GUIDEUNES FOR EXTENSION CORDS USE PROPER EXTENSION CORD. Make sure your extension cord is in good condition. When using an This tool must be grounded while in use to protect extension cord, be sure to use one heavy enough to carry Operator from electrical shock.
- Page 6 UNPACKING AND CHECKING AVAILABLE ACCESSORIES CONTENTS Carefully unpack the band saw and all its partS, and compare against the list below and the illustration on page 7. Do not attempt to modify this tool or create accessories Place the saw on a secure surface and examine it carefully. recommended for use with this tool.
- Page 7 UNPACKING YOUR BAND G • o'o' ©...
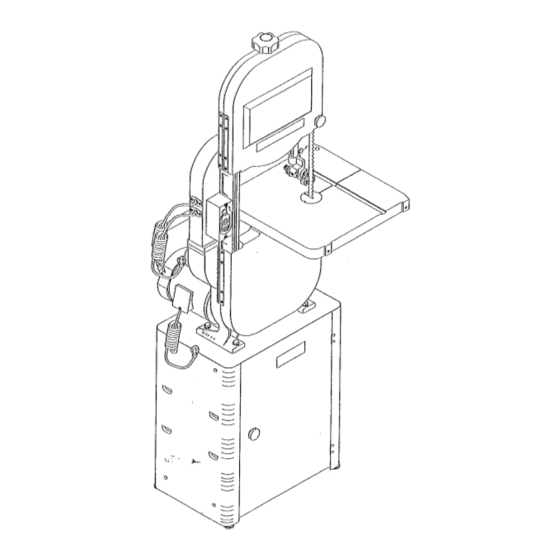
- Page 8 Upper covet" Upper blade wheel Lower blade Lower blade guide support bearing Upper blade support bearing Blade ON/OFF switch Fable insert Table removed for clarity of illustration Wheel brush Table Lower cover _'_Table Blade tension lock knob Upper guide Sawdust .sort knob Blade tension...
- Page 9 LEADING EDGE - The end of the workpiece guided into CRAFTSMAN BAND SAW TERMS the cutting tool first. BLADE GUIDES - Support tile blade and keep it from MITER CUT - An angle cut made across the width of a twisting during operation.
- Page 10 NSTRUCTRONS ASSEMBLY Although compact, this saw is heavy. [b avoid back injury, ge TOOLS NEEDED help to lift the saw. ASSEMBLE BAND SAW TO LEG STAND (Fig. l 'Combinationsquare Phillips screwdriver Lift the saw body (1) and place on tile leg stand (2), aligning the mounting holes (3) of the saw base with the foul"...
- Page 11 1112 _-_ ._._..__. -- ASSEMIBLE THE £_AND SAWTABLE (Fig. F, G, H, I,} Turn the table right side up. 10. Remove the table insert (13) frorn the table. Mounting the trunnion support bracket (Fig. F ) 11. Guide the table slot (14) over the saw blade and rotate a Remove the Iwo hex head bolts (1) and washers (2), 1/4 turn, so the slot is perpendicular to the blade.
- Page 12 Installing INSTALLING AND REMOVRNG BLADES (Fig. J) Make sure the blade tension knob (1) is turned counterclockwise until it stops. Remove old blade as explained in "Removing". To avoid injury from accidental starting, always turn the Guide the new. blade (7) througb the table slot (11). ' switch C)FF and remove the plug frorn the power source Make sure the blade teeth are pointing forwat:d and before moving, replacing, or adjusting the blade.
- Page 13 iNSTALL POWER CORD BRACKETS ( Fig,L) ADJUSTING THE 90 ° TABLE STOP (Fig. N) 1. Power c ordbrackets (1)areprovidect forconvenient Loosen the table lock knobs (2) and tilt the table to cordstorage. Atlachthepower c ordbrackets t otheback the right. ofthesawbocty, asshown, w ithtwoPhillips head Loosen the nut (4) on the table stop bolt (5) and lower screws (2).Tighten.
- Page 14 ADJUSTMENT INSTRUCT ONS Fig. Q x__/ To avoid injury, turn the switch OFF and unplug the band saw fiom the power source before making any adjustments. TSLTmNG THE TABLE t_Fig. P) Tile band saw table (1) tilts 0° to 45 ° to tile right and 15° to the left.
- Page 15 BLADE TRACKING (F_g. S) UPPER BLADE GUIDE ASSEMBLY (Fig. To avoid injury, turn the switch OFF and disconnect the To avoid injury, turn the switch OFF and disconnect the saw from the power source before making any adjustments. saw from the power source before making any NEVER make tracking adjustments with the machine adjustments.
- Page 16 UPPER BLADE GUIDES AND BLADE SUPPORT Support bearing (Fig, V) Loosen the thumb screw (6). BEARING (Fig. U, V) 10. Turning the rear knob (7), move the support bearing (8) in or out, until the bearing is 1/64" behind the blade. 11.
- Page 17 LOWER BLADEGUiDESAND SUPPORT BEARING Fig.W (Fig. W, X) To avoid injury, turn the switch OFF and disconnect the saw from the power source before making any adjustments. NEVER make acljustments will] the machine running. NOTE: Make sure the blade is tensioned and tracking properly.
- Page 18 E:]ASNC SAW OPERATF ONS 7b avoid twisting the blade do not turn sharp corners; saw around corners. "ON/OFF" SWFTCH (Fig.. Z) A band saw is basically a "curve-cutting" saw, It is not The keyed switch is intended to prevent unauthorized capable of doing intricate inside cutting as can be done use of the band saw.
- Page 19 EIL.ADK S E1LEC'TIO_ Fig. E_B Common causes of blade break.age: CAUTION: B ladeteetha_"e S harp. U secarewhenhandling Poor guide alignment and adiustment. a sawblade. Forcing or twisting a wide blade around a short radius. Forlongest w earandbestcuttingresults, u sethe correct Feeding too fast.
- Page 20 Applya thir_ coatofpastewaxonthetablesothatthewood BLADE WHEEL TIRES slides easily whilecutting. Pitch and sawdust that build up on the tires should be removed with a stiff brush or scrape off with a piece of wood. TO INSTALL A NEW BELT (Fig. NOTE: To avoid damaging the tires do not use a sharp knife Open the lower wheel door.
- Page 21 GENERAL MADNTENAINC, ADJUSTINGTHE UPPER BLADE GU_DETRAVEL (Fig. EE) If the upper guide bar assembly will not move up and down easily or falls when the lock knob is loosened, the following adjustment should be performed. For your own safety, turn switch OFF and remove the plug Remove the guide bar lock knob (1);...
- Page 22 To avoid injury from an accidental start, turn the switch OFF and always remove the plug from the power source before making any adjustments. All electrical or rne(;hanical repairs should be done only by qualified service technicians, Contact the nearest Sears Service Center.
- Page 23 MOTOR Problem Pm'obable Cause I Remedy 1. Incorrect belt tension. 1. Adjust tension. See ASSEMBLY AND Noisy operation. ADJUSTMENTS section "INSTALL THE BEET". 2. Loose motor pulley. 2. Readjust and tighten motor pulley set screw. 3. Loose pulley cover• 3. Readjust and tigtlterl pulley cover rnounting screws.
- Page 24 CRAFTS_#A_ 14" ECA_D _qAW 137.224240- " When servicing only CRAF"IFSMAN replacement pads. of any other parts create a HAZ_ARD or cause product damage. - Any attempt to repair or replace electrical parts on ibis band create a HAZARD unless repair is done by a qualified service...
- Page 25 :: ? < ::1 ,t:_j €,a ©...
- Page 26 C _AIFTSI_IAIT\_ _AND LE(_ _3L22424 STA_D When servicing .use 0nly CRAFTSMAN replacement parts. Use of any other parts may create a HAZARD or cause product damage. Any attempt to repair or rep ace electrical paris on _,hisband saw may create a HAZARD unless repair is done by a...
- Page 27 CRAFTS_'_b_N BAil[i) L[::Q STAili] =Q=o_=- °.=o -=.,_',_...