Table of Contents
Advertisement
Advertisement
Chapters
Table of Contents

Related Manuals for Denon CEOL Piccolo DRA-N5


Summary of Contents for Denon CEOL Piccolo DRA-N5
- Page 1 DRA-N5 NETWORK RECEIVER Owner’s Manual...
-
Page 2: Safety Precautions
10. Protect the power cord from being walked on or pinched particularly at to alert the user to the presence of important operating Modification not expressly approved by DENON may void your authority, plugs, convenience receptacles, and the point where they exit from the and maintenance (servicing) instructions in the literature granted by the FCC, to use the product. -
Page 3: Notes On Use
n CAUTIONS ON INSTALLATION NOTES ON USE IC Information (For Canadian customers) WARNINGS 1. PRODUCT This product contains IC: 2581A-CX8703B • Avoid high temperatures. This product complies with RSS-210 of Industry Canada. Operation is Allow for sufficient heat dispersion when installed in a rack. subject to the following two conditions: (1) this product may not cause • Handle the power cord carefully. -
Page 4: Table Of Contents
Getting started Thank you for purchasing this DENON product. To ensure proper operation, please read these owner’s manual carefully before using the product. After reading them, be sure to keep them for future reference. Contents Getting started ··············································································1 Operations Information ··············································································20... -
Page 5: Accessories
“Denon Remote App” compatibility for performing basic unit operations with an iPad ® , iPhone or Android smartphone... -
Page 6: Remote Operation
• Do not use two different types of batteries. remote control may not operate due to interference from those • The Denon Remote App can be downloaded for free from the iTunes • Do not attempt to charge dry batteries. radio communication signals. If this occurs, adjust the direction and Store. -
Page 7: Preparations
Preparations Preparations Here, we explain the connections and basic operation methods for this unit. F Connections vpage 5 F Setup vpage 9... -
Page 8: Connections
Connections NOTE Connecting the speakers • Do not plug in the power cord until all connections have been completed. Connecting the speaker cables • When making connections, also refer to the operating instructions of Subwoofer the other components. with built-in Speakers Carefully check the left (L) and right (R) channels and + (red) and – • Be sure to connect the left and right channels properly (left with left, amplifier (black) polarities on the speakers being connected to this unit, and be... -
Page 9: Connecting An Analog Device
Connecting an analog device Connecting a digital device Analog Digital device device AUDIO AUDIO OPTICAL AUDIO NOTE Other digital audio signals than 2 channel linear PCM cannot be input through DIGITAL IN connector of this unit. -
Page 10: Connecting To A Home Network (Lan)
• You can update by downloading the latest firmware from the • Some flat type Ethernet cables are easily affected by noise. DENON website. Computer We recommend using a normal type cable. For more information, see “Update” (vpage 12). -
Page 11: Connecting The Power Cord
Connecting the power cord When all of the connections are completed, insert the power plug into the power outlet. Power cord (supplied) To household power outlet (AC 120 V, 60 Hz) -
Page 12: Setup
Setup Menu map Setting items Detailed items Description Page Quick Setup Performs the network settings using a Wizard style window. [Setup] Quick Setup – Quick Setup For details on the operations, see the separate “Quick setup guide”. :enter :back General Alarm Sets the timer playback. -
Page 13: Setting The First Setup [Quick Setup]
Setting the first setup Setting the general [General] [Quick Setup] NOTE Press SETUP • If the unit or remote control is not operated for 90 minutes or more Turns on the Menu settings mode • For details on “Quick Setup” operations, see the separate when the alarm is set to on, the standby mode is activated. - Page 14 Setting the general [General] Clock n Setting the DST (Daylight Saving Time) n Setting the current time (Manual Adjust) Use the following procedure to set DST if the DST system is used (24-Hour Display) You can automatically adjust the clock of this unit using the Internet. in your country.
- Page 15 Setting the general [General] Speaker Optimization Auto-Standby Firmware An optimizing filter suited for the properties of the speakers (SC-N5) When this unit is in the stop state and there is no input signal and n Update can be used. operation for 30 minutes, it automatically enters the standby mode. • In order to update the firmware, the environment and settings For the input source “AUX:Analog In”...
- Page 16 Setting the general [General] n Update on web screen n Notification When the following screen is displayed, click the Firmware can be updated using the “Web control function” “OK” ( ) button. Update (vpage 38). Updating will begin. “Web control function” (vpage ...
- Page 17 ENTER “Upgrade Notification” menu appears. • Information regarding the “Update” function and “Add New Feature” will be announced on the DENON web site each time Display a list of the additional functions provided Upgrade Status to select “On”, then related plans are defined.
-
Page 18: Setting The Network [Network]
Setting the network [Network] n Network connecting Connecting wired LAN to select “On”, then press ENTER (when “DHCP” setting is “Off”) “DHCP (On)” menu appears. Use this procedure to configure the wired LAN settings. This section explains the settings when connecting this unit to a to select “Test Connection”, then press network that does not have a DHCP function. - Page 19 Setting the network [Network] n Proxy settings to select “Address” or “Name”, then press Configure these settings to connect to the internet via a proxy ENTER server. “Setup Proxy” menu appears. SETUP Press to select “Address” or “Name”, then press Turns on the Menu settings mode ENTER and the Menu appears on the display...
-
Page 20: Connecting Wireless Lan
Setting the network [Network] Connecting wireless LAN n WPS Settings (Push-button method) If there is an encryption setting for the access point By just pressing the WPS button on your router and this unit, the you selected in step 4, enter same encryption key as Use this procedure to configure the wireless LAN settings. - Page 21 Setting the network [Network] n WPS Settings (PIN code method) n Manual Settings Use ui to select following items, then press ENTER Press SETUP Press SETUP Turns on the Menu settings mode Turns on the Menu settings mode • None Select if not encrypted. Can also be used even without and the Menu appears on the display and the Menu appears on the display encryption, through we recommend encryption for improved...
- Page 22 Preset names • When “Network Control” is set to “On”, the power Current friendly name / DENON DRA-N5 / AV Room / display lights red. Bedroom / Dining Room / Family Room / Guest Room / • More power is consumed when in standby (Power...
-
Page 23: Operations
Operations Operations Here, we explain functions and operations that let you make better use of this unit. F Preparations vpage 21 F Operations possible during playback vpage 21 F Network audio playback vpage 23 F Favorite function vpage 29 F iPod playback vpage 30 F USB memory device playback vpage 33 F Listening to AUX vpage 34... -
Page 24: Operations
Operations This section provides information on operations of playback Operations possible during playback procedures. Preparations Adjusting the master volume Selecting the input source Turning the power on VOLUME df to adjust the n Selecting the input source using the main unit volume. -
Page 25: Adjusting The Tone
Operations possible during playback Adjusting the tone Turning off the sound temporarily Switching the display’s brightness Press SDB TONE to select the MUTE : Press DIMMER Press tone parameter to be adjusted. The “MUTING” is displayed. Bass Treble S. Direct Balance DIMMER • The display brightness is adjusted each time... -
Page 26: Network Audio Playback
Network audio playback Follow this procedure to play Internet radio stations or music files n Searching stations by keyword stored on a computer. (Alphabetic strings) • There are many Internet radio stations on the Internet, and the n About the internet radio function (vpage 48) quality of the programs they broadcast as well as the bit rate of the Press to select “Search by... - Page 27 Network audio playback Applying media sharing settings When using Windows Media Player 12 When using Windows Media Player 11 (Windows 7) Here, we apply the settings to share music files stored on a PC and Start up Windows Media Player 11 on the PC. NAS on the network.
- Page 28 Network audio playback n Switching the display Playing files stored on a PC and NAS • Connections to the required system and specific settings must be During playback, Press INFO Use this procedure to play music files or playlists. made in order to play music files (vpage 7). INFO • The display switches each time • Before starting, you must launch the computer’s server software...
- Page 29 Network audio playback n Creating a new station n Giving Feedback and Managing Stations Listening to Pandora ® internet radio You can create up to 100 radio stations. You can personalize your stations by providing feedback. Pandora is only available in the U.S. Press while a track is playing.
- Page 30 Network audio playback n Sign out n Pandora operation Disassociate this unit from your Pandora account. Operation buttons Function While the Pandora top menu is Playback Auto search (cue) displayed, press 1/3 ENTER Stop When the popup menu appears, SETUP Menu to select “Yes”, then uio p...
-
Page 31: Listening To Siriusxm Internet Radio
Network audio playback n Sign out n SiriusXM operation Listening to SiriusXM Internet Radio Disassociate this unit from your SiriusXM account. Operation buttons Function Over 130 channels of the SiriusXM programming you love, including While the SiriusXM top menu is Playback commercial-free music plus sports, talk, news and entertainment. -
Page 32: Favorite Function
Favorite function This section provides information on the Favorite function. Calling stations or files from the favorites Deleting stations or files from the favorite • The Favorite function allows you to register your favorite broadcast list list stations and files in Favorite List in advance so that you can call and listen to the stations or files right away, whenever you want. -
Page 33: Ipod Playback
iPod playback The unit can play back music stored on iPod, iPod touch, iPod classic, Loading Dismantling iPod nano and iPhone. iPod n iPod (vpage 47) Connecting an iPod Adapter Connector n iPod Dock Open the lid and mount the adapter suited for your iPod onto the dock adapter included with your iPod. -
Page 34: Playing An Ipod
• 1st generation iPod nano and iPod video do not have remote mode using the unit buttons, see “Selecting Disconnecting the iPod support. the input source using the main unit” • DENON will accept no responsibility whatsoever for any loss of iPod (vpage 21). data. Press POWER X to set the • Depending on the type of iPod and the software version, some... - Page 35 iPod playback Supported iPod models • iPod classic • iPod nano • iPod touch • iPhone (as of July 2012)
-
Page 36: Usb Memory Device Playback
, the repeat Layer-3” standards. mode is toggled as shown below. • DENON does not guarantee that all USB memory devices will devices operate or receive power. When using a portable USB connection type HDD of the kind to which an AC adapter can be connected to Connect the USB memory device to the USB port. -
Page 37: Listening To Aux
USB memory device playback Listening to AUX n USB operation n Switching the display Prepare for playback. Operation buttons Function During playback, Press INFO Check the connection, then turn on this 8, 9 Auto search (cue) units. INFO • The display switches each time Playback / Pause Press to select “AUX:Analog... -
Page 38: Airplay Function
AirPlay function Enjoy music from your iTunes library with DENON quality sound Playing iTunes music on this unit n Multiple speakers anywhere in your home. You can easily stream music from iTunes to multiple speakers in Install iTunes 10, or later, on a Mac or PC that is your home. -
Page 39: Remote Operations
AirPlay function Remote operations • Source input will be switched to “AirPlay” when AirPlay playback You can use your DENON remote control to play and pause iTunes, as is started. well as skip to next and previous tracks. • You can stop AirPlay playback by pressing the or choosing other Open “Edit”... -
Page 40: Remote Play Function
Remote play function You can use your home network to play back with this unit music Settings required for each device n Remote Play operations files stored on PC, NAS, mobile phones and portable audio players. In Operations are different for each device, but the procedures this case, you use PC, mobile phones and portable audio players for You must make settings on DMC and DMS for Remote Play. -
Page 41: Web Control Function
Web control function You can control this unit from a web control screen on a web browser. Enter the IP address of this unit in browser’s address When the top menu is displayed, click on the menu box. item you want to operate. • This unit and the PC need to be connected to the network properly For example, if the IP address of this unit is “192.168.100.19”, (vpage ... - Page 42 Network Connection Network Connection Select Connection Select Connection Select Connection Wi-Fi [+]DHCO or Proxy Wi-Fi Setup Manual Manual S SID DENON Test Connection Security None Security Key Key1 Defaullt Key [-]DHCP or Proxy DHCP Friendly Name setting IP Address 192.168.000.001...
-
Page 43: Other Functions
Other functions Using the number buttons Example: For changing characters from “POPS” to “ROCK” Inputting characters q Place the cursor at “P”. POPS Display the screen for inputting On this unit, the names displayed for “Friendly Name” and search, characters. w Press seven times. -
Page 44: Last Function Memory
Other functions Using the cursor buttons Auto power on function Last function memory When you press INTERNET Display the screen for inputting This stores the settings as they were immediately before going into the standby mode. RADIO ONLINE MUSIC MUSIC characters. -
Page 45: Information
Information Information Here, we list various information related to this unit. Please refer to this information as needed. F Information vpage 43 F Explanation terms vpage 49 F Troubleshooting vpage 51 F Specifications vpage 54 F Index vpage 55... -
Page 46: Information
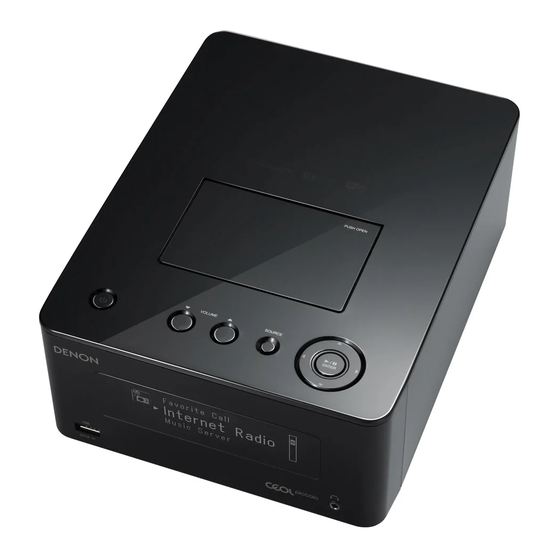
Information Part names and functions For buttons not explained here, see the page indicated in parentheses ( ). Front panel Top panel When the door is opened. PUSH OPEN USB port ················································ (30, 33) Used to connect iPod or USB memory devices. Remote control sensor ································... -
Page 47: Rear Panel
Part names and functions Rear panel AC inlet (AC IN) ············································· (8) ETHERNET connector (NETWORK) ············· (7) DIGITAL IN connector ·································· (6) Speaker terminals (SPEAKERS) ·················· (5) ANALOG IN connectors ······························· (6) SUBWOOFER connector ······························ (5) WPS button ················································· (17) -
Page 48: Remote Control Sensor
Part names and functions Remote control This section explains the buttons used to playback each input source. n Buttons that work with all input sources n Buttons that work when the input source is “Internet Radio”, “Music Server”, “Pandora” or “Sirius XM” SLEEP button ··············································... -
Page 49: Play/Pause Button
Part names and functions n Buttons that work when the input source is “iPod” or “USB” “Buttons that work with all input sources” can also be used. ) ···················· (30, 33) Play/Pause button ( Reverse-skip/Forward-skip buttons SLEEP CLOCK DIMMER POWER ) ··········································... -
Page 50: Ipod
iPod USB memory device Playing back music files recorded on a USB memory device. GCompatible formatsH Sampling Important information Bit rate Extension frequency length • Only USB memory devices conforming to mass storage class and 32/44.1/ (Windows Media 48 – 192 kbps –... -
Page 51: Network Audio
• Your favorite radio stations can be registered by accessing an WMA (Windows – .wav 96/176.4/ 24 bit exclusive DENON Internet radio URL from a Web browser on Media Audio) 192 kHz a computer. MP3 (MPEG-1 Audio .aac/ • The function is managed for individual users, so you must provide Layer-3) 32/44.1/... -
Page 52: Explanation Terms
Explanation terms AES (Advanced Encryption Standard) FLAC IEEE 802.11b Network Names This is a next generation standard encryption FLAC stands for Free lossless Audio Codec, and is a This is one wireless LAN standard set by the 802 (SSID: Security Set Identifier) method replacing the current DES and 3DES, and lossless free audio file format. - Page 53 Windows Media Player Ver. 11 or later This is a media player distributed free of charge by vTuner Microsoft Corporation. This is a free online content server for Internet It can be used to play playlists created with radio. Note that usage fees are included in upgrade Windows Media Player Ver.
-
Page 54: Troubleshooting
In this case, disconnect the power immediately and contact your retail outlet. displayed. class standards class or MTP standards. connected. GGeneralH • A USB memory device that • This is not a malfunction. DENON – Symptom Cause Countermeasure Page the set cannot recognize is does not guarantee that all USB connected. - Page 55 GPandora ® H Symptom Cause Countermeasure Page Symptom Cause Countermeasure Page Files stored on a • Files are stored in a non- • Record in a compatible format. computer cannot compatible format. Cannot login to • Login information is incorrect. • Check if the “Email address” be played.
- Page 56 GWireless LANH GAirPlayH Symptom Cause Countermeasure Page Symptom Cause Countermeasure Page Cannot connect • The settings of the SSID and • Match the network settings with The AirPlay • This unit and the computer • Connect the computer or iPhone/ to network. network key (WEP) are incorrect. this unit settings.
-
Page 57: Specifications
Specifications n Audio AMP 2-channel driving Rated output: 65 W + 65 W (4 Ω, 1 kHz, T.H.D. 0.7 %) 80 W + 80 W (4 Ω) Dynamic power: Speaker 4 – 16 Ω Output terminals: Suited for headphones/stereo headphones AUX: 200 mV/22 kΩ... - Page 58 Index IEEE 802.11b ······················································ 49 Sampling frequency ····································· 48, 49 Accessories ·························································· 2 IEEE 802.11g ······················································ 49 Setting Add New Feature ··············································· 14 Input source ······················································· 21 General ···························································· 10 AES ······························································ 18, 49 Inputting characters ····································· 37, 40 Network ········································· 10, 15, 17, 18 AirPlay ····················································...
- Page 59 Dimensions Unit : in. (mm) 7 3/32 (180.0) 25/32 5 33/64 25/32 1 1/2 5 63/64 1 47/64 (20.0) (140.0) (20.0) (38.0) (152.0) (44.0) Weight : 4 lbs 14 oz (2.2 kg)
- Page 60 D&M Holdings Inc. 3520 10170 00AD...