
Related Manuals for Zoom Handy recorder H2


Summary of Contents for Zoom Handy recorder H2
- Page 1 Operation Manual © ZOOM Corporation Reproduction of this manual, in whole or in part, by any means, is prohibited.
-
Page 2: Safety Precautions / Usage Precautions
Do not use the H2 at a loud volume for a long time Caution (Zoom AD-0006). The use of an adapter other than the since this can cause hearing impairment. specified type may damage the unit and pose a safety hazard. -
Page 3: Table Of Contents
About the 4-channel mode ....27 the card ..........60 Setup examples ........29 Formatting a card ........ 61 Recording ..........29 SD card dropout errors ....... 62 Playback ..........31 Adjusting the front/rear/left/right balance (3D panning) ........32 ZOOM H2... - Page 4 • The use of MPEG Layer-3 audio compression technology is licensed from Fraunhofer IIS and Sisvel SpA. • All other trademarks, product names, and company names mentioned in this documentation are the property of their respective owners. ZOOM H2...
-
Page 5: What The H2 Can Do
What the H2 Can Do Thank you for selecting the ZOOM Handy Recorder H2 (subsequently referred to simply as the "H2"). The H2 is a nifty SD card based recorder with two operation modes for 2-channel (stereo) or 4-channel recording. This section describes the main features of this product. - Page 6 When the members of the band are facing each other, the H2 can be placed in the middle to record sound coming from the front and rear. Position the H2 upright and have the front panel face the main sound source. ZOOM H2...
- Page 7 Audio files SD card operations (→ p. 60) You can initialize SD cards in the H2 and check how much recording time is left on a card. ZOOM H2...
-
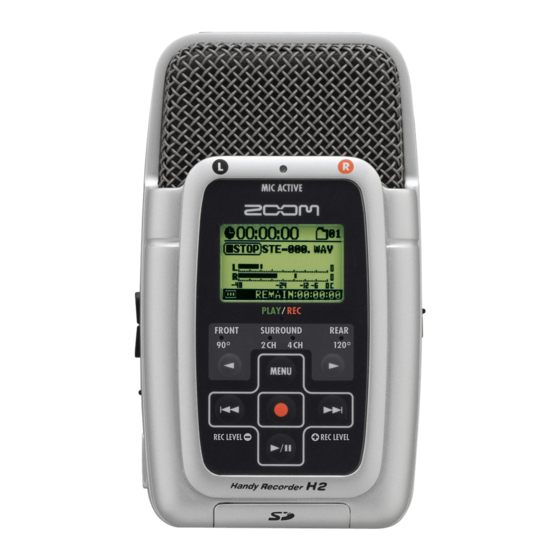
Page 8: Parts Of The H2
Display Mic pattern [PLAY/REC] indicator indicators (MIC PATTERN) (MIC PATTERN) (MENU) key (REW) key (FF) key (REC) key (PLAY/PAUSE) Rear panel [MIC ACTIVE] indicator * Flashes if the rear-side mic signal is distorted. Battery compartment cover ZOOM H2... - Page 9 When you turn the H2 on for the first time, a message asking you to set the date/time appears. Follow the instructions in the section "Setting the date and time" on page 78. Note that if you skip this step, the clock will be set to the default (2007/01/01). ZOOM H2...
-
Page 10: Getting Connected
[LINE IN] jack. If anything is connected to these jacks, the built-in mics are deactivated. • If equipment is connected both to the [EXT MIC IN] jack and [LINE IN] jack, the [LINE IN] jack has priority. ZOOM H2... -
Page 11: Operation On Battery Power
To remove the card, give it a light requiring the SD card while no card is push inwards, causing it to pop up slightly, inserted, the indication "No Card" appears then pull it out. on the display. ZOOM H2... -
Page 12: Recording
H2, but the recording angle will be different (front: 90 degrees, rear: 120 degrees). In this example, we will use the front-facing position. Single instrument Several instruments Desktop stand Mic clip adapter Mic stand ZOOM H2... -
Page 13: Power-On
• If the indication "Format Card?" appears when you turn the H2 on, the inserted SD card has not been initialized. To initialize (format) the card, use the 3 (REW)/2 (FF) keys to move the cursor to "YES" and press the 5 (REC) key. ZOOM H2... -
Page 14: Selecting The Operation Mode
120 deg. 90 deg. FRONT 90 REAR 120 Stereo recording of sound sources Stereo recording of sound sources located in front of the H2, within a located in rear of the H2, within a 90-degree range 120-degree range ZOOM H2... -
Page 15: Setting The Input Sensitivity And Recording Level
If the indicator flashes, the recording will be distorted. ZOOM H2... - Page 16 [PHONES/LINE OUT] jack. Input signal level ZOOM H2...
-
Page 17: Recording And Playback
Check the recording. To check the recorded content, press the 1 (PLAY/PAUSE) key. During playback, the [PLAY/REC] indicator is lit in green. Press the key once more to stop playback. ZOOM H2... -
Page 18: Stereo Mode Recording
(leading to distortion and status. mode (file format, quantization, sound breakup) occurs. If clipping has sampling frequency). occurred at least once during playback or recording, the clip indicator remains lit until the end of playback/recording. ZOOM H2... -
Page 19: Setup Example (1): Built-In Mics
50 cm to 1.5 back of the unit. This is useful for example to meters for off-mic recordings. record a conversation between two people or an instrument and a singer facing each other. 90 deg. ZOOM H2... -
Page 20: Setup Example (2): External Mic
Glossary On-mic/Off-mic On-mic refers to recordings made with the microphone close to the sound source, while off-mic is a recording technique that puts more distance between sound source and microphone, to capture ambience and room reverberations as well. ZOOM H2... -
Page 21: Selecting The Mic Pattern For The Built-In Mics
. According to the selected mic pattern, the recording mode will also change (stereo mode ZOOM H2... - Page 22 Which set of mics is currently active is indicated by the [MIC ACTIVE] indicator on the front panel and rear panel of the H2. [MIC ACTIVE] indicator H2 front panel [MIC ACTIVE] indicator H2 rear panel ZOOM H2...
-
Page 23: Recording
000 to 999). The file the input sensitivity to a suitable value using name can be changed later (→ p. 50). the [MIC GAIN] switch. Make the setting so that the [MIC ACTIVE] ZOOM H2... - Page 24 [PLAY/REC] indicator on the front panel stays constantly lit in red. The current position Glossary BWF (Broadcast Wave Format) An extended WAV file format used primarily in broadcasting applications. Information about the file creation date and cue points are embedded in the file. ZOOM H2...
-
Page 25: Playback
Briefly tap the 2 (FF) key to skip to the next file in the currently selected folder. To skip back by one file, press the 3 (REW) key once to return the counter to zero, and then tap the key again. ZOOM H2... - Page 26 The next file is selected. When the counter is part way into a file, it is reset to zero (beginning of the file). If the Press 1 (PLAY/PAUSE) key counter is at zero, the previous file is selected. Perform playback/pause. ZOOM H2...
-
Page 27: 4-Channel Mode Recording
To switch the H2 to 4-channel mode, simply select "SURROUND 4CH" as mic pattern. (For details on mic patterns, see page 21.) Use the 7/6 (MIC PATTERN) keys on the front panel so that the "SURROUND 4CH" mic pattern indicator is lit. ZOOM H2... - Page 28 If stereo file "SRxxxR.WAV" the currently selected clipping has occurred at least pair. recording mode (file once during playback or format, quantization, recording, the clip indicator sampling frequency). remains lit until the end of playback/recording. ZOOM H2...
-
Page 29: Setup Examples
To avoid this, mount the H2 on the supplied mic clip adapter and grasp the adapter using a glove. [MIC GAIN] switch Set the H2 to the recording standby condition. ZOOM H2... - Page 30 (PLAY/PAUSE) key. The front and rear signals are mixed and played back in stereo NOTE (2-channel). To stop playback, press the 1 It is not possible to adjust the front and rear (PLAY/PAUSE) key once more. recording level separately. ZOOM H2...
-
Page 31: Playback
HINT • All 4-channel mode files are stored in the same dedicated folder. It is therefore not necessary to select the folder. • If no 4-channel mode files have been recorded, the indication "NO DATA" is shown. ZOOM H2... -
Page 32: Adjusting The Front/Rear/Left/Right Balance (3D Panning)
3D panning adjustment. for accessing 3D panning functions appears. To select the signal, move the cursor to "PREVIEW" or "INPUT" on the above screen and press the 5 (REC) key. If "PREVIEW" was selected, the 3D PAN PREVIEW screen appears. ZOOM H2... - Page 33 Bring up the 3D panning screen. To bring up the 3D panning screen, move the cursor to the "GO" item and press the 5 (REC) key. If "PREVIEW" was set to ON in ZOOM H2...
- Page 34 file pair, the 3D panning setting will not change. • To return the 3D panning setting to the default condition, move the cursor to "RESET" on the 3D PAN menu and press the 5 (REC) key. ZOOM H2...
-
Page 35: Convenient Recording Functions
"REC MODE" and VBR (Variable Bit Rate): The number of press the 5 (REC) key. The REC MODE quantization bits is automatically adjusted screen appears. according to the amount of information in the input source. ZOOM H2... - Page 36 This is a number that specifies how many bits are used to express the dynamics of the analog signal in digital form. A higher quantization setting will result in better dynamic range, but the resulting files will be bigger and therefore consume more space on the SD card. ZOOM H2...
-
Page 37: Using The Agc/Compressor/ Limiter Function
Repeatedly press the 3 (REW)/2 (FF) This is the standard limiter setting. keys to move the cursor to "AGC/COMP" and press the 5 (REC) key. ● LIMIT2 (CONCERT) This is a limiter setting suitable for recording a live event. ZOOM H2... -
Page 38: Attenuating The Low Frequencies
Use the 3 (REW)/2 (FF) keys to move the cursor to "ON" and press the 5 (REC) key. The setting is accepted and the display returns to the main menu. To cancel the setting and return to the main menu, press the 4 (MENU) key. ZOOM H2... -
Page 39: Using The Auto Record Function
5 (REC) key. Set the various parameters for the auto record function. Use the 3 (REW)/2 (FF) keys to move the cursor to the parameter, and press the 5 (REC) key to bring up the setting screen for that parameter. ZOOM H2... - Page 40 ON and press the 5 (REC) key. The AUTO REC screen appears again. Next, move the cursor to START LVL on the AUTO REC screen and press the 5 (REC) key. The display changes as follows. ZOOM H2...
- Page 41 Auto record function Level Recording starts when signal exceeds start level When signal drops START LVL below stop level, recording stops after STOP LVL a preset delay interval Time 0 – 5 sec Press 5 (REC) key Record ZOOM H2...
-
Page 42: Using The Pre-Record Function
4 (MENU) key. NOTE The pre-record function and auto record ZOOM H2... -
Page 43: Recording A Stereo Signal In Mono (Stereo Mode Only)
"MONO MIX" and 44.1 kHz press the 5 (REC) key. 1 second 48 kHz Set the MONO MIX function to Use the 3 (REW)/2 (FF) keys to move the cursor to "ON", and press the 5 (REC) key. ZOOM H2... - Page 44 (where xxx is a number from 000 to 999) and stored in the currently selected stereo mode folder. Recorder MONO MIX function Mono signal Left channel Left channel input signal Mix to mono Right channel input signal Mono signal Right channel ZOOM H2...
-
Page 45: Convenient Playback Functions
Starting from the currently selected file (or file pair for 4-channel mode; also below), all files in the current folder are played in alphabetical order of file name. (For information on character sequence, see page 26.) Playback ZOOM H2... -
Page 46: Using The A-B Repeat Function
Specify point A. Use the 3 (REW)/2 (FF) keys to move the counter to the point where you want the repeated section to start (point A). Then press the 5 (REC) key. The screen for specifying point B appears. ZOOM H2... -
Page 47: File Operations
SD card Dedicated Storage location of file pairs Storage location of files 4-channel created in 4-channel mode created in stereo mode mode folder Folder 01 Folder 02 Folder 03 Folder 10 ZOOM H2... -
Page 48: Selecting A Folder (Stereo Mode Only)
(REC) key. The setting is accepted and the display returns Scroll to the main menu. Return to the top screen. 4-channel mode FILE MENU screen Repeatedly press the 4 (MENU) key until the stereo mode top screen appears again. ZOOM H2... -
Page 49: Viewing File Information
T h i s s c r e e n p r o v i d e s t h e f o l l o w i n g information. To view parts that are currently hidden, use the 3 (REW)/2 (FF) keys to ZOOM H2... -
Page 50: Assigning A Name To A File (Stereo Mode Only)
Available file operations are listed in the lower part of the stereo mode or 4-channel mode top the screen. screen appears again. Bring up the FILE RENAME screen. Use the 3 (REW)/2 (FF) keys to move the ZOOM H2... - Page 51 To cancel the file name edit and return to the previous screen without making a change, press the 4 (MENU) key instead of the 5 (REC) key. Return to the top screen. Repeatedly press the 4 (MENU) key until the stereo mode top screen appears again. ZOOM H2...
-
Page 52: Deleting A File
Bring up the FILE DELETE screen. Use the 3 (REW)/2 (FF) keys to move the cursor to "DELETE" and press the 5 (REC) key. The display changes as follows. ZOOM H2... -
Page 53: Dividing A File (Stereo Mode Only)
"A" and "B" appended to cursor to "DIVIDE" and press the 5 (REC) the original file name. key. The FILE DIVIDE screen for specifying the division point comes up. The currently selected division point is shown in the center of the screen. ZOOM H2... -
Page 54: Raising The Overall File Level (Normalize Function)
Stop recording or playback before carrying out these steps. Bring up the main menu screen. At the top screen, press the 4 (MENU) key. Bring up the FILE MENU screen. Repeatedly press the 3 (REW)/2 (FF) ZOOM H2... -
Page 55: Converting A Wav File Into An Mp3 File (Stereo Mode Only)
Use the 3 (REW)/2 (FF) keys to move the cursor to "MP3 ENCODE" and press the 5 Return to the top screen. Repeatedly press the 4 (MENU) key until (REC) key. The display changes as follows. the top screen appears again. ZOOM H2... - Page 56 FM radio, while a bit rate of 256 kbps the stereo mode top screen appears again. gives CD quality. (Higher bit rate settings will not result in a significant change in sound quality.) However, actual results will differ according ZOOM H2...
-
Page 57: Converting A 4-Channel File Pair To A Stereo File (4-Channel Mode Only)
"3D PAN" and press the 5 (REC) key. The display changes as Bring up the FILE MENU screen. follows. Repeatedly press the 3 (REW)/2 (FF) keys to move the cursor to "FILE" and press the 5 (REC) key. ZOOM H2... - Page 58 4-channel mode top screen appears again. Move the cursor to the target folder (FOLDER 01 – 10) and press the 5 (REC) key. The setting is accepted and the display returns to the condition of the previous step. ZOOM H2...
-
Page 59: Checking The Mark List
4-channel mode top screen appears again. Select the file whose mark list you want to check. Use the 3 (REW)/2 (FF) keys to move the cursor to the file, and press the 5 (REC) key. ZOOM H2... -
Page 60: Sd Card Operations
"SD CARD" and the stereo mode or 4-channel mode top screen press the 5 (REC) key. appears again. The SD CARD screen that gives access to various SD card related functions appears. ZOOM H2... -
Page 61: Formatting A Card
"SD CARD" and press the 5 (REC) key. The SD CARD screen that gives access to various SD card related functions appears. Bring up the CARD FORMAT screen. Use the 3 (REW)/2 (FF) keys to move the ZOOM H2... -
Page 62: Sd Card Dropout Errors
WAV96kHz/16bit WAV48kHz/16bit WAV44.1kHz/16bit WAV48kHz/24bit WAV44.1kHz/24bit WAV48kHz/16bit WAV44.1kHz/16bit Light processing load HINT When a dropout error occurs during recording, a mark is created automatically at that point. You can view time information (hours:minutes:seconds) about these marks → p. 59). ZOOM H2... -
Page 63: Tuning An Instrument
The pitch is automatically detected, and the display shows the nearest note name (C, C#, D, D#, E...). The display also indicates by how much the current pitch is different from the correct pitch. Bring up the TUNER screen. ZOOM H2... -
Page 64: Using The Dedicated Guitar/ Bass Tuner
Move the cursor to a mode other than appears again. "CHROMATIC" and press the 5 (REC) key. You can select "GUITAR" (standard guitar tuning), "BASS" (standard bass tuning), or special guitar tuning. In tuner modes other than "CHROMATIC", ZOOM H2... - Page 65 The pitch shift is shown on the display. Tune the string while watching the display. Tune other strings in the same way. Tuner mode GUITAR BASS OPEN A OPEN D OPEN E OPEN G DADGAD String number/ note name ZOOM H2...
-
Page 66: Adjusting The Reference Pitch Of The Tuner
5 (REC) key. The screen for making tuner settings comes up. Bring up the TUNER CALIB screen. Move the cursor to "CALIB" and press the 5 (REC) key. The TUNER CALIB screen for adjusting the reference pitch of the tuner comes up. ZOOM H2... -
Page 67: Using The Metronome Function
5 (REC) key. The screen for Switch the pre-count on or off. making metronome settings comes up. At the METRONOME screen, move the cursor to "PRECOUNT" and press the 5 (REC) key. The METRONOME PRECOUNT ZOOM H2... - Page 68 • When the auto record or pre-record function the stereo mode or 4-channel mode top screen is set to ON, pre-count settings cannot be appears again. made. Glossary BPM (Beats per Minute) Indicates the number of quarter notes that are played in one minute. ZOOM H2...
-
Page 69: Making Metronome/ Pre-Count Optional Settings
( R E C ) k e y b r i n g t h e Move the cursor to "SOUND" and press the "METRONOME PATTERN" screen. 5 (REC) key to bring up the METRONOME SOUND screen. ZOOM H2... - Page 70 5 (REC) key. The setting is accepted and the METRONOME screen appears again. HINT For any item, you can return to the METRONOME screen without making a setting by pressing the 4 (MENU) key instead of the 5 (REC) key. ZOOM H2...
-
Page 71: Connecting The H2 To A Computer
The computer and the H2 go into the online started on USB bus power. In this case the condition and the display changes as follows. USB menu of step 3 comes up automatically and you can skip steps 2 and 3. ZOOM H2... - Page 72 FOLDER01 – FOLDER10 folders or the 4CH ● When using a Macintosh folder. Then drag & drop the desired file(s) to the computer. Select the H2 icon and drag-and-drop it into the trash. ZOOM H2...
-
Page 73: Using The H2 As An Audio Interface
A device that allows importing an audio signal into the computer as data, and output of audio data from the computer as an audio signal. USB bus power A function for powering external devices connected to a computer via a USB cable. ZOOM H2... - Page 74 48 kHz) and press the 5 (REC) key Use the 3 (REW)/2 (FF) keys to move the to accept the setting. cursor to "AUDIO I/F" and press the 5 The USB AUDIO I/F screen appears again. (REC) key. ZOOM H2...
- Page 75 2 and 3. computer. Bring up the main menu screen. Select the input source and At the stereo mode or 4-channel mode top make settings for input screen, press the 4 (MENU) key. sensitivity and recording level. ZOOM H2...
- Page 76 Cancel the connection to the two screens. computer. To cancel the connection to the computer, move the cursor on the USB AUDIO I/F MENU screen to "EXIT" and press the 5 (REC) key. When the connection to the computer is ZOOM H2...
- Page 77 AUDIO I/F screen of step 4 . To return to the top screen, disconnect the USB cable to turn power off, and then set the [POWER] switch of the H2 to ON to start it up normally. ZOOM H2...
-
Page 78: Other Functions
OK button, so that the button is Cursor shown in reverse. Then press the 5 (REC) key. The setting is accepted and the display returns to the menu screen. OK button On this screen, the underline symbol functions as a cursor. OK button ZOOM H2... -
Page 79: Using The Monitor Function
The input signal is monitored only during recording standby and recording. Select the desired setting. Use the 3 (REW)/2 (FF) keys to select the setting and press the 5 (REC) key. The setting is accepted and the main menu appears again. ZOOM H2... -
Page 80: Supplying Power To An External Mic (Stereo Mode Only)
"ON" or "OFF" and press the 5 (REC) key. The setting is accepted and the display returns to the main menu screen. HINT To cancel the change and return to the preceding screen, press the 4 (MENU) key without pressing the 5 (REC) key. ZOOM H2... -
Page 81: Adjusting The Display Contrast
To cancel the change and return to the preceding screen, press the 4 (MENU) key without pressing the 5 (REC) key. Return to the top screen. Repeatedly press the 4 (MENU) key until the stereo mode or 4-channel mode top screen appears again. ZOOM H2... -
Page 82: Controlling The Backlight On/Off Setting
. T h e f o l l o w i n g s e t t i n g s a r e available. ● 15sec (default) The backlight turns itself off 15 seconds after the last keypress. ● 30sec The backlight turns itself off 30 seconds after the last keypress. ● ON The backlight is always on. ZOOM H2... -
Page 83: Specifying The Battery Type
Select this when using rechargeable nickel- hydride batteries. Select the battery type setting. Use the 3 (REW)/2 (FF) keys to select the setting and press the 5 (REC) key. The setting is accepted and the display returns to the main menu screen. ZOOM H2... -
Page 84: Making Settings For The Key Hold Function
Download the latest system Set the H2 to the playback or software (firmware) from the recording condition. ZOOM web site (http:// www.zoom.co.jp). When the key hold function is enabled, almost all controls do not operate. Therefore the selected operation mode will be maintained. - Page 85 The display changes as follows and the upgrading process begins. When the upgrading process is finished, the indication "Complete" appears on the display. After you turn the H2 off and on again, it will start up with the new version. ZOOM H2...
-
Page 86: Specifications
<Record/Play> Quantization 16/24bit Sampling frequency 44.1kHz, 48kHz, 96kHz (Stereo mode) 44.1kHz, 48kHz (4CH mode) Format MP3 (Stereo mode) <Recording> Bit rate 48, 56, 64, 80, 96, 112, 128, 160, 192, 224, 256, 320 kbps, VBR Sampling frequency 44.1kHz ZOOM H2... - Page 87 15mW+15mW (into 32-ohm load) USB 2.0 full speed Mass storage class operation, Audio interface operation(16bit 44.1kHz/48kHz) Bus-powered operation Power requirements 9 V DC, 300mA from AC adapter (ZOOM AD-0006) Batteries IEC R6 (size AA) x 2 Continuous recording time 4 hours Continuous playback time 4.5 hours...
-
Page 88: Troubleshooting
■ Cannot use built-in mics/external mic, cannot select mic pattern. • If anything is connected to the [EXT MIC IN] jack or [LINE IN] jack, the built-in mics do not operate and the mic pattern cannot be selected. Disconnect all other equipment. ZOOM H2... -
Page 89: Error Messages
[EXT MIC External mic or component is connected, Only Built-in MIC is active IN] or [LINE IN] jack. although only built-in mic is active in 4- channel mode. Invalid File! An invalid file was specified. Select a valid file. ZOOM H2... -
Page 90: Index
Normalize ....54 Inserting batteries ..11 Normalize function ..54 Select ......48 Specifying battery type Folder selection ....48 ........83 Built-in mics ..5, 6, 19, 29 Off-mic......20 BWF ....... 24 On-mic ......20 Input sensitivity ...15, 23, 29 Operation mode....14 ZOOM H2... - Page 91 Stereo mode ....23 USB bus power....73 Sampling frequency..36 SD card ..... 11, 47 Use as audio interface Dropout errors... 62 ........73 Folder contents ..72 Use as card reader..71 Initializing (formatting) ........61 ZOOM H2...
- Page 92 • Connect the equipment into an outlet on a circuit different from that to which the receiver is connected. • Consult the dealer or an experienced radio/TV technician for help. ZOOM CORPORATION ITOHPIA Iwamotocho 2chome Bldg. 2F, 2-11-2, Iwamoto-cho, Chiyoda-ku, Tokyo 101-0032, Japan Web Site: http://www.zoom.co.jp H2 - 5000-2...
- Page 93 ZOOM H2 Simple Recording Guide Turn power to H2 on Tips for Mic pattern setting Switching mic pattern by object or situation is effective for your recording. Set [POWER] switch ON. Press (REC) key to set H2 to recording mode FRONT 90 90 deg.
- Page 94 Note About Left/Right Positioning During Recording When using the H2 at default position for stereo / surround recording, left/right positioning is determined by the sound source/user facing the H2. If the H2 is pointed at a sound source on the opposite side than the user, the left/right positioning as perceived by the user during recording and the left/right positioning of the recorded content will reversed.