
Related Manuals for Baby Lock Grace A-Line Series BL40A


Summary of Contents for Baby Lock Grace A-Line Series BL40A
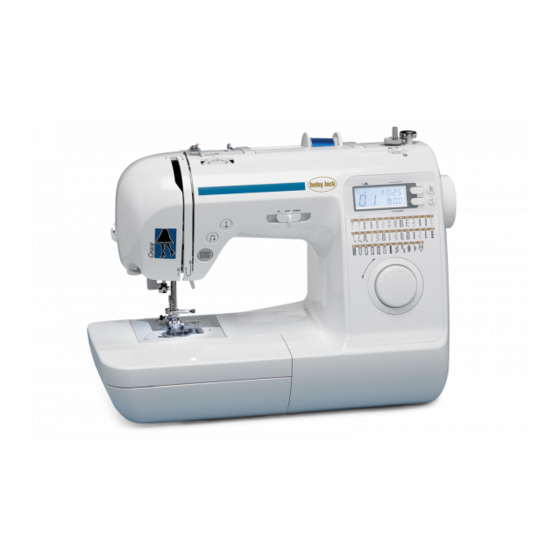
- Page 1 Getting to Know: A-Line SerieS Model BL40A Baby Lock Consumer Helpline: 800-313-4110 www.babylock.com...
- Page 2 Lock Retailer about Grace’s friends in the A-Line Series; like Lauren, Natalie, Maria and Audrey. From classic tailored looks to modern-day fashions, the machines in the A-Line Series will help you sew and serge with success – all with the quality you’ve come to expect from Baby Lock.
-
Page 3: Winding The Bobbin
Winding the Bobbin 1 Hook for the bobbin-winding thread guide 2 Pretension disk 3 Bobbin winder shaft 4 Bobbin 1. Place the bobbin on the bobbin winder shaft so that the spring on the shaft fits into the notch in the bobbin. 1 Notch 2 Bobbin winder shaft spring 2. Slide the bobbin winder shaft to the right until it snaps into place. 3. - Page 4 Winding the Bobbin 4. Slide the spool cap onto the spool pin. 5. Pull some thread off the spool and pass the thread under the thread guide, then behind the thread guide, cover from the back to the front. Hold the thread with your right hand so that there is no slack in the thread after placing it under the thread guide, and then pass the thread behind the thread guide cover with your left hand.
- Page 5 Winding the Bobbin 7. While using your left hand to hold the thread that was passed through the bobbin-winding thread guide, use your right hand to wind the end of the thread clockwise around the bobbin five or six times. 8. Pass the end of the thread through the slit in the bobbin winder seat, and then pull the thread to the right to cut it.
-
Page 6: Inserting The Bobbin
inserting the Bobbin 1. Press needle position button once or twice to raise the needle, and then raise the presser foot lever. Turn OFF the sewing machine (set it to “O”). 1 Needle position button 2. Slide the latch on the right side of the bobbin cover to the right, and then remove the bobbin cover. - Page 7 inserting the Bobbin 4. Make sure that the thread is correctly passed through the flat spring of the bobbin case. If it is not inserted correctly, reinsert the bobbin. 1 Flat spring 5. The direction for feeding the bobbin thread is indicated by marks around the needle plate cover. Be sure to thread the machine as indicated. 6.
-
Page 8: Threading The Machine
Threading the Machine 1. Raise the presser foot lever so the sewing machine can be threaded correctly. 1 Spool pin 2 Mark on handwheel NOTE: The needle threader can be used with sewing machine needles 75/11 through 100/16. The needle threader cannot be used with a wing needle, the twin needle or threads with thicknesses larger than 130/20. - Page 9 Threading the Machine 3. Fully insert the spool for the upper thread onto the spool pin. Slide the spool onto the pin so that the spool is horizontal and the thread unwinds to the front at the bottom. Slide the spool cap onto the spool pin.
- Page 10 Threading the Machine 5. Thread the machine by guiding the thread along the path indicated by the number on the machine. 6. Slide the thread into the thread take-up lever from the right to the left. 1 Thread take-up lever 7.
-
Page 11: Using The Needle Threader
Using the needle Threader Lower the presser foot lever. 1 Presser foot lever 10. While lowering the needle threader lever, hook the thread onto the guide. 1 Needle threader 2 Thread 3 Guide 11. Catch the thread on the hook as shown below. 1 Needle threader lever... - Page 12 Using the needle Threader 12. Raise the needle threader lever, and then pull the end of the thread which passed through the eye of the needle. 13. Raise the presser foot lever. Pass the end of the thread through and then under the presser foot, and then pull out about 2 inches of thread toward the rear of the machine.
-
Page 13: Selecting The Stitch
Selecting the Stitch 1. Turn the pattern selection dial to select the stitch to be sewn. Turn the dial to the right to increase the number, or turn the dial to the left to decrease the number. 1 Pattern selection dial The stitch appears in the LCD screen 2. - Page 14 Selecting the Stitch 6. Press “+” or “–” on the bottom row, which are the stitch width keys for adjusting the stitch width. 1 Stitch width key 2 Stitch width 3 Narrow 4 Wide NOTE: When the stitch length or stitch width is changed from the default setting, around disappears from the LCD screen.
-
Page 15: Starting To Sew
Starting to Sew PoSiTioning THe FABric Be sure that the fabric pieces are sewn in the correct order and that the right and wrong sides of the fabric are aligned correctly. 1. With the foot and needle raised, place the fabric under the presser foot. 2. - Page 16 Starting to Sew 5. Slide the sewing speed controller to the left or right to select the desired sewing speed. The speed set using the sewing speed controller will be the foot controller’s maximum sewing speed. 1 Sewing speed controller 6.
- Page 17 Starting to Sew 9. Raise the presser foot lever. 1 Presser foot lever 10. Pull the fabric to the left side of the machine, and then pass the threads through the thread cutter to cut them. 1 Thread cutter...
- Page 18 4. Fold the cotton fabric wrong side out so you Supplies: have four layers. • Baby Lock Grace Sewing Machine 5. Lay the leg down on the • Pair of jeans wrong side of the cotton • Iron and ironing board fabric.
- Page 19 8. Thread the Baby Lock Grace sewing machine with 17. Adjust the stitch width, and turn the handwheel all-purpose thread. to check if the needle enters into each hole in the button. Lower the foot to hold the button in place.
- Page 20 For other exciting projects like this one, visit our Web site at www.totallystitchin.net or www.babylock.com LBIN-BL40A...