Lucent Technologies MERLIN Plus Release 2 System Manual
Hide thumbs
Also See for MERLIN Plus Release 2:
- User manual (27 pages) ,
- Customization chart (6 pages)
Table of Contents
Advertisement
Quick Links
Download this manual
See also:
User Manual
Advertisement
Table of Contents
Troubleshooting

Related Manuals for Lucent Technologies MERLIN Plus Release 2


Summary of Contents for Lucent Technologies MERLIN Plus Release 2
-
Page 1: Communications System
Lucent Technologies Bell Labs Innovations ® MERLIN Plus COMMUNICATIONS SYSTEM Release 2 System Manual 999-507-148 Issue 3 August 1990... - Page 2 Technologies assumes no responsibility for any errors that may appear in this document. MERLIN is a registered trademark of Lucent Technologies. To order copies of this document, call the Lucent Technologies Customer Information Center, 1-888-582-3688 and refer to document number 999-507-148 with your order.
-
Page 3: Table Of Contents
Contents Section 1: Introduction FCC Notification and Repair Information Quick Start Procedure What’s in This Manual How to Use This Manual The MERLIN Plus Communications System Section 2: Planning the System Introduction System Configuration Form Line Assignments Form Call Restrictions Forms 2-18 System Speed Dial Forms 2-23... - Page 4 Section 6: Accessory Equipment Answering Machines Basic Telephones Basic Telephone and Modem Interface 2 Data Collector and Printer Doorphone Controller 6-11 General Purpose Adapter (GPA) 6-13 Headset and Headset Adapter 6-15 Loudspeaker Paging System 6-17 Music-on-Hold (MOH) and Background Music 6-21 Supplemental Alert Adapter (SAA) 6-23...
-
Page 5: Section 1: Introduction
Section 1: Introduction... -
Page 6: Fcc Notification And Repair Information
FCC Notification and Repair Information This equipment generates, uses, and can radiate radio frequency energy and, if INTERFERENCE not installed and used in accordance with the instructions in this manual, may INFORMATION NOTICE cause interference to radio communications. The equipment has been tested and found to comply with the limits for a Class A computing device pursuant to Subpart J or Part 15 of FCC Rules, which are designed to provide reasonable protection against such interference when the equipment is operated in a... - Page 7 Rights of the Local Telephone Company: If this equipment causes harm to the telephone network, the telephone company may discontinue your service temporarily. If possible, they will notify you in advance. If advance notice is not practical, you will be notified as soon as possible. You will also be informed of your right to file a complaint with the FCC.
-
Page 8: Quick Start Procedure
Quick Start Procedure If you need to make and receive calls the moment your MERLIN Plus system is IF YOU’RE IN A HURRY installed, and before you’ve had time to learn how to implement the entire system, this “Quick Start” information is for you. Follow this short procedure and in a few minutes you’ll hear the familiar sound of a dial tone, enabling you to make and receive calls, so that your business can continue uninterrupted while the rest of the system is being planned. -
Page 9: What's In This Manual
What's in This Manual You’ll find the information in this MERLIN Plus Communications System manual conveniently divided into eight sections, as described below. You’ll also find ten copies of the MERLIN Plus System User’s Guide enclosed. This section tells you what’s in this manual and how to use it. It also offers a SECTION 1. - Page 10 This guide is a handy reference for anyone who uses a MERLIN Plus system USER’S GUIDE voice terminal on the job. Give one to everyone in your business who uses a voice terminal. This card should be given to anyone in your company who works at home or CF/RLA CARD travels frequently but still needs to make or receive business calls.
-
Page 11: How To Use This Manual
How to Use This Manual How you should use this manual at any particular time depends on what you want to do, as the following information suggests. Use the information in Section 2, “Planning the System,” to decide which options ADMINISTERING and features you want for your system, then follow the instructions in Section 3, A NEW SYSTEM? -
Page 12: The Merlin Plus Communications System
The MERLIN Plus Communications System The basic MERLIN Plus system provides connections to up to four outside telephone lines and ten voice terminals. We use the term “voice terminal” instead of “telephone” because a basic telephone only lets you make and receive calls, while a voice terminal can be programmed to do a whole lot more, which you will soon discover as you read this manual. - Page 13 BIS-10, BIS-22, BIS-34, and BIS-34D Voice Terminals The BIS-10 Voice Terminal allows you to make and receive outside and intercom calls without lifting the handset. There are two columns of five buttons above the dial pad for incoming lines, auto intercom, and programmable features. The dual lights next to each button indicate the current status of selected features and lines.
- Page 14 The BIS-34D Voice Terminal with Display allows you to make and receive outside and intercom calls without lifting the handset. There are two columns of five buttons above the dial pad for incoming lines, auto intercom, and programmable features and two columns of 12 buttons to the right for programmable features.
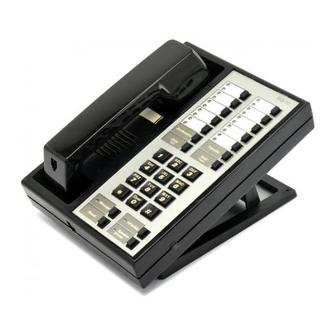
- Page 15 34-Button Voice Terminal The 34-Button Voice Terminal is a basic voice terminal that provides two columns of five buttons above the dial pad for outside lines and programmable features. The two columns of 12 buttons to the right of the dial pad can be used for Auto Intercom buttons and other programmable features that do not require lights.
- Page 16 Summary Voice terminal models BIS-34 and BIS-34D are ideal for the system administrator/attendant console because their features allow you to easily use all the system’s features. You can also use the BIS-22 and the 34-Button Deluxe models as the console. However, the SP-34, SP-34D, BIS-10, HFAI-10, 10-Button, and 5-Button voice terminals are not recommended for use as an adrninister/attendant console because the administrator would be unable to see which buttons were being assigned special features during system...
-
Page 17: Section 2: Planning The System
Section 2: Planning the System... -
Page 18: Introduction
Introduction can begin making and receiving calls as soon as your MERLIN Plus Communications System is installed. But to take full advantage of the system’s power, you should customize it to fit your business needs. Customizing the system is called administering the system throughout this manual. Administering the system involves entering information into the system’s memory about how you want the system to operate. -
Page 19: System Configuration Form
System Configuration Form Use the System Configuration Form to record information about the following: Dial Signals Long Distance Dialing Transfer Return Interval Call Report Music-on-Hold Background Music Outside Telephone Lines Voice Terminals The following information should help you make the appropriate entries for your system on the System Configuration Form. - Page 20 Initially, when someone in the MERLIN Plus system transfers a call and it is not TRANSFER RETURN answered in four rings, the call returns to the sender. You can change that INTERVAL setting so that calls don’t return, or return after up to nine rings. Under “Transfer Return Interval”...
- Page 21 If you have an optional audio system, you can connect it with an RCA-type MUSIC-ON-HOLD phonograph jack to the Music-on-Hold jack provided at the top of the Control Unit. Then when callers are placed on hold, they hear background music while they’re waiting.
- Page 22 HOLD DISCONNECT The MERLIN Plus system comes set for a long (450 milliseconds) hold INTERVAL disconnect interval because most telephone company switching systems use the long interval. If your telephone company uses a short (50 millisecond) interval, you’ll need to reset your system to prevent calls from remaining on hold after callers have hung up.
- Page 23 Activation of the ASA features requires a dedicated voice terminal jack on the control unit. At startup, the system automatically reserves jack (intercom number) 18 for the ASA features. But you can choose another voice terminal jack for ASA during system administration, or you may decide not to use any of the ASA features and assign intercom number 18 to a voice terminal.
- Page 24 Notice that “Reports” also appears in parentheses in the “Name” column next to intercom 19 on the form. If your system has the Call Report option, intercom 19 is automatically reserved for the data collector and printer required to print this report.
- Page 25 The system automatically assigns all voice terminals to a single paging group, called the Page-All Group. You can’t change the makeup of the Page-All Group. (See the “Group Page” entry in Section 5, “Reference,” for more information on the Page-All feature.) The system also assigns intercoms 10 through 19 to Paging Group 1 and intercoms 20 through 29 to Paging Group 2.
-
Page 26: Line Assignments Form
Line Assignments Form You can use the information already entered on your System Configuration Form NAME AND INTERCOM to complete this part of the Line Assignments Form. NUMBER In the “Name” column on the form . . . Write the names of the people in your business next to their intercom numbers. - Page 27 FIGURE 2-1 Original Line Assignments. 34-Button 22-Button 10-Button 5-Button Line H Line D Line G Line C Line F Line B Line E Line A Intercom Transfer Conference D r o p H o l d 2-10 Line Assignments Form...
- Page 28 MERLIN Plus system line administration offers you these options: Customize the line assignments on some or all of your voice terminals. Keep the original line assignments on some or all of your voice terminals. The following paragraphs offer guidelines for choosing a line assignment option for each voice terminal and recording your choices on the form.
- Page 29 Figure 2-2 shows how you might customize the line assignments on the buyer’s, the manager’s, and the clerk’s voice terminals to best meet their individual needs and responsibilities. FIGURE 2-2 Customized Line Assignments. Line B Line C Line C Line B Line E Line A Line D...
- Page 30 Original Line Assignments You can keep the original line assignments on the voice terminals of those people who need access to every outside line in the system. In the “Line” columns to the right of each appropriate intercom number . . . On the top row work 1 under Line A, 2 under Line B, and soon for as many lines as you have in your system.
- Page 31 You can use this option to assign outside lines to a voice terminal without BUTTON-FREE LINE assigning them to specific line buttons. This feature is useful for 5-Button and OPERATION 10-Button voice terminals so that buttons are available for programmable features.
- Page 32 In the “CF’ row under the “Line Assignments for ASA Features” . . . Write an “I” in the column of the line(s) where incoming calls are being forwarded. Write an “O” in the column of the line where you want to send the outgoing forwarded calls.
- Page 33 Under “Ring Intend” in the “DXD” row . . . Write the number of rings (0-9) before DXD calls are answered. Callers on DXD incoming lines are prompted with the following message: “Please dial desired extension number.” Once the caller dials the two-digit extension number (which is the two-digit intercom number), the call is transferred to the extension and the caller hears the following message: “Please hold.”...
- Page 34 System Answer (SA) System Answer can be used as an automated attendant to answer a call and provide a brief message before placing the caller on hold until someone is available to take the call. System Answer can have up to eight incoming lines assigned to it.
-
Page 35: Call Restrictions Forms
Call Restrictions Forms You can use call restrictions to prevent some or all voice terminals from making outside calls (both local and long distance). You can also use the Disallowed List to prevent some or all voice terminals from making billable calls to 900 numbers, the 976 exchange, or other numbers as desired. - Page 36 Creating the Disallowed List Once you’ve decided how many billable numbes you want to disallow, you write each entry next to a separate item (labeled 01 through 20) on the Disallowed List Entry Form located at the beginning of the Call Restrictions Form.
- Page 37 Some people in your business may have little need to make any outside calls, OUTWARD RESTRICTED either local or long distance. During system administration you can place an outward call restriction on their voice terminals, and the system will ignore attempts to dial outside telephone numbers from those voice terminals.
- Page 38 Naming Allowed Lists Once you’ve decided how many Allowed Lists you want and what numbers should be included in each, you may want to identify each list by name (for example, “New England Customers” or “Local Emergency Numbers”) in addition to the numbers that already appear on the form (List 01, List 02, etc.). On the “Allowed Lists Entry Form”...
- Page 39 FIGURE 2-3 MERLIN Plus System Processing Flowchart. Number dialed: System Speed Dial number Personal Speed Dial number Manually dialed number Does voice terminal have Restriction Override? Y e s number outward or number on an Allowed toll restricted? List? Number will not go through number on the Disallowed List? Number dialed...
-
Page 40: System Speed Dial Forms
System Speed Dial Forms You can assign System Speed Dial codes to frequently called telephone numbers. Then, people in your business can call any of these telephone numbers by dialing its 3- or 4-character System Speed Dial code. You can also assign these codes to account numbers that you want printed on Call Reports if your system has the Call Report (also referred to as the Station Message Detail Recording [SMDR]) feature. - Page 41 NUMBER AND In the “Number” column on the System Speed Dial form . . . IDENTIFICATION Write the telephone numbers or account numbers you want to encode on the line containing the dial codes (#60, #61, #62, etc.) of your choice. Put a check mark in the telephone column if the number is a telephone number or put a check mark in the account column if the number is an account number.
-
Page 42: Merlin Plus System Planning Forms
MERLIN Plus System Planning Forms The following forms are shown in this section: System Configuration Line Assignments Call Restrictions System Speed Dial Please make copies of these forms for use with your system. MERLIN Plus System Planning Forms 2-25... - Page 43 2-26 MERLIN Plus System Planning Forms...
- Page 44 System Configuration Form Required Settings: Transfer Return Interval Long Distance Dialing Dial Signals No Return Toll Prefix Touch-Tone Rings Area Code Only Rotary (Pulse) Optional Settings: Background Music Music-on-Hold Call Report Low Volume Low Volume Outgoing Calls Only Medium Volume Medium Volume Incoming and Outgoing High Volume...
-
Page 45: Voice Terminals
Voice Terminals Paging Groups Intercom Template Lock Location Number Name (Attendant) (ASA) (BB & Reports) 2-28 MERLIN Plus System Planning Forms... - Page 46 Line Assignments Form Line Assignments for Voice Terminals Line B Line C Line D Line E Line F Line G Icom Line A Line H Ring Ring Ring Ring Ring Ring Ring Ring Name I=Immediate Ring; D=Delayed Ring; N=No Ring; Circled=Button-Free (continued) MERLIN Plus System Planning Forms 2-29...
- Page 47 Line Assignments for ASA Features Line Line Ring Line Line Line Line Line Modify Line Interval Message Feature CF=Call Forwarding; DXD=Direct Extension Dialing; RLA=Remote Line Access; SA=System Answer 2-30 MERLIN Plus System Planning Forms...
- Page 48 Call Restrictions Form Disallowed List Entry Form List 09 Number Item Allowed Lists Entry Form List 01 List 02 Item Number Item Number (continued) MERLIN Plus System Planning Forms 2-31...
- Page 49 List 04 List 03 Number Number Item Item List 06 List 05 Item Number Number Item List 07 List 08 Item Number Item Number (continued) 2-32 MERLIN PIus System Planning Form...
- Page 50 Call Restrictions Assignment Form Toll Outward Allowed Lists Assigned Intercom Disallowed Unrestricted Restricted Restricted Number List MERLIN Plus System Planning Forms 2-33...
- Page 51 2-34 MERLIN Plus System Planning Forms...
- Page 52 System Speed Dial Form (Check one) Restriction Dial Name Private Number Override Code Telephone Account #900 #901 #902 #903 #904 #905 #906 #907 #908 #909 (continued) MERLIN Plus System Planning Forms 2-35...
- Page 53 Restriction (Check one) Dial Name Override Private Number Code Telephone Account #910 #911 #912 #913 #914 #915 #916 #917 #918 #919 #920 #921 #922 #923 #924 #925 #926 #927 #928 #929 #930 #931 #932 #933 #934 #935 #936 #937 #938 #939 #940 #941...
- Page 54 (Check one) Restriction Dial Name Number Override Code Private Telephone Account #950 #951 #952 #953 #954 #955 #956 #957 #958 #959 #960 #961 #962 #963 #964 ##65 #966 #967 #968 #969 #970 #971 #972 #973 #974 #975 #976 #977 #978 #979 #980 #981...
- Page 55 (Check one) Dial Restriction Name Number Override Code Private Telephone Account #990 #991 #992 #993 #994 #995 #996 #997 #998 #999 2-38 MERLIN Plus System Planning Forms...
-
Page 56: Section 3: Administering The System
Section 3: Administering the System... -
Page 57: Introduction
Introduction You can begin using your MERLIN Plus Communications System right now. Just make sure the system is set to generate the right dial signals for your outside telephone lines and to recognize the long distance dialing procedure for your area. -
Page 58: Administration Preview
Administration Preview The information about your system recorded on the planning forms listed below PLANNING FORMS is important to both initial and ongoing system administration. System Configuration Form Line Assignments Form Call Restrictions Forms System Speed Dial Form If you haven’t filled out any planning forms yet, you should do so now. It won’t take long, and it will save you time later. - Page 59 Administrator/Attendant Console A BIS-34 voice terminal or a BIS-34D voice terminal with display, both of which have lights for every outside line and voice terminal button, are ideal administrator/attendant consoles for MERLIN Plus systems with more than 10 voice terminals. Figure 3-2 shows a BIS-34D with display used as a console. The line buttons above the dial pad and the Auto Intercom buttons to the right of the dial pad give you one-touch access to each line and voice terminal.
- Page 60 FIGURE 3-2 BIS-34D with Display as Administrator/Attendant Console. Display Display contrast buttons control Display AT&T BIS-34D Call appearance buttons Test/Program switch Feature buttons Dial Ringer volume control Speakerphone volume control Speakerphone light Message light Microphone light HFAI light 3-4 Administration Preview...
- Page 61 FIGURE 3-3 BIS-22 as Administrator/Attendant Console. Call Appearance/ Feature buttons BIS-22 AT&T Test/Program switch Dial Ringer Volume control Speakerphone volume control Speakerphone light Message light Microphone light HFAI light Administration Preview...
- Page 62 If you are using a BIS-34, BIS-34D, or 34-Button deluxe voice terminal as the THE BIS-34, BIS-34D, OR administrator/attendant console, you have the ideal arrangement for your 34-BUTTON DELUXE MERLIN Plus system. You can administer all the features, including VOICE TERMINAL USED Disallowed and Allowed Lists, Busy Buster, and Group Page, for all the voice AS AN ADMINISTRATOR terminals on your system by using the Auto Intercom buttons (intercom numbers...
- Page 63 For example, if you want to assign voice terminal 21 to a Group Page group or add the voice terminal to an Allowed List, use the dial code, #04, that corresponds with intercom number 21. It is important that you record your decisions about Allowed and NOTE: Disallowed Lists on the Call Restrictions Assignment Form;...
- Page 64 To make button labels for the voice terminal you plan to use as your administrator/attendant console, do the following: Remove the blank button labels from the voice terminal according to the instructions that came with the voice terminal. Fill in the button labels with pencil or ballpoint pen since either can be erased if you make changes later.
- Page 65 Leaving Administration Mode Follow the boxed instructions below when you’ve finished an administration session. Leaving Administration Mode To leave administration mode: Slide the T/P switch on the left side of the console to the center position. The red light goes off next to Administer and Restrict. The red light goes on next to a line button.
-
Page 66: Basic Administration
Basic Administration Basic administration should take no more than a few minutes. All the information you need should be on the System Configuration Form. This simple procedure tells the control unit how many outside telephone lines OUTSIDE TELEPHONE your system has. But it works only if your outside lines are plugged into an LINES unbroken sequence of line jacks on the control unit beginning with line jack A. - Page 67 Locate the column headed “Long Distance Dialing” on the System Configuration LONG DISTANCE DIALING Form. Is the box next to “Toll Prefix” checked? If so, you don’t have to do anything here. Your system is factory set for this type of long-distance dialing: toll prefix (1 or 0) + area code + telephone number.
- Page 68 If you have the optional data collector and printer necessary to generate CALL REPORT Call Reports, you can keep records of incoming and outgoing calls. Y will first need to set the date using the following procedure: Enter administration mode. The red lights go on next to Administer and Restrict.
- Page 69 If you specified another duration (0, or 2 through 9) follow this procedure: Enter administration mode. The red lights go on next to Administer and Restrict. Dial *83. Dial one digit from 0 to 9 for the number of minutes. Touch Administer.
- Page 70 If you placed a check mark in the column marked “Short” under “Hold HOLD DISCONNECT Disconnect Interval” on the System Configuration Form, then your local INTERVAL telephone company uses the 50 millisecond disconnect interval instead of the 450 millisecond interval. If your local telephone company uses a short interval, you must administer this setting for each incoming line in the system.
- Page 71 Changing the Busy Buster (BB) jack assignment: If you are going to use the Call Report or System Feature Report option, NOTE: you can assign BB to the same jack as ASA by using the adapter provided with the optional data collector or memory module. Enter administration mode.
- Page 72 Changing the Reports jack assignment for System Feature Report: If you are using the same printer and data collector for producing NOTE: Call Reports and System Feature Reports, you must administer the new jack assignment for both features. Enter administration mode. The red lights go on next to Administer and Restrict.
- Page 73 When you filled in the “Paging Groups” columns on the System Configuration PAGING GROUPS Form, you learned the following about paging groups: All voice terminals are automatically assigned to a single paging group, the Page-All Group, which you cannot change. Intercoms 10 through 19 are automatically assigned to Page Group 1;...
- Page 74 If you have entered a number 1 through 4 under the “Template” column of your VOICE TERMINAL “Voice Terminal” form, use the following procedure to assign the template to the TEMPLATES voice terminal: Enter administration mode. The red lights go on next to Administer and Restrict. Dial *10 followed by the option number of the template: 1 = Clear Template 2 = Dialer Template...
- Page 75 Option 1: Clear Template This template is used to erase previously programmed features on a voice terminal so that new features can be assigned. The Clear Template removes any features assigned to a voice terminal, but does not erase line assignments. see Figure 3-4.
- Page 76 Option 2: Dialer Template This template is for personnel who do not require special features, and who are likely to have no need to make toll calls. This template can be assigned to even the smallest voice terminals, including the 5-button voice terminals. See Figure 3-5 for button assignments.
- Page 77 Option 3: Feature Template This template is designed for managers, owners, and personnel who need unrestricted phone use along with several additional features. This template is for 22-button or larger voice terminals. See Figure 3-6 for button assignments. FIGURE 3-6 The Feature Template. 34-Button 22-Button 10-Button...
- Page 78 Option 4: Receptionist/Secretary Template This template is for receptionists, secretaries, and backup call handlers, including the system attendant, and is designed for use with 22-button or larger voice terminals. See Figure 3-7 for button assignments. FIGURE 3-7 The Receptionist/Secretary Template. 34-Button 22-Button 10-Button...
- Page 79 If you placed a check mark in the “Lock” column of the “Voice Terminal” form PROGRAM MODE LOCK you want to prevent the voice terminal from reprogramming any of the features assigned to it. Use the procedure below to prevent the user of a voice terminal from reprogramming any of the features assigned to it: Enter administration mode.
-
Page 80: Line Assignments For Voice Terminals
Line Assignments for Voice Terminals As you filled out the Line Assignments Form, you learned that customizing line assignments to voice terminals can help control costs and increase the efficiency of your communications system. All the information you need to customize line assignments should be on the Line Assignments Form. - Page 81 CUSTOMIZED LINE On the Line Assignments form, the numbers 1 through 8 on the top row to the ASSIGNMENTS right of the intercom numbers should show how you plan to customize the line assignments to voice terminals. Customizing a voice terminal’s line assignments is simply a matter of removing and adding lines.
- Page 82 To assign lines to a voice terminal: Enter administration mode. The red lights go on next to Administer and Restrict. Perform one of the following procedures: > Touch the Auto Intercom button for the voice terminal you’re administering. A green light goes on next to the Auto Intercom button. Green lights also go on next to the buttons of any lines already assigned to the voice terminal.
- Page 83 If you selected Button-Free Line Operation, so that incoming lines on a voice BUTTON-FREE LINE terminal are not assigned to buttons, you can administer whether or not calls OPERATION should ring at the voice terminal. If the voice terminal is in a public place, such as a building lobby, you can select the no ring option.
- Page 84 The four Automatic System Access (ASA) features require the assignment of LINE ASSIGNMENTS FOR incoming lines and one requires the additional assignment of outgoing lines. ASA FEATURES Call Forwarding (CF) If there is an “I” and an “O” entered under two lines in this row, perform the following procedure to administer the incoming and outgoing call forwarding lines: Enter administration mode.
- Page 85 Dial the telephone number you want to include in the message. For special phone numbers, such as 800 numbers, you may prefer to NOTE: have the recorded voice pronounce the number as “Eight hundred” followed by the number, instead of “Eight, zero, zero.” To do this, touch Hold to enter a pause after the toll prefix and again after the 800 area code and then again after the exchange.
- Page 86 Direct Extension Dialing (DXD) If there is an “I” entered in this row, perform the following procedure to administer the incoming Direct Extension Dialing line(s): Enter administration mode. The red lights go on next to Administer and Restrict. Dial *58 for the Direct Extension Dialing incoming line group. Touch the line buttons until the green lights show the assignments you want.
- Page 87 Repeat the procedure for each line you are administering. Touch Administer. Continue to administer the system, or leave administration mode. Remote Line Access (RLA) If there is an “I” entered in this row, perform the following procedure to administer the incoming Remote Line Access line group: Enter administration mode.
- Page 88 System Answer (SA) If there is an “I” entered in this row, perform the following procedure to administer the incoming System Answer line(s): Enter administration mode. The red lights go on next to Administer and Restrict. Dial *75 for the System Answer incoming line group. Touch the line buttons until the green lights show the assignments you want.
-
Page 89: Systemwide Options
Systemwide Options Now that your MERLIN Plus system is up and running, you can continue with system administration at a pace that best suits your work schedule. Under this heading you’ll find a menu of options and features from which to choose. When your system is first installed, all voice terminals are unrestricted. - Page 90 For those voice terminals with a check mark in the “Disallowed List” column on CALL RESTRICTIONS the form, follow the procedure below: ASSIGNMENT FORMS Enter administration mode. The red lights go on next to Administer and Restrict. Dial *0900. Follow the appropriate procedure below: To assign the Disallowed List to all voice terminals, touch NOTE: Conference.
- Page 91 For restricted voice terminals, if there is a check mark in one or more of the “Allowed List Assigned” columns, do the following: Enter administration mode. The red lights go on next to Administer and Restrict. Dial a * and a two-digit code (01 through 08) that corresponds to the list you checked off to assign to the voice terminal.
- Page 92 You can assign System Speed Dial codes to frequently called telephone numbers SYSTEM SPEED DIAL or to account numbers you want to appear on call reports (if you have the Call Report option). All system voice terminals will have access to these System Speed Dial codes.
-
Page 93: Quick Reference Guide To System Administration
Quick Reference Guide to System Administration The following table is a quick guide to administration procedures for the MERLIN Plus Communications System. If you need more information on a procedure than the table gives you, look up the procedure in Section 5, “Reference.”... - Page 94 Do This Administration Procedure 1 Enter administration mode. Make Line A and/or Line E Private. 2 Dial * 57. The green lights next to the buttons for Line A and Line E indicate their status: Green light on = privacy active Green light off = privacy inactive 3 Touch the line button until the green light indicates the privacy status you want.
- Page 95 Do This Administration Procedure 1 Enter administration mode. Assign Call Restrictions to a telephone. 2 Touch the Auto Intercom button or dial the intercom number for the phone. 3 Touch Restrict repeatedly until the green light indicates the desired restriction. Green light on steady = Unrestricted (all calls permitted) Green light flashing = Toll restricted (no long distance permitted) Green light off = Outward restricted (no outside calls)
- Page 96 Do This Administration Procedure 1 Enter administration mode. Add an entry to the Disallowed List. 2 Dial “09 followed by the Disallowed List code (01 to 20). 3 Dial the disallowed number (up to 16 digits). 4 Touch Administer. The console beeps twice. 5 Leave administration mode.
- Page 97 Do This Administration Procedure Enter administration mode. Assign System Speed Dial codes to telephone numbers and account numbers. Dial the code (#60 through #89 or #900 through #999) you are assigning to the number. Dial either: *90 to assign the code without Restriction Override *92 to assign the code with Restriction Override *88 to assign the code to an account number.
- Page 98 Do This Administration Procedure 1 Enter administration mode. Set the Music-on-Hold volume. 2 Dial the code for the volume you want: *12 to turn off Music-on-Hold. *13 to set the volume to low. *14 to set the volume to medium. *15 to set the volume to high.
- Page 99 Do This Administration Procedure 1 Enter administration mode. Designate a telephone jack on the control unit for Call Reports. 2 Dial *82. The green light goes on next to the Auto Intercom button for the jack to which the data collector and printer are currently assigned. Touch the Auto Intercom button for the new telephone jack to which you are assigning the data collector and printer.
- Page 100 Do This Administration Procedure 1 Enter administration mode. Designate a voice terminal jack on the control unit for System Feature Reports. 2 Dial *85. If previously administered, the green light goes on next to the Auto Intercom button for the jack to which the data collector and printer are currently assigned.
- Page 101 Do This Administration Procedure Designate a jack for the ASA features 1 Enter administration mode. (jack 18 is the initial assignment). 2 Dial *59. Touch the Auto Intercom button or dial the intercom number for the jack you want to assign to ASA. 4 Touch Administer.
- Page 102 Do This Administration Procedure 1 Enter administration mode. Change the password for the CF or RLA feature. 2 Dial *56. Dial an intercom number plus three digits. To invalidate any password, dial the intercom number and 000. NOTE: 4 Touch Administer. The console beeps twice.
- Page 103 Do This Administration Procedure Reset the system. This procedure erases all system administration and telephone WARNING: programming, returns the system to its factory settings, and restores initial feature assignments to the phones. Use this feature only when you want to change the system radically. 1 Enter administration mode.
-
Page 104: Quick Reference Guide To Administration Codes
Quick Reference Guide to Administration Codes Feature Other Numbers/Buttons Administration Code Add (or remove) an Allowed List (1 through 8) *01 through *08 to a voice terminal Add telephone numbers to an Allowed List (1 through 8) 01 through 10 plus up to eight telephone number digits Add (or remove) a Disallowed List to a voice terminal Add telephone numbers to a Disallowed List... - Page 105 Feature Administration Code Other Numbers/Buttons Set the system for toll prefix, a 0 or a 1 Set the system for area code only Set the system for Touch-Tone dialing Set the system for rotary dialing Modify the Call Forwarding, Direct Extension Dialing, the line button(s) for the line(s) on which you want the modified message Remote Line Access, or System Answer voice messages...
- Page 106 Feature Other Numbers/Buttons Administration Code Assign voice terminals to Group Page group 1 the intercom numbers Assign voice terminals to Group Page group 2 the intercom numbers Assign lines that can be answered by System Answer the outside line buttons Set number of rings before an ASA feature picks up a call ASA feature number (1-4) and number of rings (0-9)
- Page 107 Other Numbers/Buttons Feature Administration Code Assign System Speed Dial codes with Restriction Override system speed dial code and telephone to outside telephone numbers number digits Assign System Speed Dial codes with Restriction Override a * plus the telephone number digits to outside telephone numbers that are private (only the dial code is printed on the call report) *99198...
-
Page 108: Section 4: Using The Attendant Console
Section 4: Using The Attendant Console... -
Page 109: Overview
Overview As your company’s system attendant, you will probably answer most calls that come into the business and transfer many of those calls to other people in the office. This section includes descriptions, instructions, and suggestions that will help you transfer calls and use Auto Intercom buttons and Group Page features, the Send Message feature, and the headset. - Page 110 FIGURE 4-1 The BIS-34D with display as attendant console. Display Display contrast buttons control Display AT&T BIS-34D Call appearance buttons Test/Program switch Feature buttons Dial Ringer volume control Speakerphone volume control Speakerphone light Message light Microphone light HFAI light 4-2 Overview...
- Page 111 FIGURE 4-2 The BIS-22 voice terminal as attendant console. Call Appearance/ Feature buttons AT&T BIS-22 Test/Program switch Dial Ringer volume control Speakerphone volume control Message light Speakerphone light HFAI light Microphone light Overview...
-
Page 112: Handling Calls
Handling Calls As the system attendant, you will be answering most of the incoming calls. To handle the calls efficiently, you will find it helpful to know about the following features and procedures: Transferring calls Using the Auto Intercom buttons for people in your system Paging through the voice terminal speakers Using the Send Message feature Changing the ringing options of the outside lines on your console or helping... - Page 113 Screening Calls When you screen a call, you first discuss the call with the person to whom it is to be transferred. There are many reasons for consulting about the call. For example, a person may want to obtain a file before taking the call, may be busy and not want to answer the call at the moment, or may want the attendant to answer the call and take a message.
- Page 114 Auto Intercom buttons on your attendant console allow you to handle calls USING AUTO INTERCOM efficiently in several ways: BUTTONS Auto Intercom buttons allow you to quickly and easily transfer calls. The lights next to Auto Intercom buttons indicate when others in your office are using their voice terminals.
- Page 115 When someone in the MERLIN PI system has a message, you can turn on the USING THE SEND Message light at the person’s voice terminal to indicate that there is a message MESSAGE FEATURE waiting. 1 Touch Send Message. 2 Touch an Auto Intercom button, if you have one for the person. Dial the 3-character dial code opposite the person’s intercom number as found on the following table.
- Page 116 You can program any outside line at your console to ring immediately, to ring SELECTING RINGING after a delay, or not ring at all. You will probably want most lines at your OPTIONS console to ring immediately (the factory-set condition), but if you answer calls on a certain line only when someone else doesn’t answer them, program that line for delayed ringing.
- Page 117 You can activate the System Answer feature with a System Answer button so ACTIVATING SYSTEM ANSWER that when selected calls come in, the system automatically y answers them, then plays a pre-recorded message before placing them on hold. This feature can only be activated from the attendant console or the alternate attendant console.
- Page 118 For optimal use of the speakerphone on the BIS, HFAI, or SP voice terminals, SPEAKERPHONE follow these guidelines: PERFORMANCE TIPS Place the voice terminal in an area with low background noise. Room acoustics and background noise may affect the proper operation of your voice terminal’s speakerphone.
-
Page 119: Section 5: Reference
Section 5: Reference... -
Page 120: Merlin Plus System Features
MERLIN Plus System Features Your MERLIN Plus system offers features that provide effective telephone service both on a business-wide and personal basis. In order to meet company priorities and needs, the system administrator can assign lines and add features that will benefit the whole system. The voice terminals (telephones) in the MERLIN Plus system come ready to use with many preassigned features, such as Transfer and Hold. - Page 121 Abbreviated Ringing When another line rings while you are busy on a call, your voice terminal rings DESCRIPTION only once. In this way you are aware that you have another call, but it does not interrupt the call in progress. After the ringing cycle stops, the green light continues to flash to remind you of the other call.
-
Page 122: Account Number Entry
Account Number Entry You can use account numbers to identify the department, project, or client to DESCRIPTION whom the call should be charged. If your system uses the Call Report feature (often referred to as Station Message Detail Recording [SMDR]), you can include these account numbers in the Call Reports. - Page 123 If your responsibilities do not include system administration, skip this ADMINISTRATION information. Before you assign a System Speed Dial code (#60 through #89 or #900 through #999) to a specific account number, refer to the System Speed Dial Form that you have filled out.
- Page 124 Dial *88 plus the account number. Dial *95 plus the System Speed Dial code (60 though 89 and 900 through 999) from a list that your administrator can give you. Slide the T/P switch to the center position. Acct. No. Acme Co.
-
Page 125: Allowed Lists
Allowed Lists When the system is installed, people can use their voice terminals to place DESCRIPTION intercom, local, and toll calls. However, the system administrator can restrict any voice terminal to intercom or local calls. (See “Call Restriction.”) If restricted voice terminals require additional calling access, the administrator can designate a list of numbers (an Allowed List) that people may call despite the established restrictions. - Page 126 Touch Administer. The console beeps twice. Leave administration mode by sliding the T/P switch to the center position. Administer 01-10 are code Administer To delete an entry from an Allowed List: Enter administration mode by sliding the T/P switch to P and touching Administer.
- Page 127 Leave administration mode by sliding the T/P switch to the center position. Drop Administer Adminster Before you assign Allowed Lists to voice terminals in your system, refer to the Call Restrictions, Allowed and Disallowed Lists Forms that you have filled out. Then use the following procedures to assignor remove voice terminals for access to Allowed Lists: Enter administration mode by sliding the T/P switch to P and touching...
-
Page 128: Alternate Attendant
Alternate Attendant You can assign a voice terminal, other than intercom 10, to be used as an DESCRIPTION Alternate Attendant. When Direct Extension Dialing (DXD) calls are busy or do not answer, they can be directed to the Alternate Attendant position. All other calls are directed to the main attendant position. - Page 129 If you will be using the System Answer feature, see “System Answer” later in PROGRAMMING this section, you must program the SA button. Only the attendant or the alternate attendant can have the SA button. Label the button “System Answer.” Slide the T/P switch to P.
- Page 130 Auto Answer-All This feature requires a General Purpose Adapter and can be used with a NOTE: modem, an answering machine, a facsimile machine, or a cordless telephone. If you want an optional piece of equipment, such as a modem, an answering DESCRIPTION machine, or a facsimile machine, connected to your voice terminal, to turn on automatically when you receive ringing calls, you need to program an...
- Page 131 To have a modem, answering machine, or facsimile machine answer calls HOW TO USE automatically: Touch Auto Answer-All. The green light next to the button goes on. Auto Ans.- This feature remains active until you: Touch Auto Answer-All again. The green light next to the button goes off. Auto Ans.- 5-12 MERLIN Plus System Features...
- Page 132 Auto Answer-Intercom This feature is used with a Hands-Free Unit. NOTE: If your voice terminal has the Hands-Free-Answer-on-Intercom (HFAI) feature DESCRIPTION or is connected to a Hands-Free Unit (HFU), you can have your speakerphone go on automatically whenever you receive an intercom call. To do this with an HFU, you must program an Auto Answer-Intercom button.
- Page 133 To have your hands-free unit turn on automatically when you receive intercom HOW TO USE calls with voice announcement: Touch HFAI or Auto Answer-Intercom. The green light next to the button goes on. Auto Ans.- Intercom To return to answering calls yourself Touch HFAI or Auto Answer-Intercom again.
-
Page 134: Auto Intercom
Auto Intercom You can use an Auto Intercom button for one-touch dialing of intercom numbers. DESCRIPTION Program any 2-digit intercom number onto an Auto Intercom button and use the button whenever you want to call the intercom number. In the MERLIN Plus system, you place an intercom call with a voice CONSIDERATIONS announcement. - Page 135 To place an intercom call with one touch: HOW TO USE Touch the Auto Intercom button for the intercom number you want to dial. If you hear a short beep, begin speaking or lift your handset. If you hear a long beep, wait for someone to answer on the other end.
- Page 136 Automatic Call Restriction Reset DESCRIPTION Use Automatic Call Restriction Reset to ensure the integrity of assigned call restrictions. CONSIDERATIONS None. ADMINISTRATION If your responsibilities do not include system administration, skip this section. Enter administration mode by sliding the T/P switch to P and touching Administer.
-
Page 137: Automatic Line Selection
Line Selection Automatic You can program the order in which your system selects outside lines when you DESCRIPTION touch Speakerphone or lift your handset to place a call. For example, you can program the line you use most often to be the first line in the Automatic Line Selection sequence. - Page 138 When you want to place an outside call: HOW TO USE Touch Speakerphone or lift your handset. The MERLIN Plus system connects you to the first available line in the Automatic Line Selection sequence. Speaker- phone MERLIN Plus System Features 5-19...
- Page 139 System Access (ASA) Automatic Automatic System Access (ASA) includes four features that allow more flexible DESCRIPTION use of your MERLIN plus system and your outside lines. The features are described in this section under separate entries: Call Forwarding (CF) When the system is in CF mode, incoming calls on designated lines are connected to a Voice Synthesis Processor (VSP) in the control unit for a message.
- Page 140 If your responsibilities do not include system administration, skip this ADMINISTRATION information. ASA Jack Assignment The Automatic System Access features require a dedicated jack on the control unit into which you can plug one end of the Auto Access cord. The cord also plugs into the memory module where the Voice Synthesis Processor (VSP) is located.
-
Page 141: Auxiliary Lines
Auxiliary Lines The MERLIN Plus system provides an auxiliary jack, labeled “AUX,” at the top DESCRIPTION of each Line Module. This auxiliary line is bridged directly to outside Line A or Line E, and does not go through the MERLIN Plus system control unit. You can connect accessory devices to the system, and use these devices independently of the system. - Page 142 The system administrator can administer the privacy feature for Line A and/or Line E so that no one else in the system can bridge onto or monitor these lines while a call is active on them. For more information, see “Privacy (on Lines A and E).”...
- Page 143 Bridging If you share a line with another person, you can join (or “bridge” onto) a call in DESCRIPTION progress on that line. In this way you can easily join a conference call by just touching a line button and Speakerphone or lifting your handset. (See “Conference.”) CONSIDERATIONS Up to three people connected to the MERLIN Plus system, including the...
- Page 144 Busy Buster (BB) The Busy Buster feature automatically redials the number you most recently DESCRIPTION dialed up to ten times at 60-second intervals. If the called telephone begins to ring within this time, your voice terminal alerts you. To use this feature, the system administrator must have assigned the feature to a voice terminal jack on the control unit, a connection must have been made from that voice terminal jack to the BB jack on the memory module, and a button must be programmed at each...
- Page 145 If your responsibilities do not include system administration, skip this ADMINISTRATION information. The system is factory-set to have the Busy Buster feature assigned to voice terminal jack 19 on the control unit. However, you can use the following procedure to assign the feature to any other voice terminal jack in the system, except jack 10.
- Page 146 If the number you are calling is busy and you want to use the BB feature, follow HOW TO USE this procedure: Before you hang up, touch the Busy Buster button. The green light next to the Busy Buster button flashes. Hang up.
- Page 147 Operation Button-Free Line Button-Free Line Operation allows people with a 5-button or any 10-button DESCRIPTION voice terminal to access lines, even though the lines do not appear on the voice terminal buttons. Therefore, those voice terminals have additional free buttons for needed programmed features.
- Page 148 Touch the Auto Intercom button or dial the intercom number for the voice terminal you are administering. A green light goes on next to the Auto Intercom button. Green lights go on next to the buttons of any lines already assigned to the voice terminal. Touch the line button until the green light next to it shows the line assignment you want: Green light on = the line is assigned to the voice terminal...
- Page 149 None PROGRAMMING If you do not have a line button for a call that you have received or that has been HOW TO USE transferred to you, you can still put the call on hold using the Hold button. To retrieve the call, you can use the Hold Retrieve feature.
- Page 150 Call Forwarding (CF) Call Forwarding is an ASA feature and therefore requires the NOTE: assignment of the ASA jack. If the ASA jack assignment has not yet been made, refer to “Automatic System Access” in this section before attempting to administer this feature. DESCRIPTION When in CF mode, incoming calls on designated lines are connected to the Voice Synthesis Processor (VSP), then while the caller is listening to the...
- Page 151 That there can be more than one CF/DXD button in the system, but a voice terminal can have only one CF/DXD button: If two or more users have a CF/DXD button programmed on their voice terminals, each of them can turn the features on and off. For example, if one of these users activates Call Forwarding, the red light goes on next to the CF/DXD button on all the voice terminals that have that button.
- Page 152 If your responsibilities do not include system administration, skip this ADMINISTRATION information. Call Forwarding Line Groups At startup, none of the system’s outside lines are assigned to the CF incoming or outgoing line group. To use this feature must assign line(s) to each group. To use Call Forwarding with the MERLIN Attendant, you should have NOTE: one outgoing line for each incoming line in every Call Forwarding line...
- Page 153 Voice Messages The system automatically provides the following default voice message for call forwarded calls: “Your call is being forwarded. Please hold.” You can modify this message to include the following statement: “You have reached nnn...” where nnn... is the telephone number of one of your outside lines. The number can be up to 16 digits, including * or #.
- Page 154 Touch the line button. The green light goes off. Touch Administer. The console beeps twice. Leave administration mode by sliding the T/P switch to the center position. 555-1234 Administer Administer You may also choose to forward your calls without a message: Enter administration mode by sliding the T/P switch to P and touching Administer.
- Page 155 Passwords You and others in your business need at least one valid 5-digit password in order to change a call forwarding number from a remote location. The first two numbers in the password are the caller’s intercom number. To create or invalidate a password, follow this procedure: Enter administration mode by sliding the T/P switch to P and touching Administer.
- Page 156 To enter, change, or delete the From the Administrator/Atfendant Console CF destination telephone number from the administrator/attendant console, follow this procedure. Press CF/DXD to go into normal mode. Green and red lights go off. Enter administration mode by sliding the T/P switch to P and touching Administer.
- Page 157 Dial the new CF telephone number plus a pound (#). The VSP repeats the new number and asks you to either confirm it by dialing a * or deny it by dialing 00. Dial * to confirm, or dial 00 to return to step 5, above, and try again. After receiving the confirmation signal, the VSP repeats the new number once more and identifies it as the new call forward number Hang up.
- Page 158 Call Forwarding/Remote Line Access Disconnect Timer The Call Forwarding/Remote Line Access Disconnect Timer is used in DESCRIPTION conjunction with the Call Forwarding and Remote Line Access features in MERLIN Plus systems for which the Central Office (CO) lines do not provide a forward disconnect signal.
-
Page 159: Call Pickup
Call Pickup If you want to pick up an intercom or outside call that is ringing at another voice DESCRIPTION terminal, use the Call Pickup feature. You can use this feature in three different ways: Option A —You can use a dial code and dial the intercom number of the ringing voice terminal. - Page 160 You do not need to program Option A. PROGRAMMING To program Option B: Label the button Call Pickup. Slide the T/P switch to P. The voice terminal rings every 5 seconds to remind you that you are programming and that you cannot place or receive calls.
- Page 161 To pickup a call ringing at any other voice terminal using Option B: Touch Speakerphone or lift your handset. Touch the Call Pickup button you programmed above. Touch the Auto Intercom button or dial the intercom number of the voice terminal at which the call is ringing. Call Speaker- John 12...
-
Page 162: Call Report
Call Report This feature is used with a MERLIN Plus system data collector and an NOTE: AT&T 475/476 or 572/573 printer or its equivalent. The Call Report feature, often called Station Message Detail Recording DESCRIPTION (SMDR), enables a business to keep records of incoming and outgoing calls. The information in a printed call report gives details about outgoing and incoming calls: the date and time of each call, its duration, the line and voice terminal on which the call was made or received, and the dialed numbers of the... - Page 163 As you can see from the reports in Figure 5-1, the system prints the number of each outgoing call. If there’s a telephone number you’d like to keep private— say, a number containing a long distance access code —you can give that number a System Speed Dial code and mark it for privacy when you enter it during system administration.
- Page 164 If your responsibilities do not include system administration, skip this ADMINISTRATION information. Before you administer the Call Reports options for your system, refer to the System Configuration Form that you have filled out. To administer the various Call Reports options for your system: The Date and the Time To set today’s date: Enter administration mode by sliding the T/P switch to P and touching...
- Page 165 Control Unit Jack Assignment for the Call Report Feature To specify the voice terminal jack to which the data collector and the printer will be connected: The system is factory-set for jack 19. NOTE: Enter administration mode by sliding the T/P switch to P and touching Administer.
- Page 166 Type of Documented Calls To specify the type of calls that will be documented (the system is set to have no calls reported): Enter administration mode by sliding the T/P switch to P and touching Administer. Dial *84. Dial a number code 0 through 2 to specify the kind of calls to be reported (the system is factory-set so that no calls are reported): >...
-
Page 167: Call Restriction
Call Restriction When the system is first installed, people can use their voice terminals to place DESCRIPTION intercom, local, and toll calls. However, the system administrator can assign either of two types of call restrictions for selected voice terminals: Outward Call Restriction restricts voice terminals so that only intercom calls can be placed. - Page 168 Repeat steps 2 through 4 for each voice terminal you want to restrict. Leave administration mode by sliding the T/P switch to the center position. Susan 15 Administer Restrict Administer PROGRAMMING None HOW TO USE Ask your system administrator what call restrictions, if any, he or she has assigned to your voice terminal.
-
Page 169: Centralized Programming
Centralized Programming The Centralized Programming feature allows the system administrator the DESCRIPTION convenience of programming features onto individual voice terminals directly from the administrator/attendant console. In this way there is no need to go to each voice terminal to do the programming. This feature is useful when the administrator is assigning Ringing Options for incoming calls. - Page 170 None PROGRAMMING HOW TO USE None MERLIN Plus System Features 5-51...
- Page 171 Conference When you want people outside the MERLIN Plus system to join a call in DESCRIPTION progress, you can use the Conference feature. You can set up a conference call that includes up to two people from outside the MERLIN Plus system, up to two people within the system, and yourself, a total of five people.
- Page 172 Announce the conference call through your speaker or handset. Touch Conference. Touch the line button for the line that you put on hold. H o l d 555-1234 Conference 555-1234 tel. no. rejoin the call: Touch a line button associated with the call. 555-1234 disconnect one participant from the call: Touch Drop.
- Page 173 Copy DESCRIPTION If there are two or more voice terminals that require identical feature assignments, the system administrator can use the Copy feature to copy the line and programmable feature assignments from one voice terminal onto another. When the administrator uses the Copy feature, the MERLIN Plus system copies CONSIDERATIONS the line assignments from one voice terminal to the other.
- Page 174 Touch the Auto Intercom button or dial the intercom number of the voice terminal from which you are copying line assignments. Touch Administer. The console beeps twice. Leave administration mode by sliding the T/P switch to the center position. Be sure to label the new line assignments on the voice terminal to which you did the copying.
- Page 175 Customized Line Assignment The system administrator can assign lines to any voice terminal in any order, or DESCRIPTION choose not to assign particular lines to a voice terminal. The administrator can use Customized Line Assignment if he or she wants to assign lines or groups of lines to selected voice terminals with similar requirements for placing and receiving calls.
- Page 176 Assigning Lines to Voice Terminals Before you assign lines to voice terminals in your system, refer to the Line Assignments Form that you have filled out. To assign lines to a voice terminal: Enter administration mode by sliding the T/P switch to P and touching Administer.
- Page 177 Dialing (DXD) Direct Extension Direct Extension Dialing (DXD) is an ASA feature and therefore NOTE: requires assignment of an ASA jack. If the ASA jack assignment has not yet been made, refer to “Automatic System Access” in this section before attempting to administer this feature. When you put the system in DXD mode, the control unit acts like an automated DESCRIPTION attendant.
- Page 178 That one jack on the control unit be dedicated to the ASA features At startup, jack number 18 is automatically designated as the ASA jack. An Auto Access cord that you plug into this jack is connected to the memory module which houses the VSP.
- Page 179 If your responsibilities do not include system administration, skip this ADMINISTRATION information. DXD Line Groups At startup, none of the system’s outside lines are assigned to each ASA line group. You need to assign which lines you want to designate for DXD. Enter administration mode by sliding the T/P switch to P and touching Administer.
- Page 180 You can modify this message to include the following statement: “You have reached nnn...” where nnn... is the telephone number of one of your outside lines. The number can be up to 16 digits, including * or #. You can modify the message for all lines in an incoming line group, or you can modify the message for some and leave others unmodified.
- Page 181 A button with a red and green light next to it is required for the DXD features. PROGRAMMING To program a CF/DXD button on a voice terminal: Label the button CF/DXD. Slide the T/P switch to P. The voice terminal rings every 5 seconds to remind you that you’re programming and that you can’t place or receive calls.
- Page 182 Disallowed List Most businesses find it inappropriate for their employees to make billable calls DESCRIPTION to numbers such as those beginning with the “976” exchange or the “900” area code, for services such as, comedy, weather, sports, lottery, and chatlines. The Disallowed List feature enables you to deny access to up to 20 area codes, exchanges, and entire numbers, even on unrestricted lines.
- Page 183 To assign Disallowed List to voice terminals: Slide the T/P switch to P and touch Administer. Dial *0900. Touch the Auto Intercom button or dial the appropriate code from the table below for the voice terminal you want to assign the Disallowed List. If you want to prevent all voice terminals in the system from dialing the number, touch Conference.
- Page 184 To remove a number from a Disallowed List: Slide the T/P switch to P and touch Administer. Dial *09 followed by the Disallowed List code (01-20) that you want to remove. Touch Administer. Leave administration mode by sliding the T/P switch to the center position.
- Page 185 Display Unit Some 34-Button speakerphone voice terminals, namely, the BIS-34D and the DESCRIPTION 34-Button (SP-34D) voice terminal with display, are equipped with a display unit. You can also purchase one separately and add it later to a 34-Button (SP-34) voice terminal. To order the Display Unit, call the AT&T National Sales Parts Center’s tollfree number, 1-800-222-PART, and ask for order number 105400030 (for black BIS-34 voice terminals).
- Page 186 None ADMINISTRATION None PROGRAMMING To use the four features associated with the display unit, follow the instructions HOW TO USE on the next few pages. Received Call ID When you receive an intercom call, the 2-digit intercom number of the person calling you appears on the screen, as shown below.
- Page 187 If you touch a preassigned, or nonprogrammable button, such as Conference or Hold, the following message appears on the display screen: Not Programmable Error You can use nonprogrammable buttons, such as Hold or Recall to enter NOTE: a special character, such as a pause or a stop, into a dialing sequence. Number Dialed When you dial outside, intercom, or account numbers, or touch a button that contain numbers, such as an Outside Auto Dial, Auto Intercom, Last Number...
- Page 188 Setting the Alarm Alarm setting display screen ALARM: Off 12:00 p Alarm Alarm set for status 12:00 p.m. To set the alarm (for example, when you want a reminder that you have a meeting in five minutes): Press Set until the item you want to change flashes. Press Fwd or Rev to advance or reverse the time until the display shows the time you want the alarm to sound.
- Page 189 Do Not Disturb (DND) When you are busy and do not want to receive calls, you can touch the DESCRIPTION Do Not Disturb button, if you have programmed one onto your voice terminal. When you receive outside calls, the green light next to the line button flashes, but your voice terminal does not ring.
- Page 190 To prevent calls from ringing at your voice terminal: HOW TO USE Touch Do Not Disturb. The green light next to the button goes on. Do Not Disturb This feature remains active until you: Touch Do Not Disturb again. The green light next to the button goes off. Do Not Disturb MERLIN Plus System Features...
- Page 191 Drop If you get a busy signal or no answer as you setup a conference call, or if you DESCRIPTION want to disconnect one outside line at a time from a conference call, use the Drop feature For more information about using this feature, see “Conference.” CONSIDERATIONS If you press the switchhook, you may disconnect everyone on the conference call.
-
Page 192: Group Listening
Group Listening If you want other people in your office to hear a call, you can turn on your voice DESCRIPTION terminal speaker. Everyone can then hear the voice of the other person on the call without that person being aware that the call is on a speaker. This feature is not available on the BIS model voice terminals. -
Page 193: Group Page
Group Page The system administrator can set up Group Page groups so anyone in the system DESCRIPTION can use the Group Page feature to page up to 20 people at a time directly through the voice terminal speakers. You can have up to three paging groups. The Page-All group consists of all voice terminals in the system;... - Page 194 Perform the appropriate procedure: > Touch the appropriate Auto Intercom button(s) until the green light beside it shows the paging group assignment you prefer. Green light on = voice terminal is assigned to the group Green light off = voice terminal is not assigned to the group >...
- Page 195 Touch Administer. The console beeps twice. Leave administration mode by sliding the T/P switch to the center position. Drop Administer 71 or Administer PROGRAMMING To program a Group Page button for your voice terminal: Label the button Group Page plus a group number. Slide the T/P switch to P.
- Page 196 group using a dial code: To page a Intercom. Touch Speakerphone or lift your handset. Touch Dial the code for the group you want to page: 70 = Page-All (all voice terminals in the system) 71 = group 1 72 = group 2 When you hear a beep, begin speaking.
- Page 197 Hands-Free Answer on Intercom (HFAI) If you are using a voice terminal that has a Hands-Free Answer on Intercom DESCRIPTION (HFAI) button on it, without lifting your handset, you can touch the HFAI or HFAI/Mic button when you want to answer intercom calls hands free. You will hear the other person’s voice through your voice terminal speaker.
- Page 198 If you have a HFAI button on your voice terminal and you want your intercom HOW TO USE calls answered automatically: Touch HFAI or touch HFAI/Mic. The green light flahes on BIS-10 and 10-Button HFAI models when active on a call and remains steady on all other BIS models.
- Page 199 Hold When you need to put someone on hold, use the Hold feature. DESCRIPTION Before placing an intercom call on hold that has been answered using the HFAI CONSIDERATIONS feature, lift the handset or the call will be disconnected. When you leave a call on hold for more than a minute, your voice terminal rings at one minute intervals to remind you the call is still on hold.
-
Page 200: Hold Disconnect Interval
Hold Disconnect Interval Telephone company central offices use either a “short” (50 millisecond) or a DESCRIPTION “long” (450 millisecond) disconnect interval. Because most switching systems use along interval, your MERLIN Plus system is factory-set for a long interval. If your telephone company uses a short interval, or if your MERLIN Plus system has been reprogrammed, the disconnect interval for your system may cause problems with held calls. - Page 201 Touch Administer. the center position. Leave administration mode by sliding the T/P switch to 555-1234 Administer Administer None PROGRAMMING HOW TO USE None MERLIN Plus System Features 5-82...
- Page 202 Hold-Exclusive DESCRIPTION By programming the Exclusive Hold feature onto a button, you can put an outside caller on Exclusive Hold, which means that no one else at another voice terminal in the system can pick up the held call. This feature must be programmed on a button with a green light. CONSIDERATIONS To place a call on normal hold, after it’s been placed on Exclusive Hold, or vice versa, you must reconnect with the caller before touching the hold button.
- Page 203 pick up the call that you have put on Exclusive Hold. Touch the line button of the held call. 555-1234 To place a call on normal hold after it’s been placed on Exclusive Hold: Touch the line button of the held call. Touch Hold.
- Page 204 Hold Retrieve If you do not have a line button for a call that you have received or that has been DESCRIPTION transferred to you, you can still put it on hold using the Hold button. However, to retrieve the call, you must use a dial code or program a Retrieve Call button. To use this feature, you can either program a button or use a dial code.
- Page 205 You can use a programmed button or a dial code for the Hold Retrieve feature. To use a Retrieve Call button to retrieve a held call: Touch Retrieve Call. Retrieve Call To use a dial code to retrieve a held call: Dial #*.
- Page 206 Intercom Each voice terminal connected to the MERLIN Plus system has a unique 2-digit DESCRIPTION intercom number. You can dial intercom numbers to place calls to people connected to the system. In the MERLIN Plus system, you place an intercom call with a voice CONSIDERATIONS announcement.
- Page 207 Preference Intercom Intercom Preference provides an intercom line immediately upon touching DESCRIPTION Speakerphone or lifting the handset. If you are at a voice terminal that either has Intercom Preference or has no CONSIDERATIONS outside lines assigned to it, you will be connected to an intercom line when you touch Speakerphone or lift your handset.
-
Page 208: Last Number Dial
Last Number Dial With a Last Number Dial button, you can redial with one touch the number you DESCRIPTION dialed most recently. Each time you want this feature to redial a number, you must touch the programmed Last Number Dial button. You do not need to do anything to save this number. - Page 209 You can use a programmed button or a dial code to access this feature. HOW TO USE If you are using the Last Number Dial feature, can follow this procedure to have the system redial the last number you dialed: Without touching Speakerphone or lifting your handset, touch Last Number, or dial #24 if you haven’t reprogrammed this as a personal speed dial code.
-
Page 210: Speakerphone Button
Lights The lights next to the line buttons on your MERLIN Plus system voice terminal DESCRIPTION give you immediate status of any of your lines. There is also a light next to the Message button, and, on most voice terminals, there is a light next to the Speakerphone button. - Page 211 None CONSIDERATIONS None ADMINISTRATION None PROGRAMMING None HOW TO USE 5-92 MERLIN Plus System Features...
-
Page 212: Line Request
Line Request If any or all the lines that appear on your voice terminal are busy, you can still DESCRIPTION request the use of one of these intercom or outside lines. When the line becomes available, the system alerts you. If two or more people request the same line, the system places them in a queue CONSIDERATIONS according to the sequence in which the people requested the line. -
Page 213: Line Select
Line Select You may need to make an outside call at a time when you also need to leave DESCRIPTION your primary line open for incoming calls. If your voice terminal has more than one outside line, you can select a line other than your primary line for an outside call. - Page 214 Loudspeaker Paging This feature is used with an optional loudspeaker paging system and is NOTE: compatible with paging systems with talkback. Refer to “Loudspeaker Paging System” under “Accessories” at the end of this section for more information. If you have a Loudspeaker Paging System connected to the MERLIN Plus DESCRIPTION system, you can page people, make announcements, and provide background music (if available) throughout the building.
- Page 215 If your loudspeaker paging system is connected to a CO line, follow this HOW TO USE procedure: Touch the loudspeaker page’s line button. Follow the instructions provided with your loudspeaker page system. Ldsp. Page If your loudspeaker paging system is connected to the page jack on the control unit, you can use a programmed button or a dial code to access the Loudspeaker Page feature.
-
Page 216: Manual Signaling
Manual Signaling You can use a Manual Signaling button to generate a beep at a co-worker’s voice DESCRIPTION terminal. Most often, this feature is used by a boss who wants to buzz his or her secretary. Assign a Manual Signaling button to each person you want to signal. You can signal someone with a Manual Signaling button while you have an CONSIDERATIONS outside call in progress. - Page 217 To signal a co-worker: HOW TO USE Without lifting your handset, touch a Manual Signaling button. The signal is heard as long as you continue to touch the button. Signal Mary To place an intercom call using a Manual Signaling button: Touch Intercom.
- Page 218 Message When the light next to the Message button is on, your MERLIN Plus system DESCRIPTION attendant has a message for you. Your Message light can only be turned on from the administrator/attendant CONSIDERATIONS console. If the attendant is using a BIS-22 and the system has more than 10 voice terminals, refer to “Send Message”...
- Page 219 Monitor-on-Hold This feature is only for use with voice terminals that have a speaker button but DESCRIPTION not a speakerphone button. When someone puts your call on hold, you can turn on your voice terminal’s built-in speaker, hang up, and continue working while you wait for the person to return to the call.
-
Page 220: Night Service
Night Service When the person who usually answers calls leaves for the day, you can make DESCRIPTION answering calls after hours easy for night shift personnel and security guards by providing Night Service for your office. You can implement Night Service one of three ways: Provide the person with a voice terminal that has all the lines, or have the person monitor the attendant console and answer calls there. - Page 221 For further information on the attendant console, see Section 4, “Using the HOW TO USE Attendant Console.” If you need help in using the Call Pickup, the Ring Override, or the Call Forwarding features, see the entries “Call Pickup,” “Ring Override,” or “Call Forwarding” in this section. 5-102 MERLIN Plus System Features...
- Page 222 One-Touch Dialing In the MERLIN Plus system, there are six features that allow you to dial or redial DESCRIPTION a telephone number with the touch of a button. Outside Auto Dial — Dial an outside number by touching a button. An Outside Auto Dial button can hold a maximum of 16 digits.
-
Page 223: On-Hook Dialing
On-Hook Dialing Instead of using your handset to listen while you place a call, you may want to DESCRIPTION use your voice terminal’s built-in speaker. When instructions in this guide tell you to lift your handset before dialing, CONSIDERATIONS you may choose to leave your handset on-hook and use the speaker instead. If you have a Speakerphone button, you can use it when you dial a call, so you can speak with people hands-free. -
Page 224: Outside Auto Dial
Outside Auto Dial You can use Outside Auto Dial to dial frequently used numbers and codes with DESCRIPTION one touch. These numbers and codes can include telephone numbers, and PBX, Centrex, or Custom Calling feature codes. You can include up to 16 numbers and special characters in an Outside Auto Dial sequence. - Page 225 To program an Outside Auto Dial button for your voice terminal: PROGRAMMING Label the button with a name and/or a number. Slide the T/P switch to P. The voice terminal rings every 5 seconds to remind you that you are programming and that you cannot place or receive calls.
-
Page 226: Personal Lines
Personal Lines When the system administrator assigns lines to voice terminals, he or she can DESCRIPTION select lines that will serve as personal lines for individuals in the business, such as the president of the company. N one else has these lines on his or her voice terminal. - Page 227 None PROGRAMMING You can begin speaking when a call comes in on your personal line. If you want HOW TO USE your personal line to be the first line in your Automatic Line Selection sequence, tell your system administrator when he or she administers that feature for your voice terminal.
-
Page 228: Personal Speed Dial
Personal Speed Dial If you don’t have many available buttons on which to program Outside Auto DESCRIPTION Dial, you can use the programming instructions below to assign a 3-character Personal Speed Dial code (from #01 through #24 for BIS-10 models and from #01 through #12 for BIS-22 models) to telephone numbers, PBX, Centrex, or Custom Calling feature codes you frequently dial. - Page 229 From a BIS-10 Voice Terminal If you are using a BIS-10 voice terminal, use the following procedure to program a Personal Speed Dial sequence: Slide the T/P switch to P. The voice terminal rings every 5 seconds to remind you that you are programming and that you cannot place or receive calls.
- Page 230 From a BIS-10 Voice Terminal HOW TO USE To place a call using a Personal Speed Dial code: Touch Speakerphone or lift the handset. Dial a Personal Speed Dial code (#01 through #24). If you programmed the special character STOP in a personal speed dial sequence, after you hear the second dial tone, dial the Personal Speed Dial code again to continue the dialing.
-
Page 231: Personalized Ringing
Personalized Ringing To make it easy for the right person to pick up calls in a group office, people in DESCRIPTION this type of office may want to program their voice terminals with a ringing pattern that is easier for each person to identify. There are eight different ringing patterns available. - Page 232 Privacy If you share an outside line with other people, you may choose to program a DESCRIPTION Privacy button that allows you to control when others may join or monitor your telephone conversations. None CONSIDERATIONS None ADMINISTRATION PROGRAMMING The Privacy feature requires a button with lights. To program a Privacy button for your voice terminal: Label the button Privacy.
- Page 233 A and E) Privacy (on Lines The system administrator can administer the Privacy feature for Line A and/or DESCRIPTION Line E so that no one in the system can bridge onto or monitor these lines while a device plugged into the Aux jack is off-hook on Line A or Line E. (See “Auxiliary Lines.”) CONSIDERATIONS This feature is used for a modem, facsimile machine, or other equipment...
- Page 234 Program By using the Test/Program switch and following the instructions listed below, DESCRIPTION you can program features that you have selected for your voice terminal onto available buttons. There are several programmable features that you can use with either a button or CONSIDERATIONS a dial code.
- Page 235 Touch the first button you want to program. Dial the required programming code and any other numbers required. Touch the second button you want to program and dial the required programming code and numbers. Continue to follow this procedure for all other buttons you want to program.
- Page 236 Program Mode Lock The system administrator may choose to disable (or “lock”) the programming DESCRIPTION function at an individual voice terminal so that the person at the voice terminal cannot change the programmed assignments. When a voice terminal’s T/P switch is locked, programming for that voice terminal can be done only at the administrator/attendant console.
- Page 237 Perform one of the following procedures: > Touch the Auto Intercom button of the voice terminal that you are administering. Green light on = the voice terminal is locked. Green light off = programming can be done from the voice terminal. >...
- Page 238 Touch Administer. The console beeps twice. Leave administration mode by sliding the T/P switch to the center position. Conference Administer Administer None PROGRAMMING HOW TO USE Check with your system administrator to see if you can program features at your voice terminal or if programming can be done only at the administrator/attendant console.
- Page 239 Recall DESCRIPTION If you are on a PBX or Centrex system, you can use the Recall feature when directions tell you to include a switchhook flash. CONSIDERATIONS By touching the Recall button, you will get one of the following: A new dial tone. Access to Custom-calling services.
- Page 240 Remote Line Access (RLA) Remote Line Access (RLA) is an ASA feature and therefore, requires NOTE: the assignment of the ASA jack. If the ASA jack assignment has not yet been made, refer to “Automatic System Access” in this section before attempting to administer this feature.
- Page 241 Call Forwarding should be used only at night if your system has one or more MERLIN Attendants, and you do not have dedicated lines for Call Forwarding. To use Call Forwarding at night with the MERLIN Attendant, activate this feature before leaving the office at the end of the business day, and deactivate it as soon as your business day begins.
- Page 242 Passwords You and others in your business must enter a password to use RLA. The password is 5-digits and must be entered in order to gain access to an outside line using RLA or to change the current call forward number from a remote location.
- Page 243 A button with a green light next to it is recommended for the RLA feature. PROGRAMMING To program an RLA button on a voice terminal: Label the button RLA. Slide the T/P switch to P. The voice terminal rings every 5 seconds to remind you that you’re programming and can’t receive or place calls.
- Page 244 When you have finished responding to the voice prompts, you will hear normal call-progress tones (ringing, busy signal, fast busy signal, etc.). Complete your call as usual. If the system is in either CF or DXD mode, you can gain access to a line in the RLA outgoing line group from a remote location by following this procedure.
- Page 245 Ring Override Sometimes you may want all of your calls to ring immediately, even if you have DESCRIPTION programmed the lines on your voice terminal to ring after a delay or not at all. (See “Ringing Options.”) For instance, you may need to cover calls for someone who shares one of your lines.
-
Page 246: Ringing Line Preference
Ringing Line Preference When you receive an outside call, the MERLIN Plus system automatically DESCRIPTION connects you to the ringing line. If you want to place an outside call while one of the lines on your voice terminal CONSIDERATIONS is ringing or in use, touch the line button of the line you want to use. When you touch Speakerphone or lift the handset, the MERLIN Plus system connects you to the line you have selected. -
Page 247: Ringing Options
Ringing Options You can designate incoming calls to ring immediately at your voice terminal, DESCRIPTION ring at a second voice terminal if they are not answered at the first one after two rings (delayed ring), or not ring at all. When your system is installed, the lines at each voice terminal ring immediately when a call comes in on them. - Page 248 To program the line ringing option you prefer: PROGRAMMING Slide the T/P switch to P. Touch the line button for which you want to program immediate, delayed, or no ringing. Dial one of these codes for the type of ringing you want the line to have: >...
-
Page 249: Saved Number Dial
Saved Number Dial If you have programmed a Saved Number Dial button, you can use the button to DESCRIPTION save an important number for one-touch dialing at a later time. If the number you call is busy or no one answers, or if you need to call the person back, you can save that number by touching Saved Number before you hang up. - Page 250 You can use a programmed button or a dial code to access this feature. HOW TO USE To save a number for redialing: Before you touch Speakerphone or hang up your handset from a call in progress, touch Saved Number or dial #23, if you haven’t already programmed this personal speed dial code.
-
Page 251: Send Message
Send Message The system attendant can turn on the Message light at the voice terminals of DESCRIPTION people in the MERLIN Plus system in order to alert them that they have a message. (See “Message.”) The Message light at voice terminals in the system can only be turned on at the CONSIDERATIONS attendant/administrator voice terminal. - Page 252 From a BIS-22 Console If you are using a BIS-22 console, use one of the following procedures to turn on the message light at a voice terminal: At the administrator/attendant console, touch Send Message. Follow one of these procedures: > Touch an Auto Intercom button that the attendant has programmed for the person.
- Page 253 Speaker If your voice terminal does not have a speakerphone button, you can use your DESCRIPTION voice terminal speaker when you have dialed a call or been put on hold to monitor a line without lifting your handset. You can also allow others in your office to hear a conversation while you have a call in progress.
- Page 254 If the line is busy, or if you get no answer: Touch Speaker to cancel the call. Speaker use Monitor-on-Hold: When you have been put on hold, touch Speaker. Hang up. When you hear the other person return to the call, lift your handset and continue the call.
- Page 255 Special Characters in Dialing Sequences You may need to program a pause, stop, or switchhook flash into an Outside DESCRIPTION Auto Dial, a Personal Speed Dial, a Disallowed List, or a System Speed Dial sequence, or may need to switch from rotary to Touchstone signals in the middle of a programmed dialing sequence.
- Page 256 Stop Program a stop into a dialing sequence to wait for a second dial tone. For example, you may need to program a stop between a local telephone number and an alternate long distance authorization code. Dial the local telephone number (seven digits). Touch Drop (Stop).
- Page 257 System Answer (SA) System Answer is an ASA feature and therefore requires the assignment NOTE: DESCRIPTION of the ASA jack. If the ASA jack assignment has not yet been made, refer to “Automatic System Access” in this section before attempting to administer this feature.
- Page 258 Follow the administration procedure under “Automatic System Access” in this ADMINISTRATION section, for ASA jack assignments. If your responsibilities do not include administration, skip this information. SA Line Groups To add lines that can be answered by SA: Enter administration mode by sliding T/P to P and touching Administer. Dial *75.
- Page 259 Voice Message To select a message to be played to the caller for lines answered by SA: Enter administration mode by sliding T/P to P and touching Administer. Dial *77 followed by the option desired. (Message 2 is the default): No voice message;...
- Page 260 To activate the System Answer feature: HOW TO USE Touch System Answer. Green light on = SA on Green light off = SA off Green light flushing = Problem with SA If the green SA light is flashing, report the problem to the system administrator who should refer to Section 7, “Troubleshooting,”...
- Page 261 (SFR) System Feature Report This feature is used with a MERLIN Plus system data collector and an NOTE: AT&T 475/476 or 572/573 printer or equivalent. If the system administrator needs to verify the features administered to the DESCRIPTION system or needs a written copy of the lines and features on each voice terminal, he or she can use the data collector and the printer to print a System Feature Report.
- Page 262 FIGURE 5-3 A printout of a typical System Feature Report. SYSTEM ADMINISTRATION OPTIONE Data: 04.01.89 Time: 05:55:45 MISCELLANEOUS FEATURES: (*14) MUSIC-ON-HOLD VOLUME MEDIUM MEDIUM (*13) A 2. BACKGROUND MUSIC VOLUME IS: TRANSFER RETURN (*2): rings TOLL PREFIX: 4. L0NG (*38) DISTANCE DIALING: TOUCH TONE (*38)
- Page 263 If your responsibilities do not include system administration, skip this ADMINISTRATION information. To set the date and the time, to assign a voice terminal jack for the System Feature Report, and to print or to cancel a report, use the following procedures. The Date and the Time (If you have already set the date and time for the Call Report feature, you don’t have to do it again.)
- Page 264 Control Unit Jack Assignment for the System Feature Report To assign a voice terminal jack on the control unit for the System Feature Report: The system is factory-set to have the data collector and printer NOTE: connected to voice terminal jack 19 for the System Feature Report feature.
- Page 265 System Administration Report To print out a system administration report only: Enter administration mode by sliding the T/P switch to P and touching Administer. Dial *61. The printer prints the report as it receives data from the system. Touch Administer. The console beeps twice.
- Page 266 Printout Cancellation To cancel a printout in progress and to delete all waiting report requests: Enter administration mode by sliding the T/P switch to P and touching Administer. Dial *63. The printer stops printing. Touch Administer. The console beeps twice. Leave administration mode by sliding the T/P switch to the center position.
-
Page 267: System Reset
System Reset This feature is intended for service personnel only. WARNING: When the service person or the administrator uses System Reset, the entire DESCRIPTION MERLIN Plus system is set to the initial feature assignments, and consequently erases any system administration, such as System Speed Dial numbers or call restrictions. - Page 268 PROGRAMMING None This feature is recommended for service personnel only. HOW TO USE 5-149 MERLIN Plus System Features...
- Page 269 System Speed Dial The administrator can store System Speed Dial codes for telephone numbers, DESCRIPTION such as a warehouse number or a branch office number, and account numbers that people in the office frequently use. People can then dial the number simply by dialing the proper Speed Dial code.
- Page 270 It is sometimes necessary to include a pause, stop, or switchhook flash, or to switch from rotary to Touch-Tone signals within a dialing sequence. To do so, the administrator must enler one or more of the following special characters into the dialing sequence.
- Page 271 Dial one of the following codes: > Dial *90 to assign the Speed Dial code (without Restriction Override). For example, if you want the Speed Dial number to have the same restrictions as the actual telephone number, that is, call or toll restrictions still apply with this number, dial the System Speed Dial code (such as #67 or #936),*90, and then the telephone number.
- Page 272 In order to use the System Speed Dial feature, you can use a Speed Dial code or HOW TO USE touch a programmed button. To place a call by dialing a System Speed Dial code: Touch Speakerphone or lift your handset. Dial a System Speed Dial code (#60 through #89 or #900 through #999).
- Page 273 Test When you need to test the lights and the ringing on your voice terminal, or if you DESCRIPTION need to verify that your voice terminal has been installed correctly, you can use the Test/Program (T/P) switch on the left side of your voice terminal. If your system administrator has administered the Program Mode Lock feature CONSIDERATIONS for your voice terminal, you cannot use the T/P switch for changing programmed...
- Page 274 Toll Prefix Setting In most telephone systems people must dial a toll prefix (a 1 or a 0) before they DESCRIPTION dial an area code and telephone number. When the MERLIN Plus system is installed, it is set for dialing a toll prefix. If people in your system don’t need to dial a toll prefix, the system administrator must set the system for dialing the area code only.
- Page 275 Tones Your MERLIN Plus system and your voice terminal provide the following tones DESCRIPTION to inform you of the progress of a call you are placing or are about to place. There are also tones that let you know you are in administration or programming mode and a tone to tell you that your voice terminal is working satisfactorily.
- Page 276 The MERLIN Plus system also provides you with the following ringing sounds or voice announcements so that you know immediately what kind of call you are receiving. If you hear this type of ring or You are receiving this kind of call announcement Transferred Call One short and one long ring...
- Page 277 Touch-Tone Enable This feature is for rotary lines only. NOTE: DESCRIPTION If you have telephone lines that carry rotary signals, use the Touch-Tone Enable feature to switch to Touch-Tone signals midway through a dialing sequence. This lets you take advantage of bank-by-phone, credit card authorization, computer access, and alternate long distance services.
- Page 278 Touch-Tone or Rotary Setting When the MERLIN Plus system is installed, it is set to generate Touch-Tone DESCRIPTION signals. If any of the system’s lines are rotary, the administrator must reset the system to rotary dialing by entering a code at the administrator/attendant console.
- Page 279 Transfer You can use your voice terminal Transfer button to transfer outside calls to DESCRIPTION someone else in your MERLIN Plus system. There are three ways to transfer calls: Option A—Simple Transfer You can ask the person to whom you are transferring the call if he or she wants to accept the call.
- Page 280 Announce the call and ask if it will reaccepted. Touch the held call’s line button. Advise the caller. Hang up. Hold Susan 15 555-1234 Pause Yes? Advise the person to touch the appropriate line button. Hang Up. To transfer a call using Option B, One-Touch Transfer: With the call in progress, touch the Auto Intercom button of the person to whom you want to transfer the call.
-
Page 281: Transfer Return Interval
Transfer Return Interval When someone in the MERLIN Plus system transfers a call and it is not DESCRIPTION answered, the call returns to the sender. When the system is first installed, it is set to return calls after four rings. The system administrator can change that setting so that calls ring as many as nine times before they return to the person who has transferred it. - Page 282 Voice Announcement Enable/Disable intercom feature to Ordinarily, people can use the MERLIN Plus system DESCRIPTION However, if you do not announce calls through your voice terminal speaker. want a voice announcement to interrupt your work, you can use the Voice Announcement Disable feature to have intercom calls ring at your voice terminal instead.
- Page 283 Voice Terminal Templates During administration, it may be useful to use the four voice terminal templates DESCRIPTION already designed for typical business uses, rather than program each voice terminal individually. The four templates are: The Clear Template: This template is used for erasing previous voice terminal features so that new features can be assigned.
- Page 284 Touch the Auto Intercom button or dial the intercom number of the target voice terminal. The console beeps twice after each voice terminal is administered a template. Label the target voice terminal with the lines and features provided NOTE: by the assigned template. Touch Administer.
-
Page 285: Quick Reference Guide To Merlin Plus Features
Quick Reference Guide to MERLIN Plus Features The table below lists the preassigned and programmable features available from your MERLIN Plus system voice terminal. Those features that can also be accessed by using a dial code are identified with a “ †.” Each feature is listed by function, followed by a brief description. - Page 286 Preassigned or Programmable Feature Name Description Programming Code CALL-HANDLING REPORTS Programmable Dial *82 Enter an account number on a Call Account Number Entry Report (SMDR) by dialing the number or a System Speed Dial code Programmable Dial *88 + an account number Account Number Entry Enter an account number on a with one touch...
- Page 287 Preassigned or Programmable Programming Code Description Feature Name PAGING Programmable† Dial *91 + one of the following codes: Page a group of people through their Group Page 70 for all voice terminals voice terminal speakers 71 for Group 1 72 for Group 2 Programmable†...
- Page 288 Preassigned or Programming Code Programmable Description Feature Name INTEROFFICE COMMUNICATION Programmable Dial *6 + an intercom number Signal someone within your MERLIN Manual Signaling Plus system The attendant touches Send Message + Preassigned Know when the attendant has taken a Message an intercom number message for you...
-
Page 289: Quick Reference Guide To Using The Asa Features
Quick Reference Guide to Using the ASA Features Do This Procedure Repeatedly touch the CF/DXD button until the red and green light next Using the CF/DXD Button to the button show the ASA mode you want the system to be in. Red and green light off = the system is in the normal mode (calls coming into the system are handled normally) Green light on = the system is in DXD mode... -
Page 290: Quick Reference Guide To Programming Codes
Quick Reference Guide to Programming Codes Feature Other Numbers/Buttons Programming Codes Manual Signaling an intercom number Busy Buster Ringing Options, no ring Ringing Options, delayed ring Ringing Options, immediate ring Voice Announcement Enable Voice Announcement Disable System Answer Auto Answer Intercom Do Not Disturb Privacy Last Number Dial... -
Page 291: Section 6: Accessory Equipment
Section 6: Accessory Equipment... -
Page 292: Accessory Equipment
Accessory Equipment Once you have set up your MERLIN Plus system, you may decide to purchase additional hardware such as a headset that the system attendant can use for easier call-handling or a basic telephone that is connected to the MERLIN Plus system and can be used off-premises. -
Page 293: Answering Machines
Answering Machines DESCRIPTION Answering machines can be used as back-up “voice mailboxes” with any telephone in your MERLIN Plus system. MERLIN Plus is compatible with many of the most widely used answering machines, including AT&T models 1321 and 1323. Consult the user manual supplied with your answering machine for specific information on installing your answering machine and using its features. - Page 294 — Toll Saver Most answering machines allow you to determine whether or not you have messages by dialing your telephone number from an outside telephone and counting the number of rings. The answering machine will take longer (usually four rings) to answer the first call than to answer subsequent calls (usually two rings).
-
Page 295: Basic Telephones
Basic Telephones Basic Touch-Tone telephones can provide regular phone service and can use DESCRIPTION many of the features of your communication system using dial codes and switchhook flashes. The table below shows the telephones that are compatible with the MERLIN Plus system and the possible connections: Connect To Compatible Telephones AUX port... - Page 296 Basic telephones are able to receive ringing intercom calls, but not intercom calls with voice announcement. Therefore, you must program the Voice Announcement Disable feature for the telephone. In order to program Voice Announcement Disable, Ringing Options, or an Automatic Line Selection sequence for the basic telephone, the system administrator can use the Centralized Programming feature on the administrator/attendant console.
- Page 297 If you want to change the order in which the system selects available lines for this telephone, assign an Automatic Line Selection sequence. While in programming mode, dial **. Touch the line buttons in the order you want them to be selected. When you are finished programming the basic telephone, slide the T/P switch to the center position.
-
Page 298: Basic Telephone And Modem Interface 2
Basic Telephone and Modem Interface 2 The Basic Telephone and Modem Interface 2 (BTMI 2) allows you to connect DESCRIPTION most types of telephone and data devices to your MERLIN Plus system, including auto-dial modems, facsimile machines, credit phones, and the MERLIN Attendant. - Page 299 The BTMI 2 works with Touch-Tone and rotary telephones. CONSIDERATIONS None ADMINISTRATION If you do not want the basic telephone to ring on every line, you can specify PROGRAMMING which lines ring when a call comes in using Ringing Options and programming the lines for immediate or no ring.
-
Page 300: Data Collector And Printer
Data Collector and Printer The MERLIN Plus system Data Collector uses information from the Call Report DESCRIPTION and System Feature Report features and transmits the material from the MERLIN Plus system to a printer or to a PC with a standard RS232-C, 1200 baud, serial interface. - Page 301 An AT&T 475/476 or 572/573 printer or its equivalent is recommended to work CONSIDERATIONS with the MERLIN Plus system data collector. The MERLIN Plus system is set to have the data collector and the printer connected to voice terminal jack 19, but the administrator can connect the data collector and the printer to any other voice terminal jack in the system, except jack 10.
-
Page 302: Doorphone Controller
Doorphone Controller A Doorphone Controller (DAC-1Z) can be connected to your MERLIN Plus DESCRIPTION system to allow employees to answer calls made from a business entrance. The controller is connected directly to a CO line port on the MERLIN PLUS control unit. - Page 303 You must have a licensed locksmith install any locks or electric strikeplates used CONSIDERATIONS for doorphone operation. Although the Doorphone Controller can be configured to connect to either a Central Office (CO) port or a station port, it is recommended that only the CO port connection be used.
-
Page 304: General Purpose Adapter (Gpa)
General Purpose Adapter (GPA) With the General Purpose Adapter (GPA) you can connect to your voice DESCRIPTION terminal’s Touch-Tone (not rotary) equipment such as manual dial modems, auto dialers, answering machines, and telephone extensions (including cordless telephones). See Figure 6-5. FIGURE 6-6 A modem, PC and a voice terminal connected to a GPA (back view). - Page 305 You can select the switch position, labeled Join, Basic, or Auto on the adapter, HOW TO USE required for operating the telephone or data equipment. When you have made the appropriate selection for your needs, slide the three-position option switch to the selected mode of operation.
-
Page 306: Headset And Headset Adapter
Headset and Headset Adapter A Headset connected to your voice terminal by way of the Headset Adapter DESCRIPTION allows you to handle calls more easily. See Figure 6-6. FIGURE 6-7 A headset connected to the headset adapter. Line Other A headset cannot be used with a 5-button or a lo-button HFAI voice terminal. CONSIDERATIONS The cord on the headset is plugged into the headset adapter, and the voice terminal and the adapter are connected by way of a modular cord which comes... - Page 307 To mute the microphone: Hold down On/Quiet on the headset adapter. To hang Up: Touch Off on the headset adapter. The green light next to On/Quiet goes off.. 6-16 Accessory Equipment...
-
Page 308: Loudspeaker Paging System
Loudspeaker Paging System If you have a compatible loudspeaker paging system, you can connect it to the DESCRIPTION MERLIN Plus system either through the page jack on the control unit or through a CO (outside) line jack on a line module as shown in Figures 6-7 and 6-8. can then page people, make announcements, and provide background music (if available) throughout the building. - Page 309 FIGURE 6-9 Loudspeaker Paging System connected to a CO Line on a Line Module. MERLIN Plus control unit Loudspeaker paging system CONSIDERATIONS Considerations for the Page Jack connection: The loudness of the loudspeaker paging system is controlled by the loudspeaker paging system only.
- Page 310 Considerations for CO line connection: If the paging unit is connected to a CO port but is administered as a paging port, it is treated differently than a CO line, and has the following restrictions: An auxiliary jack cannot be used as a paging port. Conferencing to this paging port or adding this port to a conference call is prohibited.
- Page 311 Administration procedures for CO line connection: Slide the T/P switch to P and touch Administer. Dial *91 Touch the button for the line you want to be the paging port. Green light on = line added to paging port Green light off = line removed from paging port Touch Administer.
-
Page 312: Music-On-Hold (Moh) And Background Music
Music-on-Hold (MOH) and Background Music When you have Music-on-Hold, you can provide background music for callers DESCRIPTION whom you have placed on hold. The Music-on-Hold (MOH) Jack is an RCA-type phonograph jack, into which you can plug an audio system. It is on the front of the control unit behind the top cover under the red warning and the green power lights as seen in Figure 6-9. - Page 313 You should use the Music-on-Hold feature with DXD so that callers can hear music when they are placed on hold. See “Direct Extension Dialing” in this section. You can also use the Music-on-Hold feature with System Answer, so that callers hear a special prerecorded message or music while they are waiting.
-
Page 314: Supplemental Alert Adapter (Saa)
Supplemental Alert Adapter (SAA) You can connect Extra Alert Devices, such as a bell, hom, strobe, or chime, to DESCRIPTION your system so that people working in noisy or remote areas of a building can be alerted when a call rings. See Figure 6-10. When activate the Supplemental Alert Adapter (SAA) and a voice terminal rings, the adapter automatically activates the connected extra alert device, which gives a visual or audible signal... - Page 315 If you want to use extra-alerting devices simultaneously, you need to plug the modular cord for each device into a Line Bridging Adapter which you can connect to either position (1) or position (2) on the bottom of the extra alert switch.
-
Page 316: Section 7: Troubleshooting The System
Section 7: Troubleshooting the System... -
Page 317: Troubleshooting Procedures
Troubleshooting Procedures As with any piece of equipment, there are times when some parts of your MERLIN Plus Communication System may not be working properly. Rather than call someone immediately, you can often determine the cause of the problem yourself. Simply follow the step-by-step procedures outlined in this section. - Page 318 Possible Cause 3: Call Restriction feature activated on malfunctioning voice terminal. Then Do This Deactivate the feature The feature is activated on Refer to Section 5, the malfunctioning voice following the instructions in “Reference,” to learn how to Section 5, “Reference.” terminals administer the call Restriction feature.
- Page 319 Possible Cause 6: Faulty telephone company wiring. Do This Then The trouble appears on the At the control unit location, Go to Possible Cause 7. basic telephone and the find the network interface network interface uses a line associated with the outside adapter line from which you cannot make a call.
- Page 320 Possible Cause 1: Volume control is set too low. SYMPTOM: A VOICE TERMINAL DOESN’T RING. Then Do This Go to Possible Cause 2. The voice terminal still Slide the volume control to a doesn't ring high setting. Possible Cause 2: Voice terminal is administered not to ring.
- Page 321 Possible Cause 1: Cable connection, power supply, or voice terminal. SYMPTOM: TROUBLE WITH VOICE TERMINAL LIGHTS, SPEAKER, AND Do This Then RINGING. All the red and green lights Slide the T/P switch on the The voice terminal is side of the voice terminal to flash alternately and a tone working properly.
- Page 322 Possible Cause 3: Cable connections. Do This Then The trouble occurs on the The problem is caused by Step 1. previously working voice your control unit. Call your Go to the control unit and terminal equipment supplier for locate the intercom jack for assistance.
- Page 323 SYMPTOM: Possible Cause: Voice terminal is connected to the port that is administered for A VOICE TERMINAL Busy Buster (BB). SPONTANEOUSLY PLACES CALLS. Do This Then Move the voice terminal to The voice terminal should no Check the control unit to see if the voice terminal is another port longer spontaneously place...
- Page 324 Possible Cause 3: Faulty power outlet. Do This Then The appliance doesn't work The outlet is faulty. Test the outlet by plugging in an appliance such as a Go to Possible Cause 4. The appliance works lamp or a radio. Possible Cause 4: A module is loose.
- Page 325 Possible Cause 2: The Hold Disconnect Interval setting is different than the local telephone company’s central office. Do This Then The Hold Disconnect You’ve solved the problem. Refer to “Hold Disconnect Interval is set to 450 Interval” in Section 5, milliseconds (long) and “Reference”...
- Page 326 Possible Cause 1: SYMPTOM: PROGRAMMED Feature is programmed or is being used incorrectly. VOICE TERMINAL FEATURE DOESN’T WORK. Then Do This Try the feature again. If the The feature is programmed Step 1. correctly and the feature still problem persists, go to Review the programming doesn't work Possible Cause 2.
- Page 327 Possible Cause 2: Control unit or voice terminal may be defective. Then Do This The trouble is either the The feature works correctly Step 1. voice terminal on which the Program the feature on a feature did not work or the second voice terminal and try control unit.
- Page 328 Possible Cause 3: A voice terminal is plugged into the ASA jack. Then Do This The feature works Press the feature button twice Move the voice terminal or to stop the flashing light. administer a new jack assignment for the ASA features.
-
Page 329: System Test
System Test If you are experiencing a problem other than those described in the previous tests, try the following procedure before calling your equipment supplier. Possible Cause 1: The control unit may need to be reset. SYMPTOM: SYSTEM NOT WORKING; TROUBLE NOT DESCRIBED IN ABOVE Do This Then... -
Page 330: Section 8: Installation
Installation Insert your MERLIN Plus Release 2 Installation Manual here for future reference. Installation... - Page 331 Index maximum number of entries on, 5-6 10-Button, naming, 2-21 Hands-Free Answer on Intercom voice terminal, 1-7, 5-78 number of, 3-33, 5-6 description of, 1-9 remove an entry, 3-39 with headset, 6-15 remove from a voice terminal, 3-48 voice terminal, 1-7 removing an entry, 5-7 description of, 1-9 setting up, 5-6...
- Page 332 Automatic Line Selection, 5-18 — 5-19, 5-88, 5-168 Button-Free line operation, 2-14, 3-38, 5-28, 5-30 sequence, 2-14, 3-25 cannot be bridged, 5-24, 5-28 with Button-Free line operation, 5-28 cannot use conference with, 5-28 with basic telephone, 6-6 reassigning lines, 3-48 with copy, 5-54 setting immediate ring on a line, 3-48 Automatic System Access, 5-20, 5-21, 5-142...
- Page 333 Call Restriction Forms, 2-1, 2-18 — 2-22 Disallowed List, 2-18, 5-63, 5-65 call restriction, assign to voice terminals, 3-33 use of, 2-18 Entry Form, 2-31 with copy, 5-54 using with dial codes, 3-6 calls, handling at attendant console, 4-4 — 4-10 disconnect a line from a conference call.
- Page 334 line ringing options, 2-14 immediate ring, 2-14 Hands-Free Answer on Intercom, 5-78 — 5-79, 5-166 no ring, 2-14 with Auto Answer-Intercom, 5-13 headset, 6-1, 6-15 — 6-16 line select, 5-94, 5-166 using, 4-9 lines A and E, headset adapter, 4-9, 6-15 — 6-16 assigning privacy to, 3-49 HFAI auxiliary jack bridged to, 5-22...
- Page 335 Outside A Dial, 5-103, 5-105 — 5-106, 5-167, 5-171, 7-2 program, definition of, 3-1 button, 5-105 Program Mode Lock, 3-23, 5-117 — 5-119, 5-154 with Saved Number Dial, 5-130 programmable feature button above transfer button, 3-25 maximum number of characters, 5-105 programming erased.
- Page 336 System Configuration Form, 2-1, 2-27 Saved Number Dial, 5-89, 5-103, 5-130 — 5-131, 5-167, 5-171 description of, 2-2 — 2-8 button, 5-130 use for basic administration, 3-10 Saved Number Redial, 7-2 using reformation from, 2-9 Screen calls, 4-5 — 4-6, 5-107 System Feature Report, 5-142, 5-147, 6-9 Send Message, 4-7, 5-99, 5-132 —...
- Page 337 voice announcement, 5-15 telecommunication devices for the deaf, with auxiliary lines, 5-22 telephone number, Disable, 4-5, 5-15, 5-160, 5-168, 5-171, 6-5 privacy with Call Report, 5-44 and transferred calls, 4-4 to forward calls to, change, 3-46 on HFAI voice terminal, 5-163 to forward calls to, enter, 3-46 with basic telephone, 6-5 assigning System Speed Dial codes to, 2-23...