Table of Contents
Advertisement
Advertisement
Table of Contents

Summary of Contents for Balance KH 8097
- Page 1 KH 8097 Operating Manual Blood pressure meter 0197...
-
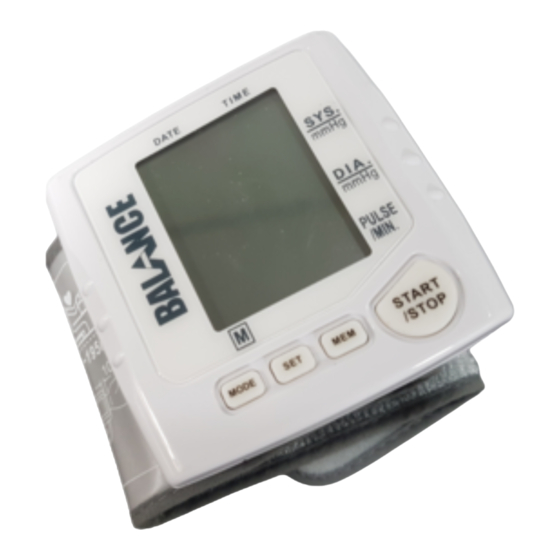
Page 2: Unit View
Time / Date Display Systolic Blood Pressure Diastolic Blood Pressure Pulse per Minute Start / stop measuring process Sequential memory recall Time / Date: Adjust the setting; Select memory block; Enter limit values Time / Date: Select position; Confirm entered values Number of saved measured values Battery compartment... -
Page 3: Table Of Contents
KH 8097 Blood pressure meter Intended Use ......4 Package contents ..... . 4 Important information for your health and safety: . -
Page 4: Blood Pressure Meter
1. Intended Use With the blood pressure meter KH 8097 you can quickly and easily measure your blood pressure, save the mea- sured values, enter in limit values as well as display the progress and average of the last 3 measurements. The appliance is intended for... -
Page 5: Important Information For Your Health And Safety
3. Important information for your health and safety: The information contained in this handbook and that obtained from measurements with the appliance should not encourage you to make any forms of diagnosis, to treat health problems or to make any decisions about medications. - Page 6 This blood pressure meter contains precision compo- nents and electronics. Measurement accuracy and the usable life of the appliance both depend on careful handling: You must ... - protect the appliance from knocks and from being dropped. - use the appliance only in normal interior ambient conditions;...
-
Page 7: Insert / Exchange Batteries
4. Insert / exchange batteries Replace the batteries when the appliance functions become faint, at the latest after 1 year. In this way you will prevent discharged batteries from leaking into the appliance. Open the battery compartment, as illustrated. • Insert the batteries exactly as marked in the battery compartment. -
Page 8: Adjust Date / Time
5. Adjust date / time This is necessary should you wish to save and eva- luate your measurements. Press the button MODE The month and day as well as the time appear at the top of the display. You can move from one position to the next by pressing the button again. -
Page 9: Enter Limit Values
6. Enter limit values After you have entered in the time and date, the first programmable limit value for systolic blood pressure blinks in the display. Press the button , to raise the value in 5 mmHg steps. The adjustment range for systolic blood pressure lies between 70-250 mmHg. -
Page 10: Fitting The Appliance
7. Fitting the appliance Use the appliance only on persons whose wrist 'fits' the pressure sleeve. The sleeve must be attached lightly and closed firmly with the Velcro fastener. The sleeve is appropriate to a wrist perimeter of 135m-195mm. If ... - the wrist is too thin, it may not be possible to pump up the pressure sleeve sufficiently, and in this case an exact measurement is not possible. - Page 11 Notice: Before taking the first measurement, remove the protective foil from the display. Place the appliance on the inside of the left wrist, as illustrated. Close the Velcro fastener firmly - but only sufficiently to ensure the sleeve is lying evenly.
-
Page 12: Measuring Blood Pressure
8. Measuring blood pressure DATE TIME SYS. mmHg DIA. mmHg PULSE /MIN. START MODE /STOP It is important to avoid moving the appliance in any way while a measurement is being taken. The arm should be supported on a firm surface and held still. As far as possible, do not talk! Position the arm such that the appliance is at the same level as the heart. - Page 13 The measurement process starts with the pumping up of the sleeve. To break off the measurement process press the button again. START / STOP During measurement, air is gradually released from the sleeve. If the measurement fails at this point, the appli- ance may pump some more air into the sleeve.
-
Page 14: Saving Measured Values
9. Saving measured values DATE TIME SYS. mmHg D I A . mmHg PULSE /MIN. START MODE /STOP The appliance has three memory blocks (numbered 1 to 3), each with 30 memory locations. It can therefore save up to 30 measurements for 3 persons, or up to 90 mea- surements for one person. - Page 15 b) Recalling a previous measurement First of all, select "your" memory block. For this, re- peatedly press the button , until "your" memory block, „no.1“ to „no.3“, appears in the display. Press the button to call up the indicated memory block. There then appears on the lower dis- play line an A (= average) and, in alternating display, the average values of the last three measurements as well as the programmed limit values for the...
-
Page 16: Cleaning And Care
c) Erasing stored measurements When all memory spaces are occupied, the appliance automatically overwrites the oldest measurement. Should you however wish to erase all measured values, select first of all „ your" memory block. For this, repeatedly press the button until "your"... -
Page 17: Storage And Disposal
11. Storage and Disposal Should you not use the appliance for a longer period of time remove the batteries to prevent possible damage by battery leakage. Keep the appliance only in the box supplied. Store it at a location that is both dry and protected from large temperature variations. -
Page 18: Troubleshooting
12. Troubleshooting Never open the casing – you will not be able to close it again correctly without a special tool. Do not carry out repairs by yourself! In case of problems, approach the Customer Service department. (see Warranty Card). - If no display appears, although a button has been pressed: Remove the batteries and insert them again after a few seconds. - Page 19 What do the symbols on the display mean? Symbol Meaning What is to be done? Appears as soon as a pul- Keep the arm still - se is detected. If it does do not move or not appear, or unregularly, speak.
-
Page 20: Technical Data
13. Technical Data Measurement range: 0-300 mmHg Pressure Pulse 40-200 beats / minute Measurement accuracy: +/- 3 mmHg Pressure Pulse +/- 5% Inflation / deflation: automatic Pressure sleeve size: for wrist circumference 135-195 mm Operating temperature: +10...40°C at 30...85% relative humidity Storage temperature: -20°C...+50°C at 10...95% relative humidity. -
Page 21: Warranty And Service
14. Warranty and service The warranty conditions and the service address can be found on the warranty card. - Page 22 Kompernaß GmbH · Burgstraße 21 D-44867 Bochum · www.kompernass.com Producer: Health & Life Co., Ltd. 9F. No. 186, Jian Yi Road, Chung Ho City, Taipei, Taiwan. ID No.: KH 8097-0106_V4...
Need help?
Do you have a question about the KH 8097 and is the answer not in the manual?
Questions and answers