3M C1060 Operating Instructions Manual
Headset intercom system
Hide thumbs
Also See for C1060:
- Manual (90 pages) ,
- Operating instructions manual (33 pages) ,
- Installation instructions manual (29 pages)
Table of Contents
Advertisement
Advertisement
Table of Contents
Troubleshooting

Related Manuals for 3M C1060


Summary of Contents for 3M C1060
- Page 1 Headset Intercom System Model C1060 Operating Instructions...
-
Page 3: Table Of Contents
Turning On the Base Station......................9 Turning On the Headset ........................9 Operating Modes ............................9 Standby Mode ............................ 9 Talk/Listen Mode..........................9 Single–Lane Standard or Duplex Communication Systems............9 Dual–Lane Standard or Duplex Communication Systems ............9 Cross–Lane Communication Systems..................9 3M 2001 February... - Page 4 Changing Channels if Interference is Encountered.................. 18 Changing the Day/Night Switch Setting ....................21 Adjusting the Monitor Speaker Volume ....................22 Troubleshooting..........................23 Introduction.............................. 23 System Troubleshooting .......................... 23 Battery and Battery Charger Troubleshooting ..................26 Service..............................27 3M 2001 February...
-
Page 5: Intended Use
Model C1060 Important Information Intended Use The 3M Headset Intercom System, Model C1060, is designed to provide 2–way radio–frequency audio communication in quick service drive–through restaurants and convenience stores. Misuse of the Model C1060 could result in poor performance and/or undesired operation. - Page 6 Important Information Model C1060 (Blank Page) 3M 2001 February...
-
Page 7: System Description
Model C1060 System Description Introduction The 3M Model C1060 Headset Intercom System is a wireless intercom system designed for high reliability, compactness, and ease of service. The system can be programmed to operate on any one of 16 different channels to provide high–quality audio performance and reduce the possibility of... -
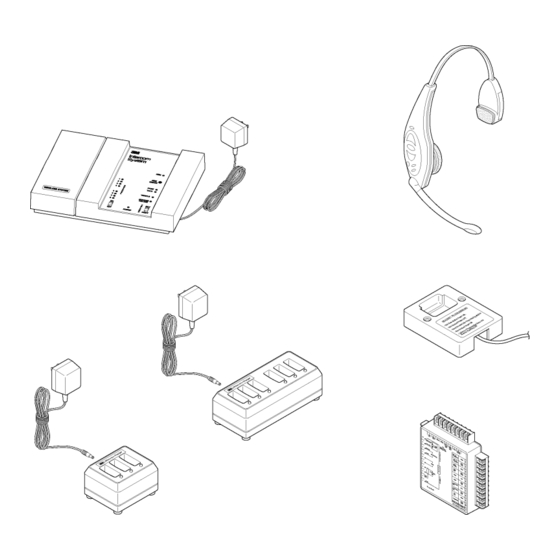
Page 8: System Components
Headsets feature a light–weight design to provide for comfort. The headset pads can be easily replaced. See Figure 2. Figure 2. Headset 3M 2001 February... -
Page 9: Programming Station
Figure 3. Programming Station Battery Charger The battery charger charges headset batteries in approximately 1.5 to 2 hours. The charger is available in 3–slot and 6–slot versions. See Figure 4. Figure 4. 3–Slot and 6–Slot Battery Chargers 3M 2001 February... -
Page 10: Controls And Indicator
This indicator lights when headset–to–menu sign “ Talk” communications occur. 9 Vehicle Indicator This indicator lights when a vehicle is detected at the menu sign. 10 Monitor Volume This access hole allows for adjusting the volume of the optional monitor Access speaker. 3M 2001 February... -
Page 11: Headset
Note that even when set to its lowest level, headset volume is not turned completely off. Press and hold the T1 (Talk Lane 1) switch to talk to the customer at the menu 4 T1 (Talk Lane 1) sign in lane 1. Release the switch to listen. Switch 3M 2001 February... - Page 12 15 Indicator LED Indicates operating status of the headset as follows: – glows green when power is on – glows red when in Talk Lock mode flashes to indicate successful programming 3M 2001 February...
-
Page 13: Battery Chargers
RED indicates the battery is being charged. GREEN to indicate the battery is fully charged. 4 Power Supply This jack accepts the plug from the power supply cord. The power supply provides power to the battery charger. 3M 2001 February... -
Page 14: Headset Preparation
Positioning the Ear Rotate the microphone boom up or down so that its tip is in line with the corner Pad and Microphone of your mouth. Do not bend the rubber microphone boom. See Figure 8. Figure 8. 3M 2001 February... -
Page 15: Operation
During peak hours, the cross–lane module is turned off and the system functions like a dual–lane duplex system. Some headsets are programmed to communicate with Lane 1 and others are programmed to communicate with Lane 2. The headsets are labeled accordingly. 3M 2001 February... -
Page 16: Talk Lock Mode (" Hands Free" )
To use the talk lock mode, press the talk lock switch on the transceiver housing. To return to normal headset operation, press T1 or P. The LED indicator changes from glowing green to glowing red when the headset is in the talk lock mode. 3M 2001 February... -
Page 17: Page Mode
When Headset is ON Press ON / OFF Switch Figure 9. Turning Headset OFF 2. While pressing and holding the page switch, turn the headset ON. This locks the headset in the page monitor mode. See Figure 10. 3M 2001 February... -
Page 18: Special Considerations
(except those in page monitor mode). In the page mode, communication from any headset is heard only by all operators who are wearing headsets (not the customer at the menu sign). 3M 2001 February... -
Page 19: Maintenance
2. Remove the discharged battery from the battery housing. 3. Insert a fully charged battery in the housing with the notch facing the battery release. Make sure the battery is fully inserted (battery release clicks). See Figure 11. Figure 11. 3M 2001 February... -
Page 20: Replacing The Ear And Headband Pads
To replace the headband pad, remove the worn/damaged pad by peeling it from the back of the battery housing. Remove protective backing from new pad and press it into place on the back of the battery housing. See Figure 12. 3M 2001 February... -
Page 21: Battery Charger
Discharged batteries require 1–1/2 to 2 hours to charge. ü Note When the GREEN indicator lights, the battery is approximately 80% charged. An additional 1/2 hour of charging is required to achieve maximum charge. Charging Status Indicator Figure 13. 3M 2001 February... -
Page 22: Disposing Of Batteries
Information about establish operating procedures: C1060 Rechargeable Each 3M battery contains an internal protective device to prevent unsafe Batteries discharge rates. But, as with any battery, avoid shorting across the battery contacts with metal items. Never carry a battery in a pocket or place it in a drawer where it can accidentally be shorted by keys, coins etc. -
Page 23: Special Instructions For System Manager
OFF, then hold down either T1 or T2 while pressing ON for 5 seconds. You will hear an acknowledging beep. (Holding down T1 configures the headset to be a lane 1 headset; holding down T2 configures it for lane 2. 3M 2001 February... -
Page 24: Enabling/Disabling The Talk Lock Feature
In cases where a cellular phone tower is nearby, certain combinations of cell frequencies may cause random interference. In some cases, changing channels may have no effect. Please call your local 3M Dealer, or 3M F.S.T. Communications Products Technical Service (800–328-0033) in these cases. - Page 25 (1–8) will light, indicating the newly selected channel. See Figure 15. Figure 15. 2. Pull outward on the right side of the base station half–cover and then lift and remove the cover. See Figure 16. Half Cover Figure 16. 3M 2001 February...
- Page 26 Figure 17. 3. Press the RESET switch to “ read” the new channel selection into the microprocessor. ü Note When two systems are used in a cross–lane application, both base stations must be set to the same channel. 3M 2001 February...
-
Page 27: Changing The Day/Night Switch Setting
Changing the background noise is reduced. To allow you to reduce the volume of the menu Day/Night Switch sign speaker to a lower, pre–set nighttime level, the base station has a VOLUME Setting DAY/NIGHT switch. See Figure 19. 3M 2001 February... -
Page 28: Adjusting The Monitor Speaker Volume
1. With the base station turned ON, insert a small straight–blade screwdriver Volume into the MONITOR VOLUME access hole. See Figure 19. 2. Turn the volume control clockwise to increase the volume or counterclockwise to decrease it. 3M 2001 February... -
Page 29: Troubleshooting
2. Vehicle detector is “ locked up.” 2. Remove power to vehicle detector for a few seconds to reset the detector. 3. The base station alert tone 3. Adjust alert tone volume. volume is set too low. 3M 2001 February... - Page 30 2. Call for authorized service. 3. Poor location of Base Station 3. Relocate the Base Station, or (behind large metal objects, add an additional Base Station too far from work area, etc.). to extend the range of the system. 3M 2001 February...
- Page 31 1. The Talk Lock button is not 1. Refer to the Operating not work. enabled on the headset. Instructions to enable Talk Lock. 2. The system is operating in 2. Talk Lock is disabled in Standard mode. Standard mode. 3M 2001 February...
-
Page 32: Battery And Battery Charger Troubleshooting
2. Wrong type of power 2. Make sure power transformer is transformer used for charger. marked “ Secondary Voltage 14 VAC.” 3. The green light on the charger 1. Defective battery. 1. Replace the battery. never comes on. 3M 2001 February... -
Page 33: Service
Model C1060 Troubleshooting Service Most, if not all, C1060 system service needs can be fulfilled by your local 3M dealer. If special service assistance is needed, however, or for information on how to properly dispose of your non–functional C1060 rechargeable batteries, please call 1–800–328–0033. - Page 34 Food Services Trade Department Printed in U.S.A. Printed on 50% recycled 3M Center 3M 2001 February waste paper, including 10% St. Paul, MN 55144-1000 70-0710-3648-0 Rev. A post-consumer waste paper.