Table of Contents

Related Manuals for RCA 2132


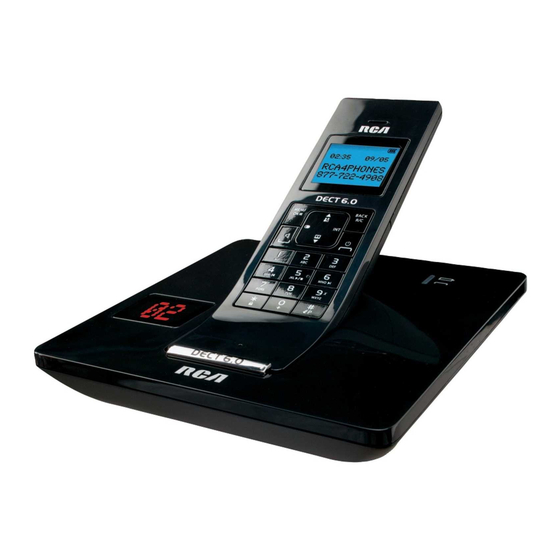
Summary of Contents for RCA 2132
- Page 1 DECT 6.0 Multi-Handset Cordless Speakerphone with Answering Machine User’s Guide Please read this manual before operating product for the first time. Visit the RCA web site at www.rca4phones.com Model 2132 / 2132-2 / 2132-3 / 2132-4...
-
Page 2: Equipment Approval Information
Equipment Approval Information Your telephone equipment is approved for connection to the Public Switched Telephone Network and is in compliance with parts 15 and 68, FCC Rules and Regulations and the Technical Requirements for Telephone Terminal Equipment published by ACTA. 1 Notification to the Local Telephone Company On the bottom of this equipment is a label indicating, among other information, the US number and Ringer Equivalence Number (REN) for... -
Page 3: Interference Information
2 Rights of the Telephone Company Should your equipment cause trouble on your line which may harm the telephone network, the telephone company shall, where practicable, notify you that temporary discontinuance of service may be required. Where prior notice is not practicable and the circumstances warrant such action, the telephone company may temporarily discontinue service immediately. -
Page 4: Hearing Aid Compatibility (Hac)
• Reorient or relocate the receiving antenna (that is, the antenna for radio or television that is “receiving” the interference). • Reorient or relocate and increase the separation between the telecommunications equipment and receiving antenna. • Connect the telecommunications equipment into an outlet on a circuit different from that to which the receiving antenna is connected. -
Page 5: Information For Dect Product
Information for DECT Product This telephone is compliant with the DECT 6.0 standard which operates in the 1.92GHz to 1.93GHz frequency range. Installation of this equipment is subject to notification and coordination with UTAM. Any relocation of this equipment must be coordinated through and approved by UTAM. -
Page 6: Save These Instructions
-Avoid using a telephone (other than a cordless type) during an electrical storm. There may be a remote risk of electric shock from lightning. -Do not use the telephone to report a gas leak in the vicinity of the leak. -Use only the power cord and batteries indicated in this manual. -
Page 7: Table Of Contents
Table of Contents To unlock the keypad:....15 Equipment Approval Information Charge/in use Indicator on ..............2 Base............15 Interference Information ....3 Set time and date......15 Hearing Aid Compatibility (HAC)..4 Speakerphone Operation..16 Licensing ..........4 Making a Call........16 FCC RF Radiation Exposure Answering a call......16 Statement ..........4 Call Timer..........16 Information for DECT Product ..5... - Page 8 Table of Contents Delete the redial list ....21 Handset tone........27 Call Waiting Caller ID....21 Ring volume........28 Caller list .........21 Ring melody........28 Access the Caller list ....22 Key Beep.........28 Calling back a caller....22 Handset Name......28 Storing a caller record....22 Auto answer........29 Deleting a caller record...22 Auto hang-up.......29 Deleting all caller record..22...
-
Page 9: Introduction
Introduction CAUTION: When using telephone equipment , there are basic safety instructions that should always be followed. Refer to the IMPORTANT SAFETY INSTRUCTIONS provided with this product and save them for future reference. IMPORTANT: Because cordless phones operate on electricity, you should have at least one phone in your home that isn’t cordless, in case the power in your home goes out . -
Page 10: Telephone Jack Requirements
Telephone Jack Requirements To use this phone, you need an RJ11C type modular telephone jack installed in your home. If you don‟t have a modular jack, call your local phone company to find out how to get one installed. Installation Digital Security System Your cordless phone uses a digital security system to protect against false ringing, unauthorized access, and charges to your phone line. -
Page 11: Base Layout
Never touch non-insulated telephone wires or terminals, unless the telephone line has been disconnected at the network interface. Use caution when installing or modifying telephone lines. Base layout Base layout A FIND button Search handset Register handset B Charge-in use indicator C Message counter... -
Page 12: Handset Layout
Handset layout A Earpiece B LCD display C MENU/OK/MUTE button - Access to main menu - Select a menu entry - Mute the microphone D Redial button E TALK/SPEAKER button - Make a call/Accept a call - Switch to speakerphone mode F Navigation button - Up to increase volume and view CID - Down to decrease volume and access... -
Page 14: Installation And Set-Up
Installation and Set-up Fit the rechargeable batteries in each handset 1) Install the AAA batteries (Brand name: CORUN, Capacity: Ni-MH 1.2V/550mAh, or Brand name: SANIK, Capacity: Ni-MH 1.2V/550mAh) into handset in accordance with the polarity marked in the battery compartment . 2) Close the battery compartment cover, sliding it into place and pressing firmly to make sure it is secure. -
Page 15: Keypad Lock
an incoming call. To answer a call, you will need to switch it back on. It may take some time for the handset to re-establish a radio link with the base unit . Keypad lock To lock the cordless handset‟s keypad: Press and hold [*] button for 2 seconds until you hear a beep tone, when the keypad lock is activated, shows on the display. -
Page 16: Making A Call
Press the TALK/SPEAKER button again to switch from speakerphone to earpiece mode. Press the HANG UP button to end conversation. Making a call 1. Press the TALK/SPEAKER button. Dial the desired number. - OR - Dial the number first , press the TALK/SPEAKER button. - OR - Press the Navigation (or ) button to select the desired record, press the TALK/SPEAKER button. -
Page 17: Exit
1. Press the TALK/SPEAKER button. 2. Press the redial button. -OR- 3. Press the redial button first , then use the Navigation button to select the desired redial number. - Press the Navigation () to review the oldest call and scroll toward the most recent calls (higher numbers). -
Page 18: Phonebook
Phonebook You can store up to fifty records in phone book for quick dialing; each record can contain a maximum of 20-digit numbers and 10-character names. Reviewing phonebook records Make sure the phone is OFF (not in TALK/SPEAKER mode). 2. Press the Phonebook button to access the phone book, all records are shown in alphabetical order. -
Page 19: Inserting A Pause
Use the touch-tone pad to enter the telephone number (up to 20 digits, including pauses), and press the MENU/OK button to confirm. Select Melody, Melody 5 shows on the display. 8. Press the Navigation (or ) button to select from melody 1 to melody 10 (a testing tone is generated while making melody selection), press the MENU/OK button to confirm, the records are stored alphabetically in the phone book. -
Page 20: Dialing A Phonebook Number
Dialing a phonebook number Make sure the phone is OFF (not in TALK/SPEAKER mode). 2. Press the Phonebook button to access the phone book, all records are shown in alphabetical order. 3. Press the Navigation (or ) button or key in alphabet to the desired records. -
Page 21: Call Waiting Caller Id
Press MENU/OK key again to confirm. Call waiting caller ID Provided you subscribe to Call Waiting Caller ID service from your phone company; if you receive an incoming call and you are using the multi handset system, a beep indicates the presence of a Call Waiting call on the line. -
Page 22: Deleting All Caller Record
2. Press the Navigation (or ) button to select a call record. Press MENU/OK button to open sub-menu. 4. Select Delete, press MENU/OK button to confirm your deletion. Deleting all caller record 1. Press the CID button to enter the Caller List menu. Press MENU/OK button to open sub-menu. -
Page 23: Record A Personalised Outgoing Message
To pre-record an outgoing message you must first follow the procedure to set the answer mode. Record a personalized outgoing message * You can choose to replace the predefined OGM with your own pre- recorded personalized messages. Repeat steps 1 to 4 on Set the Answer mode section. Display shows Select mess. -
Page 24: Remote Access Operation
Remote access operation The unit answers after 15 rings if the answerer is turned off. To access the answering system, enter your remote PIN (default:0000) The telephone will allow you to check your messages remotely from another phone. To use this function you must be using a tone dialing telephone and you will need to enter your remote PIN (default: 0000). -
Page 25: Call Screening
Press 2 to play all messages or press 2 to play new messages only. Press 3 to go to the next message Press 02 to delete the current message Press 8 turn the answering machine on/off ... -
Page 26: Answering An Intercom Call
The cordless handset rings, and the Int symbol flashes on handset display. When the handset user answers, you will be connected. Answering an intercom call The ringing tune for intercom calls is different from external calls. When someone makes an intercom call to you, Int icon appears on your cordless handset‟s display with the number of the handset calling you. -
Page 27: Personal Setting
features. You may program the following items in main menu: Phonebook, Set Date/Time, Personal Set , Advanced Set and Answ. Machine. Personal setting Make sure the phone is OFF (not in TALK/SPEAKER mode). 2. Press the MENU/OK button to go to main menu. 3. -
Page 28: Handset Name
2. Press the MENU/OK button to enter the menu. 3. Press the Navigation (or) button to select On or Off. 4. Press the MENU/OK button to confirm. You will hear a confirmation tone. Handset name From the Personal Set sub-menu: 1. -
Page 29: Auto Hang-Up
Auto hang-up This function enables you to end a call automatically by simply placing the handset on the base station. By default, the Auto Hang up feature is Off. From the Personal Set sub-menu: 1. Press the Navigation (or) button to scroll to the Auto Hang-up sub- menu. -
Page 30: Base Ring Melody
Base ring melody You may choose from three different melodies for base unit . From Base Tone setting sub-menu: 1. Press the Navigation (or) button to select BS Ring Mel. 2. Press the MENU/OK button to enter the menu. 3. Press the Navigation (or) button to select the desired melody ring tone. -
Page 31: De-Register The Handset
De-register the handset You may need to do this in order to replace a faulty handset . From the Advanced Set sub-menu: 1. Press the Navigation (or) button to scroll to Unregister. 2. Press the MENU/OK button to access de-register setting, the screen display Enter PIN----. -
Page 32: Default Settings List
Default settings list Keypad: unlocked Redial list: empty Caller Display records: empty Phonebook: empty Earpiece volume: High; speakerphone volume: 2 Handset ringer volume: High; Melody: 5 Base unit ringer volume: Low; Melody: 3 ... -
Page 33: To Playback Recorded Messages
OK key to select . 4. Press the Navigation key to select On or Off and then press MENU/OK key to confirm. Use the BACK/R/C button to exit the menu or press HANG UP to go to standby mode. The telephone can store a number of messages in its memory. The messages will be available for replay until you delete them to make room for new messages. -
Page 34: Changing The Battery
A memo will be played back with other messages from callers. To record a memo 1. Press the MENU/OK key to enter menu selection. 2. Press the Navigation key to select Answ. Machine and then press MENU/OK key to select. 3. -
Page 35: Troubleshooting
Troubleshooting ALWAYS check first You have followed all the steps listed in the user that: manual to install and set up your telephone. All connectors are firmly inserted in their sockets. Main power to the base unit is switched on at the socket . - Page 36 “When I key in a number, Try a different position for the base unit – it appears on the somewhere higher if possible, or further from display, but I cannot other electrical equipment. make an outside call” Try moving the handset closer to the base unit . “The phone does not Check that the base unit‟s main power adapter ring”...
- Page 37 “When I try to make a If you‟re using a multi-handset system, check call, I hear busy tone” whether another handset is already on a call. “The volume in the Make sure you‟re holding the earpiece correctly earpiece is low when I‟ over your ear.
-
Page 38: Warranty Assistance
Warranty Assistance Your sales receipt will be required to demonstrate proof of purchase in order to validate your warranty eligibility. You may want to attach either the original, or a photocopy, of your sales receipt to this booklet for future reference. - Page 39 from the date the replacement product was shipped to you, whichever is longer. How to get service: • Call Customer Care at 1-877-722-4908. Please have your product with you and please have your model number and date code available when calling us. The model number and date code can be found on the underside of the base unit.
- Page 40 • Acts of nature, such as but not limited to, lightning damage. Limitation of Warranty: • THIS LI MI TED WARRANTY I S THE ONLY WARRANTY A P P L I C A B L E TO THIS PRODUCT. ALL OTHER WARRANTIES, EXPRESS OR IMPLIED (INCLUDING ALL IMPLIED WARRANTIES OF MERCHANTABILITY OR FITNESS FOR A PARTICULAR PURPOSE) ARE HEREBY DISCLAIMED.
- Page 41 Visit the RCA web site at www.rca4phones.com Please do not send any products to the Indianapolis address listed in this manual or on the carton. This will only add delays in service for your product. 2132 Printed in China 10-35...