
Related Manuals for RCA DECT 00023265


Summary of Contents for RCA DECT 00023265
- Page 1 2-Line Intercom Speakerphone DECT6.0 Cordless Handset Telephone Answering System User’s Guide Please read this manual before operating product for the first time. Model 25250...
-
Page 2: Important Information
Important Information Equipment Approval Information Your telephone equipment is approved for connection to the Public Switched Telephone Network and is in compliance with parts 15 and 68, FCC Rules and Regulations and the Technical Requirements for Telephone Terminal Equipment published by ACTA. 1 Notification to the Local Telephone Company On the bottom of this equipment is a label indicating, among other information, the US number and Ringer Equivalence Number (REN) for... -
Page 3: Interference Information
2 Rights of the Telephone Company Should your equipment cause trouble on your line which may harm the telephone network, the telephone company shall, where practicable, notify you that temporary discontinuance of service may be required. Where prior notice is not practicable and the circumstances warrant such action, the telephone company may temporarily discontinue service immediately. -
Page 4: Icensing
Important Information Notice: The changes or modifications not expressly approved by the party responsible for compliance could void the user’s authority to operate the equipment. Licensing Licensed under US Patent 6,427,009. Hearing Aid Compatibility This telephone system meets FCC standards for Hearing Aid Compatibility. FCC RF Radiation Exposure Statement This equipment complies with FCC RF radiation exposure limits set forth for an uncontrolled environment. -
Page 5: Table Of Contents
quipmEnt pprovAl nformAtion ... 3 ntErfErEncE nformAtion ... 4 icEnsing ... 4 EAring ompAtibility fcc rf r AdiAtion xposurE dEct p nformAtion for roduct ... 7 ntroduction ... 7 Arts HEcklist ElEpHonE EquirEmEnts ... 8 nstAllAtion ... 8 igital ecurity yStem our cordlEss pHonE usEs A digitAl sEcurity systEm to protEct AgAinst fAlsE ringing... - Page 6 Table of Contents id (cid) ... 31 AllEr ciD r eceiving anD toring ciD r ...31 eviewing ecorDS ciD r aving a ecorD to hone ...32 emory ciD r ...32 eleting a ecorD ...32 eleting ecorDS ...32 ialing rogrammeD ...32 rogram ...33 iD ...33...
-
Page 7: Ntroduction
Introduction CAUTION: When using telephone equipment, there are basic safety instructions that should always be followed. Refer to the IMPORTANT SAFETY INSTRUCTIONS provided with this product and save them for future reference. IMPORTANT: Because cordless phones operate on electricity, you should have at least one phone in your home that isn’t cordless, in case the power in your home goes out. -
Page 8: Nstallation
VCRs. To minimize or prevent such interference, the base of the cordless telephone should not be placed near or on top of a TV, microwave ovens, or VCR. If such interference continues, move the cordless telephone farther away from these appliances. -
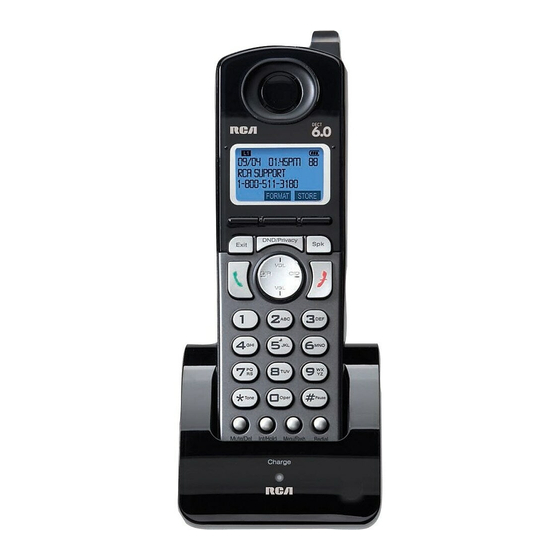
Page 9: Handset Layout
Handset Layout 3 Soft keys DND/Privacy (button) Exit (button) VOL +/- (buttons) (button) Talk (button) * Tone (button) Mute/Del (button) Int/Hold (button) Connections & Setup Visual Indicator display (Speaker button) (button) (button) #Pause (button) Redial (button) Menu/Flash (button) -
Page 10: Base Layout
Connections & Setup Base Layout DND/Privacy (button) Delete (button) Exit (button) Charge Mute (button) Headset (button) Flash (button) Ans Sys (button) Memo (button) (button) Play/Stop (button) 3 Soft Keys #Pause (button) Speaker (button) Hold (button) Vol +/- (buttons) (button) One Touch (1-10) buttons Line 1 &... -
Page 11: Installing The Phone
Installing the Phone Installing the Handset Battery NOTE: You must connect the handset battery before use. CAUTION: To reduce the risk of fire or personal injury, use only the Thomson Inc. approved Nickel-metal Hydride (Ni-MH) battery model 5-2734, which is compatible with this unit. 1. -
Page 12: Ase S Tation
1. Choose an area near an electrical outlet and a telephone wall jack (RJ11C), and place your cordless telephone on a level surface, such as a desktop or tabletop, or you may mount it on the wall. - Page 13 Connections & Setup 4. If you want to mount the telephone on the wall, you can plug the 2 lines such as the below drawing; Line 2 Line 1 -OR- Line 2 Line 1 -OR- Line 1 + 2...
-
Page 14: Programming The Phone
Programming the Telephone 5. Place the handset in the base cradle. The charge indicator illuminates, verifying the battery is charging. 6. Allow the phone to charge for 14 hours prior to first use. If you don’t properly charge the phone, battery performance is compromised. NOTE: If the model you bought is a RE2 version, there is one additional charger. -
Page 15: Date/Time
Area Code (base only), Registration (handset only), De-Registration (base only), 2nd Call Alert (both base and handset), Handset Name (handset only), Update HS List (base only). Date/Time From the Phone Setting Menu: 1. Press the VOL (- or +) button to scroll to Date/Time. 2. -
Page 16: Uto Nswer Ntercom Applicable For Base And Handset )
Programming the Telephone Auto Answer Intercom (applicable for base and handset) If it is set to on, this handset or base will auto answer the intercom call when it receives an intercom call. From the Phone Setting Menu: 1. Press the VOL (- or +) button to scroll to Auto Answer Int. 2. -
Page 17: Remove Handset
Register From the Phone Setting Menu: 1. Press the VOL (- or +) button to scroll to Register. 2. Press SELECT soft key. “Press base unit page button until beep” shows in the display. 3. Press and hold the Page button on base for 5 seconds. 4. -
Page 18: Nd C All A Lert
Programming the Telephone 2nd Call Alert If it is set to On, you will hear the alert tone when you are in conversation and there is an incoming call from another line. From the Phone Setting Menu: 1. Press the VOL (- or +) button to scroll to 2ND Call Alert. 2. -
Page 19: Contrast
Language From the Display Setting Menu: 1. Press the VOL (- or +) button to scroll to the Language. 2. Press SELECT soft key. 3. Use the VOL (- or +) button to select English, Francais or Espanol. The default setting is English. 4. -
Page 20: Ring Volume
Programming the Telephone Ring Volume There are 5 volume levels and OFF for your selection. The Ring volume can be set individually for each line. From the Sound Settings Menu: 1. Press the VOL (- or +) button to scroll to the Ring Volume. 2. -
Page 21: Oga Playback
OGA Playback From the Answering System Menu: 1. Press the VOL (- or +) button to scroll to the OGA Playback. 2. Press SELECT soft key. 3. Use left and right button to toggle between Line 1 and Line 2 and use VOL (- or +) button to scroll to your selection. -
Page 22: Set Work Hours
Programming the Telephone Set Work Hours This will allow you to program the start time for the working hour. From the Answering System Menu: 1. Press the VOL (- or +) button to scroll to the Set Work Hours. 2. Press SELECT soft key. 3. -
Page 23: Message Length
Ring Delay This feature lets you select the number of times you want the phone to ring before the answering system answers a call. From the Answering System Menu: 1. Press the VOL (- or +) button to scroll to the Ring Delay. 2. -
Page 24: Emote Assword
Telephone Operation Remote Password You can access the answering system from a tone dialing telephone in another (remote) location. The security code is required for remote access, and it prevents unauthorized access to your answering system. From the Answering System Menu: 1. -
Page 25: M Aking C All In The
Making Call in the Speakerphone mode (from the handset) 1. Press the Speaker button to activate the speakerphone on the first available line. -OR- Press the LINE 1 or LINE 2 soft key to select a specific line. The handset will activate the ear piece. -
Page 26: S Witching B Etween The
Telephone Operation For the base: 1. Press the Speaker button to answer the call in speakerphone mode, -OR- 2. Press the corresponding Line button to answer the call in speakerphone mode, -OR- 3. Press the Headset button to answer the call in headset mode. 4. -
Page 27: Do Not Disturb
Do Not Disturb This feature is set at individual telephones to disable (silence) an incoming ring signal, intercom ring. When there is an incoming call or an intercom call, the status indicators function as normal but the phone will not ring. 1. -
Page 28: S Toring A R Edial R
Telephone Operation NOTE: If you do not select a Line button, the line is automatically seized and the number is dialed accordingly. Storing a Redial Record in Phone Book 1. Make sure the phone is OFF (not in Talk mode). 2. -
Page 29: And H Eadset V Olume
Speakerphone, Handset, and Headset Volume While the phone is in use, during the desired mode, press the VOL (+ or -) buttons until you reach a comfortable listening level. The phone stores the setting after the last button pressed. Hold In Talk mode, press the Hold button to hold the line. -
Page 30: Page
Intercom Calls 3. The originating caller can then press the CONF soft key shown on the display to initiate a conference. Since Line 1 and 2 are both on hold, the user will be prompted to select Line 1, Line 2 or Both to conference with. -
Page 31: Caller Id (Cid)
Caller ID (CID) IMPORTANT: In order to use this unit’s Caller ID features, you must subscribe to either the standard Name/Number Caller ID Service or Call Waiting Caller ID Service. To know who is calling while you are on the phone, you must subscribe to Call Waiting Caller ID Service. -
Page 32: S Aving A Cid R Ecord To P Hone B M Emory
Caller ID Saving a CID Record to Phone Book Memory 1. While viewing a CID record, press the STORE soft key. 2. The name shows in the display. You can edit it. After editing, press the SAVE soft key. 3. The number shows in the display. You can edit it. After editing, press the SAVE soft key. -
Page 33: Area Code
Number of digits 7-digits: 10-digits: 11-digits: 4. To dial the displayed number, select a Line or press Talk, Spk, or Headset button. If You Did Not Program Your Local Area Code 1. Use the CID button to display the number you want to dial. You will only see 10-digit numbers (i.e. -
Page 34: Reviewing Phone Book Records
Memory 7. Use VOL (- or +) button to scroll to the selection and press SELECT soft key to complete. NOTE: If “Memory full” shows in the display, you should delete one or more unnecessary records and repeat above steps to continue the call record storage. -
Page 35: Deleting A Phone Book Record
5. Press SELECT soft key to complete. NOTE: Press the BACK soft key to keep the previous setting (making no changes). Copying a Phonebook Record You can copy one phone book record or the whole phone book from the handset extension to the base or from the base to desired handset extension. -
Page 36: D Ial A Phone Book Record While In
Answering System Operation Dialing a Phone Book Record Dial a phone book record while in Talk mode: 1. Make sure the phone is ON (in Talk mode) by pressing the Talk, Spk button, or selecting a Line. 2. Press the DIR button to access the phone book. 3. -
Page 37: Memo Record
NOTE: Your unit will record a message up to the maximum length of time you set as long as the caller continues speaking. To save recording capacity, your unit will automatically stop recording after 7 seconds of silence or if there is a steady dial tone for 7 seconds. -
Page 38: O Erase A Message While It Is Playing
Answering System Operation During each message playback, it shows the current message information on the screen. If the message playback is a stored incoming message, it shows the message’s CID, including Date/Time, Name and Number. If it is a memo, only Display memo and Date/Time. During each message playback, you can press the CID/Next button to skip to the current message OR press the DIR/Prev button to replay the message. -
Page 39: Memory Full
5. To exit remote operation, hang up. The system will automatically disconnect the call if the user does not enter a command within 10 seconds. NOTE: Only the message being played can be erased in remote access mode. Memory Full When the answering system memory is full, the system answers after 10 rings. -
Page 40: Display Messages
Other Information Display Messages The following messages show the status of the phone, provides Caller ID information, or helps you set up and use your phone. DELETE ALL? Prompt asking if you want to erase all records. DELETE? Prompt asking if you want to erase the current record. END/ START Indicates that it is the end of the list. -
Page 41: No Dial Tone
Troubleshooting Guide Telephone Solutions No dial tone • Check or repeat installation steps: Make sure the base power cord is connected to a working electrical outlet. Make sure the telephone line cord is connected to the base and the wall jack. •... -
Page 42: Battery
Other Information Caller ID Solutions No Display • Charge the battery (for 14 hours). Or replace the battery. • Make sure the unit is connected to a non-switched electrical outlet. Disconnect the power adaptor from the base and reconnect it. No Caller ID •... -
Page 43: Causes Of Poor Reception
Causes of Poor Reception • Aluminum siding. • Foil backing on insulation. • Heating ducts and other metal construction that can shield radio signals. • You ’re too close to appliances such as microwaves, stoves, computers, etc. • Atmospheric conditions, such as strong storms. •... -
Page 44: Warranty Assistance
Warranty Warranty Assistance If trouble is experienced with this equipment, for warranty information, please contact customer service at 1-800-511-3180. If the equipment is causing harm to the telephone network, the telephone company may require that you disconnect the equipment until the problem is resolved. Any unauthorized repairs, changes or modifications not expressly approved by Thomson Inc. -
Page 45: Limited Warranty
Limited Warranty What your warranty covers: • Defects in materials or workmanship. For how long after your purchase: • Two years, from date of purchase. (The warranty period for rental units begins with the first rental or 45 days from date of shipment to the rental firm, whichever comes first.) What we will do: •... - Page 46 Warranty Limitation of Warranty: • THE WARRANTY STATED ABOVE IS THE ONLY WARRANTY APPLICABLE TO THIS PRODUCT. ALL OTHER WARRANTIES, ExPRESS OR IMPLIED (INCLUDING ALL IMPLIED WARRANTIES OF MERCHANTABILITY OR FITNESS FOR A PARTICULAR PURPOSE) ARE HEREBY DISCLAIMED. NO VERBAL OR WRITTEN INFORMATION GIVEN BY THOMSON INC., ITS AGENTS, OR EMPLOYEES SHALL CREATE A GUARANTY OR IN ANY WAY INCREASE THE SCOPE OF THIS WARRANTY.
-
Page 47: Ccessory I Nformation
Accessory Information DESCRIPTION Handset Replacement Battery AC Power Adaptor To place order, have your Visa, MasterCard, or Discover Card ready and call toll-free 1-800-338-0376. A shipping and handling fee will be charged upon ordering. We are required by law to collect appropriate sales tax for each individual state, country, and locality to which the merchandise is being sent. - Page 48 Index 2nd Call Alert 3-way conference call by an intercom call 3-way conference call with two lines 4-way conference call (Line 1 + Line 2 + 2 extension) Accessory Information Adding Phone Book Entries Answering a Call Answering an Intercom Call Answering System Answering System On/Off Answering System Operation...
- Page 49 Making Call in the Speakerphone Mode Making Calls in the Speakerphone Mode Making Calls with the Cordless Handset Making Calls with the Optional Headset Memo Record Memo Recording Memory Full Memory Log and Phone Book Memory Message/Memo Playback Message Alert Message Length Monitoring Incoming Calls Mute...
- Page 50 Visit the RCA web site at: www.rca.com Please do not send any products to the Indianapolis address listed in this manual or on the carton. This will only add delays in service for your product. Thomson Inc. 101 West 103rd Street Indianapolis, IN 46290-1102 ©...
- Page 51 Teléfono con Altavoz de Dos Líneas DECT 6.0 Sistema de Auricular Inalámbrico y Altavoz con Contestador Guía del Usuario Por favor lea este manual antes de operar este producto por primera vez. Modelo 25250...
- Page 52 Información Importante Información sobre la Aprobación de Equipo El equipo de su teléfono esta aprobado para la conexión con la red Telefónica Pública (Public Switched Telephone Network) y cumple con los requisitos establecidos en las secciones 15 y 68 de las Reglas y Regulaciones de la FCC y con los Requerimientos Técnicos para Equipos de Terminales Telefónicas (Technical Requirements for Telephone Terminal Equipment), publicado por ACTA.
-
Page 53: Información De Interferencias
Información de Interferencias Este artefacto cumple con la Parte 15 de las Reglas de la FCC. Su funcionamiento es sujeto a las dos condiciones siguientes: (l) Este artefacto no puede causar interferencia dañosa, y (2) Este artefacto debe aceptar cualquier interferencia recibida, incluyendo interferencia que puede causar un funcionamiento no deseado. - Page 54 Información Importante Declaración de la FCC sobre Exposición a la Radiación RF Este equipo cumple con los límites a la exposición de radiación RF de la FCC establecidos para un ambiente no controlado. Este equipo deberá ser instalado y operado a una distancia mínima de 20 centímetros entre el radiador y su cuerpo.
-
Page 55: A Uto Tandby
nformacIón sobre la probacIón de nformacIón de nterferencIas ompatIbIlIdad con udífonos ... 3 IcensIng eclaracIón de la sobre rf ... 4 xposIcIón a la adIacIón nformacIón para el roducto ... 7 ntroduccIón ... 7 Ista de artes equeRimientos de nchufe ... -
Page 56: Tabla De Contenido
Tabla de Contenido i usted RogRamó su á ...35 ocal lamada en sPeRa dentificadoR ...35 lamada Itácora de emorIa y emorIa del ... 36 IrectorIo elefónIco ñadiR egistRos del ...36 elefónico lmacenar un egIstro arcacIón de un oque evisaR egistRos del ...37 elefónico ditaR un... -
Page 57: Introducción
Introducción CUIDADO: Cuando use equipo telefónico, hay instrucciones básicas de seguridad que siempre deben seguirse. Refiérase a la sección INSTRUCCIONES IMPORTANTES DE SEGURIDAD provistas con este producto y guárdelas para referencia en el futuro. IMPORTANTE: Como los teléfonos inalámbricos operan con electricidad, usted debe tener por lo menos un teléfono en su casa que no sea inalámbrico, en caso de una interrupción de corriente. Lista de Partes Asegúrese de que su paquete incluye los artículos mostrados aquí. Base Soporte del escritorio... -
Page 58: Sistema Digital De Seguridad
Conexión y Programación Instalación Sistema Digital de Seguridad Su teléfono inalámbrico usa un sistema de seguridad digital para evitar el timbrado falso, el uso no autorizado y cargos a su línea telefónica. NOTA SOBRE LA INSTALACIÓN: Algunos teléfonos inalámbricos operan a frecuencias que pueden causar o recibir interferencia con aparatos de televisión, hornos de microondas, hornos, o videocaseteras que se encuentren cerca de este aparato. -
Page 59: Formato Del Auricular
Formato del Auricular 3 Soft keys (Tres teclas de función programables) DND/Privacy (botón no molestar/ privacia) Exit (botón salir) VOL +/- (botón de volumen) (botón directorio) Talk (botón llamar) * Tone (botón tono) Mute/Del (botón mudo/ bocina) Int/Hold (botón intercomunicación/ sostener) Conexión y Programación Indicador de... -
Page 60: Formato De La Base
Conexión y Programación Formato de la Base DND/Privacy (botón no molestar/ privacia) Delete (botón borrar) Exit (botón salir) Charge LED (LED carga) Headset (botón audífono) (botón mudo) Flash (botón para servicios especiales) Ans Sys (botón contestadora) Memo (botón) Play/Stop (botón reproducir/ detener) directorio) 3 Soft keys... -
Page 61: I Nstalación Del
Instalación del Teléfono Instalar la Batería del Auricular NOTA: Usted debe conectar la batería del auricular antes de utilizar el aparato. PRECAUCION: Para reducir el riesgo de fuego o lastimaduras personales, use solamente la batería de Níquel- Hidruro Metálico (Ni-MH) modelo 5-2734 aprobado por Thomson Inc. eso es compatible con esta unidad. 1. Localice la puerta de la batería y la batería que vienen empacadas juntos dentro de una bolsa de plástico y están separados del auricular. 2. -
Page 62: Estación Base
Conexión y Programación Estación Base El teléfono puede ser conectado a dos receptáculos de pared para dos líneas (RJ14C) para acomodar las dos líneas. 1. Elija un área cerca de una toma eléctrica y de un receptáculo de pared para teléfono (RJ11C), y coloque su teléfono inalámbrico en una superficie nivelada, tal como un escritorio o la parte superior de una mesa, o usted puede montarlo en la pared. - Page 63 Conexión y Programación 4. Si usted quiere montar el teléfono en la pared, puede conectar las 2 líneas tal como se indica en el siguiente diagrama; Linea 2 Linea 1 ‑O‑ Linea 2 Linea 1 ‑O‑ Lineas 1 + 2...
-
Page 64: P Rogramación Del
Programación del Teléfono 5. Coloque el auricular en la base. El indicador de carga se ilumina, comprobando que la batería está cargando. 6. Permita que el teléfono cargue por 14 horas antes del primer uso. Si usted no carga apropiadamente el teléfono, el desempeño de la batería puede verse disminuido. -
Page 65: D Esde El M Enú De C Onfiguración
4. Presione la tecla de función programable SELECT (derecha) para confirmar y usted puede programar los elementos siguientes: Fecha/Hora (solamente la base), Respuesta Automática (solamente el auricular), Intercomunicación Respuesta Automática (tanto en la base como en el auricular), Modo Marcación (solamente la base), Código de Area (solamente la base), Registro (solamente el auricular), Desregistro (solamente la base),... -
Page 66: R Espuesta
Programación del Teléfono Respuesta Automática (solamente el auricular) Esta opción le permite levantar el auricular de la base para responder una llamada entrante sin presionar el botón Talk/Spk/L1/L2. Cuando está apagada, esta función está inhabilitada en el auricular. Desde el Menú de Configuración de Teléfono: 1. -
Page 67: C Ódigo De A Rea
Código de Area (solamente la base) El teléfono usa un código de área preprogramado para determinar el formato del número a visualizar cuando un registro de Identificador de Llamada válido se recibe. El Código de Area preprogramado es usado también para la modalidad de Retorno de Llamada. Desde el Menú... -
Page 68: P Ara R Emover El R Egistro
Programación del Teléfono Para Remover el Registro de un Auricular La remoción del registro cancela el registro. Durante el proceso de remoción de registro, mantenga el auricular cerca de la base. ADVERTENCIA: No se recomienda la remoción de registro de un auricular a menos que sea absolutamente necesario, ya que una vez que un auricular es desregistrado, las características telefónicas de ese auricular no pueden ser usadas hasta que vuelva a ser registrado. Desde el Menú de Configuración de Teléfono: 1. -
Page 69: N Ombre De A Uricular
Nombre de Auricular (solamente el auricular) Desde el Menú de Configuración de Teléfono: 1. Presione el botón VOL (‑ ó +) para desplazarse a Nombre de Auricular. 2. Presione la tecla de función programable SELECT. El nombre predeterminado es Auricular. 3. -
Page 70: Contraste
Programación del Teléfono Idioma Desde el Menú de Configuración de Pantalla: 1. Presione el botón VOL (‑ ó +) para desplazarse a Idioma. 2. Presione la tecla de función programable SELECT. 3. Use el botón VOL (‑ ó +) para seleccionar Inglés, Francés, Español. La configuración predeterminada es Inglés. -
Page 71: Olumen De Imbre
Tono de Timbre Hay 8 niveles de tono para su selección. Estos son Melodía 1 a 8 para Línea 1 y Línea 2 respectivamente. Desde el Menú Configuración de Sonido: 1. Presione el botón VOL (‑ ó +) para desplazarse a Tono de Timbre. 2. -
Page 72: Estado On/Off
Programación del Teléfono Estado On/Off Esto es usado para encender o apagar el sistema de contestadora para cada línea telefónica en forma individual. Desde el Menú del Sistema de Contestadora: 1. Presione el botón VOL (‑ ó +) para desplazarse a Estado On/Off. 2. -
Page 73: Configuración De Horas De Oficina
NOTA: Si usted selecciona la opción “Por Tiempo” cuando haya una llamada entrante, el OGA “Horas Hábiles” o el OGA “Horas Inhábiles” se visualizará según el horario de oficina que usted establezca. Configuración de Horas de Oficina Desde el Menú del Sistema de Contestadora: 1. -
Page 74: Demora Del Timbre
Programación del Teléfono Ejemplo: a) Establecer las Horas Hábiles para iniciar a las 9:00 a.m., y “Sólo Anuncio” como NO. b) Establecer las Horas Inhábiles para iniciar a las 5:00 p.m., y “Sólo Anuncio” como NO. c) Seleccione “Por Tiempo” al seleccionar el OGA. Cuando la llamada llegue dentro de las 9:00 a.m. -
Page 75: Alerta De Mensaje
Alerta de Mensaje Esta característica configura su sistema de contestadora para dar un tono de alerta cada 10 segundos cuando haya nuevo mensaje. Desde el Menú del Sistema de Contestadora: 1. Presione el botón VOL (‑ ó +) para desplazarse a Alerta de Mensaje. 2. - Page 76 Operación del Teléfono Operación del Teléfono Para hacer Llamadas con el Auricular Inalámbrico 1. Presione el botón Talk, la unidad tomará la primera línea disponible para usted. ‑O‑ Presione la tecla de función programable Line 1 ó Line 2 para seleccionar una línea que usted desee.
-
Page 77: Premarcación
5. Para el auricular inalámbrico, presione el botón Talk. 6. Espere el tono de marcación, y luego marque el número telefónico. 7. Presione el botón Headset (en base) o el botón End (en el auricular) al terminar. CUIDADO: Use únicamente el auricular Thomson Inc. 5-2425 que son compatibles con este aparato. NOTA: Si el audífono no está conectado (o si no está completamente insertado en el receptáculo del audífono), un tono de error se escucha cuando se presiona el botón Headset. -
Page 78: Auricular Inalámbrico
Operación del Teléfono Para Alternar Entre el Modo Altavoz, Auricular y Audífono Base Para cambiar al altavoz, presione el botón Spk. El indicador altavoz se ilumina. Para cambiar al audífono, presione el botón Headset para activar el audífono, y el indicador de audífono se ilumina. Auricular Inalámbrico Para cambiar al altavoz, presione el botón Spk. - Page 79 Inserción de una Pausa en la Secuencia de Marcación Presione el botón #pause dos veces para insertar una demora en la secuencia de marcación cuando se necesite una pausa para esperar un tono de marcación (por ejemplo, después de marcar el 9 para tener acceso a una línea externa, o para esperar el tono de acceso de una computadora).
- Page 80 Operación del Teléfono 6. Usted puede editar el número de teléfono. 7. Presione la tecla de función programable SAVE para entrar a la selección de Melodía de Tono VIP. Transferencia de una Llamada a otra Extensión 1. Presione la tecla de función programable XFER cuando el teléfono esté en modo Hablar.
-
Page 81: Llamadas De Conferencia
Retención En modo Hablar, presione el botón Hold para retener la línea. “Línea X en retención” se muestra en la pantalla, y el ícono de línea parpadeará. En la base, el indicador de botón Line parpadeará también. Cuando la línea esté en retención, el tono de alerta de retención será emitido. -
Page 82: Llamadas De Intercomunicación
Llamadas de Intercomunicación Llamada de conferencia de 4 vías (Línea 1 + Línea 2 + 2 extensiones): 1. Una vez que la unidad base o el auricular tenga tanto la Línea 1 como la Línea 2 en retención, presione el botón Intercom y luego seleccione el auricular o base deseada para intercomunicación. -
Page 83: Identificador De Llamada
Búsqueda La característica de búsqueda le ayuda a ubicar un auricular extraviado. 1. Presione el botón Page en la base. El auricular emite bips y el Indicador Visual en el auricular parpadea. “Buscando desde la Base” se muestra en la pantalla del auricular. 2. -
Page 84: R Evisión De R Egistros
Identificador de Llamada Revisión de Registros CID • Presione el botón CID, y luego use el botón VOL (‑ ó +) para desplazarse a través de los registros de llamada. • Cuando usted se desplaza al inicio/fin de la listan, “--INICIO/FIN--” aparece en la pantalla. -
Page 85: Marcación De Regreso De Llamada
Marcación de Regreso de Llamada Al revisar los registros CID, usted puede marcar para regresar la llamada usando los números que se muestran en la pantalla presionando el botón Headset, o el botón Talk, o el botón Spk o el botón Line 1 ó Line 2. Si usted Programó... - Page 86 Memoria Bitácora de Memoria y Memoria del Directorio Telefónico Usted puede almacenar datos en el directorio telefónico (hasta 99 registros en memoria) o en (Intercomunicación/Memoria) Intercom/Memory (10 botones ubicados a la derecha del teclado numérico en la base). El directorio telefónico y cada bitácora de Intercom/Memoria almacenan hasta 16 caracteres y 32 dígitos.
- Page 87 6. Presione la tecla de función programable SAVE. “Ingresar número” se muestra en la pantalla. 7. Use el teclado de tonos para ingresar un número de teléfono. TIP: Presione el botón #pause dos veces para insertar una pausa en un número si es necesario.
- Page 88 Sistema de Contestadora En la Unidad Base: 1. Mientras ve el registro del directorio telefónico, presione la tecla de función programable COPY. 2. “Copiar registro actual o todo el directorio?” se muestra en la pantalla. Presione la tecla de función programable CURR para copiar el registro actual o presione la tecla de función programable ENTIRE para copiar todo el directorio telefónico.
- Page 89 2. Presione el botón Phonebook para accesar el directorio telefónico. 3. Use el botón VOL (‑ ó +) o las teclas numéricas para desplazarse al registro deseado. 4. Presione el botón Talk o Spk en el auricular o presione el botón Speaker o Line 1/2 en la base.
- Page 90 Sistema de Contestadora Registro de Memo Usted puede dejar un mensaje presionando el botón Memo en la base o seleccionando grabación de memo bajo el menú del auricular. 1. Presione el botón Memo en la base o el menú del auricular para ingresar al modo grabación de memo.
- Page 91 Para Borrar Mensajes Usted puede borrar mensajes en las tres siguientes formas: Para borrar un mensaje mientras está en reproducción 1. Seleccione y reproduzca el mensaje que quiere borrar. 2. Presione el botón Delete. La unidad le pedirá que confirme la eliminación.
-
Page 92: Memoria Llena
Otra Información Memoria Llena Cuando la memoria del sistema de contestadora está llena, el sistema responde después de 10 timbres. “Memoria llena” será anunciado y espera que usted ingrese un código de seguridad de 3 dígitos. Si usted no ingresa el código de seguridad en 7 segundos, el teléfono cuelga. - Page 93 Indicadores de Mensajes del Identificador de Llamadas Los siguientes mensajes muestran el estado del teléfono, proveen la información del Identificador de Llamadas, o le ayudan a programar y a utilizar su teléfono. BORRA TODO? BORRAR? FINE DE LISTA INSCRIBA NOMBRE INSCRIBA NUMERO NUEVA LLAMADAS NOMBRE DEL AURICULAR NO DISPONIBLE LINEA NO LINEA OCUPADA...
- Page 94 Otra Información Señales Sonoras del Auricular Señal Significado Un tono de gorgeo largo (con el timbre activado) Dis bips cortos Un tono corto cada 14 segundos Un tono largo Un tono de gorgeo corto (con el timbre activado) Solución de Problemas Soluciones para el Teléfono No hay tono de marcar •...
-
Page 95: Cuidado General Del Producto
El aparato se traba y no hay comunicación entre la base y el auricular inalámbrico • Desconecte el cable de corriente del enchufe eléctrico y de la parte posterior de la base. Quite la batería del auricular. Espere 30 segundos y vuelva a conectar el cable de corriente al enchufe de pared y al enchufe en la parte posterior de la base. -
Page 96: Causas De Una Mala Recepción
Garantía Causas de una Mala Recepción • Recubrimiento externo de la casa con aluminio. • Aislación con revestimiento de papel de aluminio. • Conductos de calefacción y otras construcciones de metal que paran las señales de radio. • Está demasiado cerca de los aparatos eléctricos como microondas, cocina, computadoras, etc. - Page 97 Cómo obtener servicio: • Empaque bien la unidad, incluyendo todos los cables, etc., que originalmente venían con el producto. Se recomienda usar el cartón y materiales de empaque originales. • “Prueba de compra como factura o recibo de compra, que ofrezca evidencia de que el producto está...
- Page 98 Indice Acceso Remoto desde una Parte Remota Actualizar Lista de Auricular Alerta de 2a. Llamada Alerta de Mensaje Auricular Inalámbrico Auto Standby Ayuda de la Garantía Base Bitácora de Memoria y Memoria del Directorio Telefónico Búsqueda Cambiar la Batería Causas de una Mala Recepción Clave de Acceso Remoto Código de Area Compatibilidad con Audífonos (CCA)
- Page 99 Para Almacenar un Registro en Marcación de un Toque Para Alternar Entre el Modo Altavoz, Auricular y Audífono Para Añadir Registros del Directorio Telefónico Para Borrar Mensajes Para Contestar una Llamada Para Copiar un Registro del Directorio Telefónico Para Editar un Registro del Directorio Telefónico Para Eliminar Todos los Registros de Llamada...
-
Page 100: Información De Accesorios
área individuales a las cuales se envíe la mercancía. Los artículos están sujetos a disponibilidad. Visite el sitio de RCA en www.rca.com Por favor no envíe ningún producto a la dirección de Indianápolis enlistada en este manual o en la caja. Esto únicamente resultará en un retraso para dar servicio a su producto.