Table of Contents
Advertisement
Advertisement
Table of Contents

Related Manuals for THUNDER TIGER ER-1


Summary of Contents for THUNDER TIGER ER-1
-
Page 2: Table Of Contents
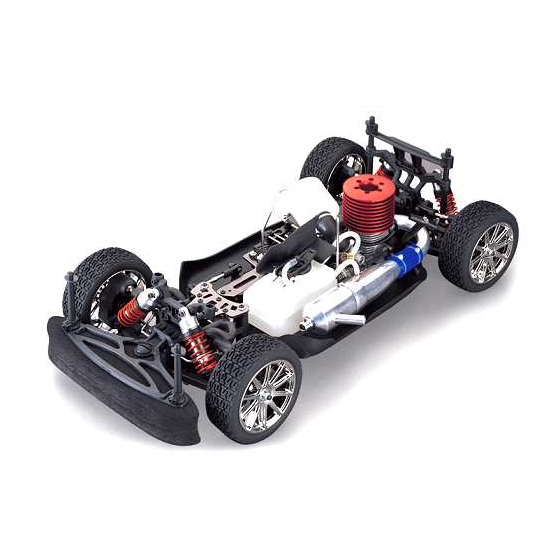
INTRODUCTION Thank you for purchasing the Thunder Tiger ER-1 Nitro Powered 4WD All Road Car. Thunder Tiger strives to bring you the highest level of quality and service we can provide. We race and test our products around the world to bring you state-of-the-art items. -
Page 3: Important Notes & Warning
3. If the fuel gets onto your skin, wash it well with soap and water. WARNING 1. Improper operations may cause personal and/or property damage. Thunder Tiger and its distributor have no control over damage resulting from shipping, improper construction, or improper usage. -
Page 4: Items Required For Operation
ITEMS REQUIRED FOR OPERA TION CA Glue / Instant Glue Glow Fuel, Methanol RX Battery pack and battery Screw Drivers, Lexan Body Reamer, Hobby Knife, 10% to 30% Nitro charger Lexan Scissors. 5% to 18% Caster / Synthetic Oil 5-WAY WRENCH Hex Wrench Set, 1.5mm / 2.0mm / 2.5mm / 5.0mm 4-Way, 5-Way Wrench Glow Starter w/ Charger... -
Page 5: Unwrapping Contents From Box
UNWRAPPING CONTENTS FROM BOX Contents of the box are secured with reusable zip-ties. To unlock zip-tie, press on the small lever. Pull on the zip-tie while keeping the small lever pressed. Pull the zip-tie out completely. CHARGING THE GLOW PLUG IGNITER Plug the charger into an AC outlet, and then pull on the igniter lever to accept the charging adapter. -
Page 6: Preparing The Radio
PREPARING THE RADIO Check the frequency printed on the transmitter crystal. Remove the radio receiver from box with a screw driver. Check the frequency printed on the receiver crystal, and make sure it matches with the transmitter crystal. Make sure no one will operate on the same frequency when you are. -
Page 7: Operating Radio Steering Function
OPERATING RADIO STEERING FUNCTION Check the radio steering functions. With the radio transmitter and receiver on, turn the steering wheel / stick to the left. The front tires/wheels should turn left accordingly. If not, flip the steering servo reverse switch. Return the steering wheel / stick to neutral. -
Page 8: Adjusting Throttle/Brake Linkage
ADJUSTING THROTTLE / BRAKE LINKAGE To set the throttle/ brake linkage, first the radio should be on and neutral; thus, the servo is at neutral position. With the servo at neutral, loosen the brake linkage collar and move it to a point where the brake levers still have 2mm of space before brakes are engaged. -
Page 9: Fuelling
(replace with new one). After checking, reinstall the glow plug. The glow plug used for this engine can be: Thunder Tiger 9281, McCoy #9 / #59, Novarossi C4S / C5S / C6S,OS #8 / #A3 / #A5, and Picco P6S / P7S. -
Page 10: Starting The Engine
STARTING THE ENGINE Turn on the radio (transmitter first, then receiver) Clip the glow plug igniter onto engine's glow plug. Pull on the engine starter, release, repeat until the engine starts. Throttle maybe required to be opened momentarily, (release back to neutral immediately after it starts). Remove the glow plug igniter from engine after engine has started and warmed up. -
Page 11: Shock And Rear Toe-In Adjustment
SHOCK AND REAR TOE-IN ADJUSTMENT Use the included shock clips to adjust for spring pre-load. Pressing the entire car down, release, and the car should return to ride height (indicated on set-up page). More pre-load clips will produce higher ride height, and less clips will produce lower ride height. Amount of clips used for front and rear shocks can be different, but clips should be the same for left and right. -
Page 12: Troubleshooting
TROUBLESHOOTING If you have trouble starting or keeping your ER-1 running, here's a quick checklist of what to look for first. Description Problem Solution Engine will not Out of fuel ..............Fill fuel tank start Contaminated fuel ............ Replace fuel Glow plug igniter not charged ........