Table of Contents
Advertisement
Advertisement
Table of Contents

Related Manuals for Alesis iMultiMix 8 USB


Summary of Contents for Alesis iMultiMix 8 USB
- Page 1 Reference Manual...
- Page 2 This page intentionally left blank 100%...
-
Page 3: Table Of Contents
Table Of Contents Introduction...3 Welcome!... 3 About the iMultiMix 8 USB...4 iMultiMix 8 USB Key Features ... 4 How to Use This Manual ...5 A Few Words for Beginners...6 Chapter 1: Getting Started ...7 Hooking up the iMultiMix 8 USB ...7 Using Proper Cables ...8... - Page 4 98 Second Edition) ... 21 Connection instructions for Macintosh (OS X only)... 21 Chapter Five: Troubleshooting ...23 Chapter Six: Specifications ...27 Chapter Seven: Block Diagram ...29 Glossary ...31 Warranty/Contact Alesis ...33 Alesis Limited Warranty... 33 Alesis Contact Information... 34...
-
Page 5: Introduction
Introduction Welcome! Thank you for making the Alesis iMultiMix 8 USB a part of your studio. Since 1984, we've been designing and building creative tools for the audio community. We believe in our products, because we've heard the results that creative people like you have achieved with them. -
Page 6: About The Imultimix 8 Usb
Introduction About the iMultiMix 8 USB The iMultiMix 8 USB mixer is the latest in the large family of Alesis audio mixers. We’ve come a long way since the 1622 mixer we first built in 1989. Since that time audio technology has grown in leaps and bounds, pushing up quality and driving down prices. -
Page 7: How To Use This Manual
Chapter 2: A Tour of the iMultiMix describes the iMultiMix 8 USB piece by piece. This chapter also features diagrams of the mixer to help you find each component as you read about it. -
Page 8: A Few Words For Beginners
We realize that some of you who have purchased the iMultiMix 8 USB are fairly new to the art of mixing, and we’ve written this manual with that in mind. We also designed the iMultiMix 8 USB to be both powerful and easy enough to use that even a beginner can quickly pick up the basics. -
Page 9: Chapter 1: Getting Started
Getting Started Hooking up the iMultiMix 8 USB This diagram will help you get the iMultiMix 8 USB hooked up and ready to go. The equipment you use depends on personal preference and on whether you’re performing live or recording. -
Page 10: Using Proper Cables
Getting Started Using Proper Cables When connecting instruments and other equipment to the iMultiMix, it’s important that you use the appropriate types of cables. Here are some simple but important guidelines: For the mic inputs, use XLR cables. For the line inputs and all other 1/4” connections, use 1/4” mono TRS cables. -
Page 11: Chapter Two: A Tour Of The Multimix
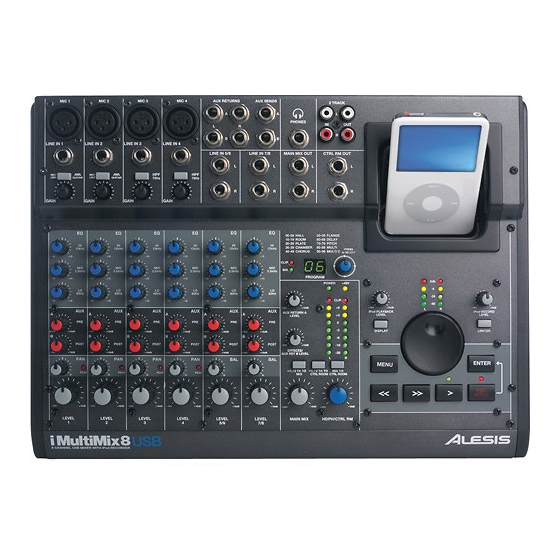
Patchbay At the rear portion of the top of the iMultiMix 8 USB, you’ll find the patchbay. This is where you plug in instruments, signal processors, multitrack recorders and other devices. In the following paragraphs, we tell you all about the inputs, outputs, switches and knobs you see in this section of the mixer. -
Page 12: Line Inputs (Channels 5 - 8)
A Tour of the iMultiMix USB Line Inputs (Channels 5 – 8) Unlike channels 1 – 4, the line inputs on channels 5 – 8 are stereo inputs that have left and right inputs. If you’re using one of these channels as a mono input, plug your instrument into the left input. -
Page 13: Channel Strips
A Tour of the iMultiMix USB Channel Strips The eight channel strips are virtually identical to each other, with the only difference being that channels 1 – 4 are mono and channels 5 – 8 are stereo. Each channel strip contains the following components. Level Control The level control knob controls how much of the signal from the mic or line inputs is sent to the channel. -
Page 14: Master Section
A Tour of the iMultiMix USB The iMultiMix gives you three bands of EQ per channel. Using these knobs, you can tailor the channel’s signal by boosting some frequencies and cutting others. The LO and HI controls are shelving controls with fixed frequencies of 75 Hz and 12 kHz respectively. -
Page 15: Hdph / Ctrl Rm
AUX RETURN A. EFFECTS / AUX RET B LEVEL If you are using one of the iMultiMix 8 USB’s internal effects, this knob controls the effect level. If AUX SEND B is connected to an external device, this knob controls the level for AUX RETURN B. -
Page 16: Ipod Section
A Tour of the iMultiMix USB iPod Section The iPod section contains the controls for your iPod. With the iMultiMix you can not only play content from your iPod, but you can also record your mix directly to it. Please note that not all iPod models are compatible for playback and recording from the iMultiMix –... -
Page 17: Rear Of The Mixer
Power Supply Unit This unit provides 18.5 VAC at 1000 mA, more than enough to keep your iMultiMix 8 USB running smoothly. As with nearly all power supply units, this one tends to get warm when left on for a while. - Page 18 A Tour of the iMultiMix USB This page intentionally left blank.
-
Page 19: Processor
Digital Effects Processor Onboard your iMultiMix 8 USB™ is a powerful effects unit that has 100 preset programs. We offer a few tips on where to use these, but don’t limit yourself to our suggestions. We recommend that you experiment with these effects to get a good feel for how they can improve your mixes. -
Page 20: Chorus
Digital Effects Processor CHORUS These create the effect of multiple voices (or instruments) sounding at once from a single input. FLANGE These create a sweeping, swooshing sound effect that you will probably recognize. DELAY These effects are based on a discreet repetition or echo of the input. -
Page 21: Chapter Four: Applications
Applications Your iMultiMix 8 USB can be used in a wide variety of ways in both live and recording applications. You have several options for bringing sound into and out of the board. And when it’s brought in, you can route it to various parts of the mixer for certain desired effects, or even send it to an external processor or tape deck and back. -
Page 22: Simple Live Setup
Using Additional External Audio Sources The iMultiMix 8 USB gives you 8 audio inputs in all. If you want to bring external audio sources into a recording or live mix, you can do it in several different ways. Using the 2-TRACK IN, you can add a tape deck, ADAT, CD player or other source to the mix. -
Page 23: Sending And Receiving Audio Data
Applications recorder—or use dedicated Digital Audio Workstation software— to record and play back CD-quality audio within your computer. A 2-meter USB cable is included. If you need to connect the Multimix across a longer distance, we recommend that you purchase a longer USB cable, as using hubs and other extenders with USB audio often causes glitches and other problems. - Page 24 Applications This page intentionally left blank.
-
Page 25: Chapter Five: Troubleshooting
Troubleshooting If you’re having problems operating the iMultiMix 8 USB, this troubleshooting index will help you correct them. Symptoms No sound from the mixer. Audio signal is distorted. My iPod recording is distorted. Cause Mixer is not plugged in or turned Channel levels are too low. - Page 26 Troubleshooting Audio signal carries an unwanted hum. Microphone level is too low. No or low sound from a channel. Internal effects aren’t working. I cannot record with my iPod. I cannot play music from my iPod. My iPod will not charge while recording.
- Page 27 Certain USB chipsets have design limitations or IRQ assignment restrictions that must be resolved before audio can work correctly on them. See your USB chipset documentation for further information if required. Replace with correct power supply (only use Alesis-recommended AC output power supply).
- Page 28 Troubleshooting This page intentionally left blank...
-
Page 29: Chapter Six: Specifications
Specifications For the more technical-minded, here are some detailed specifications for the iMultiMix’s operating levels. Input Channels Mic In Sensitivity Range: Line In Sensitivity Range: Mic/Line Gain Range: Equalization High-Pass Filter: High Shelving: Mid Bandpass/Band Reject: Low Shelving: Aux Sends Aux Send A &... - Page 30 Specifications This page intentionally left blank...
-
Page 31: Chapter Seven: Block Diagram
Block Diagram... - Page 32 Block Diagram This page intentionally left blank...
-
Page 33: Glossary
Glossary Here are the definitions to some terms you’ll probably encounter while using your iMultiMix 8 USB. Term aux (auxiliary) An additional set of outputs and inputs found on many mixers. These allow the addition of external effects and other audio sources. - Page 34 The measure of extra amplification applied to an audio signal. Channels 1 – 4 on your iMultiMix 8 USB have gain controls, which are useful for boosting mic and line signals. The amount of power driving an audio signal. The most common names given to levels of varying voltage are, from lowest to highest, microphone level, instrument level and line level.
-
Page 35: Warranty/Contact Alesis
For the most effective service, the purchaser should register the purchase on the ALESIS website at http://www.alesis.com/support/warranty.htm. During the warranty period ALESIS shall, at its sole and absolute option, either repair or replace free of charge any product that proves to be defective on inspection by ALESIS or its authorized service representative. -
Page 36: Alesis Contact Information
8 USB Reference Manual Revision 1.0 by Edwin Erdmann, Fred Morgenstern, Stephan Vankov Copyright 2007, Alesis, LLC. All rights reserved Reproduction in whole or in part is prohibited. “iMultiMix 8 USB” is a trademark of Alesis, LLC. Specifications subject to change without notice.