
Related Manuals for COMPRO VideoMate IP50


Summary of Contents for COMPRO VideoMate IP50
-
Page 1: Network Camera
VideoMate IP50/50W Network Camera Installation Guide Compro Technology, Inc. www.comprousa.com... -
Page 2: Table Of Contents
Resetting to the Factory Default Setting ............ 31 Copyright © 2001-2009. Compro Technology, Inc. No part of this document may be copied or reproduced in any form or by any means without the prior written consent of Compro Technology, Inc. -
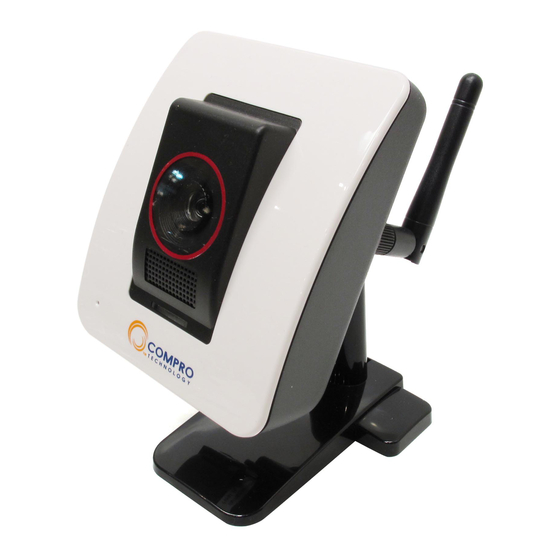
Page 3: Ip50 / 50W Network Camera Hardware Layout
IP50 / 50W Network Camera Hardware Layout Package Contents: * Quick setup guide with software CD (ComproView Manual) * Bracket * DC adapter AC100V-240V in / DC12V * Screws for ceiling mount * LAN cable * Wireless antenna (IP50W only) -
Page 4: Assembly And Disassembly
Assembly and Disassembly Assembly Disassembly... -
Page 5: Mounting
If user connects the IP camera on the intranet, then the same group of user can share that IP camera to use. 1. Plug in the power adapter to camera. 2. Use the standard RJ-45 network cable to connect with the Compro IP 50(W). Important! If the power cable (IP50W) and the network cable (IP50) are not securely fastened, it could lead to unstable connection. -
Page 6: Wireless Connection
(IP50W only): Wireless Connection On the IP50W model, you also have the option of using the wireless connection method. Please keep in mind that you can only have one active connection only, via LAN or wireless. If user connects the IP camera on the intranet, then the same group of user can share that IP camera to use. - Page 7 and closed circuit. You can check the status of the circuit by going to the Setup > Event Set > I/O Status. The output port is normally used to trigger external audio or visual indicators, e.g. sirens or strobe lights, etc. Name Specification Note...
-
Page 8: Software Installation
Software Installation: Before ComproView installation, user has to make sure the IP Camera is connected to the network. 1. Insert the ComproView installation CD. 2. Please read the license agreement, then select “I accept the terms of the license agreement”, and then press the “Next” button to continue the install process. - Page 9 3. Please enter the user name and the company name.
- Page 10 4. Depends on user’s demand to choose the “Complete” or “Custom” selection, and then press the “Next” button to continue the install process. 5. If user chooses the “Complete” selection, please press the “Install” button to start the installation.
- Page 11 6. If user chooses the “Custom” selection, user could choose the specific file folder to install the program.
- Page 12 7. After all the setting is ready, please press the “Install” button to start the installation. 8. After the install process completed, the ComproView system is finished the installation. 9. Before using the IP camera, please run the included IP Camera Utility to customize the camera to your local condition.
- Page 13 10. On page 1 of the Wizard, you can set the basic setting of the camera, including name, time, port and frequency. Please note, the default value should be used for the best performance. The “Utility Frequency” represents the frequency of your local mains power.
- Page 14 11. The default setting is for the IP camera to obtain IP address automatically via LAN connection. 12. To use the wireless network as the primary connection, please tick the “Use the wireless network as the primary connection” option.
- Page 15 13. Once all of the previous settings had been done, please press the “Finish” button to finalize the setup of this particular camera. You will need to follow all of the above processes should you wish to set another one. Note: It takes around 1 minute for the camera to apply the setting and operational.
-
Page 16: Using The Ip Camera
Using the IP Camera: Compro Technology provides a range of access method to access and using the IP camera that you’ve just installed. 1. Accessing a single camera via the Internet Explorer which is found on all Windows system. This is the easiest way of using the IP camera and requires little learning of the software. -
Page 17: Web Browser Access (Internet Explorer)
Web Browser Access (Internet Explorer): User can monitor the current condition of the monitor area via Internet Explorer which is found on all Windows based machine. Please refer the following steps: 1. Open the Internet Explorer. 2. Enter the IP 50 / 50W’s IP address. 3. - Page 18 4. After enter the valid username and password, Internet will show up the message to warning user to install the ActiveX selection. 5. Please press the selection and choose to install the ActiveX 6. And then the reconfirmation dialog will appear on the screen, please press “Install”...
- Page 19 7. After ActiveX install completed, user could start to use web browser to use IP camera function. Note: If your IP camera falls behind firewalls, you will need to set port forwarding for ports 80 and 554 (default value) to the internal IP address of the camera.
-
Page 20: The Internet Setting
The IP camera connection could follow the method below: 1. If user’s PC is support Universal Plug and Play (UPnP™) service and network setting is in DHCP, the Compro IP50 / 50W will auto detected and add it into the My Network place. (If user could see the Compro IP 50 / 50W already, please switch to next page) Note: If user wants to install the UPnP™... -
Page 21: Access The Ip Camera Via 3Gpp Mobile Phone
Access the IP Camera via 3GPP Mobile Phone: You can access the desired IP camera via compatible 3GPP mobile phone when both the IP camera has a working internet connection and the mobile phone has a good connection on the GPRS or 3G network. -
Page 22: Start Comproview
Start ComproView Once the hardware and software installations are done, user can start configuring the ComproView by adding cameras and setting the detection range. After the software is installed, user could start to add the camera and device to begin the monitoring. 1. - Page 23 4. After login the system, you will be greeted by the Quick Setup Wizard. The Wizard shall guide you through the setup process. You do not have to enter any user name or password when setting the camera unless the default had been changed.
- Page 24 5. When you’ve reached the end of the quick setup and wish to setup more than 1 camera in the system, please check the “Use this Wizard to set the next camera” setting and press the finish button to repeat Step4 until all available cameras had been set. Once the above are done, your security system had been set.
-
Page 25: Manual Installation
Manual Installation Should you wish to manually setup the camera, you can do so via the “Setup” button located on the navigation bar. Once the Setup button had been pressed, user should see the main console panel below the live view window, please go for Setup -> Camera menu ->... - Page 26 7. If the desire model shows up on above column, please select it and press “Add” button to add in the system. There is no need to enter the user name and password manually, unless the user had set a non-default combination to the camera.
- Page 27 8. If user wants to add the new IP camera manually, please enter “Camera Name”, “IP Address”, “User Name”, and “Password”. The default user name and password is “admin”. 9. After IP Camera device is decided, the following option could let user to change “Manufacture”, “Model”, “Format”, “Frame Rate”, “Resolution”, “Compression”, “Rotation”, “Enable Audio”, “Enable IO”, and “Enable PTZ”.
-
Page 28: Client For Windows Mobile 5/6 Mobile Phone
Client for Windows Mobile 5/6 Mobile Phone The ComproView Mobile client is the perfect companion to remotely access the live video and past video history stored on the ComproView. Its function far surpasses the capabilities offered by the standard 3GPP camera since the 3GPP mode only supports the viewing of live image and without audio. - Page 29 Up on starting the ComproView Mobile, you will be greeted by the welcome screen with a list of options. Setup: User selectable option for snapshot directory and phone compatibility mode. Connects to ComproView & Playback mode (LAN only): Please enter the IP address of the machine of which the ComproView is installed and currently operational.
- Page 30 Connect to a single IP camera (LAN/Internet): You can connect to any active IP50W that is currently operational and available on your network. For LAN based connection, you can use the maximum resolution and frame rate supported by your mobile phone. However, for Internet based connections, we recommend nothing higher than 160 x 120 and 5 FPS due to speed limitation imposed by many Internet service providers.
-
Page 31: Resetting To The Factory Default Setting
Status Indicator go out. 2. After about 5 seconds, the Status Indicator brightens up again. It means that the IP camera is back to the factory default. 3. Please re-install the Compro IP 50 / 50W using the one of above method. - Page 32 Compro Technology, Inc. www.comprousa.com P/N 3GA0310475 Rev.1.1...