Advertisement
Quick Links
2 band dual alarm
lamp clock radio
28011
OPERATING INSTRUCTIONS
Electrical requirements
Check the voltage on the rating plate of your clock radio corresponds with your
house electricity supply which must be A.C. (Alternating current).
For clock radios with a fitted plug.
If the socket outlets in your home are not suitable for the plug supplied with this
appliance the plug should be removed and the appropriate one fitted.
IMP0RTANT : THE PLUG REMOVED FROM THE MAINS LEAD, IF
SEVERED, MUST BE DESTROYED AS A PLUG WITH A BARED FLEXIBLE
CORD IS HAZARDOUS IF ENGAGED INTO A LIVE SOCKET OUTLET.
Should the fuse in the 13 amp plug require changing a 3 amp BS1362 fuse must
be fitted.
Battery back-up facility
(unit will work without a battery being fitted)
Your alarm clock radio is equipped with a battery back-up facility.
1
Remove the battery compartment cover (located at the back of the unit) by
sliding down.
2
Insert a battery size 9 volts PP3/6LR61 (Ensure battery is inserted correctly)
3
Replace the battery compartment cover.
Should a power interruption occur the clock will continue to run, however, time
keeping will not be accurate. The display will be extinguished to conserve
battery life but the memory will retain details of the clock time and alarm
settings.
If the optional battery is not installed in case of the AC power failure the display
will blink to indicate the power was interrupted. You will need to reset the clock
and alarm.
Battery back-up is designed to operate for a short period only.
If the unit is not to be used for a prolonged period, remove the battery to avoid
battery leakage.
In the interests of environmental safety : dispose of batteries safely.
Auto dimmer sensor
The unit has a automatic dimmer sensor (24). The clock display (20) will dim
automatically depending upon the darkness.
Earphone socket (earphones not supplied)
To listen to the radio privately, connect the earphones with a 3.5mm plug to the
jack (2) on the side of the unit. Whilst using the earphones make sure that the
alarm is not set to the buzzer position.
P.3
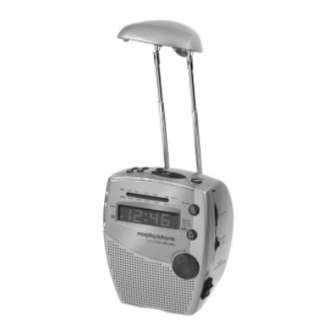
Illustration
12
13
14
15
16
26
25
17
18
19
20
21
22
23
24
Location of controls
1
Lamp on/off switch
2
Earphone jack
3
Volume control
4
Waveband switch
5
Radio AL. Off button
6
Tuning control
7
Radio on button
8
Lamp cover
9
Sleep button
10 Snooze button
11
Battery compartment
12 Time button
13 Alarm 2 button
Switching on and setting the clock time
Before any alarm functions can be used on your alarm clock radio you
must first set the clock to the correct time.
1
Place the unit on a flat surface. Plug the mains plug into the wall socket and
switch on the wall socket.
2
The clock LED display (20) will flash.
3
Press and hold the TIME button (12) and simultaneously hold down the FAST
FORWARD button (15) or the SLOW REVERSE button (16). The LED clock
display (20) will fast forward or reverse the minutes and hour segments.
Release all buttons when the correct time is set.
4
The PM indicator (23) will illuminate to indicate 12.00 midday has been
reached.
Power on and off
The unit must be switched on before the radio can operate.
1
Switch the unit on by pressing the RADIO ON button (7).
2
Press the OFF button (5) to switch off the radio.
Setting the clock alarm time
The alarm function can be set to operate on the following functions: wake up to
two different alarm times which you can choose to use independently or
simultaneously. AL1 or AL2 or AL1 + 2.
Set alarm 1
1
Press and hold the ALARM 1 button (14) and simultaneously hold down the
FAST FORWARD button (15) or SLOW REVERSE button (16).
The clock display (20) will fast forward or reverse the minutes and hour
segments. Release all buttons when the correct alarm time is reached.
Set alarm 2
1
Press and hold the ALARM 2 button (13) and simultaneously hold down the
FAST FORWARD button (15) or SLOW REVERSE button (16).
The clock display will fast forward or reverse the minutes and hour
segments. Release all buttons when the correct alarm time is reached.
If set to AL1 + AL2 the alarm will operate at the preset alarm times.
11
10
9
8
7
6
5
4
3
2
1
14 Alarm 1 button
15 Fast forward button
16 Slow reverse button
17 Dial scale with pointer
18 Alarm 1 on indicator
19 Function switch of alarm 1
20 Clock display
21 Alarm 2 on indicator
22 Function switch of alarm 2
23 PM indicator
24 Dimmer sensor
25 Telescopic arms
26 Angle adjuster
P.2
P.4
Advertisement

Related Manuals for Morphy Richards IB28011


Summary of Contents for Morphy Richards IB28011
- Page 1 Illustration 2 band dual alarm lamp clock radio Location of controls Lamp on/off switch 14 Alarm 1 button Earphone jack 15 Fast forward button Volume control 16 Slow reverse button Waveband switch 17 Dial scale with pointer Radio AL. Off button 18 Alarm 1 on indicator Tuning control 19 Function switch of alarm 1...
- Page 2 Morphy Richards products are intended for household use only. For indoor use only. Morphy Richards has a policy of continuous improvement in product quality and design. The company, therefore reserves the right to change the specification of its models at any time.