Table of Contents
Advertisement
Quick Links
Owner's Manual
Thank you, and congratulations on your choice of the BOSS
GT-6B Bass Effects Processor.
Before using this unit, carefully read the sections entitled:
• USING THE UNIT SAFELY (page 2–3)
• IMPORTANT NOTES (page 4)
These sections provide important information concerning
the proper operation of the unit.
Additionally, in order to feel assured that you have gained a
good grasp of every feature provided by your new unit,
Owner's manual should be read in its entirety. The manual
should be saved and kept on hand as a convenient reference.
■ Printing Conventions in This Manual
• Text or numerals enclosed in square brackets [ ] indicate buttons.
WRITE button
[WRITE]
[UTILITY]
UTILITY button
• Reference such as (p. **) indicate pages in this manual to which
you can refer.
* All product names mentioned in this document are trademarks or
registered trademarks of their respective owners.
Copyright © 2002 BOSS CORPORATION
All rights reserved. No part of this publication may be reproduced in any form
without the written permission of BOSS CORPORATION.
Advertisement
Table of Contents

Related Manuals for Boss GT-6B


Summary of Contents for Boss GT-6B
- Page 1 Owner’s Manual Thank you, and congratulations on your choice of the BOSS GT-6B Bass Effects Processor. Before using this unit, carefully read the sections entitled: • USING THE UNIT SAFELY (page 2–3) • IMPORTANT NOTES (page 4) These sections provide important information concerning the proper operation of the unit.
-
Page 2: Using The Unit Safely
Refer a long period of time at a high volume level, or at all servicing to your retailer, the nearest Roland a level that is uncomfortable. If you experience Service Center, or an authorized Roland any hearing loss or ringing in the ears, you should distributor, as listed on the “Information”... - Page 3 ......................the unit. • Before using the unit in a foreign country, consult ......................with your retailer, the nearest Roland Service 107c Center, or an authorized Roland distributor, as • Never handle the AC adaptor or its plugs with listed on the “Information” page.
-
Page 4: Important Notes
• Please be aware that all data contained in the unit’s memory may be lost when the unit is sent for repairs. • Use a cable from Roland to make the connection. If using some other make of connection cable, please note the Important data should always be backed up in another following precautions. -
Page 5: Table Of Contents
Contents USING THE UNIT SAFELY ......2 Chapter 4 The Effects Explained....25 COMP/LIMITER (Compressor/Limiter) ......25 IMPORTANT NOTES........4 OD/DIST (Overdrive/Distortion) ........26 ■ OD: Overdrive ................26 ■ DST: Distortion ................26 Main Features ..........7 ■ FUZ: Fuzz ..................26 CHORUS ................27 Panel Descriptions ........8 REV/DLY (Reverb/Delay)/SOS (Sound On Sound)..27 ■... - Page 6 Using Sound On Sound......54 About MIDI.................71 How MIDI messages are transmitted and received....71 Chapter 8 Main types of MIDI message used by the GT-6B ......71 Convenient Features of the GT-6B ....55 About the MIDI implementation ...........72 Factory Settings..............72 Outputting Sounds Without Effects Applied (Bypass)..55...
-
Page 7: Main Features
“Overdrive/Distortion,” and “Pedal Wah” effects. The unit also includes digital out connectors (coaxial), The resulting creations can then be saved on the GT-6B as convenient for digital recording. (p. 58) “Custom” settings. (p. 52) EZ Tone The GT-6B includes thirty representative effect sounds used for creating new sounds. -
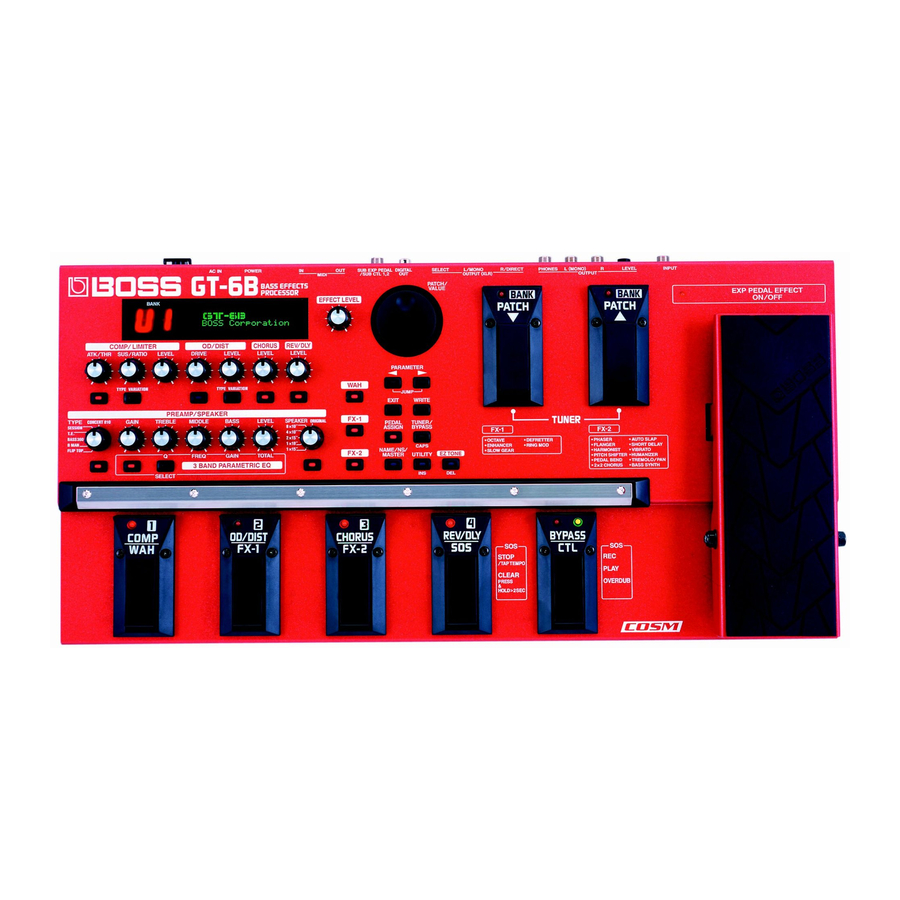
Page 8: Panel Descriptions
■ COMP/LIMITER (p. 25) 1 Display (Compressor/Limiter) A variety of information about the GT-6B appears here. The left display shows the bank number. 3 ATK/THR (Attack/Threshold) Knob The right display indicates patch names, parameters, Adjusts the compressor’s attack and the volume at which and a variety of other information. - Page 9 Panel Descriptions ■ PREAMP/SPEAKER (p. 29) 6 COMP/LIMITER ON/OFF Button (Preamp/Speaker) Press this to switch the compressor/limiter on and off and when changing other settings. 16 TYPE Knob 7 TYPE VARIATION Button Selects the preamp type. Selects the compressor or limiter type. 17 GAIN Knob Adjusts the amount of amplification from the preamp.
- Page 10 * To jump to the main parameters, hold down one of these Controls volume, wah, and other parameters. buttons while you press the other. With items for which there aren’t that many parameters, the GT-6B jumps to the last (or initial) parameter. When you operate the expression pedal, please be...
-
Page 11: Rear Panel
Panel Descriptions Rear Panel fig.00-02 10 11 1 INPUT Jack 7 DIGITAL OUT Connector (p. 58) The bass guitar is connected here. Outputs digital audio signals. 2 OUTPUT LEVEL Knob 8 SUB EXP PEDAL/SUB CTL 1,2 Jack (SUB EXP Pedal/SUB CONTROL Pedal) (p. 48 ) Adjusts the volume level of the output from the output Connect an optional expression pedal (such as the EV-5) (1/4”... -
Page 12: Chapter 1 Playing Sounds
* When using mono output, connect the cable only to the OUTPUT L (MONO) jack. * Use only specified expression pedals (optional Roland EV-5 or Roland FV-300L and PCS-33). Use of other manufacturer’s products may result in damage to the unit. -
Page 13: Turning On The Power
Chapter 1 Playing Sounds Turning On the Power * When using the GT-6B with a foot switch (the optional FS- 5U) connected to the SUB EXP PEDAL/SUB CTL 1,2 jack, set the polarity switch as shown in the following. Once the connections have been completed, turn on power to fig.01-03... -
Page 14: What Is A Patch
How to Switch Patches switch these sets, you can change tones instantly. Each of these stored sets is called a “patch.” The GT-6B can store 80 “User Patches are switched by rotating the PATCH/VALUE dial patches,” the content of which you can change as you like, while in the “Play screen.”... -
Page 15: Turning Each Of The Effects In A Patch On And Off
1. Before turning off the power, confirm the following. You can use pedals 1–4 to switch on and off the individual • Is the volume on the GT-6B, your amp, and all other effects that are used in a patch. Each pedal shows the names connected devices turned down to the minimum level? of two effects;... -
Page 16: Creating You Own Favorite Tones (Patches)
Fast (EZ Tone) Knobs In addition to tones (patches) that you can actually use in The GT-6B panel features fifteen knob controls. These knobs performances, the GT-6B also features internal sample let you make changes to the selected patch’s tone quickly and settings that are very useful when you want to create such easily. - Page 17 Chapter 2 Creating You Own Favorite Tones (Patches) COMP/LIMITER LEVEL SPEAKER Adjusts the compressor/limiter volume level. The volume Selects the speaker type. increases as the knob is turned to the right. When ORIGINAL is selected, you can select the speakers that are best suited for the PREAMP TYPE settings.
-
Page 18: Adding And Omitting Effects
Adding and Omitting Effects Switching Effects with the Pedals The GT-6B is set at the factory so that you can use Pedals “1” You can switch the internal effects on and off, which lets you through “4” to switch specific effects on and off. The names change tones by adding and omitting effects. -
Page 19: Setting The Effect Tones (Quick Settings)
Quick Settings are preprogrammed effect settings. Each The effects include extra parameters in addition to those that effect in the GT-6B has some available quick settings. You can be adjusted directly with the knobs. can easily create new effect sounds, without having to make... -
Page 20: Using The Pedal Effects (Wah, Pedal Bend, Ring Modulator)
Chapter 2 Creating You Own Favorite Tones (Patches) Using the Pedal Effects (Wah, Pedal Bend Pedal Bend, Ring Modulator) fig.02-12 You can use the GT-6B’s expression pedal to obtain wah, pedal bend (pedal-controlled pitch bend), and ring modulator effects. fig.02-11 1. Press [FX-2]. -
Page 21: Ring Modulator
Chapter 2 Creating You Own Favorite Tones (Patches) Ring Modulator Naming Tones fig.02-13 Each patch can be given a name (Patch Name) consisting of up to fourteen characters. You can assign whatever names you like, such as names suggesting the sound created or the name of the song in which it is to be used. -
Page 22: Changing The Order Of The Effects (Effect Chain)
Chapter 2 Creating You Own Favorite Tones (Patches) Changing the Order of the Effects (Effect Chain) You can switch effects on and off even while making the settings for the connection order. You can use the ON/ You can freely change the order in which the effects are OFF buttons corresponding to the effects appearing to connected. -
Page 23: Chapter 3 Saving The Tones You Have Created
1. Select the copy-source patch (refer to “How to Switch Patches”; p. 14). 2. Press [WRITE]. The content of the display changes, and the GT-6B is ready for a User patch to be specified as the copy 1. Press [WRITE]. -
Page 24: Exchanging Patches
Chapter 3 Saving the Tones You Have Created Exchanging Patches On the GT-6B, you can exchange the positions of two User patches. fig.03-05 1. Select the exchange-source patch (refer to “How to Switch Patches”; p. 14). 2. Press [WRITE]. 3. Press PARAMETER [... -
Page 25: Chapter 4 The Effects Explained
Chapter 4 The Effects Explained This chapter describes the particular qualities of each of the Rack 160D Models the dbx 160x. GT-6B’s internal effects, as well as the parameters used to Vtg Rack U Models the UREI 1178. control them. -
Page 26: Od/Dist (Overdrive/Distortion)
Chapter 4 The Effects Explained OD/DIST (Overdrive/Distortion) Custom 2 Type 2 for custom settings. This effect distorts the sound to create long sustain. The GT- ● When CUSTOM is Selected for TYPE 6B provides nine types of distortion with two different custom settings. -
Page 27: Chorus
Chapter 4 The Effects Explained CHORUS Pre Delay Adjusts the time needed for the effect sound to be output This is an effect that adds a slightly detuned sound to the after the direct sound has been output. Setting a longer pre- original bass sound, resulting in a beautiful sound with delay time results in a doubling effect. -
Page 28: Rev: Reverb
Chapter 4 The Effects Explained High Cut * When SOS is selected, Pedal 4 and the BYPASS/CTL pedal function as SOS controls. For more detailed information, refer to The high-cut filter cuts the frequencies above the specified “Using Sound On Sound” (p. 54). frequency. -
Page 29: R&D: Reverb & Delay
Chapter 4 The Effects Explained Delay Time Fine Tempo Makes fine adjustments (in units of 1 ms) to the delay time. This sets the tempo that determines the length of the loop. The CTL pedal indicator flashes at the rate set here. Tap Time When this is set to “BPM,”... -
Page 30: Speaker
Chapter 4 The Effects Explained ● When Type is Set to CONCERT 810 Treble Bright Off, On Adjusts the tone of the upper range. Turns the bright setting on/off. Turn this on to make the Middle sound brighter. Adjusts the tone of the midrange. Ultra Hi Off, On * While some amps do not feature a middle control, this control This controls the ultra high-frequency range lying beyond treble. -
Page 31: Band Parametric Eq
This adjusts the equalizer bandwidth (the range of effect. frequencies to which the equalizer is applied). The The GT-6B’s expression pedal automatically switches to the bandwidth is narrowed as the value is increased, resulting in wah pedal function when “WAH” is selected in FX Select. -
Page 32: Tw: Touch Wah
Chapter 4 The Effects Explained ● When Type is Set to Custom 1–3 Down: The filter falls from higher to lower frequencies in response You can make settings for the following parameters when to the input level. TYPE is set to Custom 1–3. Sens Making “Custom”... -
Page 33: Oct: Octave
Chapter 4 The Effects Explained FX-1 Rate This selects the auto wah cycle. With FX-1, you can select the effect to be used from the * When set to BPM, the value of each parameter is set according following. to the value of the Master BPM (p. 44) specified for each patch. •... -
Page 34: Sg: Slow Gear
Chapter 4 The Effects Explained Sens Depth This adjusts the Enhancer sensitivity. The more the value is This controls the ratio of harmonics. Raising the value increased, the more softly you can play and still have the increases the harmonic components, resulting in a unique effect applied. -
Page 35: Ph: Phaser
Chapter 4 The Effects Explained FX-2 12Stage: This is a twelve-stage phaser. This produces a phase effect With FX-2, you can select the effect to be used from the with greater depth. following. Bi-Phase: • PHASER This is a phaser effect in which two phase shift circuits are •... -
Page 36: Fl: Flanger
Chapter 4 The Effects Explained ■ FL: Flanger ■ HRM: Harmonist This produces a flanging effect that gives a sort of “twisting” This effect adjusts the shift in pitch according to an analysis character to the sound. Although it resembles the phaser of the pitch of the bass input, allowing you to create effect, the flanger yields a colder, more metallic twisting harmonics based on Diatonic or user definable scales. -
Page 37: P.s: Pitch Shifter
Chapter 4 The Effects Explained Feedback 5. Press PARAMETER [ ] to move the cursor, then rotate the PATCH/VALUE dial to set the User scale. This adjusts the feedback amount of the harmonist sound. * Only HR1 can be selected when this is set to 2-Mono or 2- Scale Stereo. -
Page 38: Pb: Pedal Bend
Chapter 4 The Effects Explained Pitch Min Mono: This mode is for the input of individual notes. This sets the pitch at the point where the expression pedal is Select this setting when you want to obtain a pedal bend fully lifted. -
Page 39: Asl: Auto Slap
Chapter 4 The Effects Explained Lo PreDly (Low Pre Delay) Parameter Value Adjusts the time from when the direct sound in the lower Step 1–17 range is output until the effect sound is output. Extending Pitch -24 – +24 the pre-delay produces the sensation of multiple sounds Length being played (doubling effect). -
Page 40: Sdd: Short Delay
Chapter 4 The Effects Explained Attack 4. Press PARAMETER [ ] a number of times until the User Phrase settings screen is displayed. Specifies that the note is to be played with an attack. fig.04-04 Less: The note is played with no attack. Good for hammering and other such techniques. -
Page 41: Vib: Vibrato
Chapter 4 The Effects Explained ■ VIB: Vibrato Mode This sets the mode used to switch the vowels. The vibrato effect is created by slightly modulating the pitch. 1 Shot: Parameter Value The tone changes from Vowel 1 to Vowel 2 one time only as the strings are played. -
Page 42: T/P: Tremolo/Pan
Chapter 4 The Effects Explained ■ SYN: Bass Synth Manual (with Auto) This effect produces a synth bass sound. Two methods are Sets the point at which the two vowels will be switched. used, the “Internal Sound Generator method” and the When set to “50,”... -
Page 43: Octave Shift
Chapter 4 The Effects Explained Bow: * When using the synth bass with this parameter on, errors may Waveform shaping outputs a soft sound with no attack. occur if the unit is unable to detect the attack properly. Completely mute the other strings, and play single notes. Octave Shift Resonance (with Square and Saw) -
Page 44: Ns: Noise Suppressor
Chapter 4 The Effects Explained NS: Noise Suppressor Master BPM Tap Input This effect reduces the noise and hum picked up by the bass. You can use the CTL pedal to set the Master BPM by Use this when noise that occurs when you are not playing the means of tap input. -
Page 45: Setting The Pedal Functions (Pedal Assign)
Chapter 5 Setting the Pedal Functions (Pedal Assign) Settings for Using the Expression Pedal These settings can be saved separately to individual patches. Normally, “FV” (Foot Volume) is assigned to the Selecting Each Effect to Be Turned expression pedal, allowing it to be used as a “volume On and Off with the Number Pedals pedal”... -
Page 46: If You Don't Want To Use The Expression Pedal As A "Volume Pedal
Chapter 5 Setting the Pedal Functions (Pedal Assign) Settings for Using the Expression If You Don’t Want to Use the Expression Pedal as a “Volume Pedal” Pedal Switch/CTL Pedal Use the procedure below to turn the expression pedal off. 1. Press [PEDAL ASSIGN]. Making Settings Instantly (Quick Settings) 2. -
Page 47: If You Don't Want To Use The Expression Pedal Switch Or Ctl Pedal
] (or [ ]) and pressing [ Expression Pedal Switch (or [ ]) causes the GT-6B to jump to the main screen, Target value range: Min allowing you to reduce the number of times you need to Expression Pedal Switch press the buttons. -
Page 48: Controlling Effects With The Gt-6B Pedals, External Pedals, And External Midi Devices
Chapter 5 Setting the Pedal Functions (Pedal Assign) Controlling Effects with the GT-6B Pedals, 5. To save the settings, use the Write procedure (p. 23). Press [EXIT] to return to the Play screen. External Pedals, and External MIDI Devices Making the Assign On/Off Setting Make these settings when controlling effects with the GT- 6B’s expression pedal, expression pedal switch, or CTL... -
Page 49: Making The Parameter Settings
Changing the parameter simultaneously while using different sources may result in noise being generated. * The GT-6B does not transmit MIDI clock. Therefore, when selecting MIDI Start/Stop as the target, be sure the connected receiving device is capable of being set to receive MIDI Start/... - Page 50 * The GT-6B’s control pedal is a momentary-type pedal. Switch Expression Pedal the settings as needed to accommodate your setup. * The range that can be selected changes according to the target Normal setting.
-
Page 51: Controlling Foot Volume And Pitch Shifter With An External Expression Pedal
Chapter 5 Setting the Pedal Functions (Pedal Assign) Controlling Foot Volume and Pitch Shifter Active Range with an External Expression Pedal fig.05-18 Make the following settings to use an expression pedal connected to the SUB EXP PEDAL/SUB CTL 1,2 jack to control foot volume and pitch shifter. -
Page 52: Chapter 6 Using The Customize Function
This is the sound of the BOSS ODB-3. Overdrive/Distortion Settings DS-1: This gives a basic, traditional distortion sound. You can prepare two different sets of settings in the GT-6B, MT-2: Custom 1 and Custom 2. This is the sound of the BOSS MT-2. -
Page 53: Making "Custom" Pedal Wah Settings
Chapter 6 Using the Customize Function Making “Custom” Pedal Type Selects the basic type of wah. Wah Settings CRY WAH: This models the ‘70s-type sound of the CRY BABY wah Here, you can make three different sets of settings, Custom 1, pedal. -
Page 54: Chapter 7 Using Sound On Sound
• Turning off the power to the GT-6B. * Depress the Number 4 pedal at least twice while Tempo (p. 29) • Switching to another patch is set to“BPM,”... -
Page 55: Chapter 8 Convenient Features Of The Gt-6B
3. To save the settings, perform the Write procedure (p. 23). R-OUTPUT-L: Stereo Output Press [EXIT] to return to the Play screen. The GT-6B’s stereo output is output as is, without change. Set the switch to this position when recording in stereo or sending stereo signals to a PA. -
Page 56: Quick Patch Volume Adjustment (Effect Level Knob)
About the Display During Tuning * When the Bypass EXP Mode (p. 55) and Noise Suppressor (p. With the GT-6B’s internal tuner, the note name is indicated in 44) is set to “Off” and only CHORUS or REV/DLY is used, the upper row of the display and the Tuning Guide is shown the direct sound is output as analog output.In this case,... -
Page 57: How To Tune
Regular performance begins is called the standard pitch. You can set 1/2 Step Down the standard pitch on the GT-6B to frequencies from 435 to 445 Hz. 1 Step Down * This is set to 440 Hz when shipped from the factory. -
Page 58: Adjusting The Overall Sound To Match The Usage Environment (Global)
Digital signals are output from the DIGITAL OUT connector on the rear panel. You can connect this directly to the digital The GT-6B includes a feature that allows you to change all of in connector of a digital recorder or other device and record the patch settings temporarily. -
Page 59: Checking The Effect Output Level With The Level Meter
* You can check the level of signals being input to the INPUT jack by selecting “Input.” Selecting “Output” allows you to check the level of signals output from the GT-6B. * You may not be able to achieve the effects adequately if your output levels are set too high. -
Page 60: Chapter 9 Other Functions
Setting the Timing Used for Switching (LCD Contrast) Patches (Patch Select Mode) Depending on where the GT-6B is placed the display may This setting determines how patches are switched with the become hard to read. If this occurs, adjust the display pedals. -
Page 61: Setting The Timing Used For Switching Patches (Patch Change Mode)
Switching the Bank and Number Patches (Patch Change Mode) fig.09-05 This sets the timing with which the GT-6B switches to the next patch when switching patches with the pedals. The Patch Change mode appears only when “BANK/ NUMBER” has been chosen as the Patch Select mode. -
Page 62: Setting "Expression Pedal Hold
If the expression pedal is operated, and that information is transmitted to the GT-6B, the volume changes in accordance with the movement of the pedal. 3. Press [EXIT] to return to the Play screen. -
Page 63: Setting The Knob Functions (Knob Mode)
* When connecting two foot switches using the special optional fig.09-07 Roland PCS-31 connector cord, the foot switch connected using the plug with the white stripe functions according to the Sub Control 1 settings, and the foot switch connected using the plug with the red stripe functions according to the Sub 2. -
Page 64: Chapter 10 Using Midi
MIDI device, the corresponding patches are connected devices match. If the MIDI channel settings are not switched simultaneously. correct, the GT-6B will be unable to exchange data with other MIDI devices. You can set the correspondence between MIDI Program Operating From the GT-6B Change messages and the GT-6B’s patches using the... -
Page 65: Making The Settings For Midi Functions
1–16, Rx Functions fig.10-06 Here is a description of the GT-6B’s MIDI functions. Set them as needed, depending on the intended use. 1. Press [UTILITY] a number of times until the following This sets the MIDI Transmit channel used for transmitting screen appears. - Page 66 Chapter 10 Using MIDI MIDI PC OUT (MIDI Program Change Out) MIDI SUB CTL 1 OUT (MIDI Sub Control 1 Out) Off, On Off, 1–31, 33–95 fig.10-09 fig.10-13 This setting determines whether or not Program Change This sets the controller number when operation data from messages are output when patches are switched on the GT- the external pedal connected to the SUB CTL 1 jack is output as Control Change messages.
-
Page 67: Transmitting And Receiving Midi Data
MIDI Data ID for the transmitting and receiving devices. fig.10-16 On the GT-6B, you can use Exclusive messages to provide another GT-6B with identical settings, and save effect settings on a sequencer or other device. This transmission of data is called “Bulk Dump,” while receiving such data is referred to as “Bulk Load.”... -
Page 68: Receiving Data From An External Midi Device (Bulk Load)
When Receiving Data Saved on a MIDI Sequencer The following appears in the display when the GT-6B Connect as shown below. Set the GT-6B’s Device ID to the finishes receiving the data. same number that was used when the data was transmitted fig.10-22... -
Page 69: Setting The Program Change Map
When switching patches using Program Change messages transmitted by an external MIDI device, you can freely set the correspondence between Program Change messages received by the GT-6B and the patches to be switched to in the “Program Change Map.” Initial Program Change Map Settings The Program Change Map set at the factory is shown below. -
Page 70: Enabling/Disabling The Program Change Map Settings (Midi Map Select)
Program Change Map settings, or to the Change message is transmitted. The correspondence default settings when the GT-6B receives Program Change between the GT-6B’s initial bank and patch numbers and the messages. transmitted Program Change messages is shown in the table 1. -
Page 71: Appendices
MIDI IN. Control change messages * The GT-6B features both “MIDI IN” and “MIDI OUT” connectors. These messages are used to enhance the expressiveness of a performance. Each message includes a controller number,... -
Page 72: About The Midi Implementation
It provides complete details concerning the way MIDI has been implemented on this unit. If you should require this publication (such as when you intend to carry out byte-level programming), please contact the nearest Roland Service Center or authorized Roland distributor. -
Page 73: Restoring The Factory Settings (Factory Reset)
Although the GT-6B’s expression pedal has been set for optimum operation at the factory, extended use and the Restoring the GT-6B to the settings made at the factory is operating environment can result in the pedal going out of referred to as “Factory Reset.”... -
Page 74: Troubleshooting
The volume level of the instrument connected to INPUT jack is too low: If there is no sound, or if the GT-6B does not function as you ❍ Could you be using a connection cable that contains a expect, first check the following points. If the measures in... -
Page 75: Error Messages
(p. 65). to “VALUE Only.” ❍ If you want to be able to switch patches using the ❍ If sending messages from the GT-6B, have you set the PATCH/VALUE dial, set the Dial function to “PATCH settings necessary for sending data? →... -
Page 76: Midi Implementation Chart
MIDI has been implemented on this unit. If you should require this publication (such as when you intend to carry out byte-level programming), please contact the nearest Roland Service Center or authorized Roland distributor. Mode 1 : OMNI ON, POLY... -
Page 77: Main Specifications
(Adaptive Focus Method) LEVEL knob Display This is a proprietary method from ON/OFF button Roland that vastly improves the signal- 16 characters, 2 lines (backlit LCD) TYPE VARIATION button to-noise (S/N) ratio of the A/D and 7 segments, 2 characters (LED) -
Page 78: Index
Index Numerics Digital Out ..............58 Direct Level .............. 26, 31 12Stage ................35 Distortion ................ 26 2CE .................. 38 DLY .................. 28 2x2 Chorus ..............38 Drive ................26 3 BAND PARAMETRIC EQ ........17, 31 DST .................. 26 4Stage ................ - Page 79 Index Level Meter ..............59 PLAY ................54 LIMITER ................. 25 Playback Level ............... 29 LongTime ............... 29 Polarity ................32 Loop ................39 Pre Delay ..............27–28 Low .................. 52 Pre Shape ................ 30 Low Cut ..............27–28 Preamp ................29 LPF ...................
- Page 80 Index T/P .................. 42 Tap Time ................. 29 Target ................ 47, 49 Target Range ..............49 Tempo ............... 29, 39 THR ................... 8 Threshold ..............25, 44 Tone ................. 25 Top ................... 52 Touch Wah ..............32 Treble ................ 26, 30 TREMOLO ..............
-
Page 81: Patch List
Patch List P/U1-1 – P/U0-4 Bank-No. Name Effects P1-1/U1-1 Pitch Double ENH + P.EQ + NS + P.S P1-2/U1-2 M Slap P.EQ + COMP + NS P1-3/U1-3 Anthony Flange COMP + FL + NS P1-4/U1-4 Demon Child COMP + DIST + PRE AMP + P.EQ + NS + CHORUS + SOS P2-1/U2-1 Funk Wah TW + PRE AMP + COMP + SPEAKER + NS... - Page 82 Patch List u1-1 – u0-4 Bank-No. Name Effects u1-1 No.1BassPlayer PRE AMP + CHORUS + SPEAKER + NS u1-2 Raney Wah WAH + PRE AMP + SPEAKER + NS u1-3 Liverpool COMP + PRE AMP + SPEAKER + NS u1-4 Graham Slap FUZZ + PH + PRE AMP + SPEAKER + COMP + NS u2-1...
- Page 83 For EU Countries CAUTION Danger of explosion if battery is Apparatus containing incorrectly replaced. Replace only with the same or Lithium batteries equivalent type recommended by the manufacturer. Discard used batteries according to the manufacturer’s instructions. ADVARSEL! VARNING Lithiumbatteri - Eksplosionsfare ved Explosionsfara vid felaktigt batteribyte.
- Page 84 For EU Countries G6017310R1 ’00-xx-xx-xxx...