Table of Contents
Advertisement
Quick Links
Owner's Manual
Thank you, and congratulations on your choice of the BOSS
GT-6B Bass Effects Processor.
Before using this unit, carefully read the sections entitled:
• USING THE UNIT SAFELY (page 2–3)
• IMPORTANT NOTES (page 4)
These sections provide important information concerning
the proper operation of the unit.
Additionally, in order to feel assured that you have gained a
good grasp of every feature provided by your new unit,
Owner's manual should be read in its entirety. The manual
should be saved and kept on hand as a convenient reference.
Printing Conventions in This Manual
• Text or numerals enclosed in square brackets [ ] indicate buttons.
WRITE button
[WRITE]
[UTILITY]
UTILITY button
• Reference such as (p. **) indicate pages in this manual to which
you can refer.
* All product names mentioned in this document are trademarks or
registered trademarks of their respective owners.
Copyright © 2002 BOSS CORPORATION
All rights reserved. No part of this publication may be reproduced in any form
without the written permission of BOSS CORPORATION.
Advertisement
Table of Contents

Related Manuals for Boss GT-6B


Summary of Contents for Boss GT-6B
-
Page 1: Printing Conventions In This Manual
Owner’s Manual Thank you, and congratulations on your choice of the BOSS GT-6B Bass Effects Processor. Before using this unit, carefully read the sections entitled: • USING THE UNIT SAFELY (page 2–3) • IMPORTANT NOTES (page 4) These sections provide important information concerning the proper operation of the unit. -
Page 2: Using The Unit Safely
USING THE UNIT SAFELY Used for instructions intended to alert the user to the risk of death or severe injury should improperly. Used for instructions intended to alert the user to the risk of injury or material damage should the unit be used improperly. - Page 3 • In households with small children, an adult should provide supervision until the child is capable of following all the rules essential for the safe operation of the unit. • Protect the unit from strong impact. (Do not drop it!) •...
-
Page 4: Important Notes
IMPORTANT NOTES 291a In addition to the items listed under “USING THE UNIT SAFELY” on page 2–3, please read and observe the following: Power Supply • Do not use this unit on the same power circuit with any device that will generate line noise (such as an electric motor or variable lighting system). -
Page 5: Table Of Contents
Contents USING THE UNIT SAFELY ... 2 IMPORTANT NOTES... 4 Main Features ... 7 Panel Descriptions ... 8 Front Panel...8 Rear Panel ...11 Chapter 1 Playing Sounds ... 12 Making Connections ...12 Turning On the Power ...13 Adjusting the Output Level...13 What is a Patch?...14 Selecting Patches...14 How to Switch Patches...14... - Page 6 Device From the GT-6B ...70 Appendices ...71 About MIDI...71 How MIDI messages are transmitted and received...71 Main types of MIDI message used by the GT-6B ...71 About the MIDI implementation ...72 Factory Settings...72 Restoring the Factory Settings (Factory Reset) ...73 Adjusting the Expression Pedal...73...
-
Page 7: Main Features
“Overdrive/Distortion,” and “Pedal Wah” effects. The resulting creations can then be saved on the GT-6B as “Custom” settings. (p. 52) EZ Tone The GT-6B includes thirty representative effect sounds used for creating new sounds. -
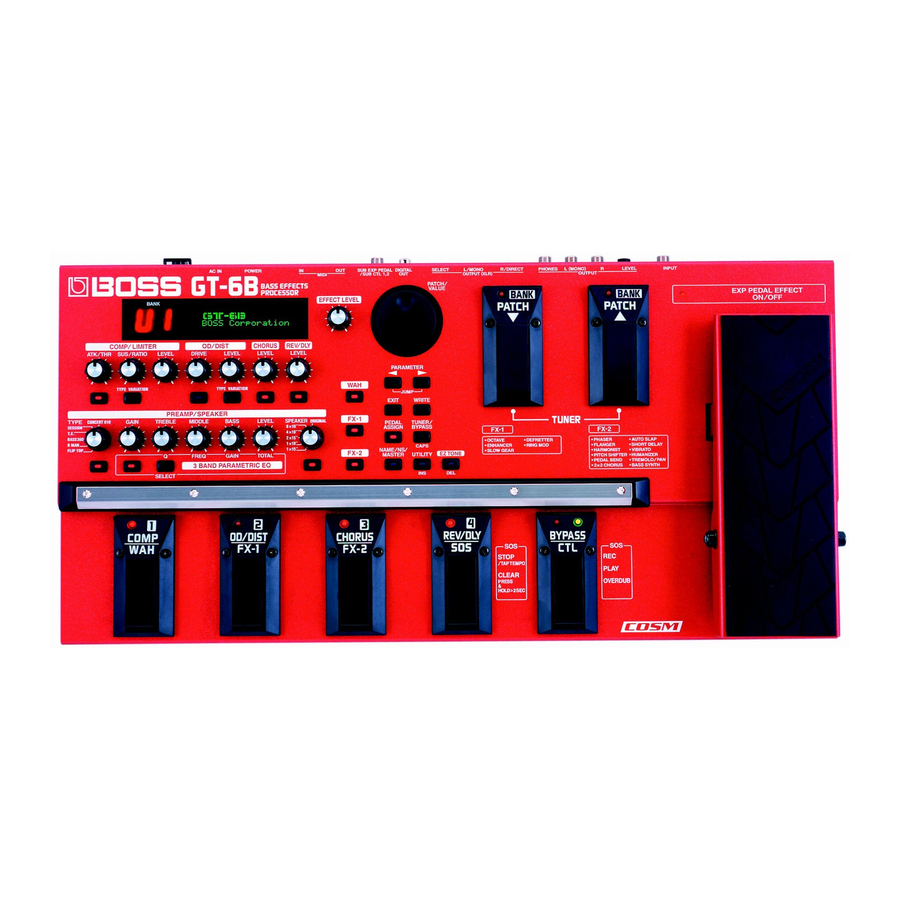
Page 8: Panel Descriptions
Panel Descriptions Front Panel fig.00-01 1 Display A variety of information about the GT-6B appears here. The left display shows the bank number. The right display indicates patch names, parameters, and a variety of other information. 2 EFFECT LEVEL Knob Adjust the overall volume. - Page 9 6 COMP/LIMITER ON/OFF Button Press this to switch the compressor/limiter on and off and when changing other settings. 7 TYPE VARIATION Button Selects the compressor or limiter type. OVERDRIVE/DISTORTION (p. 26) 8 DRIVE Knob Adjusts the distortion effect from the overdrive or distortion.
- Page 10 Press to select parameters. * To jump to the main parameters, hold down one of these buttons while you press the other. With items for which there aren’t that many parameters, the GT-6B jumps to the last (or initial) parameter. 32 EXIT Button Use this to undo operations and to return to the Play screen (p.
-
Page 11: Rear Panel
Rear Panel fig.00-02 1 INPUT Jack The bass guitar is connected here. 2 OUTPUT LEVEL Knob Adjusts the volume level of the output from the output (1/4” phone) jack and headphone jacks. 3 OUTPUT R/L (MONO) Jacks These are standard jacks that output unbalanced signals. Connect to amps, mixers, or other such devices. -
Page 12: Chapter 1 Playing Sounds
Chapter 1 Playing Sounds Making Connections * To prevent malfunction and/or damage to speakers or other devices, always turn down the volume, and turn off the power on all devices before making any connections. * Raise the amp volume only after turning on the power to all connected devices. * When using mono output, connect the cable only to the OUTPUT L (MONO) jack. -
Page 13: Turning On The Power
* When using the GT-6B with a foot switch (the optional FS- 5U) connected to the SUB EXP PEDAL/SUB CTL 1,2 jack, set the polarity switch as shown in the following. fig.01-03 Polarity Switch * You can use the special (optional Roland) PCS-31 connector cord to connect two foot switches. -
Page 14: What Is A Patch
Each of these stored sets is called a “patch.” The GT-6B can store 80 “User patches,” the content of which you can change as you like, along with 40 “Preset patches”... -
Page 15: Turning Each Of The Effects In A Patch On And Off
You can also change these with [PEDAL ASSIGN] (p. 45). Switching Patches by Specifying the Bank and Number The GT-6B has been set at the factory so that you can switch patches using the PATCH/VALUE dial or the PATCH and PATCH... -
Page 16: Creating You Own Favorite Tones (Patches)
(p. 23) to save it to a User patch. Adjusting the Tones with the Knobs The GT-6B panel features fifteen knob controls. These knobs let you make changes to the selected patch’s tone quickly and easily. * There are also other methods you can use to adjust the tone. - Page 17 COMP/LIMITER LEVEL Adjusts the compressor/limiter volume level. The volume increases as the knob is turned to the right. OD/DIST DRIVE (Overdrive/Distortion Drive) Adjusts the degree of distortion in the overdrive or distortion sound. The distortion gets stronger as the knob is turned to the right.
-
Page 18: Adding And Omitting Effects
4. Press [EXIT] to return to the Play screen. Switching Effects with the Pedals The GT-6B is set at the factory so that you can use Pedals “1” through “4” to switch specific effects on and off. The names of effects that can be controlled with these pedals appear in the lower row of the display. -
Page 19: Setting The Effect Tones (Quick Settings)
Setting the Effect Tones (Quick Settings) Quick Settings are preprogrammed effect settings. Each effect in the GT-6B has some available quick settings. You can easily create new effect sounds, without having to make any detailed adjustments, just by selecting and combining these Quick Settings. -
Page 20: Using The Pedal Effects (Wah, Pedal Bend, Ring Modulator)
Chapter 2 Creating You Own Favorite Tones (Patches) Using the Pedal Effects (Wah, Pedal Bend, Ring Modulator) You can use the GT-6B’s expression pedal to obtain wah, pedal bend (pedal-controlled pitch bend), and ring modulator effects. fig.02-11 1. Press [WAH]. -
Page 21: Ring Modulator
Ring Modulator fig.02-13 1. Press [FX-1]. 2. Turn on the FX-1 effect (“Adding Effects”; p. 18). * This step is not required if the effect is already on. 3. Press PARAMETER [ ] to select the FX Select parameter. 4. Rotate the VALUE dial to change the setting value to “R.M.”... -
Page 22: Changing The Order Of The Effects (Effect Chain)
Chapter 2 Creating You Own Favorite Tones (Patches) Changing the Order of the Effects (Effect Chain) You can freely change the order in which the effects are connected. fig.02-16 1. Press [NAME/NS/MASTER] until “Effect Chain” appears in the display. * Each time [NAME/NS/MASTER] is pressed, the item that can be set is changed, following this order: Name Noise Suppressor... -
Page 23: Chapter 3 Saving The Tones You Have Created
(“How to Switch Patches’; p. 14) before you’ve carried out the Write procedure. fig.03-01 1. Press [WRITE]. The content of the display changes, and the GT-6B is ready for a patch to be specified as the save destination. fig.03-02 Destination Patch 2. -
Page 24: Exchanging Patches
Chapter 3 Saving the Tones You Have Created Exchanging Patches On the GT-6B, you can exchange the positions of two User patches. fig.03-05 1. Select the exchange-source patch (refer to “How to Switch Patches”; p. 14). 2. Press [WRITE]. 3. Press PARAMETER [... -
Page 25: The Effects Explained
Chapter 4 The Effects Explained This chapter describes the particular qualities of each of the GT-6B’s internal effects, as well as the parameters used to control them. The sound that is input to each effect is called the “direct sound,” and the sound modified by the effect is called the “effect sound.”... -
Page 26: Od/Dist (Overdrive/Distortion)
Chapter 4 The Effects Explained OD/DIST (Overdrive/Distortion) This effect distorts the sound to create long sustain. The GT- 6B provides nine types of distortion with two different custom settings. OD: Overdrive This provides the warm, natural type of distortion that occurs naturally when you turn up the volume on a tube amp. -
Page 27: Chorus
CHORUS This is an effect that adds a slightly detuned sound to the original bass sound, resulting in a beautiful sound with greater depth and breadth. Developed by BOSS, this is one effect that is popular the world over. * When the Bypass EXP Mode (p. 55) and Noise Suppressor (p. 44) is set to “Off”... -
Page 28: Rev: Reverb
Chapter 4 The Effects Explained * When Sound On Sound is selected, Pedal 4 and the BYPASS/ CTL pedal function as Sound On Sound controls. For more detailed information, refer to “Using Sound On Sound” (p. 54). REV: Reverb Parameter Value Type Room1, Room2, Hall1, Hall2, Plate... -
Page 29: R&D: Reverb & Delay
Delay Time Fine Makes fine adjustments (in units of 1 ms) to the delay time. Tap Time (Used Only with Pan) Adjusts the delay time of the right channel delay. This setting adjusts the right channel delay time relative to the left channel delay time, which is referenced as 100%. -
Page 30: Speaker
Chapter 4 The Effects Explained Treble Adjusts the tone of the upper range. Middle Adjusts the tone of the midrange. * While some amps do not feature a middle control, this control still functions even when simulating such amps. If you want to recreate the sound as output by the original amp, set Middle to “0.”... -
Page 31: Band Parametric Eq
Selects the wah effect function. WH: Pedal Wah The Expression pedal is used for real-time control of the wah effect. The GT-6B’s expression pedal automatically switches to the wah pedal function when “WAH” is selected in FX Select. Parameter Type... -
Page 32: Tw: Touch Wah
Chapter 4 The Effects Explained When Type is Set to Custom 1–3 You can make settings for the following parameters when TYPE is set to Custom 1–3. Making “Custom” Pedal Wah Settings (p. 53) Parameter Value Type (1–3) CRY WAH, VO WAH, Bass WAH Q (1–3) -50–+50 Range Low (1–3) -
Page 33: Fx-1
Rate This selects the auto wah cycle. * When set to BPM, the value of each parameter is set according to the value of the Master BPM (p. 44) specified for each patch. This makes it easy to achieve effect sound settings that match the tempo of the song (synchronizing the cycle to one-half or one-fourth of the BPM when the set cycle rate is increased). -
Page 34: Sg: Slow Gear
Chapter 4 The Effects Explained Sens This adjusts the Enhancer sensitivity. The more the value is increased, the more softly you can play and still have the effect applied. Freq (Frequency) Sets the frequency range for the enhanced sound. Mix Level Adjusts the amount of enhanced sound added to the mix. -
Page 35: Fx-2
FX-2 With FX-2, you can select the effect to be used from the following. • PHASER • FLANGER • HARMONIST • PITCH SHIFTER • PEDAL BEND • 2x2 CHORUS • AUTO SLAP • SHORT DELAY • VIBRATO • HUMANIZER • TREMOLO/PAN •... -
Page 36: Fl: Flanger
Chapter 4 The Effects Explained FL: Flanger This produces a flanging effect that gives a sort of “twisting” character to the sound. Although it resembles the phaser effect, the flanger yields a colder, more metallic twisting effect. Parameter Value Rate 0–100, BPM Depth 0–100... -
Page 37: P.s: Pitch Shifter
Feedback This adjusts the feedback amount of the harmonist sound. * Only PS1 can be selected when this is set to 2-Mono or 2- Stereo. Level This adjusts the volume of the harmonist sound. This specifies the key of the song you are playing. By specifying the key, you can create harmonies that fit the key of the song. -
Page 38: Pb: Pedal Bend
Chapter 4 The Effects Explained Mono: This mode is for the input of individual notes. Select this setting when you want to obtain a pedal bend effect using an external expression pedal. * Because of the need to analyze the pitch, chords (two or more sounds played simultaneously) cannot be played. -
Page 39: Asl: Auto Slap
Lo PreDly (Low Pre Delay) Adjusts the time from when the direct sound in the lower range is output until the effect sound is output. Extending the pre-delay produces the sensation of multiple sounds being played (doubling effect). Lo Level (Low Level) Adjusts the volume of the lower range. -
Page 40: Sdd: Short Delay
Chapter 4 The Effects Explained 4. Press PARAMETER [ ] a number of times until the User Phrase settings screen is displayed. fig.04-04 5. Press PARAMETER [ then rotate the PATCH/VALUE dial to set the User phrase. fig.04-50 Step Pitch Length Sound Attack... -
Page 41: Vib: Vibrato
VIB: Vibrato The vibrato effect is created by slightly modulating the pitch. Parameter Value Rate 0–100, BPM –BPM Depth 0–100 Trigger Off, On Rise Time 0–100 Rate This adjusts the period of the vibrato. * When set to BPM, the value of each parameter is set according to the value of the Master BPM (p. -
Page 42: T/P: Tremolo/Pan
Chapter 4 The Effects Explained Manual (with Auto) Sets the point at which the two vowels will be switched. When set to “50,” an equal length of time is used to switch Vowel 1 and Vowel 2. When it is set to lower than “50,” the time for Vowel 1 is shorter. -
Page 43: Octave Shift
Bow: Waveform shaping outputs a soft sound with no attack. Octave Shift (with Square and Saw) This outputs sound one octave below the original sound. PWM Rate (Pulse Width Modulation Rate) (with Square) Modulation is applied to the waveform (Square wave only) to create a broader, fatter sound. -
Page 44: Ns: Noise Suppressor
Chapter 4 The Effects Explained NS: Noise Suppressor This effect reduces the noise and hum picked up by the bass. Use this when noise that occurs when you are not playing the bass becomes noticeable. Since it suppresses the noise by monitoring the volume level of the actual bass sound being input, it always gives a natural effect. -
Page 45: Setting The Pedal Functions (Pedal Assign)
Chapter 5 Setting the Pedal Functions (Pedal Assign) These settings can be saved separately to individual patches. Selecting Each Effect to Be Turned On and Off with the Number Pedals You can change the effects that are turned on and off with the number pedals 1–4. -
Page 46: If You Don't Want To Use The Expression Pedal As A "Volume Pedal
Chapter 5 Setting the Pedal Functions (Pedal Assign) If You Don’t Want to Use the Expression Pedal as a “Volume Pedal” Use the procedure below to turn the expression pedal off. 1. Press [PEDAL ASSIGN]. 2. Press PARAMETER [ until you have one of the following screens displayed. fig.05-04 3. -
Page 47: If You Don't Want To Use The Expression Pedal Switch Or Ctl Pedal
] (or [ ]) and pressing [ (or [ ]) causes the GT-6B to jump to the main screen, allowing you to reduce the number of times you need to press the buttons. 3. Rotate the PATCH/VALUE dial to select the pedal setting. -
Page 48: Controlling Effects With The Gt-6B Pedals, External Pedals, And External Midi Devices
Chapter 5 Setting the Pedal Functions (Pedal Assign) Controlling Effects with the GT-6B Pedals, External Pedals, and External MIDI Devices Make these settings when controlling effects with the GT- 6B’s expression pedal, expression pedal switch, or CTL pedal, or with external pedals or external MIDI devices connected to the GT-6B. -
Page 49: Making The Parameter Settings
Changing the parameter simultaneously while using different sources may result in noise being generated. * The GT-6B does not transmit MIDI clock. Therefore, when MIDI Start/Stop is selected as the target, set the receiving device so its own clock is used for the performance. - Page 50 FS-5U) is used. When the pedal is fully advanced * The GT-6B’s control pedal is a momentary-type pedal. Switch the settings as needed to accommodate your setup. Normal The normal state is Off (minimum value), with the switch On (maximum value) only while the foot switch is depressed.
-
Page 51: Controlling Foot Volume And Pitch Shifter With An External Expression Pedal
Active Range fig.05-18 When an expression pedal or other controller that changes the value consecutively is used as the source, this sets the operational range within which the value of the setting changes. If the controller is moved outside the operational range, the value does not change, but instead stops at “minimum”... -
Page 52: Chapter 6 Using The Customize Function
COSM technology. Making “Custom” Overdrive/Distortion Settings You can prepare two different sets of settings in the GT-6B, Custom 1 and Custom 2. * Editing the Custom 1 or Custom 2 settings alters all tones in patches that use these custom settings. -
Page 53: Making "Custom" Pedal Wah Settings
Making “Custom” Pedal Wah Settings Here, you can make three different sets of settings, Custom 1, Custom 2, and Custom 3. * Editing the Custom 1, 2, or 3 settings alters all tones in patches that use these custom settings. 1. -
Page 54: Chapter 7 Using Sound On Sound
* The recorded content is temporary. Note that carrying out the following procedures erases the recording. • Turning off the power to the GT-6B. • Switching to another patch • Setting the REV/DLY Fx Select to anything other than “SOS.”... -
Page 55: Chapter 8 Convenient Features Of The Gt-6B
OUTPUT SELECT switch on the rear panel. R-OUTPUT-L: Stereo Output The GT-6B’s stereo output is output as is, without change. Set the switch to this position when recording in stereo or sending stereo signals to a PA. -
Page 56: Quick Patch Volume Adjustment (Effect Level Knob)
“Play mode.” About the Display During Tuning With the GT-6B’s internal tuner, the note name is indicated in the upper row of the display and the Tuning Guide is shown in the lower row, indicating the difference between the input sound and the sound in the display. -
Page 57: How To Tune
You can set the standard pitch on the GT-6B to frequencies from 435 to 445 Hz. * This is set to 440 Hz when shipped from the factory. -
Page 58: Adjusting The Overall Sound To Match The Usage Environment (Global)
Chapter 8 Convenient Features of the GT-6B Adjusting the Overall Sound to Match the Usage Environment (Global) The GT-6B includes a feature that allows you to change all of the patch settings temporarily. This is called the “Global function.” With the Global function, you can temporarily change your... -
Page 59: Checking The Effect Output Level With The Level Meter
* You can check the level of signals being input to the INPUT jack by selecting “Input.” Selecting “Output” allows you to check the level of signals output from the GT-6B. * You may not be able to achieve the effects adequately if your output levels are set too high. -
Page 60: Chapter 9 Other Functions
Chapter 9 Other Functions Adjusting the Display Contrast (LCD Contrast) Depending on where the GT-6B is placed the display may become hard to read. If this occurs, adjust the display contrast. 1. Press [UTILITY] a number of times until “LCD Contrast”... -
Page 61: Setting The Timing Used For Switching Patches (Patch Change Mode)
When you switch banks, the indicator for number pedal last pressed before pressing the BANK pedal flashes, and the GT-6B is ready for the patch number to be specified (the patch cannot yet be switched in this condition). 2. Press a number pedal to select the patch you want to use. -
Page 62: Setting "Expression Pedal Hold
If the expression pedal is operated, and that information is transmitted to the GT-6B, the volume changes in accordance with the movement of the pedal. 3. Press [EXIT] to return to the Play screen. -
Page 63: Setting The Knob Functions (Knob Mode)
Setting the Knob Functions (Knob Mode) This sets the way the values of settings are changed when the control knobs are turned. 1. Press [UTILITY], then press PARAMETER [ ] so that “Knob Mode” is displayed. fig.09-07 2. Rotate the PATCH/VALUE dial to set the Knob mode. Immediate: Turning the knobs immediately changes the values. -
Page 64: Chapter 10 Using Midi
GT-6B. * The use of MIDI requires that the MIDI channels of the connected devices match. If the MIDI channel settings are not correct, the GT-6B will be unable to exchange data with other MIDI devices. Operating From the GT-6B... -
Page 65: Making The Settings For Midi Functions
Making the Settings for MIDI Functions Here is a description of the GT-6B’s MIDI functions. Set them as needed, depending on the intended use. 1. Press [UTILITY] a number of times until the following screen appears. fig.10-03 2. Press PARAMETER [ ] so that the parameter that you want to set appears in the display. - Page 66 Chapter 10 Using MIDI MIDI PC OUT (MIDI Program Change Out) Off, On fig.10-09 This setting determines whether or not Program Change messages are output when patches are switched on the GT- Off: Program Change messages are not output, even when patches are switched.
-
Page 67: Transmitting And Receiving Midi Data
Transmitting and Receiving MIDI Data On the GT-6B, you can use Exclusive messages to provide another GT-6B with identical settings, and save effect settings on a sequencer or other device. This transmission of data is called “Bulk Dump,” while receiving such data is referred to as “Bulk Load.”... -
Page 68: Receiving Data From An External Midi Device (Bulk Load)
MIDI Device (Bulk Load) Making the Connections When Receiving Data Saved on a MIDI Sequencer Connect as shown below. Set the GT-6B’s Device ID to the same number that was used when the data was transmitted to the MIDI sequencer. fig.10-02... -
Page 69: Setting The Program Change Map
When switching patches using Program Change messages transmitted by an external MIDI device, you can freely set the correspondence between Program Change messages received by the GT-6B and the patches to be switched to in the “Program Change Map.” Initial Program Change Map Settings The Program Change Map set at the factory is shown below. -
Page 70: Enabling/Disabling The Program Change Map Settings (Midi Map Select)
External MIDI Device From the GT-6B When patches are switched with the GT-6B, a Program Change message is transmitted. The correspondence between the GT-6B’s initial bank and patch numbers and the transmitted Program Change messages is shown in the table below. -
Page 71: Appendices
This connector transmits messages from this device. MIDI THRU: This connector re-transmits the messages that were received at MIDI IN. * The GT-6B features both “MIDI IN” and “MIDI OUT” connectors. MIDI channels MIDI is able to independently control more than one MIDI device over a single MIDI cable. -
Page 72: About The Midi Implementation
Exclusive messages can be employed to save the settings for effects programs into a sequencer, or for transferring such data to another GT-6B. The two instruments must be set to the same device ID numbers when exchanging SysEx messages. -
Page 73: Restoring The Factory Settings (Factory Reset)
Restoring the Factory Settings (Factory Reset) Restoring the GT-6B to the settings made at the factory is referred to as “Factory Reset.” Not only can you return all of the settings to the values in effect when the GT-6B was shipped from the factory, you can also specify the range of settings to be reset. -
Page 74: Troubleshooting
Appendices Troubleshooting If there is no sound, or if the GT-6B does not function as you expect, first check the following points. If the measures in this checklist do not resolve your problem, you should contact your dealer or the nearest Roland Service Center. -
Page 75: Error Messages
Do the MIDI channel settings of both devices match? Make sure that the MIDI channels on both devices match (p. 65). If sending messages from the GT-6B, have you set the settings necessary for sending data? Check the on/off status (p. 66) for transmission of Program Change messages and the settings for the controller numbers to be transmitted (p. -
Page 76: Midi Implementation Chart
Appendices MIDI Implementation Chart fig.11-401 BASS EFFECTS PROCESSOR Model GT-6B Function... Default Basic Channel Changed Default Mode Messages Altered Note True Voice Number : Note ON Velocity Note OFF Key's After Touch Ch's Pitch Bend 1–31 33–63 64–95 Control Change... -
Page 77: Main Specifications
Main Specifications GT-6B: Bass Effects Processor AD Conversion 24-bit + AF method DA Conversion 24-bit Sampling frequency 44.1 kHz Program Memories 120: 80 (User) + 40 (Preset) Nominal Input Level INPUT: -10 dBu Input Impedance INPUT: 1 M Nominal Output Level... -
Page 78: Index
Index Numerics 12Stage ... 35 2CE ... 38 2x2 Chorus ... 38 3 BAND PARAMETRIC EQ ... 17, 31 4Stage ... 35 8Stage ... 35 Active Range ... 51 ASL ... 39 ASSIGN ... 48 ATK ... 8 Attack ... 25 Auto Slap ... - Page 79 Level Meter ... 59 LIMITER ... 25 LongTime ... 29 Loop ... 39 Low ... 52 Low Cut ... 27–28 LPF ... 32 Manual ... 35 Map Select ... 70 Master BPM ... 44 Mic Level ... 30 Mic Set..30 Middle ...
- Page 80 Index T/P ... 42 Tap Time ... 29 Target ... 47, 49 Target Range ... 49 Tempo ... 29, 39 THR ... 8 Threshold ... 25, 44 Tone ... 25 Top ... 52 Touch Wah ... 32 Treble ... 26, 30 TREMOLO ...
- Page 81 MEMO...
- Page 82 MEMO...
- Page 83 Apparatus containing Lithium batteries ADVARSEL! Lithiumbatteri - Eksplosionsfare ved fejlagtig håndtering. Udskiftning må kun ske med batteri af samme fabrikat og type. Levér det brugte batteri tilbage til leverandøren. ADVARSEL Eksplosjonsfare ved feilaktig skifte av batteri. Benytt samme batteritype eller en tilsvarende type anbefalt av apparatfabrikanten.
- Page 84 G601744601 ’00-xx-xx-xxx...