Table of Contents
Advertisement
Region number
The player plays DVD-Video marked with labels containing the region
number "1" or "ALL".
Example:
1
ALL
As an ENERGY STAR Partner,
Panasonic has determined that
this product meets the ENERGY STAR
guidelines for energy efficiency.
§
For Canada only: The word "Participant" is used in place of the word
"Partner".
P
PC
1
2
4
®
®
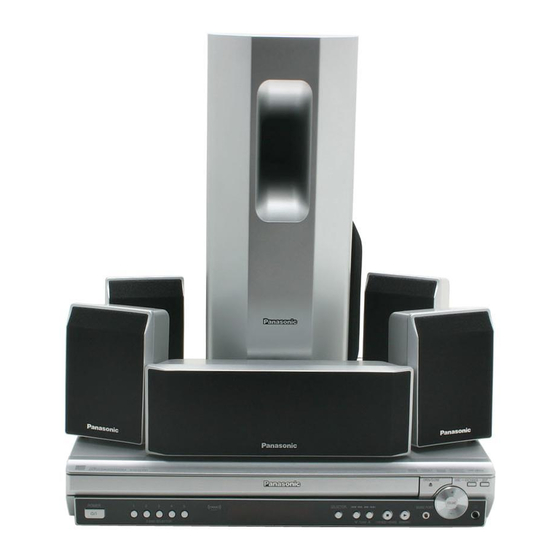
Operating Instructions
DVD Home Theater Sound System
Model No.
Wireless-ready
surround sound
Optional wireless surround
speaker connection.
High-quality picture
HDMI capability, Advanced
progressive scan and more.
XM
Satellite Radio
®
Enjoy a variety of digital radio
channels.
Before connecting, operating or adjusting this product, please
read the instructions completely.
Please keep this manual for future reference.
If you have any questions contact
In the U.S.A.: 1-800-211-PANA (7262)
In Canada: 1-800-561-5505
SC-PT650
4
6
28
RQTX0069-P
Advertisement
Table of Contents

Related Manuals for Panasonic SC-PT650


Summary of Contents for Panasonic SC-PT650
-
Page 1: Operating Instructions
® Enjoy a variety of digital radio channels. ® As an ENERGY STAR Partner, Panasonic has determined that ® this product meets the ENERGY STAR Before connecting, operating or adjusting this product, please guidelines for energy efficiency. read the instructions completely. -
Page 2: Important Safety Instructions
(1) This device may not cause harmful interference, and (2) this device must accept any interference received, including interference that may cause undesired operation. Responsible Party: CAUTION Panasonic Corporation of North America One Panasonic Way RISK OF ELECTRIC SHOCK Secaucus, NJ 07094 DO NOT OPEN... -
Page 3: Table Of Contents
TABLE OF CONTENTS IMPORTANT SAFETY INSTRUCTIONS ..2 step 4 AC cord connection... . . 8 Simple Setup Getting step 5 Preparing the remote control ..9 Started step 1 Positioning . -
Page 4: Positioning
Expand your listening options with a multi-room wireless sound system. § Optional Panasonic wireless accessory SH-FX85 You can enjoy a multi-room wireless sound system when you use the optional Panasonic wireless accessory SH-FX85. For details, please refer to the operating instructions for the optional Panasonic wireless accessory. §... -
Page 5: Speaker Installation Options
Notes on speaker use Speaker installation options ≥Use only supplied speakers Using other speakers can damage the unit, and sound quality will be ∫ Attaching to a wall negatively affected. ≥ You can damage your speakers and shorten their useful life if you play You can attach all of the speakers (except subwoofer) to a wall. -
Page 6: Step 2 Cable Connections
≥ Set “Video Output Mode” (➜ page 21, Picture Menu). AV OUT EZ Sync HDAVI Control [Note] AV IN If your Panasonic television is an HDMI control ≥ Non-HDMI-compliant cables compatible television, you can operate your television cannot be utilized. synchronizing with home-theater operations or vice [Canada] ≥... -
Page 7: Speaker Connections
Speaker connections ≥ Be careful not to cross (short-circuit) or reverse the polarity of the speaker wires as doing so may damage the speakers. Main unit i: White Speaker cable sticker (included) Attach the corresponding speaker cables with the speaker-cable SURROUND stickers to make connection easier. -
Page 8: Step 3 Ipod Connection
step iPod connection ∫ Charging the iPod Proceed to step 4 if you are not connecting an iPod to the main unit. Dock adapter for Dock adapter for Dock adapter for iPod (not included) iPod 5th generation iPod 5th generation iPod nano 2nd generation (aluminum) (video) (60GB, 80GB) - Page 9 step Preparing the remote control Do not: ≥ mix old and new batteries. Insert so the poles (i and j) match those in the remote control. ≥ use different types at the same time. ≥ heat or expose to flame. ≥...
-
Page 10: Control Reference Guide
≥ Press and hold the button again to confirm the remaining time on the unit’s display. Operating the television Aim the remote control at the Panasonic television and press the button. [Í TV]: Turn the television on/off [TV/VIDEO]: Change the television’s video input mode [r, s]: Adjust the television volume ≥... -
Page 11: Listening Caution
Standby/on switch [POWER Í/I] < OPEN/CLOSE Turn the main unit on/off. Open/Close the disc drawer (14) Press to switch the unit from on to standby mode or vice versa. In standby ∫ / -TUNE MODE / —FM MODE mode, the unit is still consuming a small Stop playing (14)/Select the tuning mode (27) amount of power. -
Page 12: Discs That Can Be Played
Discs that can be played Commercial discs Indicated in these Disc Logo Remarks instructions by [DVD-V] DVD-Video High quality movie and music discs Music discs with video [VCD] Video CD Including SVCD (Conforming to IEC62107) [CD] Music discs Recorded discs (±: Playable, k: Not playable) Recorded on a Recorded on a personal DVD video... -
Page 13: Maintenance
∫ Tips for making data discs Format Disc Extension Reference [WMA] ≥ Compatible compression rate: between 48 kbps and 320 kbps CD-R/RW “.WMA” ≥ You cannot play WMA files that are copy-protected. “.wma” ≥ This unit does not support Multiple Bit Rate (MBR: an encoding process for audio content that produces an audio file encoded at several different bit rates). -
Page 14: Basic Play
Basic play To display the picture from the main unit, turn on your television and change its video input mode (e.g. VIDEO 1, AV 1, etc.). ≥ To change your television’s video input mode, refer to its operating instructions. POWER OPEN CLOSE Power on. -
Page 15: Using The Remote Control
If you are experiencing problems, refer to troubleshooting (➜ page 33 to 35). Using the remote control Select TV/VIDEO VOLUME TUNER/BAND On-screen — EXT-IN item select ONE TOUCH PLAY Numbered ONE TOUCH PLAY VOLUME buttons Register VOLUME DISC SKIP SLOW/SEARCH SKIP SLOW/SEARCH [DVD-VR] [DVD-V] [VCD] [CD]... -
Page 16: Checking And Selecting The Disc
Convenient functions Displaying current playback condition TV/VIDEO VOLUME TUNER/BAND Press [FUNCTIONS]. EXT-IN Main menu (➜ page 20)> Basics > Details ONE TOUCH PLAY ^------ off (No on-screen display),-------b Numbered buttons VOLUME ∫ Basics Current playback number Elapsed play time DISC DISC e.g. -
Page 17: Program And Random Play
To change the selected program Press [3, 4] to select the program number. Program and Random play Press the numbered buttons to change each item. ([WMA] [MP3] Press [ENTER] to register the selection.) To clear the selected program Press [PLAY MODE] while stopped. Press [3, 4] to select the program number. -
Page 18: Playing Data Discs Using Navigation Menus
Playing data discs using navigation menus ∫ Using the submenu 1 While Navigation Menu (➜ left) is displayed Press [FUNCTIONS]. TV/VIDEO VOLUME TUNER/BAND 2 Press [3, 4] to select an item and press [ENTER]. EXT-IN Items shown differ depending on the type of disc. ONE TOUCH PLAY Groups and contents are displayed. -
Page 19: Playing Ram And Dvd-R/-Rw (Dvd-Vr) Discs
Playing RAM and DVD-R/-RW Playing HighMAT discs (DVD-VR) discs [WMA] [MP3] [JPEG] [DVD-VR] Press [TOP MENU]. ≥ Titles appear only if the titles are recorded on the disc. ≥ To exit the screen, press [∫ STOP]. ≥ You cannot edit programs, playlists and disc titles. ≥... -
Page 20: Using On-Screen Menus
≥ [DVD-VR] “On” or “Off” appears only with discs that ≥ To change the steps more quickly, press and hold contain subtitle on/off information (Subtitle on/off [3, 4]. information cannot be recorded using Panasonic To change remaining/elapsed time display DVD Recorders). [DVD-V] (with multiple soundtracks) -
Page 21: Other Settings
Other Settings Items shown differ depending on the type of disc. ∫ Picture Menu [DVD-VR] [DVD-V] To change play speed Normal – from “k0.6” to “k1.4” Cinema1: Mellows images and enhances detail in ≥ Press [1 PLAY] to return to normal play. dark scenes. -
Page 22: Audio Menu
Using on-screen menus Other Settings Items shown differ depending on the type of disc. ∫ Picture Menu (Continued) This works when the HDMI connection is being used and To zoom in and out manually “Video Mode” (➜ page 24, “HDMI” menu) is set to “On”. –... -
Page 23: Changing The Player Settings
Changing the player settings Press and hold to show -RETURN the Setup menu. -SETUP Setting Item TV/VIDEO VOLUME TUNER/BAND Setup EXT-IN Disc Audio English Video ONE TOUCH PLAY Subtitle Automatic Numbered Audio Menus English HDMI buttons VOLUME Intro Mode Display Advanced Disc Review Others DISC... - Page 24 Changing the player settings QUICK SETUP enables successive settings of the items in the shaded area. ∫ “Video” menu ≥ 4:3 Pan&Scan: Regular aspect television (4:3) TV Aspect The sides of the widescreen picture are cut off so it fills the screen (unless Choose the setting to suit your prohibited by the disc).
-
Page 25: Changing The Delay Time Of The Speakers
QUICK SETUP enables successive settings of the items in the shaded area. ∫ “Others” menu ≥ Bright ≥ Dim FL Dimmer ≥ Auto: The display is dimmed, but brightens when you perform some operations. Change the brightness of the unit’s display. -
Page 26: Power Off Link
EZ Sync HDAVI Control is a convenient function that offers linked operation of this unit and Panasonic TV (VIERA) with EZ Sync HDAVI Control. You can use this function by connecting the equipment with the Power off link HDMI cable. -
Page 27: Using The Fm/Am Radio
Using the FM/AM radio ∫ If noise is excessive When “FM” is selected TV/VIDEO VOLUME Press and hold [—FM MODE] on TUNER/BAND TUNER/BAND D.MIX MONO SLP STCT DDTS the main unit to display SRDE. EXT-IN “MONO”. W1 W2 WS ONE TOUCH PLAY Numbered VOLUME buttons... - Page 28 ≥ To prevent interference with wireless equipment, place the antenna away frequent explicit language are indicated with an XL. Channel blocking is from this unit, Panasonic wireless sound system SH-FX80/SH-FX85, available for XM radio receivers by calling 1-800-XMRADIO (U.S. Panasonic wireless system SH-FX50/SH-FX60/SH-FX65, and other residents) or 1-877-GET-XMSR (Canada residents).
-
Page 29: Selecting Xm Channels By Direct Entry
Selecting XM channels by direct entry Presetting the XM channels XM channels can be selected manually by directly entering the XM Channel presets allow you to quickly and conveniently select your favorite channel number. XM channels. Up to 30 XM channels can be stored as channel presets. §1 Press [TUNER/BAND] to select “XM”. -
Page 30: Using Sound Effects
Using sound effects Adjusting the amount of bass: TV/VIDEO VOLUME Subwoofer level TUNER/BAND EXT-IN You can adjust the amount of bass. The unit automatically selects the ONE TOUCH PLAY most suitable setting according to the type of playback source. VOLUME Press [-SW.LEVEL]. -
Page 31: Enjoying Audio From An External Source
Enjoying audio from an external source Using the iPod Preparation TV/VIDEO VOLUME TUNER/BAND ≥ Adjust the volume on the iPod to a normal listening level. ≥ Reduce the volume of the main unit. EXT-IN EXT-IN ≥ Confirm the iPod connection (➜ page 8). ONE TOUCH PLAY VOLUME Press [EXT-IN] repeatedly to select “OPTION”. -
Page 32: Glossary
For product information or assistance with product operation: In the U.S.A., refer to “Customer Services Directory” on page 38. In Canada, contact the Panasonic Canada Inc. Customer Care Centre at 1-800-561-5505, or visit the website (www.panasonic.ca), or an authorized Servicentre closest to you. -
Page 33: Troubleshooting Guide
Troubleshooting guide Before requesting service, make the following checks. If you are in doubt about some of the check points, or if the solutions indicated in the chart do not solve the problem, refer to “Customer Services Directory” on page 38 if you reside in the U.S.A., or refer to “Product information” on page 32 if you reside in Canada. - Page 34 Troubleshooting guide Disc operation ≥ Play may take time to begin when an MP3 track has still picture data. Even after the track starts, the It takes time before play starts. — [MP3] correct play time will not be displayed. This is normal. ≥...
- Page 35 HDMI or progressive video ≥ This problem is caused by the editing method or material used on DVD-Video, but should be There is ghosting when HDMI or progressive output is on. corrected if you use interlaced output. – When using the COMPONENT VIDEO OUT terminal, set “Video Output Mode” in Picture Menu to “480i”.
-
Page 36: Specifications
Specifications AMPLIFIER SECTION SPEAKER SECTION [Front\speakers\SB-HF650] RMS Output Power: Dolby Digital Mode 125 W per channel (3 ≠), 1 kHz, 10 % THD Front Ch Type 1 way, 1 speaker system (Bass reflex) 125 W per channel (3 ≠), 1 kHz, 10 % THD Impedance 3 ≠... - Page 37 The model number and serial number of this product can be found on DATE OF PURCHASE either the back or the bottom of the unit. Please note them in the space provided below and keep for future DEALER NAME reference. DEALER ADDRESS MODEL NUMBER SC-PT650 SERIAL NUMBER TELEPHONE NUMBER...
-
Page 38: Limited Warranty (Only For U.s.a.)
Monday-Friday 9 am-9 pm; Saturday-Sunday 10 am-7 pm, EST. For hearing or speech impaired TTY users, TTY : 1-877-833-8855 Accessory Purchases Purchase Parts, Accessories and Instruction Books online for all Panasonic Products by visiting our Web Site at: http://www.pasc.panasonic.com or, send your request by E-mail to: npcparts@us.panasonic.com... -
Page 39: Limited Warranty (Only For Canada)
Panasonic Canada Inc. PANASONIC PRODUCT – LIMITED WARRANTY Panasonic Canada Inc. warrants this product to be free from defects in material and workmanship and agrees to remedy any such defect for a period as stated below from the date of original purchase. - Page 40 [For\U.S.A.] [For\Canada] Panasonic Consumer Electronics Company, Panasonic Canada Inc. Division of Panasonic Corporation of North America 5770 Ambler Drive Mississauga, Ontario One Panasonic Way Secaucus, L4W 2T3 New Jersey 07094 www.panasonic.ca...