Advertisement
Table of Contents
- 1 Table of Contents
- 2 Safety Precautions
- 3 Caution for AC Mains Lead
- 4 Placement of Speakers
- 5 Getting Started
- 6 Getting Started
- 7 Overview of Controls
- 8 Discs
- 9 FM Radio
- 10 Dab
- 11 Timer
- 12 Sound Adjustment
- 13 External Unit
- 14 Troubleshooting Guide
- 15 Specifi Cations
- 16 Maintenance
- Download this manual
Before connecting, operating or adjusting this product,
please read the instructions completely.
Please keep this manual for future reference.
Note:
"EB" on the packaging indicates the United Kingdom.
Operations in these instructions are described using
remote control, but you can do the operations with the
main unit if the controls are the same.
Your unit may not look exactly as illustrated.
Table of contents
Safety precautions ................................ 2
Caution for AC mains lead .................... 3
Placement of speakers .......................... 3
Getting started ....................................... 4
Getting started ....................................... 6
Overview of controls ............................. 7
Discs ....................................................... 9
FM radio .................................................. 10
DAB ......................................................... 11
Timer ....................................................... 15
Sound adjustment ................................. 16
External unit ........................................... 17
Troubleshooting guide .......................... 18
Specifi cations ........................................ 19
Maintenance ........................................... 19
EB
Operating Instructions
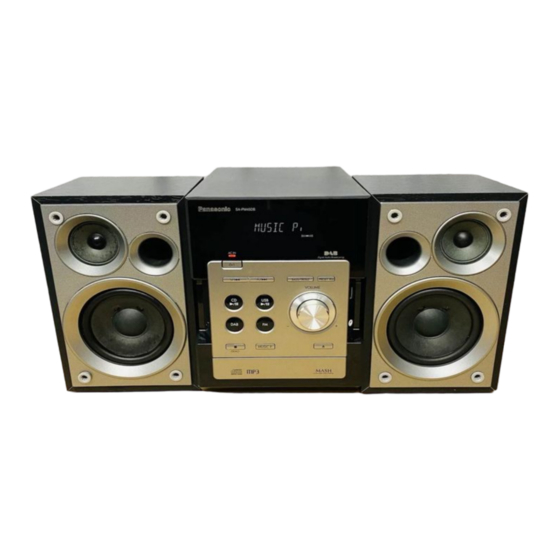
CD Stereo System
Model No.
SUPPLIED ACCESSORIES
SUPPLIED ACCESSORIES
Please check and identify the supplied accessories.
Use numbers indicated in parentheses when asking for
replacement parts. (As of January 2007)
1 x Remote control
(N2QAYB000079)
1 x FM indoor antenna
(RSA0007-L1)
1 x Antenna plug
adaptor
(K1YZ02000013)
SC-PM45DB
1 x AC mains lead
(K2CT3CA00004)
1 x DAB "T" antenna
(N1EADY000001)
2 x Remote control
batteries
RQTV0179-2B
Advertisement
Table of Contents

Related Manuals for Panasonic SC-PM45DB


Summary of Contents for Panasonic SC-PM45DB
-
Page 1: Table Of Contents
Operating Instructions CD Stereo System SC-PM45DB Model No. Before connecting, operating or adjusting this product, please read the instructions completely. Please keep this manual for future reference. Note: "EB" on the packaging indicates the United Kingdom. Operations in these instructions are described using remote control, but you can do the operations with the main unit if the controls are the same. -
Page 2: Safety Precautions
• Most major credit and debit cards accepted. • All enquiries transactions and distribution facilities are provided directly by Panasonic UK Ltd. • It couldn’t be simpler! • Also available through our Internet is direct shopping for a wide range of fi... -
Page 3: Caution For Ac Mains Lead
– If you see this symbol – Caution for AC mains lead Information on Disposal for Users of Waste Electrical & Electronic Equipment (private households) (For United Kingdom) This symbol products and/or (“EB” area code model only) accompanying documents means that used For your safety, please read the following text carefully. -
Page 4: Getting Started
Getting started Step 1 Step 1 - Making the connections - Making the connections Connect the AC mains lead only after all other connections have been made. Connect the DAB “T” antenna The cross bar of the T should be kept fi rmly stretched. Find a position with good reception. - Page 5 Connect the FM indoor antenna. Adhesive tape FM indoor antenna Tape the antenna to a wall or column, in a position with least amount of interference. Connect the AC mains lead. READ THE CAUTION FOR THE AC MAINS LEAD ON PAGE 3 BEFORE CONNECTION.
-
Page 6: Getting Started
Getting started Optional antenna connections Optional antenna connections FM outdoor antenna DAB outdoor antenna FM outdoor antenna DAB outdoor antenna (not included) (not included) 75 Ω coaxial cable (not included) Be sure to fully tighten the screw. • Never use an outdoor antenna during a lightning storm. •... -
Page 7: Overview Of Controls
Overview of controls Main unit Main unit Refer to the numbers in parentheses for page reference. AC supply indicator (AC IN) This indicator lights when the unit is connected to the AC mains supply. 1 Standby/on switch (y/l) (8, 15) Display panel Press to switch the unit from on to standby mode or vice versa. -
Page 8: Discs
Discs Play Mode function Play Mode function Press [CD 6]. Press [PLAY MODE] to select the desired mode. PROGRAM Mode To play PLAY MODE 1-TRACK one selected track on the disc. Numeric Press the numeric buttons to select the buttons track. - Page 9 Advanced play Advanced play Press [CD 6] and then [CLEAR Repeat play Repeat play Press [PROGRAM]. You can repeat program play or other selected play mode. Press [ALBUM ] to select your desired album. Press /¢] once and then the numeric buttons to Press [REPEAT] before or during play.
-
Page 10: Fm Radio
FM radio Memory preset Memory preset Up to 20 stations can be set in the FM band. Preparation Press [FM]. PROGRAM Automatic presetting Automatic presetting PLAY MODE Press and hold [PROGRAM] to start presetting. Numeric buttons Manual presetting Manual presetting Press [PLAY MODE] to select “MANUAL”. -
Page 11: Dab
DAB stands for digital audio broadcasting. It is a new form DAB reception method on this unit DAB reception method on this unit of radio that is broadcast digitally. Unlike regular analogue broadcasting, digital radio deteriorates less, and is thus able Depending on the region there is a difference between to provide quality sound close to that of a disc. - Page 12 DAB (continued) PROGRAM PLAY MODE Numeric buttons CLEAR 7 CLEAR ALBUM /¢ ENTER ENTER MUTING MENU SECONDARY -DIMMER DISPLAY DAB MENU DISPLAY SECONDARY DAB operation DAB operation DAB Auto Scan DAB Auto Scan Press and hold [PLAY MODE] until “DAB Auto Scan” Press [DAB] to enter DAB mode.
- Page 13 Selecting a preset channel Turning automatic clock adjustment Turning automatic clock adjustment function on function on Press [PLAY MODE] to select “PRESET TUNE”. To adjust the time information during DAB broadcasting and Press [ /4] or [ /¢] or numeric buttons to automatic time adjustment.
- Page 14 DAB (continued) SLEEP CLOCK/TIMER PLAY CLEAR ALBUM /¢ ENTER ENTER MUTING MENU SECONDARY -DIMMER DISPLAY DAB MENU Changing the Auto scan frequency range Changing the Auto scan frequency range Only the frequencies currently used in the UK as of January 2007 on BAND III are Auto scanned (“United Kingdom”, factory setting).
-
Page 15: Timer
Timer Setting the clock Setting the clock Using the play timer Using the play timer This is a 24-hour clock. You can set the play timer to come on at a certain time to wake you up. Press [CLOCK/TIMER] to select “CLOCK”. Each time you press the button: Preparation Turn the unit on and set the clock. -
Page 16: Sound Adjustment
Sound adjustment Selecting sound effects Selecting sound effects You can change the sound effect by selecting Preset EQ or adjusting the bass or treble effect. Preset EQ Preset EQ Press [PRESET EQ] repeatedly to select your desired setting. Numeric buttons HEAVY →... -
Page 17: External Unit
External unit Connecting and playing a USB mass Connecting and playing a USB mass Connecting and playing a portable audio Connecting and playing a portable audio storage class device storage class device equipment equipment This feature enables you to enjoy music from portable audio equipment. -
Page 18: Troubleshooting Guide
Troubleshooting guide Before requesting service, make the below checks. If you can’t fi x the system as described below, or if something not listed here occurs, refer to the enclosed directory to locate an Authorized Service Center convenient to you or contact your dealer. Common problems No sound. -
Page 19: Specifi Cations
Specifi cations AMPLIFIER SECTION USB SECTION RMS OUTPUT POWER both channel driven Playable USB Storage Media simultaneously (1) HDD 10 % Total harmonic distortion (2) USB MP3 player/Digital audio player 20 W per channel (4 Ω) (3) USB thumbdrives Input impedance Supported audio fi... - Page 20 SUCH AS LIGHTED CANDLES, ON THE UNIT. • DO NOT REMOVE THE COVER (OR BACK); THERE • DISPOSE BATTERIES ARE NO USER SERVICEABLE PARTS INSIDE. ENVIRONMENTALLY FRIENDLY MANNER. REFER SERVICING TO QUALIFIED SERVICE PERSONNEL. Matsushita Electric Industrial Co., Ltd. Web Site: http://panasonic.net RQTV0179-2B L0207CH2037...