Panasonic SC-PT170 Operating Instructions Manual
Dvd home theater sound system
Hide thumbs
Also See for SC-PT170:
- Operating instructions manual (104 pages) ,
- Operating instructions manual (40 pages)
Table of Contents
Advertisement
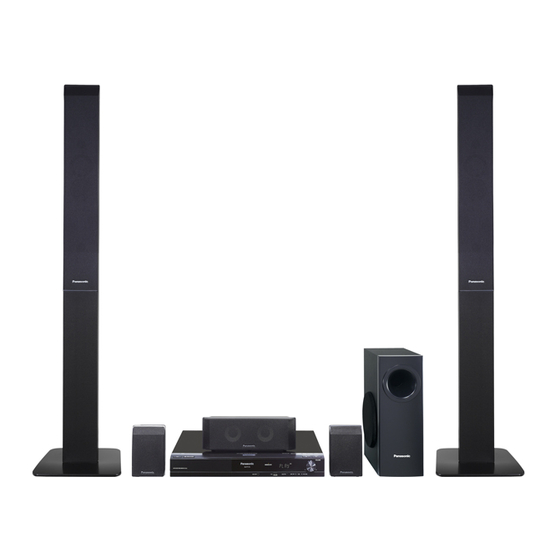
This illustration shows SC-PT170.
The illustrations shown may differ from your unit.
Region number
The player plays DVD-Video marked with labels containing the region number or "ALL".
The Middle East, Saudi Arabia and Kuwait
Southeast Asia, Hong Kong and Thailand
Australia and N.Z.
Example: [The]Middle]East,]Saudi]Arabia]and]Kuwait]
2
2
ALL
[GC] [GS] [GA] [GJ] [GN]
Region
3
4
Operating Instructions
DVD Home Theater Sound System
SC-PT170
Model No.
SC-PT175
Number
2
3
4
RQTX0242-B
Advertisement
Table of Contents

Related Manuals for Panasonic SC-PT170


Summary of Contents for Panasonic SC-PT170
-
Page 1: Operating Instructions
Operating Instructions DVD Home Theater Sound System SC-PT170 Model No. SC-PT175 This illustration shows SC-PT170. The illustrations shown may differ from your unit. Region number The player plays DVD-Video marked with labels containing the region number or “ALL”. Region Number... - Page 2 Unless otherwise indicated, illustrations in these operating Subwoofer SB-HW170 SB-HW170 instructions are of SC-PT170 for Southeast Asia, Hong Kong and Thailand. Operations in these instructions are described mainly with the remote control, but you can perform the operations on the main unit if the controls are the same.
-
Page 3: Table Of Contents
TABLE OF CONTENTS Getting Started Accessories ........4 Setting up the radio. -
Page 4: Accessories
Accessories Please check and identify the supplied accessories. [PT175] 2 Speaker stands (with cable) 1 Remote control AC mains lead [Australia]and]N.Z.] (N2QAYB000366) [Australia]and]N.Z.] [Others] (N2QAYB000364) [PT170] 4 Speaker cables [PT175] ]Saudi]Arabia]and]Kuwait] 2 Speaker cables 2 Remote control batteries [PT175] 2 Bases [Others] 1 FM indoor antenna [PT175]... -
Page 5: Step 1 Assembling The Front Speakers
step 1 Assembling the front speakers Preparation To prevent damage or scratches, lay down a soft cloth to assemble speakers. For assembly, use a Phillips-head screwdriver (not included). Make sure you have all the indicated components before starting assembly, setup, and connection. Keep the screws out of reach of children to prevent swallowing. -
Page 6: Step 2 Positioning
Getting Started step 2 Positioning How you set up your speakers can affect the bass and the sound field. Note the following points: Place speakers on flat secure bases. Placing speakers too close to floors, walls, and corners can result in excessive bass. Cover walls and windows with thick curtains. For optional wall mount, refer to page 23. -
Page 7: Step 3 Connections
step 3 Connections Turn off all equipment before connection and read the appropriate operating instructions. Do not connect the AC mains lead until all other connections are complete. Main unit SPEAKERS FM ANT (75 ) SUBWOOFER CENTER FRONT SURROUND Speaker connections Setup example Pay attention to the type of speaker and the connector colour when you place the speakers. -
Page 8: Audio And Video Connections
AV IN VIERA Link “HDAVI Control” Non-HDMI-compliant cables cannot be utilized. If your Panasonic TV is VIERA Link compatible, you It is recommended that you use can operate your TV synchronising with home theater Panasonic’s HDMI cable. operations or vice versa (... -
Page 9: Step 4 Ac Mains Lead Connection
step 4 AC mains lead connection Main unit Except [Australia]and[N.Z.] Before connecting the AC mains lead Set the voltage. AC IN Use a flat-head screwdriver to move the voltage selector to the VOLT ADJ appropriate position for the area in which this system is used. -
Page 10: Step 6 Easy Setup
step 6 EASY SETUP The Easy setup screen assists you in making necessary Easy setup settings settings. Preparation Language Turn on your TV and select the appropriate Select the language used on menu screen. video input mode (e.g. VIDEO 1, AV 1, HDMI, TV aspect etc.) to suit the connections to this unit. -
Page 11: Setting Up The Radio
Setting up the radio Confirming the preset channels Australia and N.Z. Select “FM”. PLAY MODE RADIO Main unit: EXT-IN Press [SELECTOR]. Numbered buttons Select the channel. To select a 2-digit number PLAY MODE PLAY MODE e.g. 12: [ 10] -REPEAT RADIO (Except Australia RADIO... -
Page 12: Selecting The Playback Source
Selecting the playback source Selecting the source by the remote control RADIO RADIO, EXT-IN EXT-IN DVD/CD ( Each time you press the button: RADIO FM ( EXT-IN AUX : For audio input through the AUX START terminal. D-IN : For audio input through the OPTICAL IN terminal. -
Page 13: Enjoying Surround Sound Effects
Enjoying sound from all speakers and various sound effects Subwoofer level You can adjust the amount of bass. The unit automatically selects the most suitable setting according to the type of playback source. SUB W 1 SUB W 2 SUB W 3 SUB W 4 The setting you make is retained and recalled every time you SURROUND... -
Page 14: Basic Play
Basic play If you are experiencing problems, refer to troubleshooting ( 30 to 31) Preparation To display the picture, turn on your TV and change its video input mode (e.g. VIDEO 1, AV 1, HDMI, etc.) to suit the connections to this unit. Using the main unit SELECTOR Turn on the unit. -
Page 15: Using The Remote Control
Using the remote control On-screen Select item select — Numbered buttons Confirm -REPEAT [DVD-VR] [DVD-V] [VCD] [CD] Enter number e.g. To select 12: SLOW, SEARCH SEARCH SEARCH [ 10] PLAY SKIP SLOW [VCD] with playback control SKIP SKIP PAUSE PAUSE Press [ STOP] to cancel the PBC function, and then press the... -
Page 16: Other Modes Of Play
Other modes of play For a disc with both WMA/MP3 and JPEG contents, select either music or picture contents. WMA/MP3: Select “MUSIC PROGRAM” or “MUSIC RANDOM”. Australia and N.Z. JPEG: Select “PICTURE PROGRAM” or “PICTURE RANDOM”. SLEEP PLAY MODE [DVD-V] Some items cannot be played even if you have programmed them. -
Page 17: Using Navigation Menus
Using navigation menus Selecting the picture in Thumbnail menu [JPEG] While picture is e.g. displayed Group and content Group name number JPEG images PLAY PLAY SKIP SKIP SKIP STOP Select a picture. Press [ SKIP] to skip page by TOP MENU, page. -
Page 18: Using On-Screen Menus
Using on-screen menus Items shown differ depending on the type of disc. Menu 1 (Disc/Play) TRACK SEARCH To start from a specific item Numbered [VCD] This does not work when using playback TITLE SEARCH buttons control. CONTENT SEARCH e.g. [DVD-V]: T2 C5 CHAPTER SEARCH To select numbers for data disc PG SEARCH... - Page 19 [JPEG] To select “ON” or “OFF” for picture’s Menu 3 (Audio) J P G date display DATE To make the dialogue in movies easier to hear DATE DISPLAY [DVD-V] (Dolby Digital, DTS, 3-channel or higher, with the dialogue recorded in the center channel) DIALOGUE To rotate a picture (during pause) [DivX] (Dolby Digital, 3-channel or higher, with the...
-
Page 20: Using The Viera Link "Hdavi Control Tm
VIERA Link “HDAVI Control” VIERA Link “HDAVI Control” is a convenient function that offers linked operations of this unit, and a Panasonic TV (VIERA) under “HDAVI Power off link Control”. You can use this function by connecting the equipment with the When the TV is turned off, this unit goes into standby mode automatically. -
Page 21: Viera Link Control Only With Tv's Remote Control
When the on-screen control panel appears VIERA Link Control only with TV’s remote control e.g. [DVD-V] (when “Playback Disc” is selected from the START menu.) (for “HDAVI Control 2 or later”) You can control the playback menus of this unit with the TV’s remote control. -
Page 22: Using Karaoke Mode
Enjoying Karaoke (continued) [except [Australia]and]N.Z.]] Items shown differ depending on the type of disc. Using Karaoke mode To change the audio mode (when using Select the Karaoke mode on-screen Karaoke formatted disc) menu. [ 19, Menu 4 (Karaoke)] [DVD-V] e.g. AUDIO CHANGE Solo disc OFF: Vocals off... -
Page 23: Speaker Installation Option
MP3 (Extension: “.mp3”, “.MP3”) WMA (Extension: “.wma”, “.WMA”) Video MPEG4 (Extension: “.asf”, “.ASF”) DivX (Extension: “.divx”, “.DIVX”, “.avi”, “.AVI”) For Panasonic D-Snap/DIGA MUSIC PORT [Note] Maximum: 255 folders (excluding Root folder), 4000 files, 28 characters External music device for file/folder name. -
Page 24: Changing The Player Settings
Changing the player settings DISC menu AUDIO Choose the audio language. ENGLISH (Language options) ORIGINAL OTHER – – – – SUBTITLE Choose the subtitle language. AUTO ENGLISH (Language options) OTHER – – – – MENUS Choose the language for disc menus. ENGLISH (Language options) OTHER –... - Page 25 VIDEO menu SPEAKER SETTINGS Select the delay time of the speakers. (Effective when playing 5.1-channel sound) TV ASPECT (Center and surround speakers only) Choose the setting to suit your TV. For optimum listening with 5.1-channel sound, all the speakers, except for 16:9: Widescreen TV (16:9) the subwoofer, should be the same distance from the seating position.
-
Page 26: Divx Information
Changing the player settings (continued) JPEG TIME RGB RANGE Set the speed of the slideshow. This works only when “COLOR SPACE (or COLOUR SPACE)” in Menu 5 Factory preset: 3 SEC (HDMI) is set to RGB ( 19). 1 SEC to 15 SEC (in 1-unit steps) STANDARD 15 SEC to 60 SEC (in 5-unit steps) ENHANCED:... -
Page 27: Safety Precautions
Safety precautions Placement Foreign matter Set the unit up on an even surface away from direct sunlight, high Do not let metal objects fall inside the unit. This can cause electric shock temperatures, high humidity, and excessive vibration. These conditions or malfunction. -
Page 28: Discs That Can Be Played
Reference Discs that can be played Commercial discs Indicated in these Disc Logo Remarks instructions by [DVD-V] DVD-Video High quality movie and music discs Music discs with video [VCD] Video CD Including SVCD (Conforming to IEC62107) [CD] Music discs Recorded discs ( : Playable, —: Not playable) Recorded on a DVD video Recorded on a personal computer, etc. -
Page 29: Maintenance
You can play MPEG4 data [conforming to SD VIDEO specifications (ASF standard)/MPEG4 (Simple DVD-R/RW “.asf” Profile) video system/G.726 audio system] recorded with Panasonic SD multi cameras or DVD CD-R/RW recorders with this unit. The recording date may differ from that of the actual date. -
Page 30: Troubleshooting Guide
Troubleshooting guide Before requesting service, make the following checks. If you are in doubt General operation about some of the check points, or if the solutions indicated in the No response when any buttons are pressed. following guide do not solve the problem, consult your dealer for instructions. - Page 31 No subtitles. Menu is not displayed correctly. Display the subtitles. (“SUBTITLE” in Menu 1) ( Restore the zoom ratio to “NORMAL”. (“ZOOM” in Menu 2) ( Subtitles may not be displayed depending on the disc. [DivX] Auto zoom function does not work well. Point B is automatically set.
-
Page 32: Specifications
DivX ® media files. Certified to the DivX Home Theater Profile. Full range 6.5 cm Cone type MPEG4 data recorded with Panasonic SD multi cameras or DVD Input power (IEC) 55 W (Max) video recorders Output sound pressure 80 dB/W (1.0 m) - Page 33 Macrovision, and is intended for home and other limited viewing uses only unless otherwise authorized by Macrovision. Reverse HDAVI Control is a trademark of Panasonic Corporation. engineering or disassembly is prohibited. Windows Media and the Windows logo are trademarks or registered trademarks of Microsoft Corporation in the United States and/or other countries.
-
Page 34: Control Reference Guide
Adjust the Microphone volume/ Turn Whisper-mode Surround on/off ( 13, 21) SEARCH SEARCH PLAY TV operations Aim the remote control at the Panasonic TV and press the SLOW button. SKIP SKIP PAUSE [ ]: Turn the TV on/off [AV]: Change the TV’s video input mode... - Page 35 TUNE MODE FM MODE MEMORY OPEN CLOSE VOLUME SURROUND OUTPUT 1-MIC-2 MUSIC PORT SELECTOR TUNE The indicator lights when there is surround sound effect. Standby/on switch ( /I) Press to switch the unit from on to standby mode or vice Connect USB device ( versa.
- Page 36 Panasonic Corporation Web Site: http://panasonic.net RQTX0242-B F0109AA0...