Table of Contents
Advertisement
Advertisement
Table of Contents

Related Manuals for Encore ENDSL-A2+R2


Summary of Contents for Encore ENDSL-A2+R2
- Page 1 ENDSL-A2+R2 ADSL2+ Modem One Port Full-Rated Router User’s Manual JULY 2007...
- Page 2 Copyright Copyright © 2007 Encore Electronics Inc.. All rights reserved. No part of this publication may be reproduced, transmitted, transcribed, stored in a retrieval system, or translated into any language or computer language, in any form or by any means, electronic, mechanical, magnetic, optical, chemical, manual or otherwise, without the prior written permission of this company.
-
Page 3: Table Of Contents
Front Panel Indicators and Description ............7 Back Panel ....................8 Connect Related Devices................9 3. Connecting ENDSL-A2+R2 Router via Ethernet and USB....10 3.1 Setup ENDSL-A2+4R2 router via Ethernet Cable ........10 3.2 Setup ENDSL-A2+4R2 router via USB Cable .......... 10 3.3 Configure TCP/IP.................. - Page 4 4.5.6 CWMP .....................65 Maintenance..................... 67 4.6.1 Administration .................67 4.6.2 Time Zone ..................67 4.6.3 Firmware ..................68 4.6.4 System Restart .................69 4.6.5 Diagnostic ..................70 Status ....................... 71 4.7.1 Device Info..................71 4.7.2 System Log ..................73 4.7.3 Statistics ...................74 5. Troubleshooting ..................75 5.1 Using LEDs to Diagnose Problems ............75 5.1.1 Power LED..................75 5.1.2 LAN LED....................75 5.1.3 ADSL LED..................76...
-
Page 5: Introduction
1. Introduction 1.1 Introduction to the ENDSL-A2+4R2 router This ENDSL-A2+4R2 router is a full-featured ADSL2+ router that provides Ethernet direct connections to individual PCs or local area network with 10/100 Base-T Ethernet. This product use advanced ADSL chipset solution with complete set of industry standard features and high-speed ADSL, ADSL2 and ADSL2+ Internet access solution for SOHO and residential users. - Page 6 Quick Installation Wizard Support Quick Installation Wizard Web GUI and Easy setup software to install this ADSL router easily and quickly. Multi-connection protocol support Multi Protocol over AAL5 (RFC1483 / 2684) Classical IP over ATM (RFC 1577) VC and LLC Multiplexing PPP over Ethernet (RFC 2516) PPP over ATM (RFC 2364) Network Address Translation (NAT)
- Page 7 Device Management Web-based GUI Configuration / Management Command-line Interpreter (CLI) Telnet Remote Management Firmware upgrade via FTP / TFTP (Web-based GUI) Built-in Diagnostic tool and IP Ping SNMP (Simple Network Management Protocol) Support It’s an easy way to remote control the router via SNMP. 10/100M Auto-negotiation Fast Ethernet switch This auto-negotiation feature allows the router to detect the speed of incoming transmissions and adjust appropriately without manual intervention.
-
Page 8: Hardware Installation
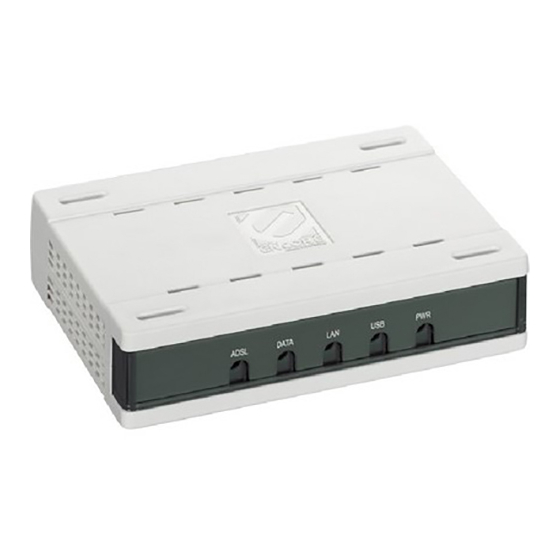
RJ-11 Phone cable USB Cable Power Adapter Software driver CD Quick Installation Guide 2.3 Front Panel Indicators and Description Front panel of ENDSL-A2+R2 has LED indicators to display router’s operating status. One-Port ADSL Router Front Panel ○ ○ ○ ○... -
Page 9: Back Panel
When port 1 connection with PC or Switch / Hub is established, this LED will light up. When connection with Internet (ADSL Connected) is established, this LED will light up. ADSL When this LED is flashing: NO ADSL physical connection 2.4 Back Panel One-Port ENDSL-A2+R2 LINE DEFAULT ON/OFF Descriptions of All Connectors... -
Page 10: Connect Related Devices
Descriptions of All Connectors ON/OFF Power switch button Connect with power adapter Connect with Ethernet Cable to Switch Hub or PC Connect with Ethernet Cable to Switch Hub or PC Connect with Ethernet Cable to Switch Hub or PC Connect with Ethernet Cable to Switch Hub or PC DEFAULT Reset button Connect with USB cable to PC... -
Page 11: Connecting Endsl-A2+R2 Router Via Ethernet And Usb
Once you establish Internet connection, you could browse the Web through the USB cable. USB Device Driver Installation for Windows Vista/XP/2000/ME/98SE Step 1: Connect ENDSL-A2+R2 Router and PC with USB cable. Step 2: Once “Found New Hardware Wizard” window pops out, chooses “Install from a list or specific location (advanced)” and click “Cancel”:... - Page 12 (Figure 1: For Windows Vista) (Figure 2: For Windows 2000 and XP) (Figure 3: For Windows 98SE and ME)
- Page 13 Step 3: Insert the installation CD and the Easy Setup main page will appear as below, Install USB Driver: If router is connected through USB cable, click here to install USB driver. Quick Setup: If router is connected through Ethernet cable or after USB driver is loaded, click here to set the ADSL Router.
- Page 14 Step 4: If router is connected with USB cable, click “Install USB Driver”, the software kit will automatically install USB driver. Please wait for a while during the configuration. Step 5: Windows XP OS, Click “Continue Anyway” to process the next step.
- Page 15 Step 6: After device installation has successfully installed ADSL USB Modem, click “OK” to exit. [Note] In Windows 98SE Operation System, the setup program will ask restart the computer to complete the installation. Please follow the below processes: Step 6: Click “OK”...
- Page 16 Step 9: After complete the installation process, the system will ask to restart your computer. Please click “Yes” to reboot your system again. To verify your router is installed properly, please follow the below descriptions: [For Windows Vista] Go through “Start Control Panel System Device Manager”...
- Page 17 [For Windows Go through “Start Control Panel System Hardware Device Manager” to check if USB device is installed properly.
- Page 18 [For Windows 2000] Go through “Start Settings Control Panel System Hardware Device Manager” to check if USB device is installed properly. [For Windows 98SE & After OS boots up, go through “Start Settings Control Panel System Device Manger” to check if USB device is installed properly,...
-
Page 19: Configure Tcp/Ip
3.3 Configure TCP/IP For Windows 98SE and ME Step 1: Click Start then Settings and choose Control Panel... - Page 20 Step 2: Double click Network icon. Step 3: Select Configuration tab, then choose TCP/IP from the list of installed network Components and click Properties button. Step 4: You can setup the following configurations in two methods: Option1: Get an IP from Router Automatically Select the IP Address tab.
- Page 21 Then, select DNS Configuration tab and select Disable DNS then click OK to finish the configuration. Option2: Configure IP Manually...
- Page 22 1) At IP Address tab, select Specify an IP address, set default IP address for the Router is 192.168.1.1, so use 192.168.1.X (X is a number between 2 to 254) for IP Address field and 255.255.255.0 for Subnet Mask field. 2) Select Gateway tab and add default Router IP Address “192.168.1.1”...
- Page 23 Under DNS Configuration tab, select Enable DNS and add DNS values (192.168.1.1) in DNS Server Search Order field then click Add. For Windows 2000 Step 1: (a) Right-click My Network Places and select Properties in the main window screen (b) Or, go to Start / Settings / Control Panel. In the Control Panel, double-click on Network and Dial-up Connections.
- Page 24 Step 2: Right click Local Area Connection (your local network hooked up with ADSL router) and select Properties: Step 3: Select Internet Protocol (TCP/IP) then click Properties:...
- Page 25 Configure IP Automatically: Step 4: Select Obtain an IP address automatically and Obtain DNS server address automatically then click OK to complete IP configuring process. Configure IP Manually: Step 4: Select Use the following IP address and Use the following DNS server addresses.
- Page 26 For Windows XP Step 1: Click Start then select Control Panel (in the Classic View). Step 2: Double-click Network Connections icon.
- Page 27 Step 3: Right-click Local Area Connection (local network your ADSL hooked up with) and select Properties: Step 4: Select Internet Protocol (TCP/IP) then click Properties:...
- Page 28 Configure IP address Automatically: Step 5: Select Obtain an IP address automatically and Obtain DNS server address automatically. Click OK to finish the configuration. Configure IP Address Manually: Step 5: Select Use the following IP address and Use the following DNS server addresses.
- Page 29 IP address: Fill in IP address 192.168.1.x (x is a number between 2 to 254). Subnet mask: Default value is 255.255.255.0. Default gateway: Default value is 192.168.1.1. Preferred DNS server: Fill in preferred DNS server IP address. Alternate DNS server: Fill in alternate DNS server IP address. You can use ping command under DOS prompt to check if you have setup TCP/IP protocol correctly and if your computer has successfully connected to this router.
- Page 30 For Windows Vista Step 1: Click Start then select Control Panel (in the Classic View). Step 2: Double-click Network and Sharing Center icon.
- Page 31 Step 3: Select “Manage Network connections”. Step 4: Right-click Local Area Connection (local network your ADSL hooked up with) and select Properties:...
- Page 32 Step 5: Select Internet Protocol (TCP/IP) then click Properties: Configure IP address Automatically: Step 6: Select Obtain an IP address automatically and Obtain DNS server address automatically. Click OK to finish the configuration.
- Page 33 Configure IP Address Manually: Step 7: Select Use the following IP address and Use the following DNS server addresses. IP address: Fill in IP address 192.168.1.x (x is a number between 2 to 254). Subnet mask: Default value is 255.255.255.0. Default gateway: Default value is 192.168.1.1.
-
Page 34: Usb Device Driver Installation On Mac Os
3.4 USB Device Driver Installation on MAC OS Step 1. Once you insert the Device Driver CD-ROM disk, direct the path of your MAC OS. Double-click the compressed “.zip” file to unzip the file. Then, you will get a “.pkg” file. Step 2. - Page 35 Step3. Select a Destination to install the Trendchip ADSL Modem software and click “Continue”. Step 4. Click “Continue” to go next process.
- Page 36 Step 5. Click “Install” to begin the installation process. Step 6. Enter your Name and Password for your system. Then, click “OK” to continue.
- Page 37 Step7. Click “Continue Installation” to start installation. Step 8. Click “Restart” to finish installing the software.
- Page 38 Step 9. After restart the PC, click “System Preferences” on the bottom of the desktop. Step 10. Click “Network” icon on the System Preferences windows.
- Page 39 Step 11. Once your Ethernet Adapter’s button is “Green”, it means your ADSL Router is successful installed. Step 12. Fill in TCP/IP IP address. IP address: Fill in IP address 192.168.1.x (x is a number between 2 to 254). Subnet mask: Default value is 255.255.255.0. Router: Default value is 192.168.1.1...
- Page 40 Step13. Go to “Applications” double-click “Internet Explorer” icon. Step14. Enter the default IP address http://192.168.1.1 Step15. Entry of the username and password will be displayed. Enter the default User ID and Password. The default login User ID of the administrator is admin, and the default admin login password is admin.
- Page 41 After you enter User ID and Password, the main webpage will show as below.
-
Page 42: Configure Endsl-A2+R2 Router Via Html Interface
4. Configure ENDSL-A2+4R2 Router via HTML Interface ENDSL-A2+4R2 Router supports a Web-based (HTML) GUI to allow users to configure Router setting via Web browser. 4.1 Login 1) Launch the Web browser. 2) Enter the default IP address http://192.168.1.1 3) Entry of the username and password will be displayed. Enter the default login User Name and Password: The default login User Name of the administrator is admin, and the default login password is admin. -
Page 43: Quick Start
The main webpage will be displayed as below: 4.2 Quick Start Click Quick Start to guide you to configure the device to connect your ISP and have Internet access within minutes. This Quick Start will guide you step by step to configure the password, time zone, and WAN settings of you device. - Page 44 The Quick Start Setup Wizard includes four quick steps: 1) Set your new password. 2) Choose your time zone. 3) Set your Internet connection. 4) Re-start your ADSL router. Please follow the quick start step by step to configure the device. Note: If your ISP doesn’t provide DNS, after you complete Quick Start configuration, please go to Interface Setup Internet to configure your DNS settings.
-
Page 45: Interface Setup
4.3 Interface Setup Click an Interface Setup link to set ATM VC values, ISP Encapsulation, configure multi- connection settings, and LAN configuration. 4.3.1 Internet [ATM VC] ATM settings are used to connect to your ISP. Your ISP provides VPI, VCI, settings to you. In this Device, you can totally setup 8 PVCs on different encapsulations if you apply 8 different virtual circuits from your ISP. - Page 46 [Encapsulation] Dynamic IP: Select this option if your ISP provides you an IP address automatically. This option is typically used for Cable services. Please enter the Dynamic IP information accordingly. Static IP: Select this option to set static IP information. You will need to enter in the encapsulation type (1483 Bridged IP LLC, 1483 Bridged IP VC-Mux, 1483 Routed IP LLC (IPoA), 1483 Routed IP VC-Mux), IP address, subnet mask, and gateway address provided to you by your ISP.
- Page 47 [PPPoA/PPPoE] Select this option if your ISP requires you to use a PPPoE connection. This option is typically used for DSL service. Select Dynamic PPPoE to obtain an IP address automatically for your PPPoE connection. Selection Static PPPoE to use static IP address for your PPPoE connection.
- Page 48 [NAT] NAT: Select this option to Activate/Deactivated the NAT (Network Address Translation) function for this VC. The NAT function can be activated or deactivated per PVC basis. Default Router: Select whether this PVC will be default router for internet data. [Dynamic Route] RIP (Routing Information Protocol): Select this option to specify the RIP version, including RIP1, RIP2-B and RIP2-M.
-
Page 49: Lan
4.3.2 There are the IP settings of the LAN Interface for the device. These settings may be referred to as Private settings. You may change the LAN IP address if needed. The LAN IP address is provided to your internal network and cannot be seen on the Internet. [Router Local IP] IP Address: Enter the IP address of your ADSL router in dotted decimal notation, for example, 192.168.1.1 (default setting). - Page 50 IGMP-v2. Select None to disable it. Please refer to Internet Multicast. The only difference is the interface. [DHCP Server] The DHCP Server gives out IP addresses when a device is booting up and request an IP to be logged on to the network. That device must be set as a DHCP client to obtain the IP address automatically.
-
Page 51: Advanced Setup
4.4 Advanced Setup 4.4.1 Firewall User can enable or disable firewall feature of the ENDSL-A2+4R router in the page. 4.4.2 Routing This table lists IP address of Internet destinations commonly accessed by your network. When a computer requests to send data to a listed destination, the device uses the Gateway IP to identify the first Internet router it should contact to route the data most efficiently. - Page 52 [Static Route] Select this option to set Static Routing information. Destination IP Address: This parameter specifies the IP network address of the final destination. IP Subnet Mask: Enter the subnet mask for this destination. Gateway IP Address: Enter the IP address of the gateway. The gateway is an immediate neighbor of your ADSL Router that will forward the packet to the destination.
-
Page 53: Nat
4.4.3 NAT Network Address Translation (NAT) is a method for disguising the private IP addresses you use on your LAN as the public IP address you use on the Internet. You define NAT rules that specify exactly how and when to translate between public and private IP addresses. Simply select this option to setup the NAT function for your ADSL router. - Page 54 [DMZ] A DMZ (de-militarized zone) is a host between a private local network and the outside public network. It prevents outside users from getting direct access to s server that has company data. Users of the public network outside the company can access only the DMZ host. DMZ Host IP Address: Enter the specified IP Address for DMZ host on the LAN side [Virtual Server] The Virtual Server is the server or server(s) behind NAT (on the LAN), for example, Web...
- Page 55 Start & End port number: Enter the specific Start and End Port number you want to forward. If it is one port only, you can enter the End port number the same as Start port number. For example, set the FTP Virtual server, you can set the start and end port number to 21. Local IP Address: Enter the IP Address for the Virtual Server in LAN side.
-
Page 56: Qos
4.4.4 QoS QoS (Quality of Service). This option will provide better service of selected network traffic over various technologies. Deploying QoS management to guarantee that all application receive the service levels required and sufficient bandwidth to meet performance expectations is indeed one important aspect of modem enterprise network. -
Page 57: Vlan
4.4.5 VLAN Virtual LAN (VLAN) is a group of devices on one or more LANs that are configured so that they can communicate as if they were attached to the same wire, when in fact they are located on a number of different LAN segments. Because VLANs are based on logical instead of physical connections, it is very flexible for user/host management, bandwidth allocation and resource optimization. -
Page 58: Adsl
Assign VLAN PVID for each interface: You can assign ATM VC, Ethernet (LAN) port, and Wireless LAN port’s PVID in this section. Define VLAN Group: Based on each VLAN group, you can configure each group’s VLAN setting. You can configure up to 8 VLAN settings. 4.4.6 ADSL Select this option to set ADSL Mode and ADSL Type information. -
Page 59: Access Management
4.5 Access Management 4.5.1 ACL Go to Access Management ACL to enable remote management. You may use telnet or Web to remotely manage the ENDSL-A2+4R2. User just needs to enable Telnet or Web and give it an IP address that wants to access the ENDSL-A2+4R2. The default IP 0.0.0.0 allows any client to use this service to remotely manage the ENDSL-A2+4R2. -
Page 60: Ip Filter
For Example: How to set your ACL? 1. You must choose Activated to enable your ACL function. 2. Select the ACL Rule Index number (up to 16 number) 3. You can set the specific Secure IP address or set 0.0.0.0 for all IPs. 4. - Page 61 rules per interface. If all six rules in an index are Next rules, the data will be sent to the next index for filtering. Filter Type: You can select IP/MAC Filter, Application, and URL Filter type. IP/MAC Filter Set Index: The IP/MAC Filter Set Index from 1 to 12 and each index can set up to 6 IP Filter.
- Page 62 leaving your system is considered Incoming and data entering your system is Outgoing. IP/MAC Filter rule Index: The IP/MAC Filter rule Index from 1 to 6. IP/MAC Filter Rule Editing: Select the IP/MAC Filter Rule Index you wish to modify. Active: Toggle this rule index on or off with Yes or No, respectively.
- Page 63 Please follow below steps to set your IP Filter: IP Filter Set Editing: Choose your IP Filter Set Index, Interface and Direction options. Remember, Interface and Direction functions are affected with IP Filter Set Index. EX: if your 1 index set of IP filter set PVC0 as Interface and Outgoing as Direction, so the list of IP Filter will be PVC0 and Outgoing as their settings.
-
Page 64: Snmp
4.5.3 SNMP The Simple Network Management Protocol (SNMP) is used for exchanging information between network devices. It enables a host computer to access configuration, performance, and other system data that resides in a database on the modem. The host computer is called a management station and the modem is called an SNMP agent. -
Page 65: Ddns
applications automatically reserve a NAT forwarding port in order to communicate with another UPnP enabled device; this eliminates the need to manually configure port forwarding for the UPP enabled application. If you don’t want to make configuration changes through UPnP, just choose “Deactivated”. -
Page 66: Cwmp
Dynamic DNS: Choose the option for Activated or Deactivated DDNS. Service Provider: The default Dynamic DNS service provider is www.dyndns.org. My Host Name: Type the domain name assigned to your ADSL by your Dynamic DNS provider. E-mail Address: Type your e-mail address. Username: Type your user name. - Page 67 gateways, Set-top box, paddles, VoIP-phones). At the same time the configuration of this equipment became more complicated -- too complicated for the end-users. For this reason the TR-069 standard was developed. It provides the possibility of auto configuration of these access types.
-
Page 68: Maintenance
4.6 Maintenance 4.6.1 Administration There is only one account that can access Web-Management interface-Administration. Admin has read/write access privilege. In this web page, you can set new password for admin. New Password: Type the new password in this field. Confirm Password: Type the new password again in this field. Note: If you ever forget the password to log in, you may press the RESET button up to 6 second to restore the factory default settings. -
Page 69: Firmware
Current Date/Time: This field displays an updated Date and Time when you reenter this menu. [Time Synchronization] Synchronize time with: You can choose “NTP Server automatically”, “PC’s Clock”, or “Manually” to coordinate the time. Time Zone: Choose the Time Zone of your location. This will set the time difference between your time zone and Greenwich Mean Time (GMT). -
Page 70: System Restart
Current Firmware Ver.: This filed displays the current firmware version. New Firmware Location: Type in the location of the file you want to upload in this field or click Browse… to find it. UPGRADE: Click UPGRADE to begin the upload process. 4.6.4 System Restart The SysRestart screen allows you to restart your router with either its current... -
Page 71: Diagnostic
If you wish to restart the router using the factory default settings (for example, after a firmware upgrade or if you have saved an incorrect configuration), select Factory Default Settings to reset to factory default settings. Otherwise, you can select Current Settings. You may also reset your router to factory settings by holding the DEFAULT button on the back panel of your router in for 10-12 second while the router is turned on. -
Page 72: Status
4.7 Status 4.7.1 Device Info The Device Info screen is a tool that you use to monitor your ADSL Router. It shows the Firmware Version, WAN, LAN, and MAC address information. Note that these fields are read-only and are not meant for diagnostic purposes. Except the Virtual Circuit, click the drop-down list and select the name of the Virtual Circuit on which the system status is to be shown. - Page 73 [Device Information] Firmware Version: This filed displays current firmware version. MAC Address: The MAC (Media Access Control) or Ethernet address unique to your modem. [LAN] IP Address: The LAN port IP address Subnet Mask: The LAN port IP subnet mask. DHCP Server: The status of DHCP Server (Enabled or Disabled) [WAN] Virtual Circuit: Click the drop-down list and select the name of the Virtual Circuit on which the...
-
Page 74: System Log
4.7.2 System Log The System Log displays data generated or acquired by routine system communication with other devices, such as the results of negotiations with the ISP's computers for DNS and gateway IP addresses. The device keeps a running log of events and activities occurring on the Router. -
Page 75: Statistics
4.7.3 Statistics The ENDSL-A2+4R Router keeps statistic of traffic that passes through it. You are able to view the amount of packets that passes through the Router on both the WAN port & the LAN port. The traffic counter will reset if the device is rebooted. You can select Ethernet/ADSL to view the statistics report of LAN/WAN. -
Page 76: Troubleshooting
[ADSL] The ADSL screen gives you information about how much data your router has transmitted or received across the ADSL connection. Click on REFRESH to update the screen. 5. Troubleshooting If the router is not function properly, first check this session for simple troubleshooting before contacting your Internet service provider (ISP) for support. -
Page 77: Adsl Led
5.1.3 ADSL LED The ADSL LED on the front panel does not light up. STEPS CORRECTIVE ACTION Check the telephone wire and connections between the router ADSL port and the wall jack. Make sure that the telephone company has checked your phone line and set it up for ADSL service. -
Page 78: Problems With The Login Username And Password
5.3 Problems with the Login Username and Password I forgot my login username and/or password. STEPS CORRECTIVE ACTION If you have changed the password and have now forgotten it, you will need to upload the default configuration file. This will erase all custom configurations and restore all of the factory defaults including the password. -
Page 79: Problems With The Internet Access
installed by the qualified and licensed electrician), and ensure that all line filters are correctly installed and right way around. Missing line filters or line filters installed the wrong way around can cause problems with your ADSL connection, including causing frequent disconnects. Frequent loss of ADSL line sync (disconnections). - Page 80 If you have any troubles to configure or setup the ENDSL-A2+4R, please feel free to contact us. Before contacting us, make sure collect following information. Submit complete detailed information of your problem will help us to provide you accurate answers. Model Name: Serial Number: PC Settings:...