ActionTec GT704-WG User Manual
54 mbps wireless dsl gateway
Hide thumbs
Also See for GT704-WG:
- User manual (123 pages) ,
- Troubleshooting manual (9 pages) ,
- Specifications (2 pages)

Related Manuals for ActionTec GT704-WG


Summary of Contents for ActionTec GT704-WG
-
Page 1: User Manual
54 Mbps Wireless DSL Gateway Model #: GT704-WG Firmware Version: 3.0.1.0.6.0-GT704-WG User Manual Ver 2.0 Solutions for the Digital Life ™... -
Page 2: Table Of Contents
Accessing Advanced Setup WAN IP Address LAN IP Address DHCP Server Services Blocking Website Blocking Remote Management Application Layer Gateway and Port Forwarding 47 DMZ Hosting Firewall Dynamic Routing NAT (Network Address Translation) Static Routing UPnP (Universal Plug and Play) - Page 3 Actiontec 54 Mbps Wireless DSL Gateway User Manual 6 Using Utilities Web Activity Log System Log DSL Settings Restore Default Settings Upgrade Firmware 7 Setting Up a Network Ethernet Wireless 8 Troubleshooting Troubleshooting Frequently Asked Questions a Reference Locating Computer Information...
-
Page 4: Introduction
Gateway is the simplest way to connect computers to a high-speed broadband connection. This easy-to-use product is perfect for the home office or small busi- ness. If you want to take your computing to the next level, the Actiontec 54 Mbps Wireless Gateway is sure to be one of the keys to your success. -
Page 5: Minimum System Requirements
Actiontec 54 Mbps Wireless DSL Gateway User Manual Minimum System Requirements Active service Computer with a Mbps Ethernet connection, or connection 10/100 Microsoft Windows Second Edition ( ), Windows Millennium Edition (Me), Windows , Windows , Windows , Mac and above NT 4.0... - Page 6 Chapter 1 Introduction relay support authentication, administrative passwords through Telnet and PAP/CHAP HTTP -, and -bit wireless security Compliant with 802.3 Ethernet standard IEEE 10/100 Base-T Ethernet ports (4) Flow control support for Fast Ethernet Web-based configuration setup Default configuration backup restore...
-
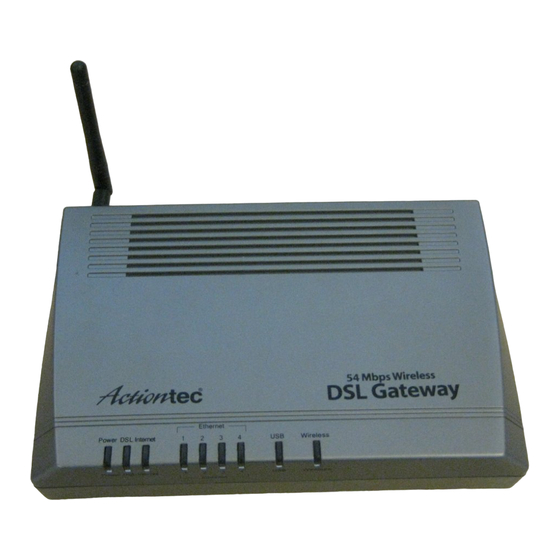
Page 7: Getting To Know The Gateway
Gateway is receiving power and fully operational. When the Power light flashes rapidly, the Gateway is initializing. If the Power light is not illuminated when the Power cord is plugged in and the Power switch is turned on, the Gateway has suffered a critical error and technical support should be contacted. - Page 8 When the Internet light glows steadily, the Gateway is connected to the pro- vider. Ethernet Lights The Ethernet lights illuminate when the Gateway is connected via one or more of its Ethernet ports. USB Light light illuminates when the Gateway is connected via its port.
- Page 9 Reset Switch Depressing the Reset switch for one or two seconds will power cycle the Gateway (similar to unplugging and then plugging in the Gateway’s Power cord). To restore the Gateway’s factory default settings, depress and hold the Reset switch for approximately 10 seconds.
-
Page 10: Setting Up The Gateway
Installation Buddy first, before attempting any other procedures. To set up the Gateway, it must be connected to a computer, and then configured. After connecting this first computer, other computers can be added to the network , Ethernet, or wirelessly (see “Setting Up a Network”... - Page 11 Actiontec 54 Mbps Wireless DSL Gateway User Manual 2. Read the instructions, select Initial Setup by clicking on the appropriate check box, then click Next. 3. Click in the check box next to Ethernet (Recommended), then click Next.
- Page 12 Chapter 2 Setting Up the Gateway 4. Make sure the items needed to connect the Gateway to the first computer are included in the kit, then click Next. 5. Get the Gateway from the kit, then click Next.
- Page 13 Actiontec 54 Mbps Wireless DSL Gateway User Manual 6. Get the Power cord and plug the smaller end into the black Power port on the rear panel of the Gateway, then click Next. 7. Plug the larger end of the Power cord into a power outlet, then click Next.
- Page 14 Chapter 2 Setting Up the Gateway 8. Click the On/Off switch to its on position (as shown in the picture on- screen), then click Next. 9. Confirm the Power light on the front of the Gateway glows solid green, then...
- Page 15 Actiontec 54 Mbps Wireless DSL Gateway User Manual 10. Get the yellow Ethernet cable from the kit and plug one end into a yellow Ethernet port on the back of the Gateway, then click Next. 11. Plug the other end of the yellow Ethernet cable into an Ethernet port on the back of the computer.
- Page 16 12. Make sure one of the Ethernet lights on the front of the Gateway glows solid green. Click Next. 13. Get the black or gray DSL cable from the kit and plug one end into the gray Line port on the rear panel of the Gateway. Click Next.
- Page 17 Actiontec 54 Mbps Wireless DSL Gateway User Manual 14. Plug the other end of the black or gray DSL cable into the phone jack clos- est to the computer. Click Next. The Gateway is connected to a computer via Ethernet. Next, install the filters as described in “Installing Filters”...
- Page 18 Chapter 2 Setting Up the Gateway 2. Read the instructions, select Initial Setup by clicking on the appropriate check box, then click Next. 3. Click the check box next to USB, then click Next.
- Page 19 Actiontec 54 Mbps Wireless DSL Gateway User Manual 4. Make sure the items needed to connect the Gateway to the first computer are included in the kit, then click Next. 5. Get the Gateway from the kit, then click Next.
- Page 20 Chapter 2 Setting Up the Gateway 6. Get the Power cord and plug the smaller end into the black Power port on the rear panel of the Gateway, then click Next. 7. Plug the larger end of the Power cord into a power outlet, then click Next.
- Page 21 Actiontec 54 Mbps Wireless DSL Gateway User Manual 8. Click the On/Off switch to its on position (as shown in the picture on- screen), then click Next. 9. Confirm the Power light on the front of the Gateway glows solid green, then...
- Page 22 Chapter 2 Setting Up the Gateway 10. Get the blue USB cable from the kit and plug the square end into the blue USB port on the back of the Gateway, then click Next. 11. Plug the rectangular end of the blue USB cable into an USB port on the...
- Page 23 12. Make sure the USB light on the front of the Gateway glows solid green. Click Next. 13. Get the black or gray DSL cable from the kit and plug one end into the gray Line port on the rear panel of the Gateway. Click Next.
- Page 24 Chapter 2 Setting Up the Gateway 14. Plug the other end of the black or gray DSL cable into the phone jack clos- est to the computer. Click Next. The Gateway is connected to a computer via USB. Next, install the filters as described in “Installing Filters,”...
-
Page 25: Installing Phone Filters
Actiontec 54 Mbps Wireless DSL Gateway User Manual 2. Read the on-screen information, then unplug all telephones and other devices from their respective phone jacks. Click Next. 3. Get the phone filters. Click Next. Caution: Do not unplug the black or gray cable from the phone jack near your computer. - Page 26 Chapter 2 Setting Up the Gateway 4. Plug a phone filter into every phone jack with a telephone or other device con- nected to it, then click Next. 5. Plug the ends of the phone lines disconnected in step 2 into the phone filters plugged into phone jacks.
- Page 27 Actiontec 54 Mbps Wireless DSL Gateway User Manual 6. Read the on-screen instructions, and make sure the Gateway is connected exactly as shown, depending on whether the Gateway is connected via Ethernet or USB. Ethernet connection setup: USB connection setup:...
- Page 28 Chapter 2 Setting Up the Gateway 7. Make sure the on the Gateway glows solid green (this may take a DSL light few moments), then click Next. Ethernet: USB: Next, go to “Setting Up the Connection” on the next page.
-
Page 29: Setting Up The Dsl Connection
Gateway searches for the connection. If successful, go to step 2. If unsuccess- ful, go to Select from the list, below. Select from the list - If Auto Detect is not successful, or the user knows which to connect to, click in the “Select from the list” box, then click Next. - Page 30 Gateway searches for the connection. If the con- nection is successful, go to step 2. If not, go to “Manual Setup,” below. Manual Setup - If the Auto Detect and Select from a list are not successful, or the user knows how to configure and Encapsulation settings, click in the “Manual Setup”...
- Page 31 In the next window, enter the and Encapsulation settings (the should provide these) then click Next. 2. If PPPoE or PPPoA was selected, enter the user name and password in the appropriate text boxes (or click the check box next to “My does not require...
- Page 32 Chapter 2 Setting Up the Gateway 3. Select the appropriate IP type. This information should be provided by the ISP. When finished, click Next. If Static IP is selected, go to step 4. If Dynamic IP (DHCP) is selected, go to step 5.
- Page 33 Actiontec 54 Mbps Wireless DSL Gateway User Manual 5. When the configuration is complete, a series of congratulations windows appears. Read the on-screen information, then click through the next few windows to exit the Installation Buddy.
- Page 34 The Gateway is successfully configured and ready for use. To make changes to the Gateway’s Advanced Configuration settings, see Chapter 4, “Using Advanced Setup.” To create a network by connecting more computers to the Gateway, see Chapter 7, “Setting Up a Network.”...
- Page 35 Actiontec 54 Mbps Wireless DSL Gateway User Manual This page left intentionally blank.
-
Page 36: Performing A Basic Setup
Performing a Basic Setup This chapter is a guide through a basic configuration setup of the Gateway for users who did NOT use the Actiontec Installation Buddy® to setup the Gateway. The basic setup includes instructions on how to connect the Gateway to the and change the user name and password. - Page 37 3. Follow the instructions in the “Set Up/Configuration” screen, then click Begin Basic Setup. 4. In the next screen, follow the on-screen instructions, then click Next. 5. In the next screen, select the type of connection provided by the clicking in the circle next to . If unsure about the selection,...
-
Page 38: Changing The User Name And Password
The Internet light will also glow steadily green. The Gateway is now configured and users can start surfing the Web. If an error stating the Web browser was unable to connect to the Internet appears, check the configuration settings. Ensure all the information required by the entered correctly. - Page 39 “New Password” text box. Re-enter the password in the “Re-enter New Password” text box. Make sure to write the user name and password down and keep them in a secure location. They will be needed to access to the Gateway’s Web Configurations screens in the future.
-
Page 40: Using Advanced Setup
Using Advanced Setup This section contains information concerning setting up the advanced features of the Gateway, such as wireless settings, remote management, and Web site blocking, using the Gateway’s Web Configurator. Accessing Advanced Setup To access the Web Configurator’s Advanced Setup screens: 1. -
Page 41: Wan Ip Address
5. The “Configuring the Advanced Settings” screen appears. To check all the set- tings, or if unsure of which settings to modify, select Next. To modify a spe- cific configuration, click on its name in the menu bar on the left. - Page 42 After selecting a connection type, click Next to continue configuring the connection. Transparent Bridging Select this option to use the Gateway as a transparent bridge. This option should only be used if the Gateway is being used as a Modem to connect...
- Page 43 Actiontec 54 Mbps Wireless DSL Gateway User Manual “Broadband Connection via PPPoA” screen: If a User Name and Password was entered in the Installation Buddy or during Basic Setup, it should be displayed in the “Broadband Connection via PPPoE/ ” screen. If not, enter the information now. If the information is unavailable,...
- Page 44 Gateway, as opposed to the address and routing information being bridged to terminate at the computer. This allows the use of the router capabilities for the Local Area Network ( ☞...
-
Page 45: Lan Ip Address
The values in the Address” and “Device Netmask” text boxes are the “Device IP address and Subnet mask of the Gateway as seen on the network. These values can be modified for your network, but Actiontec recommends keeping the default factory settings ( address 192.168.0.1 Subnet mask 255.255.255.0). -
Page 46: Dhcp Server Configuration
Gateway. If the default values are left intact, the Gateway supplies a unique address between 192.168.0.2 and 192.168.0.254 to each computer on the net- work. Note that the first three groups of numbers of the addresses are identical; this means they are on the same subnet. The... -
Page 47: Services Blocking
Default is 86400 seconds (24 hours), after which a new IP address must be released. To extend the lease time, enter a larger number. Domain Name “Domain Name” allows a network administrator to enter a domain name if the network is being used in a domain environment. -
Page 48: Website Blocking
“Blocked Website List” text box, and will not be avail- able to computers on the network. To remove a blocked Web site, click on it in the “Blocked Website List,” then click Remove. Website Blocking supports blocking up... -
Page 49: Remote Management
On and writing down the address of the Gateway (see “ WAN IP Address”). On a computer outside of the network, open a Web browser and enter the Gateway’s address in the address text box. A username and password WAN IP prompt appears in the browser window. -
Page 50: Application Layer Gateway And Port Forwarding
Port forwarding allows certain programs to bypass the Gateway’s built-in firewall, allowing access to parts of the network (for hosting a Web or ftp server, for example). To use, select the host name of a computer on the network from the “... -
Page 51: Dmz Hosting
Actiontec 54 Mbps Wireless DSL Gateway User Manual In this screen, the user can create a custom set of rules for a game or applica- tion not listed in the Application Level Gateway screen. Enter the “Rule Name,” “Protocol,” “Port Start,” “Port End,” and “Port Map” in the appropriate text boxes, then click Apply. -
Page 52: Firewall
Selecting Firewall in the “Configuring the Advanced Settings” screen generates the “Firewall Security Level” screen. Select the level of security needed for the network. High If High is selected in the “Firewall Security Level” screen, the services listed at the bottom of the screen ( HTTP... - Page 53 Additionally, the user can click in the appropriate check box to allow or deny access for a particular service (check mark in the check box to allow; blank check box to deny). All services not listed are denied access.
-
Page 54: Dynamic Routing
Selecting Dynamic Routing in the “Configuring the Advanced Settings” screen generates the “Dynamic Routing” screen. If another router or gateway is set up behind the Gateway in the network configu- ration, consult the documentation that came with the other router/gateway to see what kind of Dynamic Routing is required operate it with the Gateway, then select the appropriate option. -
Page 55: Nat (Network Address Translation)
“Static Routing” screen. Enter the addresses in their respective text boxes, then click Add. The address will appear in the “Static Routing Table.” To remove an address, highlight it by clicking on it in the Static Routing Table, then click Remove. -
Page 56: Upnp (Universal Plug And Play)
, Actiontec rec- ommends deactivating Time Zone Selecting Time Zone in the “Configuring the Advanced Settings” screen generates the “Time Zone” screen. In this screen, select the time zone in which the Gateway is being used. -
Page 57: Remote Syslog Capture
Remote Syslog Capture Selecting Remote Syslog Capture in the “Configuring the Advanced Settings” screen generates the “Remote Syslog Capture” screen. In this screen, the user can configure the Gateway to allow a remote computer to access the Gateway’s system logs. - Page 58 Chapter 4 Using Advanced Setup Wireless To activate the Gateway’s wireless radio, click in the circle next to On. To turn off wireless radio, click in the circle next to Off. ESSID is the network name assigned to the wireless network. The factory default ESSID setting is “...
- Page 59 Key text box (Key 1-, Key 2-, Key 3-, Key 4-). After activating 64-bit on the Gateway, a computer with wireless capability can join the network only if these same keys are entered in the computer’s wireless encryption scheme.
- Page 60 Key 1 by clicking in the ing from 0-9 or . To create a 256-bit appropriate circle, then enter 29 hexadecimal digit pairs in the Key text box. After activating 256-bit on the Gateway, a computer with wireless capability can join the network only if this key is entered in the computer’s wireless encryption...
-
Page 61: Wireless Mac Authentication
After changing settings, click Next or Back to continue, or Save and Restart to make all changes permanent. -
Page 62: Wireless Advanced Settings
Access to the Gateway’s network can be restricted to wireless clients using either the 802.11b or 802.11g wireless adapters. Click on the down arrow next to the text box and select the desired option. Actiontec recommends using the “Mixed” mode (the default option), which enables both 802.11b and 802.11g wireless clients to... - Page 63 Actiontec 54 Mbps Wireless DSL Gateway User Manual This page left intentionally blank.
-
Page 64: Viewing The Gateway's Status
Gateway’s Status After configuring the Gateway, settings can be viewed by selecting Status in the Web Configurator’s Main Menu. In the menu on the left side, there are other Status options available: Routing Table, ARP Table, WAN Status, LAN Status, and Active User List. - Page 65 WAN - Connection service (Connected, Disconnected, Displays the state of the connection to the or Connecting). WAN - Mode Displays the type of connection used to communicate with the WAN - IP Address Displays the address the assigned to the Gateway.
-
Page 66: Routing Table
Chapter 5 Viewing the Gateway’s Status In the menu on the left side, there are other Status options available: Routing Table, ARP Table, WAN Status, LAN Status, and Active User List. Click to gen- erate the Status option of choice. -
Page 67: Wan Status
Actiontec 54 Mbps Wireless DSL Gateway User Manual WAN Status Status generates the “ Selecting Status” screen. This screen displays on overview of the Gateway’s (Wide Area Network) connection, including infor- mation concerning the connection, as well as statistics. -
Page 68: Lan Status
, and/or wireless connections. Active User List Selecting Active User List generates the “Active User List” screen. This screen dis- plays a list of the users currently connected to the Gateway accessing the Internet with Network Address Translation ( ) security activated. - Page 69 Actiontec 54 Mbps Wireless DSL Gateway User Manual This page left intentionally blank.
-
Page 70: Using Utilities
Gateway’s factory default settings restored, and the Gateway’s firm- ware upgraded. Web Activity Log The Web Activity Log provides information about the Web sites each computer on the Gateway’s network has visited. To access the Web Activity Log, select Web Activity Log from the “Utilities” screen. -
Page 71: System Log
“Auto Refresh Every” at the bottom of the Web Activity Log screen, then enter a time value (in seconds) in the text box, or click on the down arrow and select a time value from the menu that appears. The Web Activity Log will refresh at the selected interval. -
Page 72: Dsl Settings
Display View other saved logs by selecting a log from this drop-down list. Save & Restart Pressing this button saves any changes to the System Log screen and causes the Save and Restart screen to appear. Save Log As Pressing this button allows the user to save a log as a file. -
Page 73: Restore Default Settings
Warning: Do not unplug the Power cord from the Gateway during the Restore Default Settings process. Doing so may result in permanent damage to the Gateway. When the Power Light stops flashing and glows steadily green, the Gateway is fully operational. Upgrade Firmware Selecting Upgrade Firmware in the “Utilities”... -
Page 74: Setting Up A Network
Setting Up a Network Other computers can be connected to the Gateway to form a network, which allows the computers to transfer files, communicate with each other, and share an Internet connection. The networked computers can be connected to the Gateway in three ways: Ethernet, , or wirelessly. - Page 75 Actiontec 54 Mbps Wireless DSL Gateway User Manual 2. Read the instructions, select Adding Computers by clicking on the appropriate check box, then click Next. 3. Select Ethernet, then click Next.
- Page 76 4. When the next window appears, get the yellow Ethernet cable from the Quick Start Kit, then click Next. 5. Plug one end of the yellow Ethernet cable into one of the open yellow ports on the back of the Gateway, then click Next.
- Page 77 Actiontec 54 Mbps Wireless DSL Gateway User Manual 6. Plug the other end of the yellow Ethernet cable into an Ethernet port on the back of the computer, then click Next. ☞ Note: An Ethernet port looks similar to a phone port, but is slightly bigger.
- Page 78 Chapter 7 Setting Up a Network 8. A series of congratulations windows appears. Click through them to exit the Installation Buddy. The computer is connected to the Gateway via Ethernet. To connect more comput- ers to the Gateway via Ethernet, repeat this procedure.
-
Page 79: Usb
The CD-ROM Installation Buddy starts automatically. Wait until the following screen appears, read the on-screen instructions, then click Next. 2. Read the instructions, select Additional Computers by clicking on the appro- priate check box, then click Next. - Page 80 Chapter 7 Setting Up a Network 3. Select USB, then click Next. 4. When the next window appears, get the blue USB cable from the Quick Start Kit, then click Next.
- Page 81 Actiontec 54 Mbps Wireless DSL Gateway User Manual 5. Plug one end of the blue USB cable into the blue USB port on the back of the Gateway, then click Next. 6. Plug the other end of the blue USB cable into a USB port on the front or...
- Page 82 Chapter 7 Setting Up a Network 7. Make sure the USB light glows steadily green, then click Next. 8. A series of congratulations windows appears. Click through them to exit the Installation Buddy.
-
Page 83: Wireless
To create a wireless network with the Gateway, see “Wireless Settings” on page 54 of this manual. After setting up a wireless network, consult the manual of the wire- less adapter connected to the computer to connect to the Gateway’s wireless net- work. -
Page 84: Troubleshooting
Also included is a list of frequently asked questions. Troubleshooting Cannot Use the Internet Physical Connections Ensure the Gateway’s Power light is on, as well as the appropriate lights for any active connections (Ethernet, , Wireless). If the connection is not active, reconnect the appropriate cable or adapter. -
Page 85: Frequently Asked Questions
This section contains a list of questions concerning the Gateway, and answers to the questions. General I have run out of Ethernet ports on my Gateway. How do I add more computers? Plugging in an Ethernet hub or switch can expand the number of ports on the Gateway. - Page 86 “g” wireless cards, just “b” wireless cards, or both. If I install several Gateways in different locations in my building, will they be able to talk to each other? Will I be able to stay connected as I move between them? The Gateway does not communicate with other access points, since it is a single access point system.
- Page 87 Gateway’s hexadecimal entry. Network I use my laptop at work and at home. Is there something special I need to do to make it work in both places? Yes. You must reconfigure your network settings, including Workgroup, Domain, Password, User name, IP addressing, and any other specific settings used by your company.
- Page 88 Some games require ports to be forwarded to host or join games over the Internet. I have an FTP or Web server on my network. How can I make it available to users on the Internet? For a Web server, enable port forwarding for port 8080 to the address of the server and set up the Web server to receive on that port, as well.
- Page 89 Connections How many computers can be connected through the Gateway? The Gateway is capable of 253 connections, but having no more than 45 con- nections is recommended. As the number of connections increases, the available speed for each computer decreases.
-
Page 90: Locating Computer Information
4. Close the System Properties window. 5. From the desktop, double-click on My Computer. 6. Right-click the icon representing your hard disk. For example: Local Disk (C:). Some computers have multiple hard disks. 7. From the menu that appears, select Properties. -
Page 91: Locating Windows Operating System Files
Locating Windows Operating System Files If the operating system files reside on the hard drive of the computer, follow the instructions below to locate them. If the files are not on the hard drive, they must be loaded from the installation disks. -
Page 92: A Reference
Appendix a Reference 4. Click the down arrow next to the “Look in” text box and select My Computer from the list that appears. Click Search Now. 6. Windows Me: When the search is complete, note the directory path that appears most often in the “In Folder”... - Page 93 1. From the desktop, click Start. 2. Select Search, then For Files and Folders. 3. The “Search Results” window appears. In the panel at left titled “What do you want to search for?”, click All files and folders. 4. Another panel, titled “Search by any or all of the criteria below” appears. In the “Look in”...
-
Page 94: Windows 98 Se
Setting Up Static IP on the Computer To communicate with the Gateway from a computer on the network (to use the Web Configuration Utility, for example), the user may have to switch the IP address settings from -enabled to static... - Page 95 Actiontec 54 Mbps Wireless DSL Gateway User Manual 3. Another menu appears. Select Control Panel. 4. When the “Control Panel” window appears, double-click Network.
-
Page 96: B Setting Up Static Ip On The Computer
Address tab, make sure the circle next to “Specify an Address” is selected. When active, a black dot appears in the circle. If the circle already contains a black dot, leave it alone. 8. Enter the following address in the “... -
Page 97: Windows Me
Actiontec 54 Mbps Wireless DSL Gateway User Manual 9. Enter the following address in the “Subnet mask” text box: 255.255.255.0 Enter the periods in the address by pressing the space bar on the keyboard. 10. Click . The Properties window disappears. - Page 98 Appendix b Setting Up Static IP on the Computer 3. Another menu appears. Select Control Panel. 4. When the “Control Panel” window appears, double-click Network.
- Page 99 Address tab, make sure the circle next to “Specify an Address” is selected. When active, a black dot appears in the circle. If the circle already contains a black dot, leave it alone. 8. Enter the following address in the “...
-
Page 100: Windows 2000
. The Properties window disappears. TCP/IP 11. If there is a check in the box next to “Detect connection to network media,” click on it to uncheck the box. 12. In the Network window, click . The Network window disappears. - Page 101 Actiontec 54 Mbps Wireless DSL Gateway User Manual 3. Another menu appears. Select Control Panel. 4. When the “Control Panel” window appears, double-click Network and Dial- up Connections.
- Page 102 5. In the “Network and Dial-up Connections” window, double-click Local Area Connection. A number may be displayed after the Local Area Connection. If more than one Local Area Connection is listed, locate the one that corre- sponds to the network card installed in the computer by finding the name of the network card in the Device Name column.
- Page 103 10. In the General tab, make sure the circle next to “Use the following Address ” is selected. When active, a black dot appears in the circle. If the circle already contains a black dot, leave it alone. 11. Enter the following address in the “...
-
Page 104: Windows Xp
Appendix b Setting Up Static IP on the Computer 12. Enter the following address in the “Subnet mask” text box: 255.255.255.0 Enter the periods in the address by pressing the space bar on the keyboard. 13. Click . The “Internet Protocol ( ) Properties”... - Page 105 Connections. 4. In the “Network Connections” window, double-click Local Area Connection. A number may be displayed after the Local Area Connection. If more than one Local Area Connection is listed, locate the one that corresponds to the network card installed in your computer by finding the name of the network...
- Page 106 Appendix b Setting Up Static IP on the Computer 5. The “Local Area Connection Properties” window appears. Select General. 6. In the “This connection uses the following items” list box, double-click Internet Protocol ( TCP/IP 7. The “Internet Protocol ( ) Properties”...
- Page 107 8. In the General tab, make sure the circle next to “Use the following Address” is selected. When active, a black dot appears in the circle. If the circle already contains a black dot, leave it alone. 9. Enter the following address in the “...
-
Page 108: Computer Security
Unlike a dial-up modem, service is “always connected.” The connection is always available – there is no need to dial a phone number to access the Internet. The computer can be connected to the Internet all the time. With both types of Internet connections, access to the computer must be con- trolled to make sure someone on the Internet doesn’t access the information on... -
Page 109: Gateway Security
Never run a program received as an attachment to an E-mail message unless the program is known to be safe. A program from an unknown source can delete all the files on the computer’s hard disk or install a “back door” software application that lets people on the Internet gain access to the computer without permission. -
Page 110: Electronic Security
Firewalls The safest way to prevent attacks on the computer is through a firewall – a hard- ware device or software program that protects the computer from unauthorized access by controlling who can access your computer and by monitoring the trans-... - Page 111 Actiontec 54 Mbps Wireless DSL Gateway User Manual This page left intentionally blank.
-
Page 112: Specifications
DHCP Full-rate Interface ADSL 10/100 45 switched ports (4) port Speed LAN Ethernet: 10/100 Mbps auto-sensing Wireless: 802.11g 54 Mbps optimal (see “Wireless Operating Range” for details) Cabling Type Ethernet 10BaseT: Category 3 or 5 UTP/STP Ethernet100BaseTX: Category 5 UTP/STP... -
Page 113: Wireless Operating Range
Class C (part 15, 68), Mark Commercial, Operating Temperature 0 º C to 40 º C (32 º F to 104 º F) Storage Temperature -20 º C to 70 º C (-4 º F to 158 º F) Operating Humidity... - Page 114 A device that allows wireless clients to connect to one another. An access point can also act as a bridge between wireless clients and a “wired” network, such as an Ethernet network. Wireless clients can be moved anywhere within the cover- age area of the access point and remain connected to the network.
- Page 115 A method preventing users outside the network from accessing and/or damag- ing files or computers on the network. Gateway A central device that manages the data traffic of the network, as well as data traf- fic to and from the Internet. IP (Internet Protocol) Address A series of four numbers separated by periods identifying a unique Internet computer host.
-
Page 116: E Glossary
An industry group that certifies cross-vender interoperability and compatibility 802.11b/g wireless networking products and promotes the standard for IEEE enterprise, small business, and home environments. WLAN (Wireless Local Area Network) A group of computers and other devices connected wirelessly in a small area. - Page 117 Actiontec 54 Mbps Wireless DSL Gateway User Manual This page left intentionally blank.
-
Page 118: Non-Windows System Setup
Actiontec provides the following information as a guideline only. Classic To configure the Gateway, Open Transport 2.5.2 or above must be loaded on the computer. 1. Click Apple, Control Panels, then... - Page 119 ” window and when prompted to save changes, click Save. TCP/IP 10. Restart the computer. The settings are configured. TCP/IP To finish setting up the computer to connect with the Gateway, follow the instruc- tions in chapter 3, “Performing a Basic Setup,” on page 33.
- Page 120 Appendix f Non-Windows Setup OS X 1. From the Apple Menu, select System Preferences. 2. When the “System Preferences” window appears, click Network.
- Page 121 5. Click Apply Now and close the “System Preferences” application. The TCP/ settings are configured. To finish setting up the computer to connect with the Gateway, follow the instruc- tions in chapter 3, “Performing a Basic Setup,” on page 33.
-
Page 122: Notices
Notices Regulatory Compliance Notices Class B Equipment This equipment has been tested and found to comply with the limits for a Class B digital device, pursuant to Part 15 of the Rules. These limits are designed to provide reasonable protection against harmful interference in a residential installa- tion. -
Page 123: Miscellaneous Legal Notices
FCC RF the antenna used for this transmitter must be installed to pro- vide a separation distance of at least 20 cm from all persons and must not be co-located or operating in conjunction with any other antenna or transmitter. -
Page 124: Limited Warranty
Software: Actiontec Electronics warrants to Customer that each software program licensed from it will perform in substantial conformance to its program specifica- tions, for a period of ninety (90) days from the date of purchase from Actiontec Electronics or its authorized reseller. Actiontec Electronics warrants the media con- taining software against failure during the warranty period. - Page 125 The repaired or replaced item will be shipped to Customer, at Actiontec Electronics’ expense, not later than thirty (30) days after Actiontec Electronics receives the defective product.
- Page 126 Customer is not satisfied with Actiontec Electronics’ response to the complaint. In the event that the Customer is still not satisfied with the response of the Director of Technical Support, the Customer is instructed to contact the Director of Marketing.
- Page 127 Actiontec 54 Mbps Wireless DSL Gateway User Manual Governing Law: This Limited Warranty shall be governed by the laws of the State of California, U.S.A., excluding its conflicts of laws and principles, and excluding the United Nations Convention on Contracts for the International Sale of Goods.